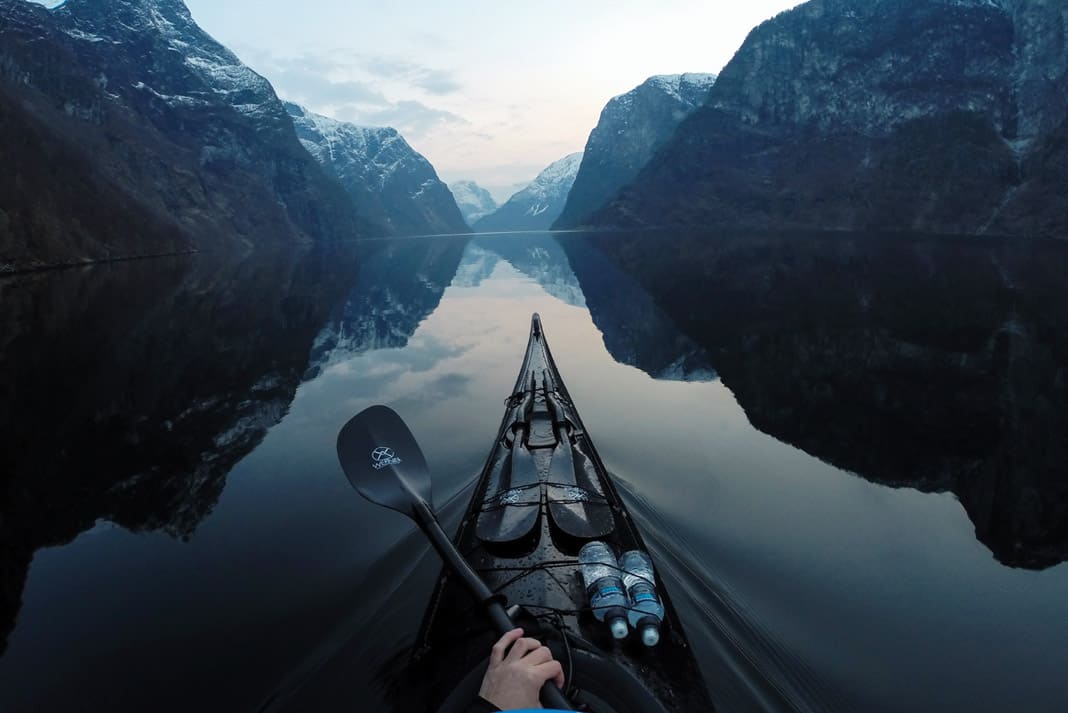
At the Paddling Magazine office, bow shots are a bit of a joke. Sure, we all take them—but we receive so many submissions featuring the pointed prow of our favorite vessel they tend to blur together, each as unremarkable as the last. The work of Tomasz Furmanek is different.
The Norwegian photographer has built a career on wonderfully composed bow shots. And since none of us are going to stop shooting from the cockpit anytime soon, we implore you to use Furmanek’s top tips to take your bow shots from meh to outrageously good.
1. Light
The best light for taking photos is usually during the golden hour, just after sunrise or just before sunset. The periods with low light, just before sunrise and after sunset, called the blue hour, are also very good.
Shooting at this time often means calmer conditions on the water, which will help achieve a nice reflection in the photo. Since you’ll be shooting in lower light conditions, it’s best to have the camera mounted on a helmet, or stabilized in your kayak by holding it close to your body.
Shooting on the water presents unstable conditions with paddler, kayak and water surface all potentially in motion. I usually take five photos of each scene to ensure I get a sharp one.
2. Plan ahead for your bow shot
Research or visit your photo location prior to arriving. This helps pre-visualize the composition of the photo so you know where you need to be to catch the light. Free online apps (try www.photoephemeris.com) have information on where the sun will be at different times of day for locations around the globe.
Keep your kayak bow clean and avoid unnecessary equipment on top of the kayak. Some gear, like a spare paddle, can add interest to the photo, so long as it’s placed in a visually appealing way. Wetting the bow before taking a photo will give the bow some shine, sometimes even making the colors of the environment reflect in the deck of the kayak.
3. Composition
Getting a good bow shot usually requires breaking some of the rules of composition. The kayak bow is a triangle with leading lines that direct the viewer’s attention towards the tip of the kayak and into the scenery beyond it.
In calm conditions when the water surface looks like a mirror, it is good to have horizontal symmetry of the reflection. The symmetry that may be boring in a normal photo makes bow shots more balanced. Point your bow where you want to direct the viewer’s attention.
4. Settings and editing
Even if taking photos in automatic mode, I recommend underexposing the photo just a bit to get more details in the highlights. The darker shadows can be lightened in photo editing, but software can’t fix blown-out highlights.
If possible, shoot raw files as this offers the most editing options, however, Photoshop Express Mobile is a free smartphone app that works well for JPG images.
Tomasz Furmanek started shooting from his kayak three years ago, aiming to capture Norway’s wild and beautiful fjords and lakes and to motivate others to visit these remote locations by kayak.





What camera do you use whilst on the water? If you use a mirrorless or DSLR, how do you keep it safe/away from water? Thanks