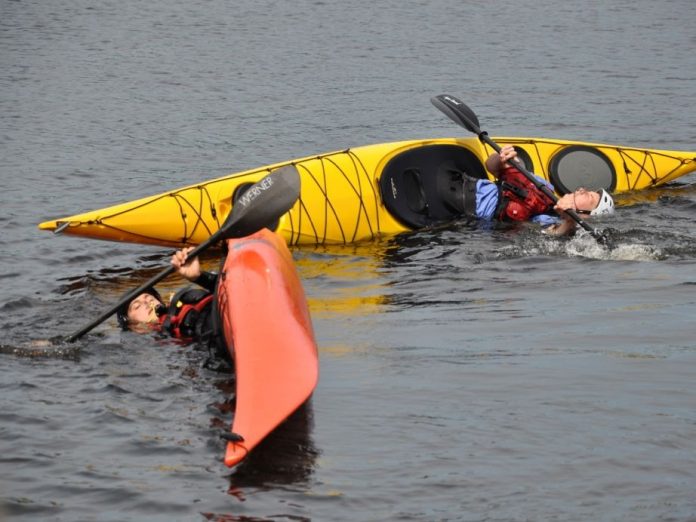
The high brace is a pre-emptive self-rescue sea kayak stroke used to stay upright when waves or current have pushed your kayak over to the edge of capsize. Responding with a high brace allows you to recover before falling into the water.
The technique is described here on the left side of the kayak. Simply reverse the lefts for rights for a right high brace. For a brace to become an instinctive response, you need to practice these three phases: the set up, the fall and the recovery.
Set Up
From your normal paddling position, move the paddle into a chin-up position. Your paddle should be parallel to the water, with the blades’ power faces facing the water and your hands above your elbows. Lower the paddle as far as you can comfortably go so the blades are closer to the water. Shift the paddle to the left until your right hand is between your sternum and belly button and your left hand is over the water. The shaft of the paddle should still be parallel to the water. Keep your right arm tight to your body, serving as an anchor for the brace.
Fall
Lean the kayak to the left so that you begin to fall toward the water. As you fall, place the left blade at the surface of the water. Use your left arm to pull the blade down against the water so the surface tension is broken and the paddle is just under the surface of the water. Remember, the high brace is NOT an aggressive slap at the surface, but a push against the water to break the surface tension. It is this pressure that slows or stops your sideways fall.
Recovery
The first part of the recovery is to get the blade out of the water. In the fall phase, the power face is facing the water. In the recovery phase, the paddle is rotated forward 90 degrees and sliced out of the water. Your index fingers are a useful visual reference. In the fall phase, point your index fingers skyward. In the recovery phase, roll your index fingers forward 90 degrees so they are pointing to the front of the kayak. As you are recovering your paddle, finish the brace by driving up with your left hip and leg to roll the kayak back under your torso. Visualize flicking an imaginary candy from your left knee up into your mouth.
A solid high brace relies on keeping your paddle shaft parallel to the water. This is accomplished by anchoring the paddle with the right hand. Imagine keeping a golf ball secure in your right armpit throughout the brace. Finishing off with a deliberate roll of your left hip will reliably prevent most capsizes.
Michael Pardy is a Paddle Canada Senior Instructor Trainer based in Victoria, BC, where he runs SKILS.ca, teaches, paddles and spends time with his family.
Peer Reviews
I have oceans of respect for Michael Pardy, but I believe the high brace can be done safer and more efficiently than described here.
Instead of levering down on an extended arm to regain the kayak’s orientation and tipping ones hips as part of the recovery, I suggest two modifications.
One, the hips are crux of this maneuver. It is the body that recovers the kayak while the paddle provides a grip on the water. Core and hips are more powerful than shoulders.
Two, keeping the arms centered in the usual paddling position connects them and the paddle to the intrinsic strength of the core and reduces exposure to shoulder injury. An overextended high brace is a classic cause of shoulder dislocation. The suggested position also unnecessarily crimps the inboard wrist (right, in the given example), while a centered stance would allow the wrist, a relatively weak joint, to remain more neutral and transfer the force of the recovery to the core.
I agree that it is critical to keep the paddle parallel to the water and the inboard hand lower than the shoulder. Note that the further over the kayak falls, the more the inboard elbow and hand wrap around the hull to keep the paddle horizontal. Imagine the setup position for a C-to-C roll, where the inboard or anchor hand begins wrapped as far around the hull as one can reach. A C-to-C roll is an extreme form of a high brace
Technique aside, I prefer to use and teach the low brace for general balance recovery because of the reduced opportunity for injury and because it is closer to the water to better catch those little bobbles without drama. However, there are instances when the high brace makes more sense, such as during a sweep stroke when one has edged the turn a little too far (drop your outboard elbow below the wrist and you will have the support of a brace), and to regain balance that was lost while moving in reverse. —Ginni Callahan, BCU level 4 coach & ACA level 5 instructor, Cathlamet, WA / Loreto, Baja
Another way of visualizing the hip flick portion of the high brace is as a sideways crunch. As you gain some stability from breaking the surface tension of the water with your paddle, crunch the (in this case left) side of your torso, pulling your shoulder down towards your hip and your hip towards your shoulder. Your head can exaggerate this movement by dropping towards your hip as well. To recover from the crunch, move your center of gravity (your shoulders) back over your center of buoyancy (your kayak). —Meaghan Hennessy, Paddle Canada level 2 instructor trainer & BCU level 3 coach, Vancouver, BC
The technique is presented as a blade-centered approach with most of the discussion and initial forces being centered on the blade. We feel a body centered approach to technique leads to greater efficiency, success, and less risk of injury.
Michael leads his recovery with the blade and follows with the body. He says, “the first part of the recovery is to get the blade out of the water” and “finish the brace by driving up with your left hip and leg to roll the kayak” For reasons of good biomechanics, we would reverse the order on these two points, by first focusing on righting the kayak with your lower body and finishing off the brace with an unloaded paddle.
Because Michael describes moving the right hand to the sternum, we feel that this would comprise the left shoulder as he would be extending the left arm and paddle too far out for leverage. The shoulder at risk and in need of protection is the left shoulder. An alternative position for the right hand is to drop it to the deck at the right hip. This will keep the left shoulder in a more stable position throughout the brace. Place a sponge under both armpits, drop the right hand to the deck, fall to the water, roll the kayak with your lower body and come up without losing the sponge under either armpit. —Shawna Franklin & Leon Sommé, BCU level 4 coaches, Orcas Island, WA
Michael describes the High Brace well and has some key points to help people master this stroke. Breaking it down to the ‘Set Up’, ‘Fall’ and ‘Recovery’ is a great concept to help people see the key stages for success. In the set up highlighting the need to keep the right arm tucked in tight to the body and left arm not over extended is great to maintain the ‘safety box’. At the fall stage again it is good to hear the move away from the old ‘slap’ for support and a clear message for the progressive and controlled pressure on the supporting blade. At the recovery stage I agree with everything said, and like the visualization at the end. For myself I would tend to prioritise what happens to the knees/legs/feet within the kayak to stop capsizing and start the righting of the kayak, this must happen before the pressure is taken off the blade and it is recovered. I believe this is the key stage of the high brace and similar to a roll it must start with the boat being brought upright, followed by the body and the head coming up last. I would encourage people to practice this righting the boat first with knees, legs and feet whilst relaxed at the hips. Often I get people to rest their paddle in a high brace position on the bank, partners boat or being held by a partner so they can focus on the boat righting manoeuvre without the fear of falling in. To help with the head position in this visualise catching that candy in the mouth, but then needing a drink and therefore imagine drinking through a straw over the side of the kayak until back in balance again. —Doug Cooper, BCU level 5 coach, Aviemore, Scotland
I teach and use the high brace in a somewhat different fashion from what Michael Pardy describes. In smaller conditions I prefer to use a low brace. However, when faced with significant waves, I have found that I am far more successful with a high brace when I let my body—specifically the posterior quadrant of my shoulder and back hit the water before attempting to brace. In this manner, I allow the natural buoyancy of my body to slow the capsize. When my downward momentum has either been stopped or significantly slowed by the surface tension of the water, I then make use of my high brace.
Three things are helpful to ensure a successful high brace at this point:
- I relax and slow down so that my body does not stiffen and become one uniformly inflexible block attempting to rise phoenix-like from the water. A supple, relaxed body is much easier to slink back up over the boat.
- I make sure to drop my offside or high-side thigh out of the thigh brace (thinking as I do so that I am sending that leg on vacation to a beach in Jamaica where it can just relax and lay around). This ensures that leg cannot counteract the upward rolling movement of the leg on the bracing side.
- I cast my eyes and dip my head back to the water. This offers more momentum for my rolling knee and, by looking back at my bracing paddle, I prevent my head reaching up toward the high side of the boat. If I tip my head toward the high side, the movement immediately causes my high-side leg to reengage (return from vacation in Jamaica) and tips me over.
—Bonnie Perry, ACA level 4 instructor trainer / BCU level 3 coach, Chicago, IL
This article originally appeared in Adventure Kayak, Early Summer 2012. Download our freeiPad/iPhone/iPod Touch App or Android App or read it here.

