Home Blog Page 549

Beach Combing: Discovering What the Currents Bring

Photo: flickr.com/traveloriented
Beach Combing: Discovering What the Currents Bring

I’m not an ideal kayaking partner. It’s not as though I lack good judgment or conversational skills, but when it comes to helping set up camp, you can forget about it. I’ll be long gone, scanning the beach.

I comb beaches in hopes of finding intriguing items like crab traps, a message in a bottle, a really thick chunk of rope or even (I’m crossing my fingers here) a can of Lucky Lager.

Most of the time I find nothing but junk, like that knotted piece of driftwood that resembled Jean Chrétien.

Above all, I’m obsessed with glass fishing floats that have escaped from fish nets in Asia, hopped aboard an ocean current, caught just the right wind and wave combination and washed up on a beach instead of a rock. They’re hardly worth a cent, but after surviving that ride they’re priceless to me.

Despite the complexity of ocean currents, they’re driven mainly by nothing more than wind. When weather patterns are such that strong winds regularly prevail in one direction, these winds push water along with them and create currents that swirl around the oceans in regular patterns.

The journeys of my glass floats begin off the coast of Asia when, one way or another, they escape from fish nets. They enter the Kuroshio Current which carries them northeast across the Pacific before arcing south along the west coast of North America—all at less than 16 kilometres per day, the maximum speed of an ocean current. A few years later, they skirt the coast of Vancouver Island. If the wind and waves cooperate, they are blown out of the current and wash ashore. If not, it may be years before the right conditions conspire to wash them out of the current and into someone else’s campsite. 

I’ve found all my glass floats along a 20-kilometre section of coastline. That’s not surprising, according to Curtis Ebbesmeyer, a Seattle-based oceanographer.

“Beaches are like restaurants. Some serve Thai food, some Indian or Chinese food,” he says. “Each beach interacts with the currents, winds and waves in a unique way.”

The interplay of these forces and the buoyancy of the objects explain how some beaches are well known for their glass or driftwood artifacts, while others trade in more pedestrian goods: running shoes, for instance.

In 1992, the Hansa Carrier freighter encountered a storm in the middle of its run from Korea to the United States. Several containers were washed overboard by massive waves and an estimated 60,000 Nike shoes spilled into the Pacific. The next winter errant sneakers, still in good condition, began washing up on beaches in British Columbia, California and Hawaii. Studying their distribution, Ebbesmeyer was able to further map the Pacific’s currents.

While glass floats and running shoes often wash ashore on B.C. or Washington beaches, other currents might carry cargo to another ocean all together. 

A load of bath toys washed off a container ship bound for Seattle in 1992. Ebbesmeyer followed their progress through reports from beachcombers and lighthouse keepers. Instead of a leisurely tour around the Pacific, the rubber duckies ended up bobbing through the Bering Strait between Alaska and Siberia where they were likely frozen in pack ice. The Arctic Ocean’s pack ice drifts eastward and Ebbesmeyer expects the first rubber duckies to thaw, navigate the currents of the Atlantic and wash onto beaches on the east coast of Canada any day now, more than a decade after they first swam free.

Unlike most beach booty, the rubber toys are actually worth something. The first person to find a duck on the east coast will win a $100 reward.

Whether it’s a $100 ducky, some glass artifact, a solo salty sneaker or a driftwood gargoyle, value is truly in the eye of the beachcomber. I’m thrilled with a worthless glass float, and, as Ebbesmeyer says, “Poor people around the world know, if you need a pair of shoes, you go to the beach.”

Ryan Stuart lives on Vancouver Island and still hopes to find a rubber ducky. 

akv5i1cover.jpgThis article first appeared in the Spring 2005 issue of Adventure Kayak Magazine. For more great content, subscribe to Adventure Kayak’s print and digital editions here.

Editorial: If I See One More Reality Show, I’m Going Paddling

Photo: flickr.com/image-catalog
Editorial: If I See One More Reality Show, I’m Going Paddling

I’ve been thinking lately about the word adventure. Five years ago we gathered around a kitchen table brainstorming titles for the launch of our new magazine. The obvious kayaking magazine titles were taken. We had to be more creative—we had to think outside the box, as they say.

Adventure to me is something I like to add to things others would have enjoyed. For example, imagine a wintry afternoon walk down a well-used trail at a local conserva- tion area. Fresh air and exercise sure, but rather predictable wouldn’t you say? I’d suggest trudging through the valley because there looks to be a goat path on the far side below the cliffs. And that goat path, I bet, leads to the bottom of the frozen waterfalls; wouldn’t it be cool to climb around on them?

My wife Tanya considers herself wiser now. She’s rappelled off icy bluffs, walked out from the bottom of the wrong mountain bowl, forded streams with her mountain bike over her head and paddled into camp late, cold and hungry, one too may times. All this because I said, “Ah come on, where’s your sense of adventure?”

We still climb, ski, bike and paddle together, but my little adventures, as she calls them, are now something I do alone or in the company of other like-minded bush-whackers.

Wendy Killoran is a bushwhacker on a global scale. Being a schoolteacher by day leaves her plenty of time to be a die-hard paddler. I’ve heard her boast at symposiums that she paddles over a hundred days a year and gets in her boat at least one day every month; no small feat on the Great Lakes in February.

Wendy was the first woman to race in Iceland’s Hvammsvik marathon. This past summer Wendy found adventure on the east coast of Greenland floating among thousands of “bergy bits.” In her story “Frozen Assets” it’s clear that for her adventure is about landing on a gravel strip outside Kulusuk on the backside of Greenland, a place where the locals still paddle in skin boats.

Not everyone needs to be lost in the fog or feel the thunder of calving glaciers. Adventure, according to reality television shows, requires just two things: young, good- looking people and a beach. In that respect Ken Whiting fits the bill, except instead of battling conniving contestants for a million bucks, Whiting is making a modest living publishing books, producing paddling videos and playing in the surf. Whiting isn’t a circumnavigator of remote islands, he’s a whitewater playboater turned sea kayaker, finding his adventure in the surf zone, tidal rapids and currents.

Ken told us he thinks sea kayaking is poised to see a huge growth in people paddling for fun—paddling, maybe, in the same spot all day, surfing the same break, going nowhere exotic, never being lost. If you think this sounds boring and devoid of adventure, like the walk in the park I was trying to avoid above, you need only watch Justine Curgenven’s new video This is the Sea. If you don’t think playing in surf is an adventure, try standing an 18-foot sea kayak on its nose.

Hours before our premier issue rolled off the printing press we settled on the name Adventure Kayak. Five years later, I still think it’s a good choice. Kayaking adventures aren’t always on the sea, nor are we always touring in our kayaks. It’s a great name because adventure, just like kayaking, can be so many things. We design the magazine to be like those books we read as kids, so that in each issue you can choose your own adventure.

akv5i1cover.jpgThis article first appeared in the Spring 2005 issue of Adventure Kayak Magazine. For more great content, subscribe to Adventure Kayak’s print and digital editions here.

Boat Review: The Kap Farvel by Nimbus

Photo: Dave Aharonian
Boat Review: The Kap Farvel by Nimbus

Little people, read on. The low-volume, high-performance kayak may be a neglected category here in the land of ever-widening girth, but when you’re building boats for the Japanese market, designing small is a big idea. Steve Schleicher of Rainforest Designs created the Kap Farvel for Japanese buyers who wanted a smaller person’s day-touring kayak with a Greenlandic look (i.e., sharp, upturned bow and stern).

Schleicher gave the Kap knife-like ends and pronounced sheer (the upward sweep of the deck toward the ends). The Kap is not as difficult to paddle as it looks, however. The dramatic rocker places the paddler low in the water, resulting in surprisingly good initial stability and comfort in rough seas. The Kap tracks easily and requires only a slight tilt to carve a turn.

Surprisingly, our Kap gave us a dry ride in steep, one-metre whitecaps. Waves fold neatly around the razor-sharp ends and dissipate instead of breaking on the paddler.

It’s only above the waterline that the Kap ranks as a Greenland boat. Down below, it has a soft chine, which Schleicher says is more efficient than a typical Greenland hard chine, reducing hull surface area and turbulence. The Kap accelerates quickly and cruises comfortably at four knots, even against strong winds. Top speed is restrained by a short waterline, though I did hit eight knots on a following sea.

The Kap is guaranteed to make you a faster paddler. How? Its best-kept secret is that your partners end up carrying half your gear.

Other advantages: The Kap’s low windage made it easy to handle in 25-knot gusts; minimal weathercocking; fun wave play; ease of turning and control without the added complexity of a rudder or skeg.

At 6’2″, 180 lbs, I actually didn’t have any problem fitting in the Kap (shoes off) for a four-hour crossing on the Strait of Georgia, and felt like I could paddle circles around my partner in his much larger boat (see “best-kept secret,” above).

Somebody remind me: Why do we normally paddle enormous boats? It can only be because we want to carry enormous loads. But how much space do we really need? I know long-distance backpackers who wouldn’t dream of packing 100 litres.

The Nimbus Kap Farvel is a lightweight, nimble and attractive little boat that’s fun for small to mid-sized paddlers who have the skills to control a narrow, rudderless kayak. It offers many advantages of a recreational kayak (small size, light weight and easy handling) in a higher-performance composite package. Think of the fun we could have in these smaller boats if we gave up Krispy Kreme and ate more sushi.

If the boat fits, paddle it.

1. Small is beautiful

The sharp ends give a beautiful look, arcing clear of the water while the paddler sits low. Heavy- duty bungees on the rear deck provide a way to deal with gear overflow. The recessed metal deck fittings and paddle float rescue straps appear very sturdy. The carrying handles are large and comfortable. There is no skeg or rudder, but this boat is too short to need either, especially for the

shorter paddling distances to which it is suited. A skeg would save a bit of energy in a crosswind and make the Kap more beginner friendly, but you wouldn’t want to sacrifice the space needed for a skeg box.

2. Big in Japan

The foam cushion seat is quite comfortable and has a high back support. Taller paddlers (6’2″) can fit inside the snug cockpit, but will have to enter and exit bum-first, ocean cockpit style. The standard neoprene storage shelf is handy, although a paddler who is 5’10″ found it got in the way of his toes—ironically, tall paddlers whose feet extend beyond the shelf have the advantage here. There is a great deal of space behind the seat which can be used for storage, but it would be nice to see the rear bulkhead moved forward so this space could be incorporat- ed into the dry rear hatch.

3. Less is more

The multi-piece hatch system is a combination of a neoprene seal and a loose-fitting fibreglass cover that straps in place, all tethered together by bungee cord. Very dry, very secure, but a bit finicky compared to some one-piece designs. The capacity is quite small, limiting you to day trips and overnights unless you’re a true wilderness ascetic, a backpacker, or have friends with large boats. Think mothership paddling or else follow Thoreau and, “Simplify, simplify, simplify.” 

akv5i1cover.jpgThis article first appeared in the Winter 2005 issue of Adventure Kayak magazine. For more boat reviews, subscribe to Adventure Kayak’s print and digital editions here.

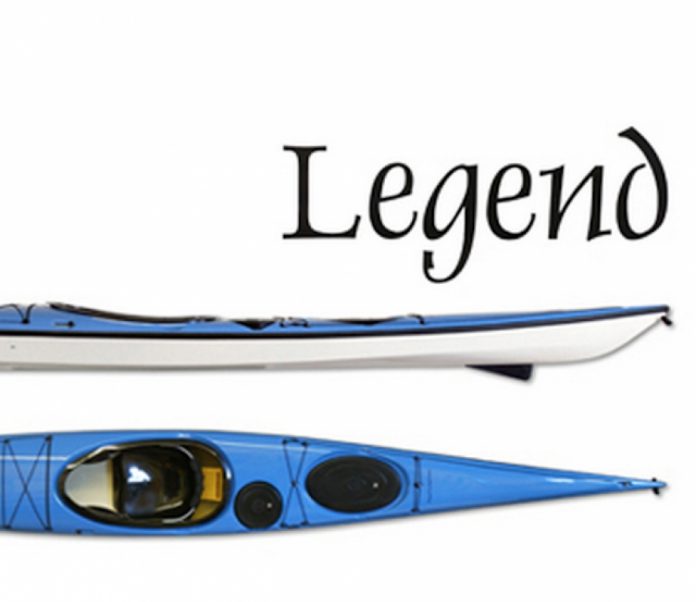
Boat Review: The Legend: Designed by Nigel Foster

Image courtesy Seaward Kayaks
Boat Review: The Legend: Designed by Nigel Foster

First impressions: The Nigel Foster Legend isn’t the hottest looking Greenland-inspired kayak on the market. It doesn’t have the graceful sharp sheer lines and chines of some of the more ostentatious British designs. But closer inspections reveal a practical advantage behind every missing aesthetic flourish.

Consider those impressive-looking upswept ends we’re so used to seeing on Greenland-style boats: What do they do? They’re like the bombastic tail fins on a ’59 Eldorado. Take them away and you’ve got a little bit less windage and a lot less attitude.

Foster has inflated a skin boat’s sunken cheeks and the result is greater carrying capacity, flotation that keeps the ends from pearl-diving in surf, and an extraordinarily dry ride. It all adds up to practical rough-water performance.

The subtly-arched decks offer similar advantages over the flatter decks of the Legend’s slimmer cousins from across the pond, which suddenly appear a tad anorexic by comparison. The Legend conceals one of the largest carrying capacities in its class—31 litres more than the similarly dimensioned Romany Explorer, that renowned expedition classic by another Nigel.

But don’t think the Legend is in any way bloated or sluggish. Would paring the silly shark fins off that ’59 Caddy rein in the V8? To the contrary, it would probably save gas. The Legend is quick enough. It doesn’t offer lightening- fast acceleration but we found it cruised easily at three to four knots fully loaded and topped out at seven knots in a sprint. On a weekend trip, it held its own alongside other narrow, fast expe- dition touring boats, the CD Expedition and NDK Greenlander Pro, and really took off in following seas. The Legend likes to surf.

Perhaps due to a unique shallow-arch cross-section below its hard chines, the Legend doesn’t flop quickly from edge to edge, but sits comfortably in the water and transitions smoothly and easily into various degrees of tilt for sculling and turning. A low seat position adds to the initial stability.

The arched hull is also likely to hold onto its gel coat through a hard life of coastal touring longer than a V-bottom keel would.

The Legend is the mid-sized version of three Nigel Foster designs hand-built by Seaward Kayaks on Vancouver Island. It’s the size that fits most people best, and is Foster’s personal choice for his expeditions today, replacing his earlier Vyneck, which he paddled on the first circumnavigation of Iceland in 1977.

Conclusion: The Legend impressed us as a renaissance kayak that impeccably balances playful handling with expedition capabilities. A top pick for mid-sized, experienced paddlers who want both capacity and performance.

1. Volvo on the outside

Note the Legend’s softer lines, reduced sheer and more capacious ends than the slender Greenlander Pro, also pictured here. Bow and stern are symmetrical with identically-sized hatches. An optional Brunton Nexus 70P compass ($215 Cdn, $140 US) is nicely recessed into the foredeck. Perimeter lines stop at the front hatch—some would say a safety drawback— Foster says the location of his deck lines is “a more easily identified and secure place to have someone hold your deck line, and because the line doesn’t run all the way through to the bow there is little stretch.” The recessed front and rear oval Kajak Sport hatches have large, easy-to-pack openings, yet are reliably waterproof in rough seas. Seaward’s thorough hand layup includes three fibreglass bulkheads, a Kevlar-reinforced bow and a seam that’s fibreglassed inside and out. Add $590 ($450 US) to get the whole boat in Kevlar or carbon fibre.

2. Caddy on the inside

Padded thigh supports and bucket seat provide a great fit. Excellent support under the thighs. Our 6’2” paddler had ample toe room but maxed out the aluminum foot braces—taller paddlers would have to customize. Reactions to the padded plastic backrest varied—some liked it, others would replace it with a back band. A slider on a cable to the paddler’s left drops the skeg, saving energy in a crosswind by eliminating the Legend’s slight tendency to weathercock.

3. Big backseat

The sloping rear bulkhead maximizes storage capacity in the generously-sized day hatch and makes it easy to empty the cockpit by lifting the bow. Located aft of the seat on the left, leaving the right hand free to brace with the paddle, the day hatch is easy to open and close while on the go and holds an impressive 36 litres. Paddle float rescue rigging is noticeably absent (Brits with bombproof rolls don’t believe in it). However, Seaward kindly offers an optional quick-release self-rescue strap system ($59 Cdn, $45 US) and will also install a Guzzler foot pump for $430 Cdn ($335 US).

akv5i1cover.jpgThis article first appeared in the Winter 2005 issue of Adventure Kayak magazine. For more boat reviews, subscribe to Adventure Kayak’s print and digital editions here.

Get In, or Stay Out?: Knowing When to Abandon the Trip

Photo: flickr.com/nordelch
Get In, or Stay Out?: Knowing When to Abandon the Trip

Kyra’s left knee swelled up like a blowfish. She couldn’t put any weight on it; it was tender to the touch; the pain increased with any movement, and there was no way she could move around, let alone sit in a kayak.

We had landed on a surf-swept white sand beach at the end of day six, halfway through a trip on the west coast of Vancouver Island. Carrying the loaded kayaks up to the high tide line, Kyra slipped on slimy seaweed and wrenched her left knee.

We started all the basic first aid things we are trained to do—elevating the knee, icing it and pressure wrapping it in a crepe bandage. That part was easy.

The sun was starting to set and we were on a remote part of the coast: we had to decide whether or not to evacuate Kyra from the trip, and how we’d make it happen.

Evacuation is serious!

Evacuation is serious! There are many variables to consider with implications for all group members including frustration, financial costs, lost time and potential risks.

When deciding to evacuate, it is most important to clearly identify the level of urgency of the situation. There are three levels of urgency to consider.

Urgent evacuations are required in situations where there is an immediate and imminent threat to life or limb. Obvious examples include any ongoing problems with a person’s airway, breathing, circulation; or deadly bleeding. Also, ongoing deterioration in the person’s level of consciousness, high fever for more than 24 hours, recovery from a near drowning, or any traumatic event that involves large mechanism of injury, are situations you’d consider an urgent evacuation.

Situations where an injured person clearly needs medical or other services but whose situation is not deteriorating would be considered semi-urgent. Examples include: broken bones; dislocations; an episode of a chronic but stable medical condition such as epilepsy or angina; severe pain; worsening infections; and vomiting and diarrhea lasting more than 24 hours.

Finally, non-urgent evacuations are required in situations where there is no imminent threat to life or limb, but the participant cannot meet the objectives of the trip because of physical, emotional, or psychological limitations. Examples include acute and chronic tendonitis, debilitating blisters, anxiety or social behaviours that seriously undermine the safety and performance of the group.

How urgent is Kyra’s situation? Kyra is in a great deal of pain and experiencing stress and anxiety. She needs to get to a hospital for treatment, but her condition is stable. So we classified her evacuation as semi-urgent and set about planning the most suitable way to get her out.

Your options for evacuation will depend in large part on your methods of communication. All groups should have at least two types of external communication equipment including both one-way and two-way devices.

In many ways, urgent evacuations are the simplest in that they require immediate action, justifying the launch of a one-way distress signal such as flares, EPIRPs or PLBs or signaling mirrors. Or, using a two-way device, make a mayday call to the Coast Guard on a marine VHF radio, or a 911 call to the police or ambulance via a cell or satellite phone. In these cases, the authorities will decide for you what resources are available for the evacuation.

Our evacuation was not urgent; we felt we had the ethical responsibility and ability to resolve this situation ourselves. So we considered our non-emergency options.

For semi-urgent or non-urgent evacuations, water taxis and other boaters are a great resource. They can be contacted through a handheld marine VHF radio. VHF radios connect you to an entire network of boaters who can help you directly or pass on messages.

Planes are another option, weather and landing-site permitting. Most helicopters and planes use land-based VHF radio frequencies, which do not normally pick up marine radio VHF signals. In some coastal areas, planes and helicopters will also carry a marine VHF radio. Normally, however, you will have to contact the company office to arrange for a plane or helicopter.

Your final option is to paddle the person out. Typically this method is used in non-urgent evacuations, but may be your only option in urgent and semi-urgent evacuations if you are unable to make other arrangements. You are limited by weather, sea state and visibility, as well as the injured person’s ability to travel; if they are unable to wear a PFD or swim, be very judicious in your use of this method.

With Kyra, we managed to contact a fishing boat with our handheld VHF. The fisherman used his more powerful radio to reach the nearest marina. The marina staff arranged for a water taxi to come out in the morning. Kyra had an uncomfortable night and a bumpy ride out in the morning.

Our backup plan was to try to paddle Kyra out: if this was too painful, we would have arranged for two paddlers to head out and arrange for a water taxi. We had lots of food and water for several days.

It should be obvious from this example that preparation goes a long way toward planning a successful evacuation. Preparation includes getting first aid training to help you diagnose a situation and developing a multi-level evacuation plan that suits your destination. You will be much better off if you research before you leave. The more emergency information you gather before you face an evacuation decision, the better the odds of an appropriate decision and a positive outcome.

Michael Pardy is co-author of the Handbook of Safety and Rescue and a founding director of SKILS, Sea Kayak Instruction and Leadership Systems.

akv4i4cover.jpgThis article first appeared in the Fall 2004 issue of Adventure Kayak Magazine. For more great content, subscribe to Adventure Kayak’s print and digital editions here.

Skills: Sculling, and Extreme Scull

Photo: Rochelle Relyea
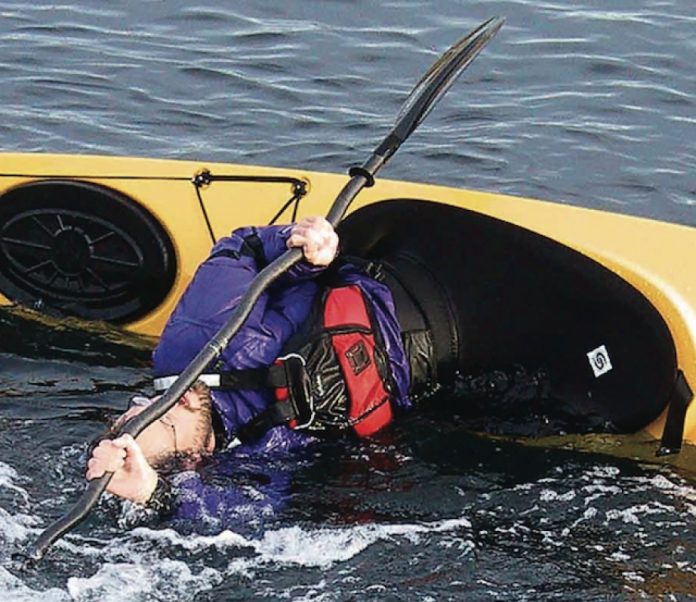
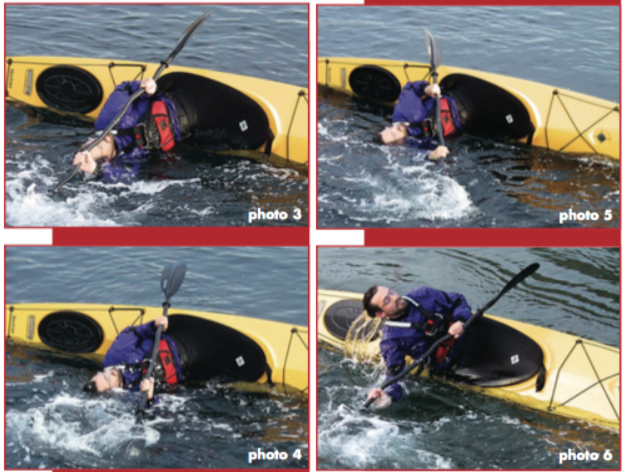
A sea kayaker practices the extreme scull technique for sea kayaking.

Sculling is a good way to maintain your balance in a kayak. A scull generates ongoing support over a far longer period of time than a brace will and therefore allows a greater sense of security when edging a kayak or navigating confused waters.

Sculling is usually practiced with the boat on a modest tilt. An “extreme” scull is a stroke where the paddler literally lies out on the water. While this is seldom used for any practical purpose other than showing off, extreme sculling is fun and a great drill. And, it looks cool!

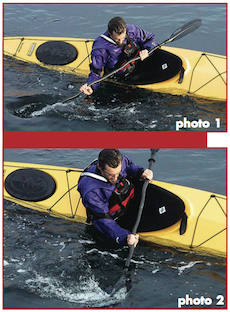
Sculling Basics (photos 1 & 2)

Photo progression images of how to stay upright in a kayak.Start off practicing the scull with the kayak on a slight lean. Reaching out over the water in a high brace position, practice the sculling motion. Think of spreading butter on toast. Spreading the butter back and forth keeping the leading edge of the knife raised above the toast prevents it from diving and cutting into your breakfast. Similarly, setting this “climbing” angle on your blade ensures that the leading edge of the blade is always raised and on the surface of the water. The sweep is a long comfortable arc. Strive for minimal splash and a smooth rhythm. 

The Extreme Scull

Mastering the extreme scull will greatly improve your ability to feather a blade in the water and lead to smoother transitions from one stroke to another. You will also gain a good feeling for leading edge lift and blade angle. An extreme scull is a natural springboard to kayak rolling or bomb-proofing your existing roll; it reinforces the correct posture and body mechanics used to finish a roll.

There are several tricks that will make the extreme scull a snap to master.

Photo 3

Lying way back onto the stern deck and committing fully to the extreme scull allows the buoyancy of your torso and PFD to help keep you floating at the surface. This is far easier than trying to scull with your body just above the water. When floating, only a light scull will be necessary to maintain the position.

Point your chest at the sky and stretch and rotate your torso in order to keep the kayak as upright as possible. Think about keeping your inside knee pointing upward to prevent the kayak from overturning.

Photo 4

Keep your outer hand low, while the inner “control hand” does the sweeping motion and sets the all important blade angle. The power face is open, leading edge up, as you sweep the blade forward toward the bow.

{loadposition PTG_AK_Midcontent}

Photo 5

As the blade reaches the end of its arc at the bow, stopping the motion will mean a momentary loss of support. No problem, quickly switch the leading edge and begin sweeping toward the stern. A smooth fluid scull is seamless support.

Photo 6

As the blade is swept back again toward the stern, the power face is closed and the leading edge angled up. This sculling action of opening and closing the power face, sweeping the blade back and forth can be maintained indefinitely.

When finishing the extreme scull and righting the kayak; it’s your body that will do most of the work. As you sweep from the bow toward the stern, drive your inside knee up— completely righting the boat—and draw your ribcage in laterally over the kayak. Leaning well back over your stern deck seems to be the easiest. Be sure it is your head that comes up and over the boat last. 

Images showing the steps to staying upright in a sea kayak.

Alex Matthews is an active and committed surf kayaker, whitewater paddler and sea kayaker based on Vancouver Island. He is a regular contributor to Adventure Kayak

Photos on this page taken by Rochelle Relyea.

Cover shot of the adventure kayak magazine photo annual edition.This article first appeared in the Fall 2004 issue of Adventure Kayak Magazine. For more great content, subscribe to Adventure Kayak’s print and digital editions here.

Just Add Water: One Step Meals

Photo: Tarmo Poldmaa
Just Add Water: One Step Meals

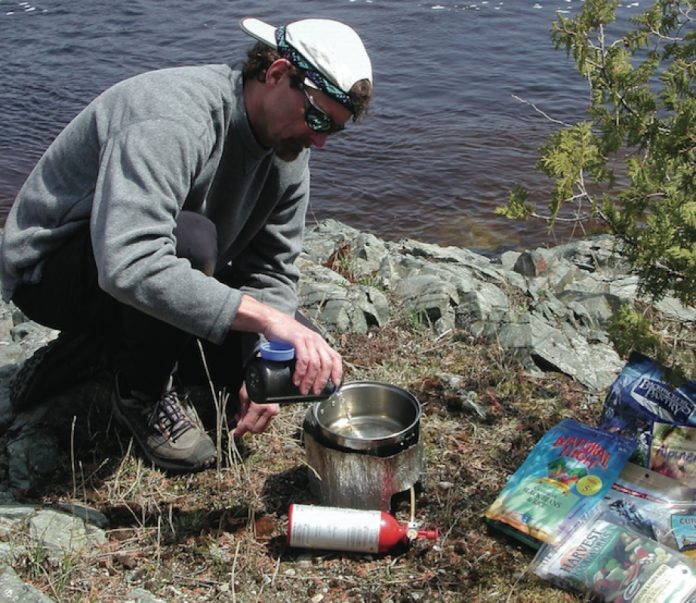
Even though I love cooking, there are those rare occasions when I’m looking for a quick fix with enough energy to get me through the day. At home this typically means picking up the phone and calling for some take-out, stopping for fast food or throwing a frozen entree into the microwave. Well, my wilderness-exploring friend, the fast food option is available to you in the great outdoors as well. You can boil water, pour it into a bag, wait 5-10 minutes and PRESTO— dinner is served. No muss, no fuss and you don’t even have to do the dishes. Just lick your spoon and belch!

Before the advent of refrigeration technology, dehydration was the most commonly used method for food preservation and it is still used with many food items today. Aside from preservation, dehydration allows a significant reduction in volume and weight— offering huge benefits with respect to the long distance transportation and storage of food.

Making food last longer and reducing bulk are the main concerns outdoor enthusiasts have to consider, especially when planning an expedition where re-supplying is not possible.

A seventeen-foot sea kayak has plenty of storage room for the average paddler packing a 10-day supply of food. However, once trips get into the range of a couple of weeks, you must start asking yourself what is absolutely necessary and what can be left behind to make more room for food? Let’s face it: we need energy to paddle.

Some fellow paddling guides and I prepared a variety of meals offered by the fol- lowing outdoor food companies: Alpine Aire Food, Backpacker’s Pantry, Natural High, Mary Janes Farm, Harvest Foodworks and Soft Path Cuisine. All brands are available at quality outdoor stores.

I have to say that we were blown away by the sheer variety of meals these companies are now producing—I’m sure a testament to their popularity. The variety included more traditional meals such as Beef Stroganoff, Chicken Pasta Salad and your standard soups like Cream of Broccoli. For those who like a little foreign variety, more exotic meals are available, including: Southwestern Smoked Salmon Pasta; Kung Pao Chicken; Santa Fe Pasta; and, winner of the meal-with-the-best- name contest, Barbie’s Dhal. There were also a plethora of appetizers and desserts like Chocolate Brownies, Peach Crumble and Banana’s Foster.

The variety was so huge I let the guides each choose one meal that appealed to them. They prepared it according to the instructions on the package; which in all cases was, “just add water”.

After a grand feast I asked my fellow chefs to speak about what they discovered. It is important to remember that all the meals were prepared following the manufacturers’ instructions to a tee. Here are some of our findings, in no particular order:

  • It was of the general opinion that the meals that required a little more preparation and cooking time (i.e. simmered for 10-15 minutes) had more general appeal. This was largely a result of texture—many of the meals that were pro- duced and eaten straight from the bag tended to be a bit crunchy and undercooked. In these cases, most of us agreed, they would have been much better cooked in a pot for a longer period of time rather than just adding water to the bag. Undercooked food can be a serious problem especially dehydrated foods that tend to cause bowel problems: not a particularly enjoyable medical condition on trip.
  • In almost all cases the meals tended to, as one guide put it, “smell much better than they actu- ally tasted”. Personally, I think many companies have reduced the amount of salt in their foods expecting you to add your own if necessary.
  • The more exotically named meals tended to be more flavourful.
  • The proportions indicated were not always satisfactory. Many meals seemed to be pretty slim once they were divided into the 2 or 4 portions recommended on the package.
  • We agreed that the major advantages these meals provide are reduced preparation time, reduced bulk, reduced cooking fuel needs and reduced gear needs—one pot. All important advantages when you are going long and hard.
  • Food additives and preservatives were also a concern for some paddling gourmets. Some of the ingredient lists included more chemical names than recognizable foods. However, I must say that a number of companies have embraced the organic foods market and their packages are preservative free.
  •  Finally, the major concern for most of us was the actual expense of these meals. Most of the two-portion entrees run in the $6-10 range and the four-portion entrees in the $8-15 range. It wouldn’t take long to run up a tab on a 14-day trip.

Personally, I don’t think I would eat packaged meals three times a day, for a couple of weeks. However, as a paddler and guide, I would not hesitate to put half a dozen meals into a small dry bag for convenience and emergency purposes.

Tarmo lives in Wawa and guides sea kayak trips on Lake Superior. 


This article first appeared in the Fall 2004 issue of Adventure Kayak Magazine. For more great content, subscribe to Adventure Kayak’s print and digital editions here.

Paddling, Over the Hill

Illustration: Lorenzo Del Blanco
Paddling, Over the Hill

I turned forty this year

Yes, I’m happier than I’ve ever been. I am more cen- tered and I know myself better than ever before. I am at peace with my goals and lifestyle. I have a life-partner. I am becoming a silver fox.

But forty years… Dude, I’m OLD!

Leonard Cohen once wrote in a song, “I ache in the places where I used to play”. Oh vey, was he right.

If you’re under forty, stop reading now. You don’t know. If you’re over fifty, don’t bother writing to com- plain that I don’t know what being old is: what, did you invent pain? I got pain I tell you. My back is so bent from sitting in a boat that I’m slowly taking the shape of a question mark and my large and powerful hump is becoming a distinguishing feature.

If you’re old and you’re still paddling, you’re going to hurt. However, there are a couple of strategies to help ease your aching back pain and allow you to continue as a prominent and respected member of your paddling community, long past your physical prime.

Self medicate

In the morning before heading out for a paddle, take ibuprofen. I like to fill a cereal bowl with capsules, add milk (or Lactaid if milk gives you gas) and maybe top with dried prunes. This go-getter pre-trip breakfast meal will have you play-wrestling with the young bucks in the parking lot before you even get in your kayak.

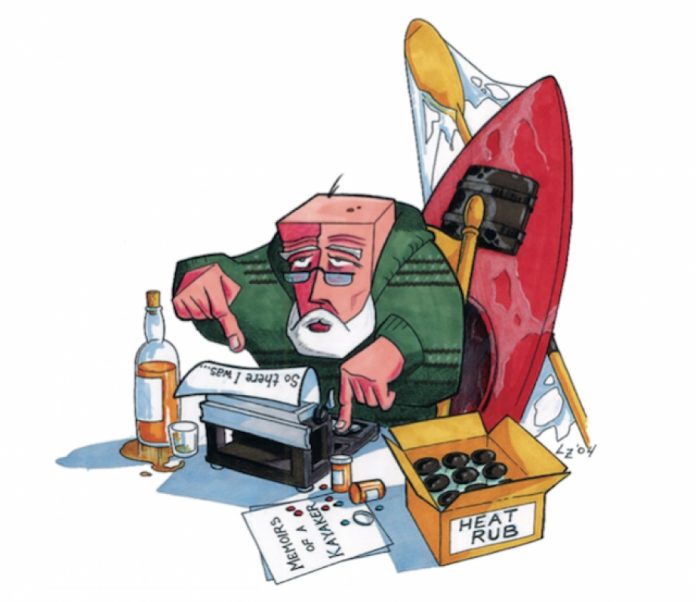
After a day of paddling I like to take the little red pills. I can’t tell you what they’re called. I’ve either got to get new glasses or longer arms to be able to read that ridicu- lously tiny print on the bottle. I can tell you the little red pills seem to complement a fine peaty single malt scotch.

Wear a nice cardigan sweater

After paddling, you’ll need to change into something dry and warm. A wool cardigan is unbeatable here. You want something in a conservative colour—you’re not put- ting on a show! In your later years, there’s nothing wrong with wearing your slippers to the coffee shop after a paddle. It’s good to be comfortable. Wrap a tartan blanket around your legs for the drive home.

Use heat on sore muscles

I find a hot après-kayak shower to be very soothing. But be careful not to fall in the tub, those things are a deathtrap. If you break a hip at forty, the bones just never knit the way they used to.

I also love Therapain spray-on liniment. This is a topical spray designed to produce heat; like a healing balm. However, extreme caution should be exercised on application. It’s best to have help when applying it to the lower back region in particular; it is all too easy to have an excessive amount of spray pool, and then run down the valley of the crack of your ass, resulting in liniment on your pee- pee, or worse… anus. The resulting heat generation is intense. This experience has come to be known in our house as “riding out the red dragon”. It’s actually proven to be somewhat addictive, with this same accidental appli- cation occurring with suspicious regularity. Think of a eucalyptus scented opium den and you get the picture. 

Gripe incessantly about your back.

I like to go down to my local paddle store and complain. They know me there: you should see the youngsters scatter when they see me come through the door. I figure, they’re getting paid so it’s part of their job to listen to me whine on and on about how my back is sore. I like to try and corner one of them and hold forth on how we used to do it back in my day.

Do other things and paddle less

Simply cutting back on your level of activity is a sure way to reduce pain. Find other things to do with the time that you used to spend on the water. Whinging on about past exploits is always good. Gassing off in the library kills a few hours. And my personal favorite— start writing about paddling instead of doing it! This last one is a time-tested classic that has been well exploited by, oh, so many.

In the next issue, look for tips on adapting equipment for aging paddlers, such as how to convert carbon paddles into a super-stiff, high-performance, lightweight walker. 

Alex Matthews is forty. He resides on Vancouver Island where he complains that everything keeps changing. 

akv4i4cover.jpgThis article first appeared in the Fall 2004 issue of Adventure Kayak Magazine. For more great content, subscribe to Adventure Kayak’s print and digital editions here.

Editorial: Motivational Speakers Foster Adventure Travel

Photo: flickr.com/ben_grey
Editorial: Motivational Speakers Foster Adventure Travel

Six months before I first sat in a sea kayak I was on the phone with harbourmasters organizing food drops along the shores of the Great Lakes. All our gear and charts had been ordered, and our new boats were scheduled to arrive in Thunder Bay the week the ice usually breaks up on Lake Superior. It didn’t seem that strange to me, but friends and family wondered what motivated me to plan a three-and-a-half month expedition without ever having paddled a sea kayak.

The inspiration for paddling home from university was surely a result of being enrolled in Lakehead’s Outdoor Recreation program and being surrounded by highly motivated, adventurous peers. Even the city of Thunder Bay is a mecca for enthusiasts: with its own chapter of the Alpine Club, a healthy ski community, and is a stop for travelling adventure road shows. The Banff Festival of Mountain Films is a sellout in the city’s largest auditorium; Waterwalker packs the first-year psychology lecture hall and Warren Miller is an annual social at the Exhibition hall. Outside after the shows, climbers are freeing 5.10a stonewalls and skiers are doing backscratchers off the roofs of cars. The motivational powers of motion pictures (and in the latter case, a dozen cans of Blue) is as strong as the commitment to outdoor adventure sports.

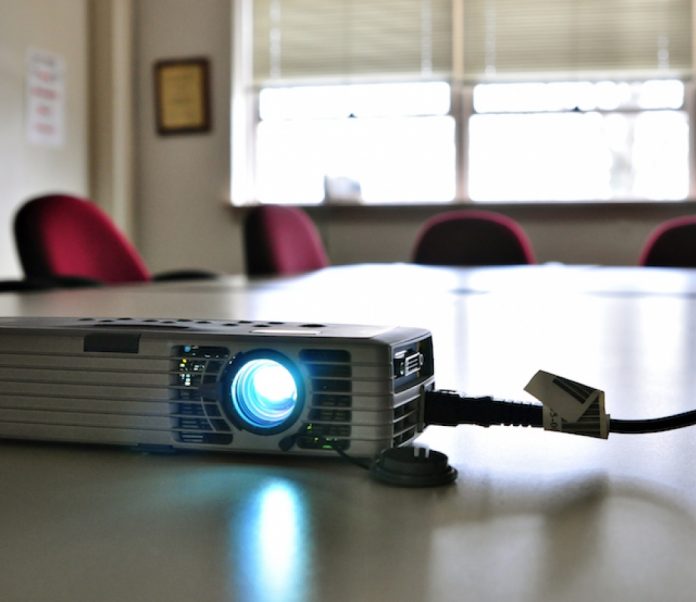
Also on campus are less glossy presentations, presentations announced by photocopied signs reading, “SLIDE SHOW TONIGHT… Room SN 210… Olav and Ali’s Trip”. Word spreads like water on GoreTex. It was these intimate presentations that best captured my imagination. Holding the projector clicker was a fellow adventurer, someone like me who decided that canoeing across Canada, sea kayaking around Lake Baikal, or skiing to the North Pole was something cool to try.

These humble presentations were relevant, and honest. Their high seas, minus 40-degree temperatures and 27 days of rain were real—not made for TV. More admirable than their attempted trips was that they took the time after- ward to share their experiences—to motivate hundreds of others. Adventure travel will never die so long as stories are told while photographs are projected on small screens. Many of these people write books; some just return to their daily routines of school or work.

When you open the first page of Adventure Kayak’s first ever photo annual, imagine that you are sitting down to watch a slide show. But, this slideshow is different: it has one photo from two-dozen trips, in almost as many countries. I suggest keeping a pen and paper handy, you’ll want to be jotting down notes, planning your next expedition. 

akv4i4cover.jpgThis article first appeared in the Fall 2004 issue of Adventure Kayak Magazine. For more great content, subscribe to Adventure Kayak’s print and digital editions here.

The Quick Fix: 5 DIY Kayak Projects To Get Trip Ready

The Quick Fix: 5 Easy Projects to get Trip Ready
Feature photo: Adventure Kayak staff

This is the year my kayak turns ten. I bought her when she was three years old at a demo sale and I’ve since put on thousands of kilometres. If she were a car, it would be time to trade her in, but she’s not a car—her only moving part is a rudder—and I’m aging faster than she is. A few repairs, upgrades and routine maintenance were all it took to make her better than new.

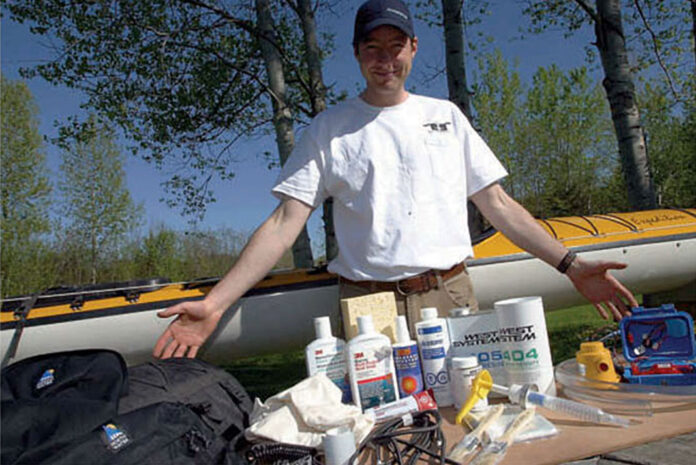
Below are five safety-oriented upgrades and DIY projects that I chose to celebrate my kayak’s diamond anniversary and prepare for my next West Coast expedition. Read on to find out how to build a new bulkhead, install an electric pump, add storage bags to your cockpit, make your kayak shine in the dark, and keep the sun from eating away at your dream machine.

The quick fix: 5 DIY kayak projects to get trip ready

1 Reduce cockpit volume with a new bulkhead

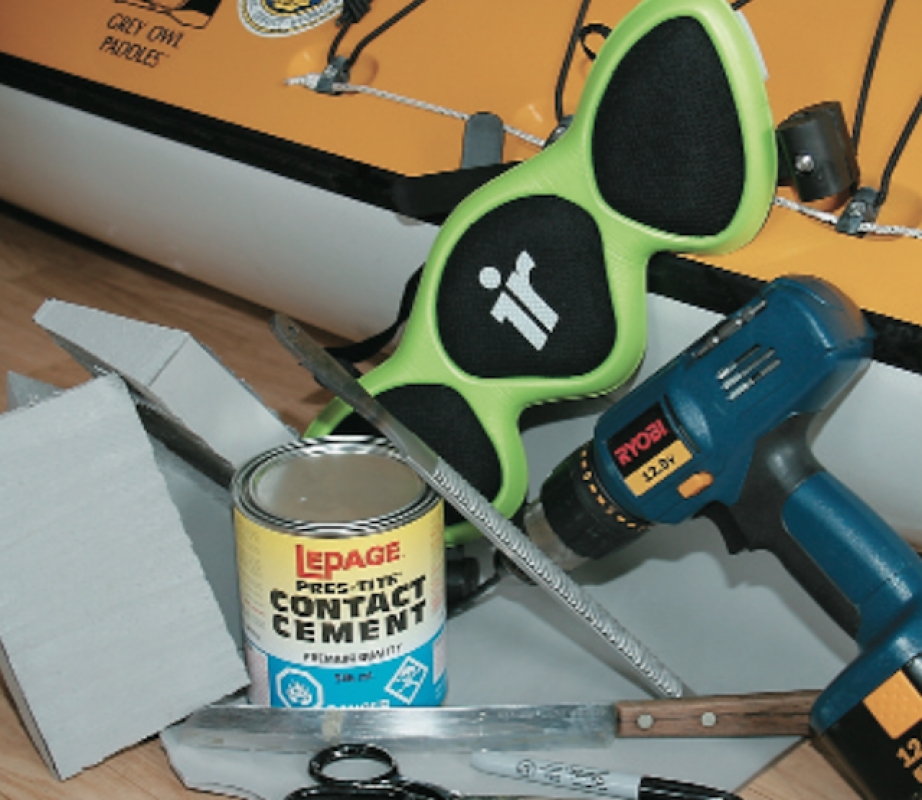
My stock front bulkhead was seven inches ahead of where I needed it, resulting in less dry storage space in my front hatch and more wasted space in my cockpit. Moving the front bulkhead as close as possible to my feet reduces the amount of water I have to pump out after a rescue. It also gives me a place to rest my feet, mount a foot-operated bilge pump or a foot switch for an electric pump. Most supplies are available at any marine supply store.

Here’s what you need:
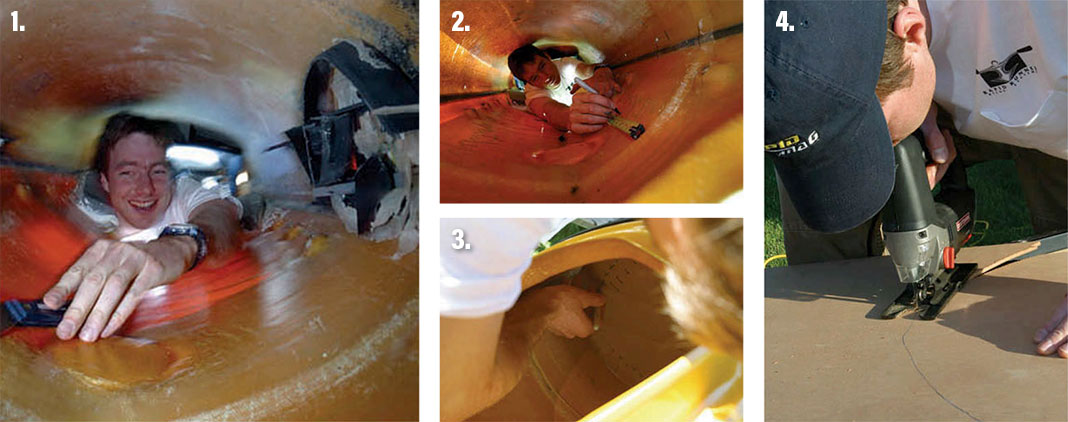
Photo 1: Begin by getting your boat up on a set of cradles at waist level and arranging your tools. Trace a line on the hull to mark the location of the old bulkhead. Then get to work removing your old bulkhead. My plastic bulkheads are sealed in with silicone, so I made a hole to insert a hacksaw blade and cut out the centre of the bulkhead. There’s nothing like the demolition phase to commit you to seeing the job through. I used a scraper and pliers to hack the bulkhead rim off of the hull.

Photo 2: I used the location of the old bulkhead as a reference point to mark out the location of the new one. I moved my bulkhead back almost seven inches. Think about your foot peg rail placement and foot room. I will move the foot pegs to the end of the rail and re-drill and remount my rails 67 mm back from their present location. This allows me to move the bulkhead back as far as possible, but it means nobody taller than me (6’2”) will ever be able to paddle my boat!

Photo 3: Making a template for the new bulkhead is time-consuming but very important. Getting it right will give your bulkhead a strong, snug fit, and save you time when you cut and shape the plywood. Draw +/– symbols on the cardboard to show where to trim and where to cut less on the next template.

Photo 4: Trace your cardboard template onto a piece of plywood and cut out your new bulkhead with a fine-toothed jigsaw or handsaw blade. Trust your template and resist the temptation to cut outside your line. Eighth-inch-thick marine grade plywood works well; consider using quarter-inch if you’re using the bulkhead as a foot brace or a mount for a foot-controlled pump. Marine plywood is waterproof, has a nice “teaky” finish and can sometimes be purchased in smaller pieces.
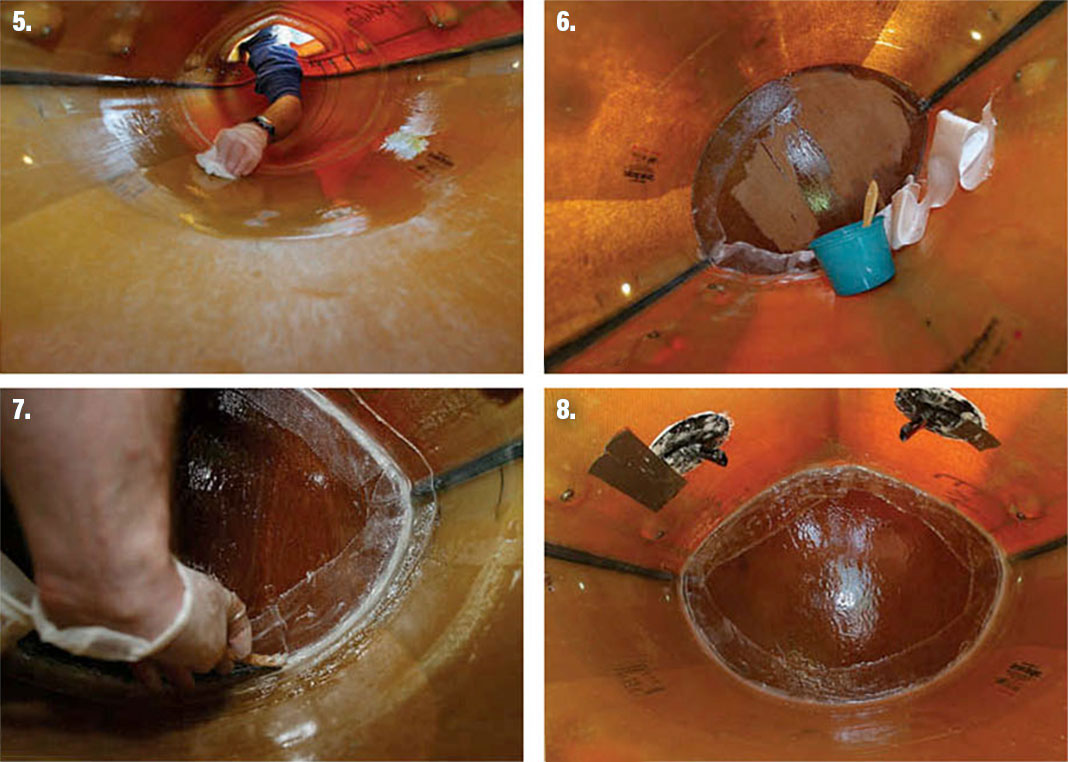
Photo 5: Wash the inside of your boat with dish detergent or boat soap to remove any contaminants. Do this before sanding to avoid sanding dirt into the surface. Then use 80-grit sandpaper to rough up a strip a few inches on either side of your new bulkhead location. Then wipe the area with Acetone to remove the sanding dust and prep the surface for bonding.

Photo 6: Fit your new plywood bulkhead snugly—don’t force it in place or it may bulge out your hull and deck. Glue your bulkhead in place with a few drops of epoxy. This is a good time to practice mixing your resin and observe how quickly it cures.

You’ll want to apply two or three coats of epoxy consecutively, waiting just until the preceding coat is tacky—have a few hours to kill. Fiberglass saturates and sticks better if you place it on a pre-epoxied surface, so begin by spreading epoxy on either side of the rim of your bulkhead. Then apply the tape, working your way around the rim, working in additional epoxy to saturate the tape as you go. Use scissors to snip the overlapping pleats on the bulkhead side of the tape, and overlap the ends. With my boat up on cradles, I was able to rotate the boat so the loose tape is always at the bottom. Finally, paint your entire bulkhead with a thin layer of epoxy to seal the wood. Do the other side of the bulkhead.

Photo 7: When the first layer of epoxy is still tacky, recoat your bulkhead and seam with a second thin layer of epoxy and add a fillet to your seam on both sides of the bulkhead for extra strength. A fillet is a bead of epoxy thickened with high-density adhesive filler, applied along the seam like a strip of caulking. For a lightweight installation, it’s possible to skip the fiberglassing stage entirely and just use an epoxy fillet to glue your bulkhead in place. I opted for both for maximum strength. I used West System 404 High-Density Adhesive Filler to make my filleting compound. Mix the epoxy first; add plenty of filler powder until the epoxy is the consistency of peanut butter. Use the end of a Popsicle stick cut flat or V-shaped to spread the fillet. Optional: when tacky apply a third coat of epoxy both sides of the bulkhead.

Photo 8: Tada! Eight inches less wasted space in my cockpit and seven inches of extra dry storage space in my front hatch thanks to a shinier, newer, stronger bulkhead.


2 Get the water out with an electric bilge pump

A hands-free, built-in pump system is a must-have add-on for the serious paddler. It allows you to have your sprayskirt on and be bracing and paddling while you pump out a flooded cockpit. The state-of-the-art electric pump system from Rapid Runner Bilge Systems is one of the easiest hands-free pumping systems to install and to use. The main components are a 1,000 gallon-per-hour Johnson-Mayfair Proline bilge pump and a polymer lithium ion (LiPo) battery in a pre-wired waterproof case. The LiPo battery weighs less than 300 grams (10 ounces) and can power the pump for about 50 minutes.
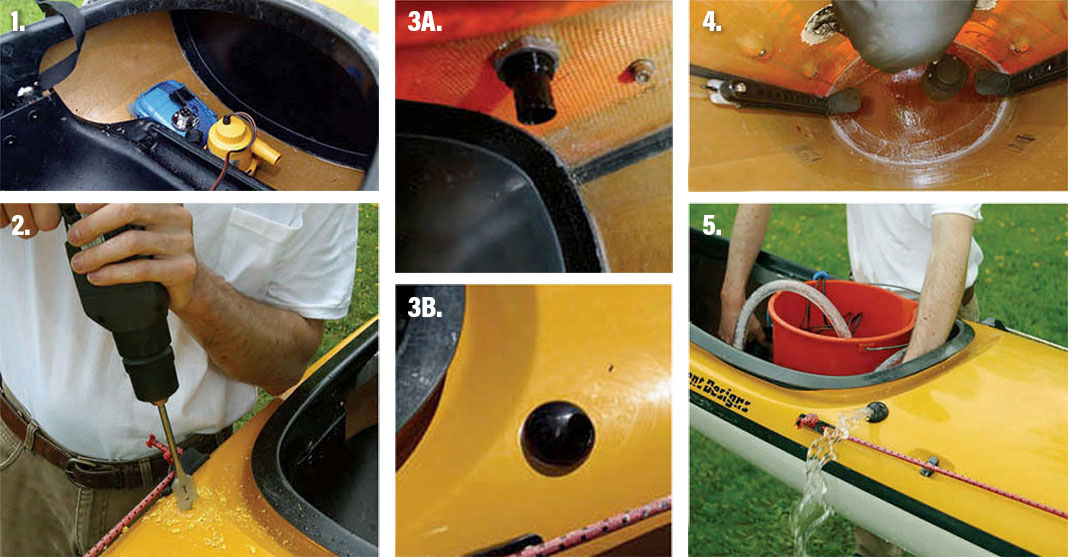
Photo 1: The pump system is super-easy to install because the pump and battery both strap to a Hypalon pad that glues to the hull. Attach the battery pack and pump to the vinyl pad behind your seat so that the pump will be against the hull at the lowest point. Rough up the hull with 80-grit sandpaper and clean with solvent. Glue in place using Shore adhesive or Vinyl Bond. Alternatively, the bilge pump can be bolted separately to the seat or bulkhead.

Photo 2: Drill the hole for the through-hull fitting (where the water will come out). The long hose allows you to put it anywhere in the cockpit but somewhere behind the paddler is recommended. Make sure you won’t knock your elbow on the fitting and that it won’t interfere with a paddle-float rescue.

Photos 3A & 3B: Leave enough clearance under the deck around bulkheads, cockpit and deck hardware to screw on the nut that holds the through-hull fitting in place. Secure the hose to the fitting with a zip tie. Aim the outlet and seal the fitting to the deck using a marine adhesive (such as 3M’s 5200 Marine Adhesive Sealant).

Photo 4: Rapid Runner provides a foot switch that either bolts to a foot pedal mounted on the rail behind your existing foot pegs, or attaches to the front bulkhead. I glued a foam pad behind the foot switch and fixed it toe height on my bulkhead to bring it within easy reach.

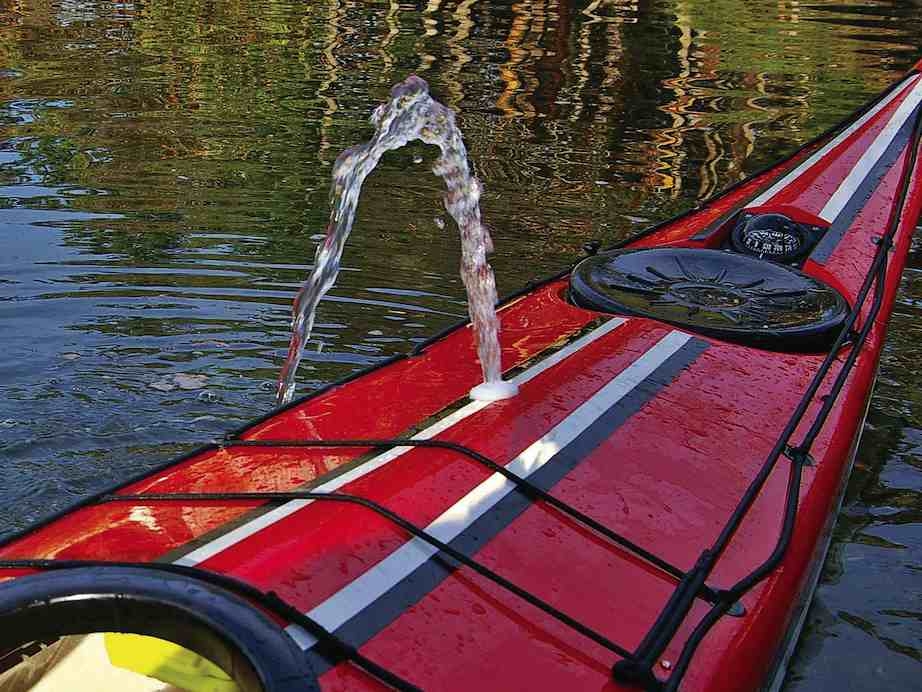
Photo 5: We couldn’t wait to try it. The 1000 GPH pump puts out an impressive stream of water. Tilting your boat just so, you’ll be able to hose down your buddies. No more excuses—get out there and practice your rescues.


3 Apply UV protection for decks and gaskets

Gel coat, plastic or rubber hatch covers and rubber hatch seals all take a UV beating. You wouldn’t forget it for your skin, so don’t forget sunscreen for your boat! Apply before every paddling season or long trip.

Note: It’s way easier to wash and wax your boat when you’re replacing your deck lines and bungees. Pick up some 3/16” bungee for your front deck and a 1/4” for your rear deck paddle float attachment. Use 5 mm cord for deck lines.

Photo 1: Wax on! Pre-wash the boat and then find a specialty marine wax such as 3M’s Marine Fiberglass Cleaner and Wax, which helps to remove scratches and restores and protects your boat’s finish.

Photo 2: Wax off! Remember Karate Kid? Use a soft cloth to buff your boat to a shine and you’ll have your black belt before you know it.

Photo 3: Treat rubber, plastic and vinyl with 303 Protectant. Just spray on, wipe off, and repeat every several weeks. Prolongs the life of rubber hatches and hatch seals. Also restores the colour of faded plastic hatch covers.


4 Be visible with reflective tape and deck line covers

For night paddling in areas of boating traffic, or just to be more visible in the event of rescue, adding reflective strips to your boat is an easy upgrade that you can do in minutes.
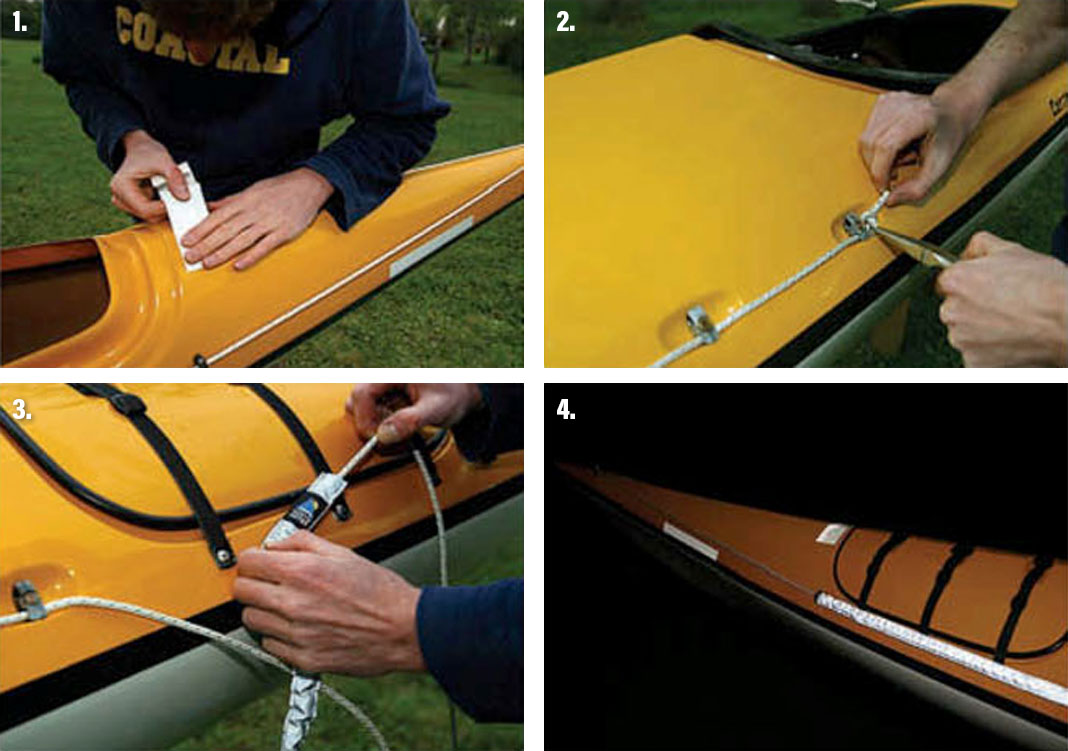
Photo 1: 3M reflective tape is like one long license plate registration sticker—super-sticky and easy to put on. Getting it off is another story, so put it where you really want it. Look for a spot that’s not likely to be covered or get scratched. If you’re feeling pessimistic, put tape on the underside of the hull.

Photo 2: Needle nose pliers are helpful for removing tight deck line knots, if you don’t want to cut and replace the lines.

Photo 3: Once you get your deck lines off, install North Water Reflective Deck Line Covers. These can go on deck bungees too. You don’t have to cut them—they scrunch to fit.

Photo 4: Behold, it works! The North Water covers are more reflective than the 3M tape, possibly because the scrunched fabric reflects lights from all angles. They are also easily removed if you want to switch boats or morph into stealth mode.

5 Add North Water cockpit storage bags

Making use of a sea kayak’s ample cockpit space for storage keeps the deck free of paraphernalia that can wash off in the surf or get snagged during rescues. The Under-Deck Bag from North Water Paddle Sports Equipment hangs from the roof of the cockpit in the place of a traditional knee tube—it’s a kayak glove compartment.

And North Water’s Interior Mount Cockpit Bags provide convenient storage along the sides of the cockpit. They double as thigh padding for a better fit and also help displace water from the cockpit.
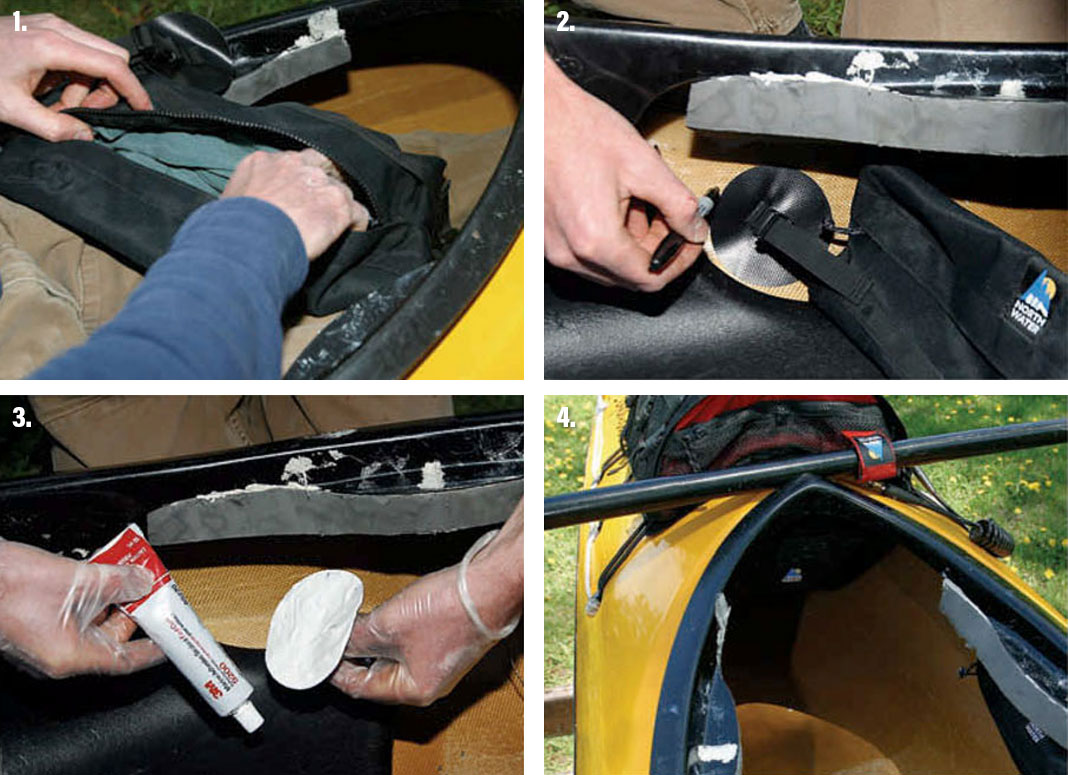
Photo 1: Sit in your cockpit and line up your Interior Mount Cockpit Bags in a place where you’ll be able to access them and they’ll be out of the way, or provide some desired padding beside your thighs. Don’t forget to stuff them when you’re positioning them.

Photo 2: The cockpit bags attach in one of two ways—clipping to glued-in vinyl patches or hanging from your rudder cable on a Velcro sleeve. My cable doesn’t extend far enough. I marked the location of the vinyl patches beyond the edges of the cockpit bags, so they’ll hang taught to the side of the hull.

Photo 3: Prepare the surface of the boat by roughing it with 80-grit sandpaper and cleaning with a mineral spirit such as Toluene. Use a vinyl adhesive such as Vinyl-Tec 2000 or Vinyl Bond to secure the patches.

Photo 4: With the Interior Mount Cockpit Bags and the Under Deck Bag installed, there’s so much storage space, you’ll never have to leave the cockpit! North Water’s Expedition Deck Bag provides even more. The bags can all be quickly unclipped for packing, cleaning, or carrying around the campsite.
Cover of the Late Summer 2004 issue of Adventure Kayak MagazineThis article was first published in the Late Summer 2004 issue of Adventure Kayak Magazine. Subscribe to Paddling Magazine’s print and digital editions, or browse the archives.


Feature Photo: Adventure Kayak staff