Some boat repairs are of the on-water emergency variety; other fixes may allow for minor gelcoat touch-ups done at one’s leisure. This story is about one boat so badly damaged that it was thought to be beyond repair.
It all started in the summer of 2013, when I spotted a dirty, green-and-white kayak under a friend’s deck. “Oh, that boat,” said Jay, “it was given to us by a friend who had it lying around for years after it flew off the roof of her moving vehicle.” We pulled the fiberglass boat out from under the deck and loaded it on top of his car—cracked and missing hatch covers—grabbed a roll of duct tape, and took it to a nearby lake. Even though it leaked no matter how much tape we used, I began to form an image of what the British racing green NDK Romany might have looked like when it was shiny and new…and what it could look like again.
Returning home to Ohio, the image of this Romany as a winter project was stuck in my head. In half-jest, I proposed to my friends that I trade the Romany for a dry top that Jay was interested in and they accepted. The Romany was mine!
Assess the Damage
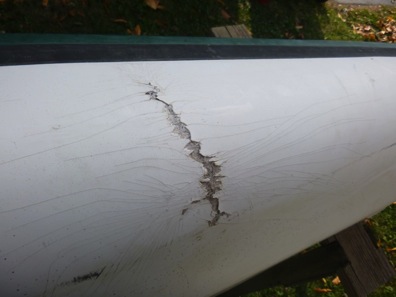
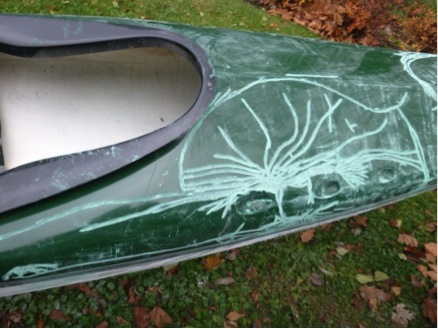
Putting the boat up on saw horses and surveying the damage left me with a sense of nausea in the pit of my stomach. The hull had major cracks running through the structural fiberglass in four places. Moreover, a multitude of spider cracks populated the entire boat, hull and deck.
Structural Fiberglass Repair
The four major breaches were all reachable from the hatches and easily repaired from the inside. Rough up the surface, cut fiberglass tape a little larger than the size of the repair, place the cloth on a piece of wax paper and saturate the cloth with epoxy resin, and then slap the patch in place. The next day, I was able to sand the patch and spray a little paint on the area. Done with the fiberglass repair.
Spider Cracks
I had performed gelcoat repairs on other boats, but none as badly damaged as this one. How to even tackle spider cracks that covered nearly every square inch of a boat? My first thought was to use an angle grinder and remove nearly all of the gelcoat and find a way of spraying a new coat on the entire boat. Luckily, before I impulsively jumped on this idea, I consulted my trusted sources for all things unknown – friends, Internet searches and YouTube.
Spider cracks are likely to re-appear unless you widen the crack, with tapered edges, through the full thickness of the gelcoat. There were lots of suggestions on how to affect this repair, but I chose one not mentioned by any of them – my Dremel tool. A conical, aluminum oxide grinding stone did the trick. It allowed me to trace each crack from source to end to a depth where the crack line was no longer apparent. In most cases, this was down to the fiberglass – without penetrating the glass. The advantage of this time-consuming method was that it provided enough of the surrounding gelcoat to serve as a thickness gauge so that when a filler was later applied, it could be sanded to the level of the original gelcoat. The result looked like an abstract painting…
Don’t miss the rest of Dene Berman’s tutorial, Kayak: A Repair Saga, Part II.


