Some boat repairs are of the on-water emergency variety; other fixes may allow for minor gelcoat touch-ups done at one’s leisure. This story is about one boat so badly damaged that it was thought to be beyond repair.
Don’t miss the first installment of Dene Berman’s two-part repair guide—where we look at making structural fiberglass repairs and beginning to mend spider cracks.
Spider Cracks
What is needed is a waterproof bonding agent that will adhere to the fiberglass and the existing gelcoat, expanding and contracting with temperature changes at the same rate as the gelcoat. Material of this sort is referred to as a fairing compound, and can be shaped to blend in with the surrounding areas. The repaired area can then be determined to be “fair” to one’s eye and touch.
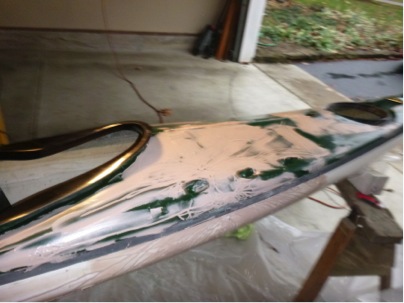 Unable to find a satisfactory compound, I contacted the traditional source for all things needed to keep a boat supplied – a ship chandlery. Jamestown Distributors in Bristol, Rhode Island, was very helpful. Their fiberglass repair specialist knew just the right product to recommend. I took his advice and purchased Quikfair fairing compound by System Three. This product contains microbaloons, hollow glass micro-spheres that help create a strong yet lightweight fairing compound. This two-part epoxy putty is intended for use above or below the waterline, has a pot life of 10 minutes and can be sanded in a few hours. I mixed small, golf-ball sized batches, and used auto body putty spreaders to apply the mixture. The result looked like I was frosting a cake.
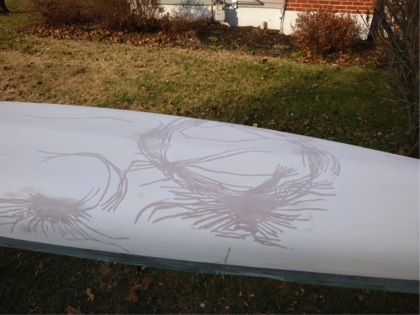
Sanding
Removing the excess fairing compound is a matter of sanding. Lots of it. Start with an orbital sander and 80-grit paper and work toward 220-grit. The goal is to use the original gelcoat as the guide for when to stop sanding. While that yielded rough results, it also revealed holidays, or missed spots, in the outcome as well as ridges and valleys in the finish. Nevertheless, the overall outcome of this stage was beginning to take the shape of an intact boat.
Priming and Painting
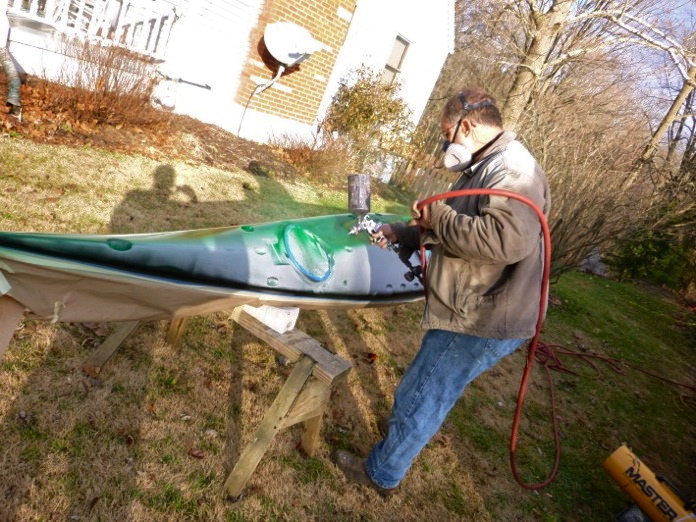
My neighbor Dave is a car body paint expert who, out of his van, goes around to car dealers, making the finish of cars look as near to new as possible. We talked about the right products to use, settling on two-component acrylic finishes that are appropriate for surfaces like auto bumpers – strong, resilient and weatherproof. We started with a primer coat that revealed many of the imperfections that made my fairing compound not quite so fair to the eye. This was followed by the use of thin coats of the fairing compound and lots of detailed sanding, even to the point of removing much of the primer.
Next was the final paint stage of painting the hull and deck. We chose Spies-Hecker two-component acrylic urethane mixing colors, scale-weighed to tenths of grams, to which bonding and curing agents are added. For the finish coats, lots of thin coats are sprayed, with light sanding, close inspection, minor adjustments and more spraying. The process may seem easy, but involved masking off areas of the boat and finding the right colors – we started with the NDK color chart and modified from there. Waiting for the right temperatures, putting the boat inside during the rain, getting out the propane heaters when the temperature plunged, re-doing the mixture when the yellow hull was too translucent… Seeing Dave with his spray gun was like watching magic as he transformed the boat into a shining gem.
Final Touches
Repaired and painted, the boat needed only new hatch covers, stickers, deck lines and bungees to complete the transformation. With the help of suppliers and friends, what had been a rotting hull held prisoner for years is now a sleek craft that again awaits the spring thaw to carve beautiful lines in the water. This project is proof that an avid kayaker can resurrect a lost cause into a sea-worthy, beautiful craft. -Dene Berman


