Home Blog Page 321

On Thin Ice: Following the First Ever Circumnavigation of Ellesmere Island

Photo: Erik Boomer
On Thin Ice: Following the First Ever Circumnavigation of Ellesmere Island

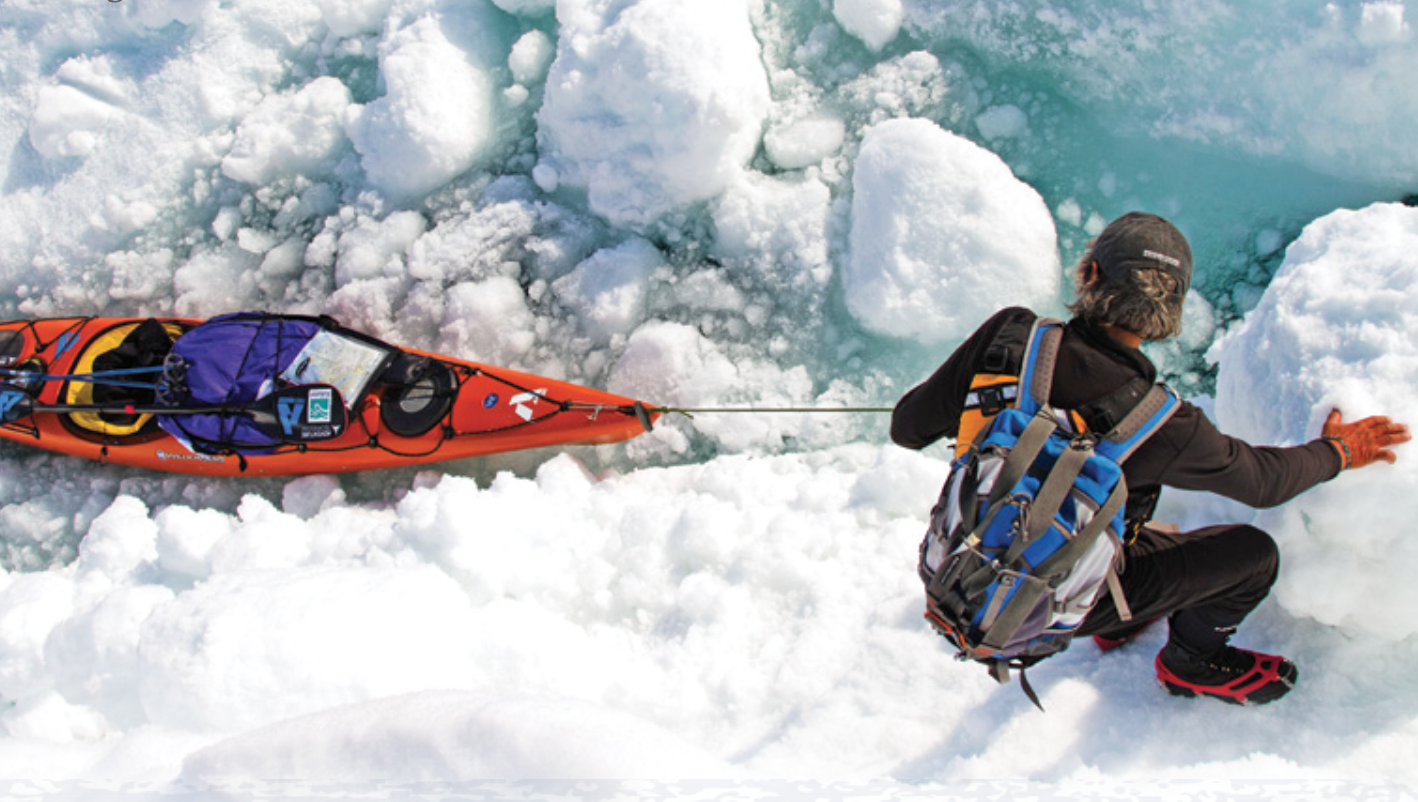
On August 19, 2011, veteran explorer Jon Turk and expert whitewater kayaker Erik Boomer became the first people to circumnavigate Ellesmere Island, a mountainous, ice-smothered landmass in the Canadian High Arctic. Nearly the same area as Great Britain, Ellesmere has just two permanent settlements, 500 miles apart and home to 146 souls between them. Boomer and Turk’s incredible journey spanned 1,500 miles, 104 days, four uniquely demanding environments, and not a few unspoken doubts. At times, the intensity of their undertaking was so great that it seemed superfluous, even counterproductive, to discuss their deepest fears and emotions.

Now, from the safety of home, Turk and Boomer ask each other the questions that they couldn’t voice on the ice. 

Lifiting kayak onto ice on Ellesmere Island

Turk: We left the Eureka weather station on day 24 with 50 days of food and 300 miles to our next cache, near Ward Hunt Island. Knowledgeable explor- ers had warned us that the ice on the northwest corner of Ellesmere might be very rough and that we might be slowed to traveling a few miles or even a few hundred yards a day. If the ice turned out to be that rough, we would have starved before reaching our food drums. Why did you continue on with me in the face of such uncertainty and potentially dire consequences?

Boomer: This was my biggest concern of the whole expedition. The environment was so harsh and unpredictable that rescue options were few and far between. Even if we could make it to one of the few viable landing strips, there was no guarantee that the weather would allow a plane to reach us.

So unless we were extraordinarily lucky, we might have had to wait a week or more for an aircraft. If we were starving or injured, that might be too long.

Paradoxically, this risk factor is the main reason I joined you on this expedition. I found myself going through the same mental process that I go through before paddling over a huge un-run waterfall. Identify the dangers and decide if I can hit the line that will lead to a clean drop. The major difference is that kayaking waterfalls lasts only a few seconds. On this expedition the nervous uncertain feeling was a nagging daily emotion.

The unknown, difficult nature of the North Coast kept the expedition exciting and fun. No day was monotonous. We skied to exhaustion every day, knowing that if we met or exceeded our 15-miles-per-day average, we would be saving food, time and energy for the possibility of rough ice and slow travel ahead.

As it turned out, we exceeded our expectations and made great time getting to our food cache near Ward Hunt. Actually, I think the traveling became a lot tougher later.

We could worry all day about the “what ifs.” Adventure is about accepting the challenge to go into the unknown. 

Wildlife seen on Ellesmere Island

{loadposition PBG_AK_Midcontent}

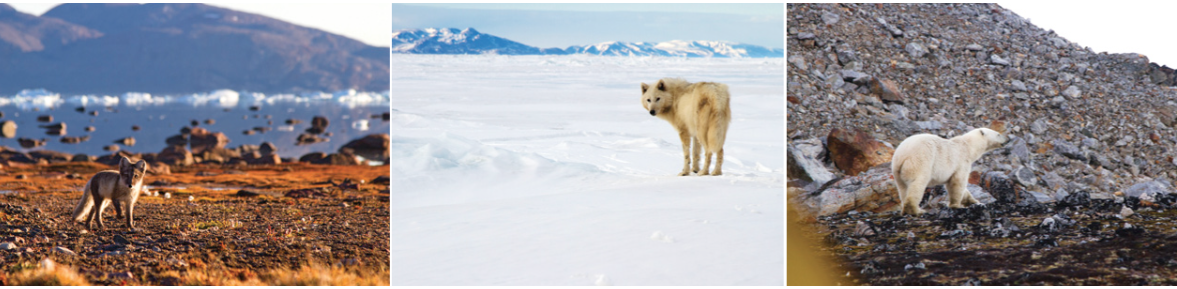
Boomer: Just as we were crossing the 80th parallel, passing from the High Arctic into the Polar latitudes, a white wolf spent a considerable amount of time with us in camp. You had a unique way of interpreting this experience. I’d like to know more about this perspective and your take on our intimate relationship with the natural landscape.

Turk: When I was five years old, my family moved from New York City to rural Connecticut. At a very early age, I remember venturing alone into the woods until I was scared that I would not find my way home. So I’ve been wandering around in natural environments for over 60 years. After enough time, the fear melts away and the spiritual connection with nature dominates.

Between 2000 and 2005, I embarked on five expeditions to Vyvenka, a small Koryak village in northeast Siberia. I traveled with indigenous hunters and was guided on hallucinogenic and healing journeys by an old shaman, Moolynaut. The Koryak people see nature as animate, alive and magical. Every animal, every rock, every blade of grass has soul and communicates with humans.

According to a scientific worldview, we would view the white wolf that slept only a few feet from our tent as a purely physical event. But the Koryak people would have interpreted it as a magical communication with the wolf spirit, the guard- ian of a passage into a new realm. There is no right or wrong. We can never ask the wolf what it was thinking or know its intentions. But I have found that life is so much more rewarding and satisfying if we embrace the magic that I believe is flying around us all the time.

Turk: We were essentially trapped for 17 days in the Robeson Channel as winds and currents compressed the North Pole icepack into the narrow Nares Strait between Ellesmere and Greenland. During that time, we occasionally made forays onto moving ice. Several times, we found it necessary to jump across fields of small, tippy, floating ice floes. There was always the danger of falling in or a pan tipping over and being crushed as the ice chunks compressed together. You are 40 years younger than I. During these critical moments, you were both stronger and more agile. How did you feel about the age gap?

Boomer: The age gap was actually one of my favorite parts of this expedition. It amazes me how similar we are and how well we were able to relate to each other.

In the more mellow times we found great companionship. People have asked me, “Being around just one person that long, you must have not talked some days?” On the contrary, we had great conversations every day. I really enjoyed your storytelling and often prodded you with questions to keep the stories coming.

In critical times, like when we were venturing across the broken ice, I think we both agreed that losing each other was the biggest concern. Not only would it have been unthinkably tragic to have an accident, but we also shared group gear that was vital to our survival. For example, I carried the sleeping bags, while you had the tent. We depended on each other so much; it was essential to travel as a single unit.

Because of my youth, I could move faster across the ice, but what we were attempting was not a sprint. We traveled over a half marathon every day for 104 days—keeping a good pace was critical and you set a great pace. I feel like the age gap galvanized our relationship and helped keep us in balance.

Jon_Turk_crosscountry_skiing_through_snow.png

“I felt I could continue forever, do another lap around the island if we had to.”

Boomer: We experienced challenges and difficult conditions that pushed our bodies to the limit. At what point did you feel most physically spent?

Turk: It’s tempting to say that it was most challenging where the ice was roughest. On the northeast coast, Cape Hecla comes to mind. Intense north winds had forced the North Pole icepack into formidable pressure ridges. There were no flat surfaces and all day long we were lifting and lowering our boats— heavily laden with 50 days of food—over ice ridges 30 feet high. Sometimes we worked for half an hour to gain only 30 yards horizontally. Yet, truthfully, I was no more tired at the end of a day of travel on rough ice than I was at the end of a day of moving on smooth ice. Every day, I gave the expedition everything I had.

After the first day, I wrote in my journal, “Completed: 15 miles. To Go: 1,485.” Then I took a quick mental survey of all the little aches and pains throughout my body, and concluded that I’m 65 years old and there was no way I could complete the circumnavigation. I thought seriously about saying to you, “Hey, Boomer. This is really dumb. I can’t do this. I’m going to turn back tomorrow morning. Sorry.” But I just couldn’t end my career so ignominiously. 

Fourteen hundred miles later, we were losing sun angle and shivering cold every day. I was exhausted, totally spent, but I had pushed so hard for so long, through so many barriers, that I felt invincible. I felt I could continue forever, do another lap around the island if we had to.

The day before we finished, on a 15-mile crossing, I started out paddling strongly. As we neared land, a fog rolled in. You were ahead, so I tried to paddle harder to catch up because I didn’t want to lose you. But my arms wouldn’t work. It wasn’t fatigue; it was something way beyond that. I shouted to you, “Hey, Boomer, you gotta slow down. I’m bumping up against some wall I’ve never witnessed before. It’s eerie, it’s scary; I feel like I’m nearing breakdown.”

{loadposition PTG_AK_Midcontent}

Final Thoughts

We finished the journey in late summer, paddling over a placid sea into Grise Fiord, our starting point three-and-a-half months before. With the nose of my kayak just touching the beach, I sat for a minute, reflecting on the passage.

I had paddled strongly into town, angry with myself for being wimpy the day before. I thought my trials were over—all I needed to do was catch the flight home and eat the garden vegetables that my wife, Nina, had been growing all summer. Expeditions had become part of my soul, and now I was ready for the long, treacherous and demanding journey into geezerhood.

Then, 39 hours later, my body sunk suddenly and inexplicably into metabolic breakdown. My kidneys stopped working, my blood pressure went through the roof and my blood chemistry was all wrong. I was dying. We called Global Rescue to send an air ambulance.

Boomer was beside me during the emergency flight south. I looked into his eyes; he had experienced a long distance expedition for the first time and I could see that he was excited about the op- portunities and adventures awaiting him. I realized that I was content, at last, to pass the baton, man the satellite phone and be the expedition dispatch for young men and women who continue to push the frontiers.

Turk and Boomer can be reached at: jonturk.net and wayofthenorth.com. They wish to thank expedition sponsors Eddie Bauer/First Ascent, Polartec, Confluence Watersports and Kokatat. 

All photos this page: Erik Boomer.

This article on an Ellesmere expedition was published in the Spring 2012 issue of Adventure Kayak magazine.This article first appeared in the Spring 2012 issue of Adventure Kayak Magazine. For more great content, subscribe to Adventure Kayak’s print and digital editions here.

Rock the Boat: Understanding Risk

Illustration: Lorenzo Del Bianco
Rock the Boat: Understanding Risk

In 1994, cab drivers in Munich were given cars with new safety equipment: anti-lock brakes. Surprisingly, their crash rate stayed the same. Nothing was wrong with the new brakes. The cabbies simply drove more aggressively, knowing that they had better brakes.

This phenomenon is called risk homeostasis. It also applies to skiers, skydivers, cyclists and, yes, kayakers.

Risk homeostasis states that people have a target level of risk they’re willing to tolerate. Above that risk level, things are scary; below it, they are boring. Give a cabbie better brakes and he’ll drive faster. Give a kayaker a drysuit and she’ll paddle in bigger seas.

This might not seem like a problem, since that kayaker gets more challenging paddling for the same level of risk. However, paddlers often assume that safety equipment provides more safety—or different kinds of safety— than it does.

The U.S. Coast Guard and American Whitewater Association recently published 2010 statistics on boating accidents. The single greatest cause of sea kayak accidents was, for the eleventh year running, “Unexpected changes in weather conditions.” A New Zealand study of near-misses agreed. Of course, “unexpected” is a loaded word.

Most weather changes can be anticipated through forecasts, weather knowledge and seamanship. But relatively few kayakers have honed these skills. It’s quicker and easier, if more expensive, to buy a drysuit.

The best approach is to make risk more apparent

In Sea Kayaking Safety and Rescue, John Lull describes a four-level safety hierarchy. The first is judgment and decision-making. Second, paddling skills and boat control keep kayakers upright and away from hazards. It’s not until the third level—rescues—when that $800 drysuit actually helps. At level four— outside assistance—we’re reliant on a VHF radio, SPOT messenger or cell phone to call in the cavalry. If we’re really worried about safety, we should focus on the top two levels.

Unfortunately, it’s not that simple. Risk homeostasis applies to skill as well as equipment. Kayakers who feel safe in big waves will simply head for bigger waves. Therefore safety education shouldn’t try to make kayaking less risky, since paddlers will just compensate. Nor should it try to lower the appetite for risk, since there’s evidence of a genetic con- nection. Headed into Okisollo Rapid? You probably have an elongated DRD4 gene.

The best approach is to make risk more apparent. In sea kayaking, unlike whitewater paddling, the dangers are mostly invisible. The weather systems, tides and currents that lead to those “unexpected” weather and sea changes are usually hours or miles away when critical decisions are made. Sea kayaker safety relies more on judgment, risk assessment, weather interpretation and the ability to accurately assess skills, rather than boat handling.

Karl Andersson, a BCU coach, assessor and 5-star paddler, notes that removing equipment often increases diligence and safety.

“When students show me their trip plan, I also inspect their kit,” Anderson says. “I then take away some of their kit and ask them if their plan stays the same. The students become nervous. They compensate for the missing kit with an improved launch list, formal assessment of group skills and crux points for plan reassessment. In other words, what the plan should have been all along.”

And there’s the built-in paradox. Tom Vanderbilt, who studies risk behavior at New York University, says,“When a situation feels dangerous to you, it’s probably more safe than you know; when a situation feels safe, that is precisely when you should be on guard.”

Neil Schulman writes, photographs and paddles from Portland, Oregon, where running out of coffee is considered an unacceptable level of risk. 

This article on understanding risk was published in the Spring 2012 issue of Adventure Kayak magazine.This article first appeared in the Spring 2012 issue of Adventure Kayak Magazine. For more great content, subscribe to Adventure Kayak’s print and digital editions here.

Live and Unplugged: Bringing Along Your Guitar

Photo: Mike Monaghan
Live and Unplugged: Bringing Along Your Guitar

Several years ago, the desire to paddle big water found me giving my canoe a rest in favor of a kayak. With the new boat and the related equipment ready for Lake Superior, the search was on to find a way to bring my other passion—the guitar—along on my adventure.

For over 30 years I’ve been pickin’ the old six-string. I’ve played in basements and backyards, in cafés and on couches, but there is something about the accompanying hiss and pop of the campfire and the silent glow of the moon that sweetens the hum of wood and steel.

Campfires themselves, quiet and contemplative, seem to blend into one another in the memories of trips past. But a campfire graced with music becomes a milestone, an event that sets that night apart from any other. On some nights the guitar elicits the lending of voices, of harmonies and laughter, while on others it sings alone as faces entranced gently sway in time.

“I can barely fit my usual gear into my kayak, where am I going to put a guitar?”

While a kayak can’t accommodate a full-sized guitar, there are many options out there for those who feel that playing some music of their own is the perfect ending to a day of paddling.

Though guitars come in all shapes and sizes, a true travel guitar measures about 33 by 13 inches or smaller, with a depth of no more than three inches. At the more affordable end of the spectrum are the Baby Taylor and the similar sized Little Martin. Both are compact, fun to play and will only set you back about $300. They’ll also double as great starter guitars for young kids. For those in search of an even smaller option, the Martin Backpacker guitar, while low on tone, is high on portability.

On the higher end are the carbon fiber offerings. Unaffected by humidity, heat or cold, guitars like the Rider by Blackbird or the Cargo by Composite Acoustics are suited to the most demanding pickers and paddlers alike. With one of these sleek little axes in your gear locker, there’s no excuse to go tripping without a guitar again.

I know what you’re thinking: “I can barely fit my usual gear into my kayak, where am I going to put a guitar?”

My solution was to place my guitar in a tall SealLine 35L Kodiak drybag and slip it under the bungees on my stern deck. The setup is waterproof and keeps a low enough profile that it is virtually unaffected by wind or waves. I also had a nylon handle sewn onto the side of the bag to make it convenient to carry around camp or down the beach.

My two-week solo trip through Pukaskwa Park on Lake Superior was a success. I brought my carbon fiber travel guitar. It was great to have on wind- and fog-bound days, not to mention relaxing around the fire at Cascade Falls. Making the transition from canoeing to kayaking has been exciting, and knowing that I can bring my music with me, I have no regrets.

Mike Monaghan is a professional photographer, lifelong paddler and fingerstyle guitarist living in Waterloo, Ontario. You can check out some of his photographic work at mikemonaghan.ca

This article on bringing your guitar on your kayaking trip was published in the Spring 2012 issue of Adventure Kayak magazine.This article first appeared in the Spring 2012 issue of Adventure Kayak Magazine. For more great content, subscribe to Adventure Kayak’s print and digital editions here.

Editorial: Lessons From Dorothy Gale

Photo: Virginia Marshall
Editorial: Lessons From Dorothy Gale

There are adventurers who roam to all the far-flung ends of the earth seeking adventure, and there are those who find a lifetime of the stuff right on their doorsteps.

I confess I’ve spent much of my paddling career looking over the rainbow and beyond the horizon for bluer waters. With a paddle and a pair of trusty red clogs rather than sequined ruby slippers, I’ve hunted for Oz on the East Coast and out West, in the South Pacific and on the North Shore.

Much of my time now is spent absorbing other peoples’ adventure stories—emails, blog posts and photo CDs recounting exotic expeditions in Baja, Australia, Fiji, Chile, Italy, Alaska and the like. Some drift through my consciousness like clouds, while others snag on the yellow brick road of imagination, lingering and becoming tangible, almost personal, through their storytelling. Jon Turk and Erik Boomer’s Ellesmere Island expedition (found in our Spring 2012 issue) is one such example. Don Starkell’s storied career is another.

Dreaming is important – but so is paddling

When the stories accumulate in such numbers that I have to struggle against the compulsion to do something wickedly ad- venturous, some would say (they’re probably right) wickedly foolish, of my own—book a flight, sublet my apartment, quit my job, buy a Feathercraft, and turn my back on land—I know it’s time to get out. Not on a summer-long expedition or a record-setting circumnavigation. Just somewhere I can leave log prints in the sand and let the waves wash away the funk of self-pity.

Most recently, I tied my boat to the roof and drove two hours for a hastily planned, packed-on-my-lunch-break overnight. On a forgotten coast less than a day’s drive from two of the country’s most populous cities, I watched the sun set and rise over open water. After just 24 hours with my kayak and the coast, I felt infinitely satisfied. Like Dorothy in the Land of Oz, I had been transported to a secret, magical kingdom.

I’m learning that even a brief trip is more rewarding than throwing a tantrum at what might be if not for the constraints of time, money, career obligations and family responsibilities. With a pair of lucky red shoes, a paddle and a fresh perspective on my own backyard, I can transcend these realities.

So be inspired by the achievements of Turk, Boomer, Starkell and others—I know I am. But don’t discount the adventures close to home, the ones you can do on the weekend, after work, or even on a loosely enforced lunch hour. Dreaming is important, but so is paddling.

Virginia Marshall is Adventure Kayak’s senior editor and a fan of old movies. 

This article on dreaming and paddling was published in the Spring 2012 issue of Adventure Kayak magazine.This article first appeared in the Spring 2012 issue of Adventure Kayak Magazine. For more great content, subscribe to Adventure Kayak’s print and digital editions here.

Whitewater Rescue: Learn How To Set Up A Z-Drag System In 60 Seconds

Just like any other rescue skill, it’s essential that you’ve practiced it before you get into a high-pressure situation. You can watch as many videos and read as many articles as you want—but there’s no better teacher than working through it with your own two hands.

Of equal importance is staying in practice. It’s a good idea to refresh your (muscle) memory every so often, especially when it involves setting up gear you don’t often use. All this advice applies to using a Z-drag setup to haul a boat that has been pinned or wrapped.

In this article we’ll go over how to set up and use a Z-drag system, but don’t leave it there. Gather the gear and get practicing.

[ Paddling Buyer’s Guide: View all safety and rescue gear ]

How the Z-drag works

The Z-drag is a 3:1 mechanical advantage system, which will enable you to move a heavy boat through the water with less exertion. Let me explain it like this: imagine you have a 100-pound bucket of cement. When you grab the handle you will struggle to lift it, as your arm is lifting all 100 pounds. But if a friend grabs onto the handle too, you will each be lifting 50 pounds. Add another arm and you each lift a third, or 33 pounds. Three arms split the work in three, or create a 3:1 system. Flip this logic around: three arms can do three times the work of one; more arms multiply the force.

The physics are the same for the Z-drag. Even though there is only one handle on the boat, the three parallel lines are like three arms pulling, splitting the load and multiplying the force.

The Z-shape is what matters, as it gets three lines working together. The other parts of the system—the sliding prusik and pulleys—just keep the arms equalized so they can all do their third of the job.

How to set up a Z-drag in 60 seconds

You will need a 50- to 75-foot throw rope, a prusik, two carabiners, two pulleys and a sling.

Step 1: Build an anchor by wrapping the sling around a sturdy tree or rock. Clip a carabiner and pulley through the sling.

Step 2: Secure the bag end of your rope to the load. Run the tail end through the anchor pulley.

Step 3: Wrap the prusik loop as far back down the rope toward the load as possible. Clip the second carabiner and pulley through the prusik.

Step 4: Run the tail end of the rope through the prusik pulley and back toward the anchor. Pull on the tail end of the rope in the same direction as the main line is pulling on the boat. You now have a Z-drag.

How to Hang a Hammock

Sleep right in a hammock. Photo: Stephen Brede
Catch a breeze in a hammock.

The best reason to move up to the trees is the elevation in comfort. The logistics of hammock camping are similar to tarp camping, except the sleeping area is off the ground. Gone are problems with uneven or wet rain, roots and rocks. The cocoon structure is cozy, and lying diagonally flattens the hammock so you can sleep on your back or side.

The basic setup is simple: You need two trees, 12 to 15 feet apart. They should be alive with no overhanging widow makers. They need diameters of at least six inches, as the force exerted isn’t simply your weight divided by two, but hundreds of pounds at each end. The hammock attaches to the trees with 1-to-1.5-inch nylon straps, which prevent damage to the bark.

Hammocks ideal for this application are sewn of lightweight nylon. A high-tensile line stretching from the head of the hammock to the foot establishes the hang. It also forms a ridgeline for draping an attached or removable bug net. Access is usually through a zipper or Velcro opening along the hammock/net interface, or through a slit in the bottom. Guy lines can be rigged from each side to keep the net from sagging, and to reduce swing. A tarp suspended from the pair of trees and guyed out over the hammock weatherproofs the setup.

The downside of hammock camping is, well, the downside. It’s colder sleeping in the air than on the ground. Your body compresses the bottom of your sleeping bag to the thickness of a tortilla, so you need to insulate. Some campers use traditional sleeping pads, but these slide around and most are too narrow to hug your hips and shoulders. One fix is to attach a second layer to the hammock bottom, into which you can sandwich a wider pad, clothing or tortillas. Another option is to suspend a down quilt—known as an underquilt—beneath the hammock.

It’s usually easy to find a pair of suitable hammock anchors. But what to do if the trees don’t cooperate? If you have to go to ground, suspend one end of your tarp from a paddle, trekking pole, stick or single tree, and stake and guy the rest. Then hang the hammock underneath, attaching the head to the vertical support and staking the foot. A hammock with attached netting will keep the bugs at bay. The ridgeline will be slack, so shorten it with a loop to keep the netting from sagging.

Before you pitch your tent, Google “hammock camping” or ask around at your local outfitter—you’ll find several hammock manufacturers and lots of uplifting advice.

Stephen Brede honed his hammock hanging skills during a three-month canoe circumnavigation of Lake Michigan. He prefers cedar trees, with a view of the water.


This article originally appeared in Canoeroots & Family Camping, Spring 2012. Download our freeiPad/iPhone/iPod Touch App or Android App or read it here.

Smooth Dock Landing Canoe Technique

Smooth dockside landings. Photo: Marty Tannahill
Smooth dock landings.

This article on smooth dockside landings from the seat of your canoe was  originally published in Canoeroots and Family Camping magazine.

Gracefully bringing your canoe to rest adjacent to a dock or deep rocky shoreline is the aim of a well-executed landing. In this position, paddlers can more conveniently exit the boat, stabilizing themselves by using the dock or shoreline for support.

The ideal landing is completed with the canoe under constant motion, stopping it snuggly against the dock. To make this happen, approach a fixed target on the dock in a straight line, roughly 45 degrees to the landing. As the boat nears the landing point, the stern paddler initiates the turn by using a draw or pry. If the landing is on the stern person’s paddling side, he or she should use a draw. The stern person should use a pry to initiate the turn if the landing is on the opposite side. 
Immediately after the stern paddler initiates, the bow paddler reciprocates with a complementary stroke. If the stern paddler uses a draw, the bow paddler can assist with a draw or bow cut. If the stern paddler uses a pry, the bow paddler should choose from a pry, bow jam, crossbow draw or crossbow cut. Just before reaching the target, both paddlers provide well-timed reverse strokes usually followed by some subtle draws or pries to stop the canoe at the intended spot.

Practice the timing of your strokes. Initiating the maneuver too soon will leave you too far from your target. However, waiting too long could result in a collision with the dock.

As you develop this skill, communication be- tween paddlers is important, especially when changing partners. Plan the landing out verbally before you begin. It’s best to start at slow speeds so you don’t ram the dock or damage the canoe. Increase the speed only after you can competently complete the maneuver. Try slightly different approach angles to see what works better for you and your partner. Knowing how your boat responds to the strokes is important as all canoes maneuver differently.

Marty Tannahill is a Master Canoe Instructor with the Ontario Recreational Canoeing and Kayaking Association. When he’s not paddling you’ll find him fly-fishing Ontario’s remote rivers.

This article originally appeared in Canoeroots & Family Camping, Spring 2012. Download our freeiPad/iPhone/iPod Touch App or Android App or read it here.

Wave Wheel Kayak Technique

Demonstrating the wave wheel. Photo: Kelsey Thompson
Demonstrating the wave wheel kayak technique.

Learn how to perform a wave wheel with this technique article from Rapid magazine.


The wave wheel lets you style almost any wave train and is one of the most basic downriver freestyle moves you can add to your arsenal. Resembling a downriver cartwheel, it involves using the face of a standing wave like a ski jump to throw your boat vertically into the air.

Find a steep standing wave that is deep on its backside—wave wheeling into shallow water can be extremely painful. Choose a green wave, as breaking waves will slow your downriver momentum too much. Although it’s possible to wave wheel on any sized wave, a larger wave will make this move easier.

Approach the steepest part of the wave with speed; the faster you go, the higher you’ll launch. Speed also helps your boat break free of the water, making the move easier.

As you reach the wave and begin climbing its face, take a powerful forward stroke with your boat edged toward the blade you’ve planted. Time your stroke to finish when the peak of the wave reaches your hip. This will wind your body up for the next step and pull your stern underwater, allowing your bow to rise off the backside of the wave.

Keeping your boat on edge, begin reversing your forward stroke into a back stroke on the wave’s peak—this pushes your bow down into the trough behind the wave and your stern free of the water into the air. The power for this move comes from unwinding your torso to bring your bow under your body. Rotate your upper body down towards the water, thinking about getting your paddle shaft parallel with an imaginary plane extending off the wave’s face.

Timing is everything. If you unwind too early, you’ll drive your bow into the face of the wave; too late and you’ll plant your paddle into thin air.

As you back stroke, think about pushing your feet under your body and keeping constant pressure on your planted blade. If you finish your stroke before your boat reaches vertical, your momentum will end abruptly and you’ll fall back to the water.

As your boat approaches vertical, lift your knee to flatten your boat and switch to the other edge. Keep your weight forward as you fall onto your hull facing upstream. Finish the move with a back stroke that acts as a brace to assist in returning your boat and body to an upright position.

Wave wheeling is an excellent way to spice up a mellow section of river or drop into a wave or hole to front surf. Once you’ve mastered wave wheeling forwards, try it backwards. On bigger waves you can even wave wheel your creek boat. 


 This article originally appeared in Rapid, Spring 2012. Download our free iPad/iPhone/iPod Touch App or Android App or read it here.

Jet Ferry Open Canoe Technique

Demonstrating the jet ferry technique. Photo: Andrew Westwood
Open Canoe Technique Jet Ferry

I’ve long used the jet ferry as a reliable meth­od for crossing wide expanses of current, or reaching mid-river surf waves. But the incred­ible speed and efficiency of this move wasn’t fully revealed to me until last summer.

Paul Mason and I were teaching out West on Alberta’s Red Deer River and were impressed with the many spectacular surf waves. Front surfing, back surfing, spinning on waves—on this river you could do it all! Paul commented curiously on the remarkable speed of his jet fer­ries. Could it be that there was something differ­ent about these waves compared to ours back east, or was there something different about Paul? (Some of you may know the answer al­ready if you’ve read his Bubble Street cartoons.)

To solve the mystery, I watched Paul and oth­ers tackle some challenging jet ferries. Most kept an active paddle or ruddered throughout their move. But not Paul. He kept his paddle vertical, practically side slipping on a draw. When I asked him to rudder instead, he claimed the magic was gone and the surf felt slower. It turns out that the secret to Paul’s accelerating jet ferry is to use the paddle blade as a foil to sail across the wave. When he ruddered, the blade no longer had the foil effect, making the move feel sluggish in comparison.

To understand how this works, imagine a min­iature sailboat upside down on a jet ferry wave. The inverted boat would have its sail catch­ing the current instead of the wind. A paddle blade acts in much the same way. Just as with a sail, a paddle catches the rushing current and redirects it behind you toward the stern of the canoe. With the water deflected to the stern, the paddle is propelled forward increasing the speed of a jet ferry—just like a sailboat tacking across the water on a windy day.

Similar, too, is how the hull of a sailboat or ca­noe tracks the boat to prevent sideways move­ment. A sailboat needs a keel to grip the water so that the force of the wind will move the boat forward. A canoe uses its chine in the same way. The edge of the canoe carves aggressively into the wave face—that plus gravity pulling the canoe down the wave keeps the canoe on a for­ward path so it doesn’t slide downstream and off the wave.

To gain the most momentum from the paddle sail, angle the blade so that the leading edge points slightly in the direction of the ferry. Simi­larly, point the canoe across the wave but with just enough upstream angle to cause it to surf down the wave face. For sailing, the best jet ferry waves are ones positioned perpendicular to the flow of the current.

Mystery solved. As it turns out, Paul is differ­ent, at least in how he jet ferries.


Andrew Westwood is an open canoe instruc­tor at the Madawaska Kanu Centre, member of Team Esquif and author of The Essential Guide to Canoeing. www.westwoodoutdoors.ca.


 This article originally appeared in Rapid, Spring 2012. Download our free iPad/iPhone/iPod Touch App or Android App or read it here.

Feathercraft Heron Kayak Review

Photo: Virginia Marshall
Feathercraft Heron Folding Sea Kayak. Photo: Virginia Marshall

A review of the Feathercraft Heron folding sea kayak from Adventure Kayak magazine.

Feathercraft’s first new long haul tripper since launching the K1 Expedition in 1981, the Heron is for paddlers “with a weeklong or multi-week expedition in mind who want a high performance boat in terms of speed and agility,” says designer and company founder Doug Simpson. Hand built on Granville Island in Vancouver, B.C., it’s positioned as the new premier choice for travelers needing a fast, high volume folding kayak capable of handling the world’s most demanding environments.

With tent pole-style, aluminum bow and stern frame assemblies, six donut-shaped crossribs, nine additional frame poles and a myriad of subsidiary pieces, it isn’t the quickest to assemble folding kayak on the market. Nor is it the cheapest. But the Heron does benefit from the same full-featured outfitting and durable construction as the legendary K1.

Three dry bag-style, roll closure hatches access two cavernous storage compartments; there’s enough capacity for several weeks worth of food, fuel and gear. No day hatch means you’ll likely want a deck bag for on-water essentials. Like its Feathercraft forebears, the Heron doesn’t have bulkheads and utilizes a sea sock—a waterproof cockpit cocoon that attaches to the coaming—to keep the storage areas dry, and an unloaded boat floating in the event of capsize.

Our six-foot-plus testers enjoyed the roomy fit and accessibility of the deep, extra-long cockpit and found the slender thigh brace tubes adequate for a dialled in fit. At 5’6”, the high coaming and backrest hindered my torso rotation, and just my kneecaps made contact with the thigh braces. Adding foam or an inflatable booster seat improves fit for smaller paddlers, but this is really a big-boy boat. Simpson recommends the capable, lower volume Feathercraft Wisper for petite paddlers (see Inside Out, Spring 2006, www.adventurekayakmagazine.com/0035 for a full review).

The long waterline combined with a Swede form shape and clipper bow make the 17’7” Heron significantly faster than the shorter, beamier K1 Expedition. It accelerates quickly to a cruising speed comparable to many composite touring kayaks.

The hard-chine, V-shape hull provides less initial stability but edges with aplomb. Rock solid secondary stability is enhanced by small-diameter, integrated sponsons above the chines. When inflated, the sponsons fill out the skin, stretching it drum-tight and adding a cushion of support when the boat is edged aggressively.

Dropping the rudder or heeling the hull onto its windward edge easily corrects weathercocking. Rough water paddling is a pleasure, with the generously rockered hull dampening rather than slapping the waves. For those coming from a plastic or composite kayak, paddling a Feathercraft is a unique way to experience an even closer connection with the water.

The capacity of the Heron favors long distance touring over day paddling. It’s ideal for medium to large paddlers whose travel plans demand mile-chewing performance, proven durability and unparalleled portability.


ELBOW GREASE
Assembly is straightforward, but significantly easier with a helper. Our first attempt took one and a half hours. Practice and watching the provided DVD—which we neglected to do in the spirit of a remote field assembly—would cut this in half.
MISSION CONTROL
Gas pedal-style rudder controls adjust to a wide range of leg lengths and provide a solid platform for power transfer and bracing. Comfort touches include an inflatable backrest and calf plates for under-leg support.
TOTALLY TUBULAR
A combination of long waterline, Swede form shape, pronounced V hull, hard chines and internal sponsons stretch the cruising speed of the hardwearing, reinforced welded urethane hull while enabling aggressive edging and surprisingly nimble turning.


A VIDEO REVIEW OF THE FEATHERCRAFT HERON FOLDING SEA KAYAK


FEATHERCRAFT HERON SPECS

LENGTH: 17′ 7″
WIDTH: 24″
WEIGHT: 54 LBS
PACKABLE SIZE: 36″ x 18″ x 12”
MSRP: $6,200 CAD / $6,112 US
www.feathercraft.com


This article originally appeared in Adventure Kayak, Summer/Fall 2012. Download our free iPad/iPhone/iPod Touch App or Android App or read it here.