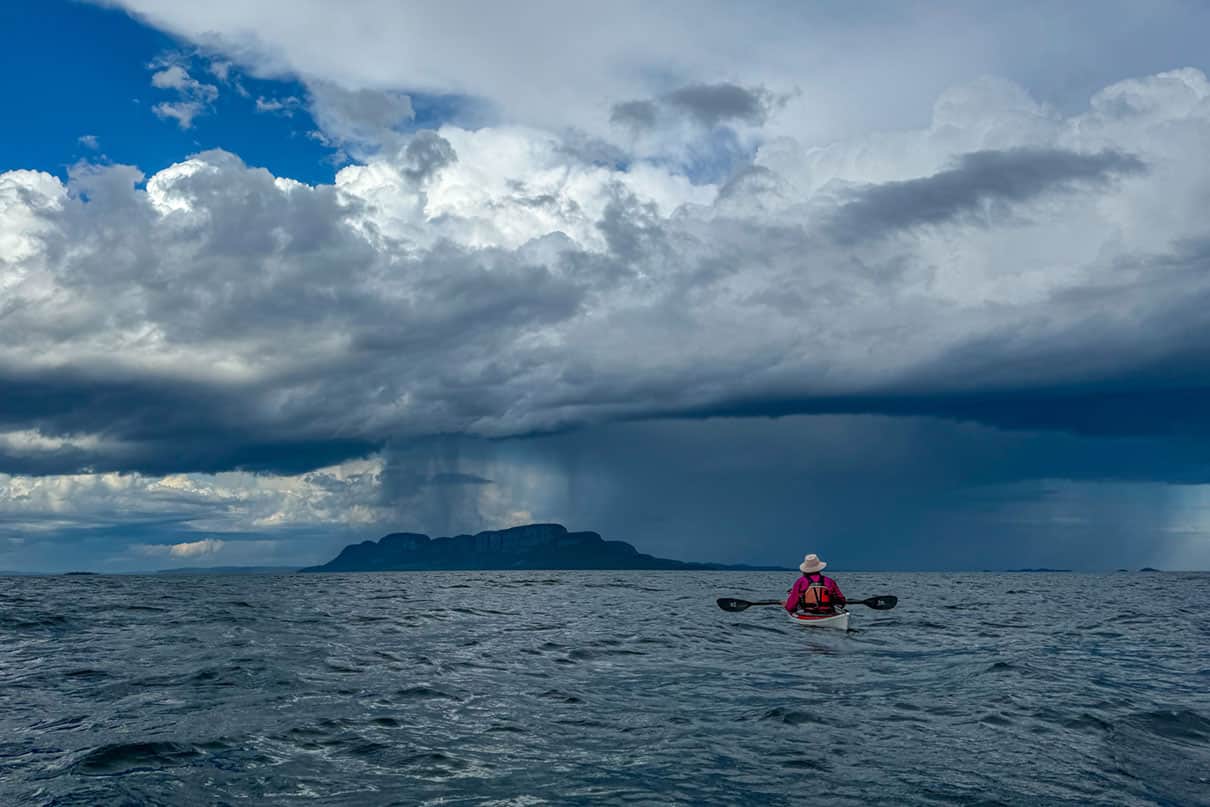
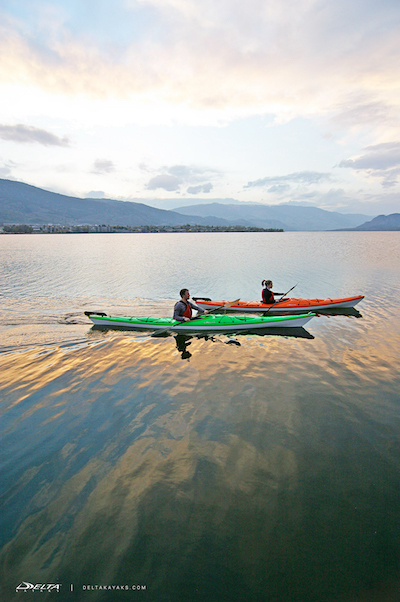
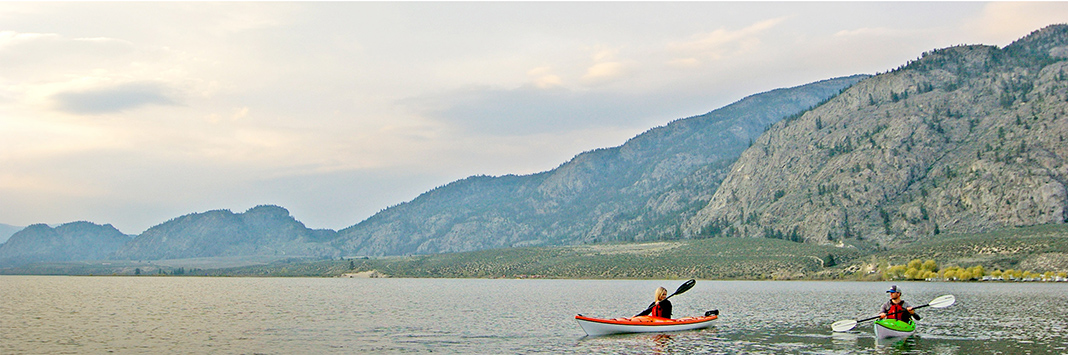
Dramatic skies during a crossing to the mainland. | Feature photo: Oli Broadhead
Dad and I lie dead still in the dark tent, listening to a grizzly grunting outside. The old half-joke that, “You don’t need to outrun the bear, just the person next to you,” isn’t as reassuring when you’re both rolled up in sleeping bags like a pair of bear burritos. I ease the bear spray out of a pocket and flick the safety off. Minutes crawl by, but eventually, we hear heavy footsteps plodding away.
We’re not on tonight’s menu.
Dramatic skies during a crossing to the mainland. | Feature photo: Oli Broadhead
Tide & teeth: Inside four months kayaking the Inside Passage
Morning is welcome but bitterly cold. A pair of bald eagles chirrup on their nest as we warm our hands on bowls of porridge. It’s early May, and we’re camped in Icy Strait, the northernmost link of the Inside Passage, a 1,000-mile stretch of islands and inlets that shield southeast Alaska and Canada’s west coast from the brunt of the Pacific’s swell. If all goes to plan, we have four months of sea kayaking ahead of us, zigzagging south towards Victoria, British Columbia. Today is day three, and last night was our first bear. The first of many.
After breakfast, we haul the kayaks down the beach. The pebbles are scattered with snow, and the peaks opposite are smothered in it. An unseen avalanche rumbles in the distance as we stand by the water’s edge, watching our breath fog as we brush our teeth. But the rising sun breaks through the low cloud, and we can imagine that we’re warm as we launch onto shining water.
Packing fast with a storm on the horizon. | Photo: Oli Broadhead
Moss makes a good mattress. | Photo: Oli Broadhead
Hungry? Drying supplies after a dry bag got soaked in high tide. | Photo: Oli Broadhead
Stormbound
Two weeks later, we’re huddled in a sodden tent. Outside, it’s raining so hard that the air is basically water. Small fish could swim into treetops if they tried. The cove we’re camped in is small, steep, and full of bear tracks. By recent standards, this is a pretty good spot. A few days ago, we ended up rigging a bivvy on a tiny, exposed island while a pair of oblivious grizzlies patrolled the opposite shore, just a short swim away for a hungry bear.
I poke my head out of the tent to check the paddling conditions. The wind is hauling sheets of spray off the sea and whirling them into the rain. We’re not going anywhere today. On the bright side, it’s a good time to be stuck. A few days ago, Dad tripped on a root and twisted his dodgy knee. Lying white-faced on the ground, he began to insist that he was fine but gave the game away by swearing.
Dad never swears, so he was obviously in agony.
An experienced paddler, Dad retired early to make this trip on the basis that you never know how long you’ll stay fit, particularly when you’re turning 60. I decided sharing the adventure was worth quitting my job for, a choice that somehow resulted in me being given a sabbatical.
We were ready to go. Then COVID paused everything for two years. At the start of the third year, Dad was kayaking near home when a rogue wave slammed him into a shallow gully. He escaped with a dislocated shoulder, and then a month later, I dislocated my shoulder climbing, and the trip was off again. A friend suggested that the universe might be trying to tell us something.
Once our shoulders had recovered, Dad got back into training, while I moved to rural India for my partner’s PhD fieldwork and lost whatever paddle fitness I had left, just in time for us to finally set off. So, despite a more than 30-year age gap, we’ve ended up on a pretty equal footing: Dad grimacing whenever he bends his leg, and me grimacing whenever I lift my paddle.
The next day we pull on our wet kit in the dark and launch at dawn, even though Dad can’t put weight on his bad leg and there’s serious whitewater offshore. Unsurprisingly, we retreat at the first headland. We set the tent up wetter than before and spend the rest of the day trying to sleep.
The following day, the weather hasn’t calmed. We eat porridge in the rain, then get back in the tent to read and sleep, sleep and read… BOOM! We shove our heads out, just in time to see falling spray hit the water. A humpback is breaching in our cove! It launches again… WHAM! Then starts tail slapping, WHAM! WHAM! WHAM! I sprint down to the water’s edge in nothing but my boxers. The whale does a final body slam and then glides off.
The world is full of omens, so pick the ones you like. The wind drops overnight.
Kayak hauling during a howling headwind in Dry Strait. | Photo: Oli Broadhead
Orcas incoming. | Photo: Oli Broadhead
Too close for comfort, as the duo soon learns. | Photo: Oli Broadhead
Bears and ‘bergs
We’ve now been kayaking for over a month, and we’ve got used to bears wandering past in the night. I suspect we sleep soundly through most visits, although tonight’s bear came too close for comfort, snuffling at the tent edge directly behind our heads. We both sat up slowly in our sleeping bags, but we were grinning in the dark.
Today will be our second attempt at paddling through Dry Strait, a sprawling tidal sandflat at the mouth of the Stikine River. We tried yesterday, setting off into a building wind that eventually slowed us to a standstill. We got out and hauled the kayaks for a while, plodding along the edge of a mudflat with the boats bobbing behind on tow lines and fresh bear tracks between our feet. It was great fun, but we weren’t getting anywhere fast, so we clambered back in and let the wind blow us back to our previous camp spot.
The wind is light this morning, and we make it through the strait with no issues. We’re rewarded with icebergs, and they’re more than worth the two-day effort. Every crack and recess glows with the bluest blue imaginable. Otherworldly blue. Luminous blue. The blue all blues want to be when they grow up.
The first berg we reach is as big as house, and even though we can’t remember the exact ratio, the currents whirling around the base remind us that it’s many times bigger below the water. Dad hangs back while I go for a closer look. The surface is studded with frozen bubbles that crackle as they burst in the sunlight, but I don’t have much time to admire the effect because a choppy undercurrent drags me behind an overhang, and I have to paddle hard to escape.
As soon as I’m clear, Dad goes in for a look. I take photos while he gets caught in the exact same current. Once he’s out, I hand over the camera and head in for round two. I’ve just made it back to Dad when the iceberg implodes. The overhang crashes down first, then the whole thing rears up in the water, flips over, and disintegrates. We sit in thoughtful silence for a moment. Later, we paddle past more icebergs and discover that they collapse often. Lesson learned.
Bald eagle breakfasts on an unlucky seal pup. | Photo: Oli Broadhead
Humpbacks passing in Tenakee Inlet. | Photo: Oli Broadhead
Close encounters
After two months, we’re nearing the Canadian border. Technically, we’re not even halfway done yet, but the remotest and roughest paddling is behind us. We’ve both recovered from the aches and sprains of the first month, we’re on schedule, and even hauling heavy kit between the kayaks and our camps has eased from a grinding slog into a mediative ritual. But our new, comfortable rhythm does come with a downside. For the first time on the trip, whole days can feel mundane.
This morning, even the weather is boring—a flat grey sky over a flat grey sea, and the only wildlife we’ve spotted all morning are herring, thousands of them, flashing silver in the murky water. Then, from the distance, we hear whale spouts. I spot the black fins before Dad does.
Sunrise dissolving the dawn fog. | Photo: Oli Broadhead
The orcas are a long way off, but they’re headed our way. They’re following the coast like us, staying close, with the herring shoals. We raft up. It’s a moment we’ve been hoping for since before we began the trip, but now there’s fear mixed in with the excitement. Orcas don’t hunt humans, but that comforting fact doesn’t change the immediate truth—we’re a pair of bobbing bath toys, and there’s a pod of super predators cruising towards us.
Also, I’ve seen what they can do to a seal.
It’s a big pod, strung out into three groups. Four adults up front, trailing a calf that keeps jumping and bumping. Then, another group, maybe five adults, and finally, two massive bulls at the back, with fins taller than I am.
They’re passing parallel to us, close but not too close, and we briefly wonder if they haven’t spotted us. Then they pause and cluster up. We can hear them breathing at the surface. One makes a loud farting noise that echoes across the water, which is quite funny but not reassuring. Perhaps it’s a signal. Either way, they know we’re here.
Two adults break off from the group and start to swim in our direction. They’re moving slowly at first, then they slide out of sight beneath the surface, and I notice my hands are shaking. There’s a heartbeat’s pause before they surge back up, accelerating hard and half-breaching, their massive heads bulldozing whitewater. It feels like we’re trying to sit calmly in the middle of a motorway with a couple of lorries racing at us. They dive hard just before they reach us, then come up suddenly on both sides, blowing hard and making the boats rock in their wake. They dive again, so close they almost hit us, and I feel a strong urge to lift my bum off my seat as they pass under the kayaks. I look down and there’s an orca rolled on its side, staring straight back at me.
The next thing we know, the rest of the pod has joined in. There are orcas everywhere: behind us, under us, around us—it’s impossible to keep track of them all. The noise is incredible: blowholes snort, fins slap, and bodies splash. They dwarf us, but they’re unbelievably precise, passing under our kayaks within a finger’s width but never touching. Eventually, one by one, they move off.
I turn to Dad. We’ve both got our mouths open. I try to say something, but my voice keeps cracking, and I give up.
A rare calm evening on an unnamed beach. | Photo: Oli Broadhead
Wildfire haze over the mainland. | Photo: Oli Broadhed
Oli (right) and his dad. | Photo: Oli Broadhead
Southbound
That evening, we have to make a tricky landing onto sea-slick boulders. A lone humpback glides past in the shallows while I stand waist-deep in the water, unloading the kayaks.
Tomorrow, we’ll paddle across an invisible line, out of Alaska and into Canada. The last two months were full of aches, pains, hunger, and hard paddling, but looking back, it feels like we moved effortlessly from one incredible encounter to another: paddling through a flock of sea ducks as wide as the horizon, singing sea shanties to an unimpressed bear blocking a narrow portage point, watching the bulbous nostrils of a humpback clamp shut as it dived within a kayak’s length of us.
The rose-tinted glasses get stronger as time passes. The exhaustion will fade, the perpetually soaked gear will become a footnote, and by the time we’re home, Dad will be insisting Alaska was warm the whole time.
Oli Broadhead is a documentary photographer, filmmaker and writer. Find a day-by-day account of his journey at @oli_broadhead.
This article was published in Issue 73 of Paddling Magazine. Subscribe to Paddling Magazine’s print and digital editions, or browse the archives.
Dramatic skies during a crossing to the mainland. | Feature photo: Oli Broadhead
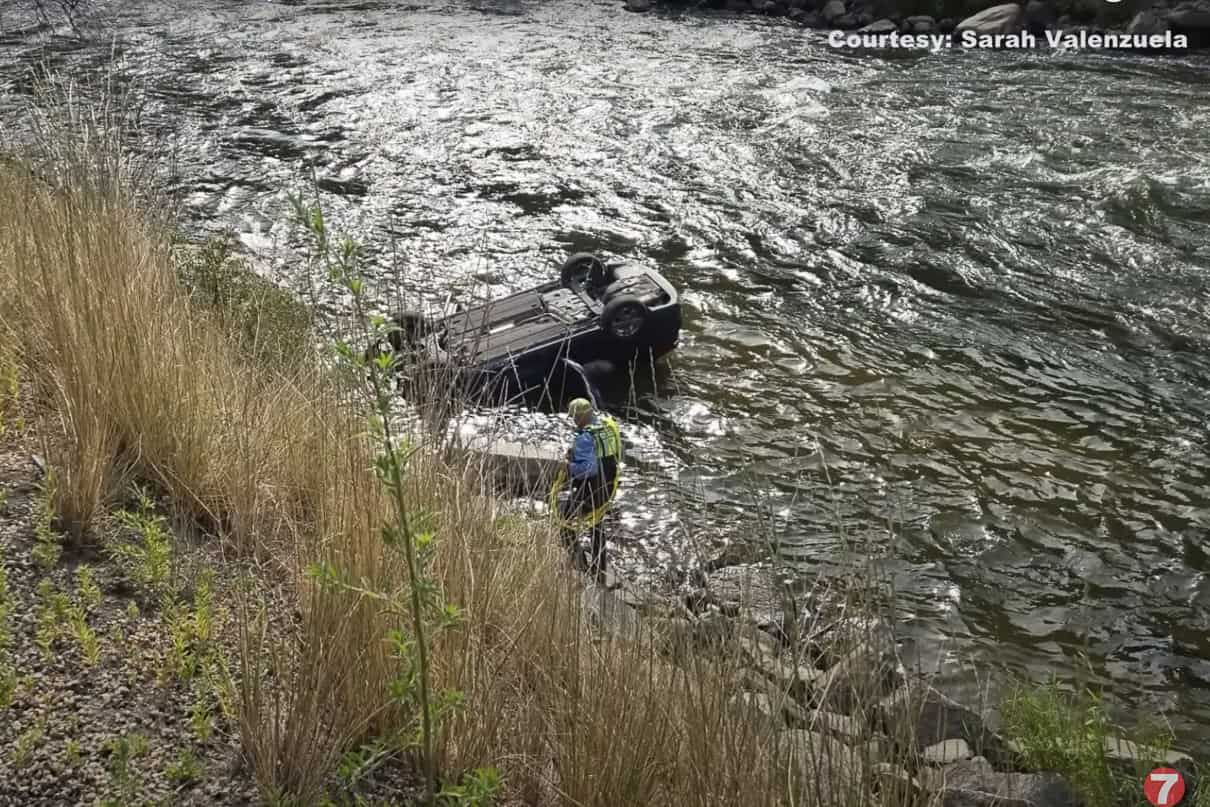
On the most deadly road in Idaho, a group of whitewater kayakers were in the right place at the right time on Sunday, August 3, 2025 when a couple crashed, their car overturning and landing upside down in the Payette River.
Sonya Valenzuela and her partner Will had been travelling the scenic Highway 55 between McCall and Treasure Valley, returning home from spreading Sonya’s mother’s ashes with Sonya’s six daughters when the car crashed, careening off the road and into the river.
River rescue on Idaho’s most deadly road
Sarah Valenzuela, one of Sonya’s daughters, shared that her mother had experienced a stroke a year and a half ago that had left her paralyzed on the left side of her body. As a result, Sonya now uses a wheelchair.
Idaho Highway 55 sees an average 8.2 yearly fatalities according to the National Highway Traffic Safety Administration (NHTSA), making it the most deadly road in Idaho. The road features tight turns along the river and occasionally has no shoulder. The family had already been concerned for their mother on the long drive and had even outlined rest stops along the way.
Sarah shared with KTVB News that Sonya had become irritated with her seatbelt while driving and took it off; Will, her partner and the driver, attempted to help her with the seatbelt and the car went off the road, crashing into the Payette River and landing upside down.
Sonya broke her femur, tibia and nose and fractured her upper spine, and her partner Will suffered only minor injuries–injuries that could have been more severe if not for the quick action of nearby kayakers.
Kayakers save couple from smoking overturned car partially submerged in Payette River
Meanwhile on the Payette River, kayaker Jeff Landers, his wife Sara and their friend Micah Barker had been kayaking all day when Jeff and Micah decided to go out for one last run. Jeff told KTVB News that he had paddled that section of river as many as 600 times.
“Their car came careening off the road, slammed into the rock and flipped upside down, landing upside down in the North Fork, up to about the wheels,” Jeff told KTVB News. “I was directly across from them in the eddy, probably like 20 feet away, maybe 25 feet, so I just ferried across the river as fast as I could.”
The overturned car in the Payette River. Feature Image: Sarah Valenzuela | KTVB News | YouTube
With smoke pouring out of the vehicle, Jeff caught hold of Will’s hand and pulled him out of the car at which point Will shared that Sonya was still trapped on the other side of the car. They found Sonya pinned between the seat backs with her head just above the water. Together, Jeff and Micah worked to free her.
Before long, more kayakers joined the scene and used a backboard to help carry Sonya up the rocky river bank. A doctor in the group checked Sonya and Will’s vitals and an ambulance arrived to take Sonya to the hospital.
Angels come with kayaks
After the accident, Sara Valenzuela received a message sharing Jeff’s name and number and they connected. Jeff told Sarah that the event was very traumatic for him.
“He realized who I was; you could hear him crying on the other side of the phone,” Sarah told KTVB News.
“I’m glad I was placed in the right spot at the exact moment,” shared Jeff.
From the hospital, Sonya later sent a video message to Jeff thanking him for saving her life.
“Angels come with kayaks or angels come with paddles,” said Sarah Valenzuela.
At the end of a school year, I was surrounded by parents and their kids—my children’s cohorts in grade one and preschool. We were all talking about summer plans and what everyone was excited about. When I told them about plans to enter a kayak race, go on an overnight paddling trip, and scope out a new kayak festival seven hours away, they all seemed to be looking at me like I had two heads. As if in coordination, some followed up with the question, “But what are you doing with your kids?”Their reaction caused me to reflect on the summer of kayaking I had dreamed up with my young children. These were all experiences my kids and I were going to take part in together. Were my plans more ambitious than the other families? Was I going to burn myself out this summer trying to share my passion for paddlesports?
I thought intensely about what the other parents felt would make these plans challenging, and in my mind, none of those challenges outweighed the monumental, life-altering experiences my children were about to have. So my answer was yes to the adventure.
Kayaking with kids is not something that should scare people, no matter the age of their child. It’s easier than we build it up to be if… IF… you set zero expectations for yourself to begin with and keep in mind a few considerations.
Wear A Life Jacket
Everyone, even strong swimmers, needs to wear a life jacket at all times when on the water. It is extremely difficult to put a life jacket on once you fall into the water. Even a light wind can blow any paddlecraft away from you, faster than you can swim.
Always wear a USCG-approved Level 70 or Type III life jacket designed for paddling.
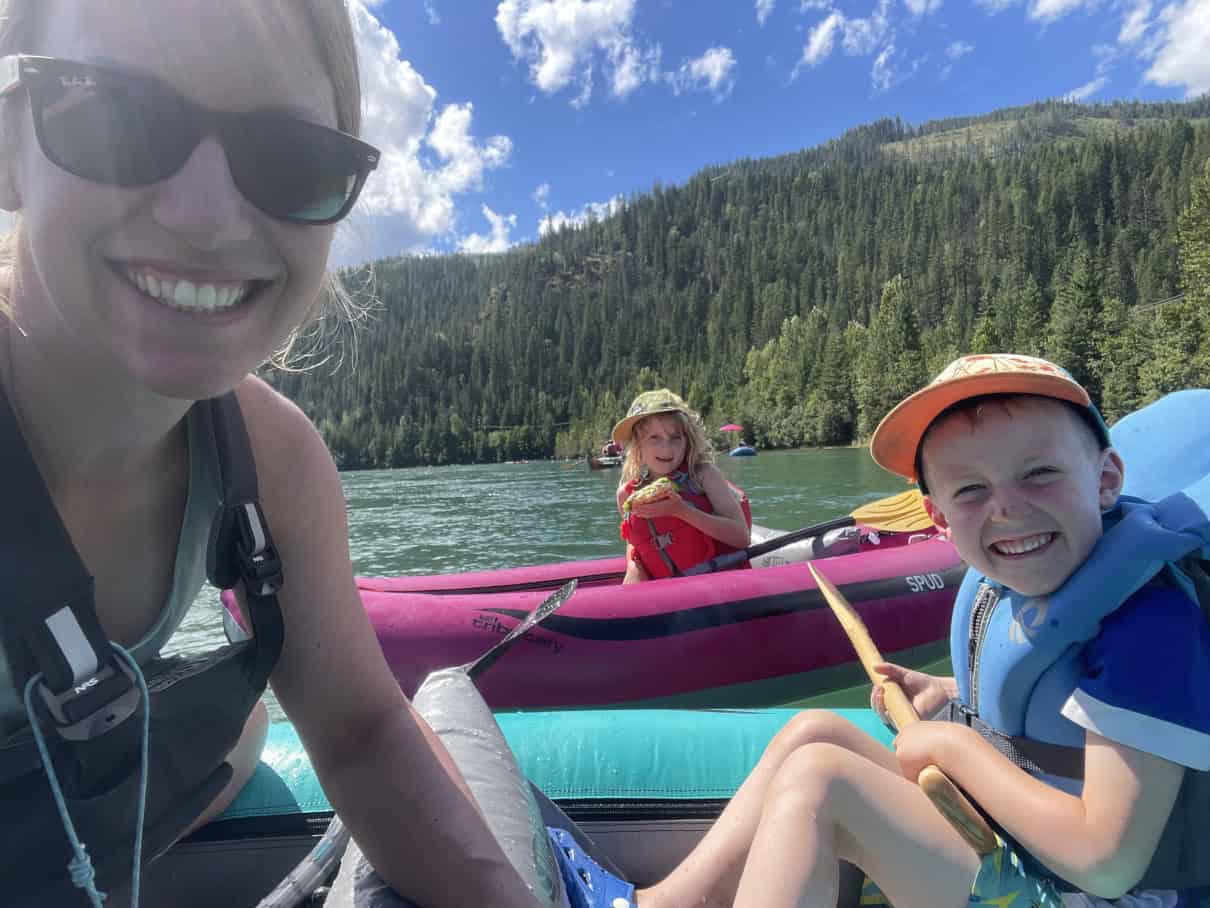
Family planning. | Feature photo: Bruce Kirkby
A Guide To Kayaking With Kids
Planning your trip
Plan a trip that you will actually do. We can all dream of something spectacular that will hook our kids on kayaking forever, but the reality is that it’s not the one time that you went kayaking that hooked you, it was the accumulation of experiences. If you don’t have the energy or bandwidth to plan a “trip” then just load your boats to the roof and go to the nearest beach for a two-hour scoot. Keep it simple. I assure you, it will still be more fun for your kids than watching four back-to-back episodes of whatever show is recommended by the Netflix algorithm that day.
If you do want to do something that is longer than a couple of hours and you do have some time to plan, figure out what you have the time to plan for. A multi-day self-supported kayak trip seems a bit daunting with kids, even for me, but possible. Or a multi-day cottage-base with daily outing is another option—hey, no one’s judging. We aren’t here to set records or score bragging rights. We are aiming to get our kids on the water in kayaks as much as possible. If that means visiting your local paddle club and renting boats anytime you want to go out, do it. If that means you visit your parents’ cottage more than you ever used to, do it. The goal is simple, butts in boats.
Kayaking gear for kids
Gear checklist
This is the checklist for a minor outing, assuming the child is very young and inexperienced. Don’t overwhelm them with gear and instructions; keep it simple. The items listed below are all a child needs for a bit of fun paddling whether they are sitting in a boat with you or their own kayak:
Bathing suit, sunshirt, and hat (wetsuit for colder water)
Bowline (if they need a tow on flatwater)
Super Water Blaster 5000 (also works well as a bailer)
Additional gear parents should consider having:
Water
Drybag with…
Communication device (cell phone, radio, other)
Snacks
extra layers
splash jacket
Sunscreen
Basic first aid kit
Buoyant rope
Bailing system (like a bilge pump or waterscoop)
Float bags (for enclosed kayaks that do not have sealed bulkheads)
Things you may want to bring along to make the experience more fun include things like:
Binoculars
Mini paddles
Waterguns
Nature Identification Activity Sheets
Again, we don’t want to overcomplicate things, so if the outing is simple, keep your packing list simple.
On the water
When you are on the water with your child who is still getting into kayaking just remember what it’s truly about. It’s not something we are doing so we can be the best. It’s something we are doing to help us enjoy nature and each other. My tips for ensuring your kids have fun on the water are:
Don’t be in a rush, give yourself lots of time.
Take breaks
Play simple games like you would on a road trip
Learn skills through games
Tell jokes
Stop and look at cool things
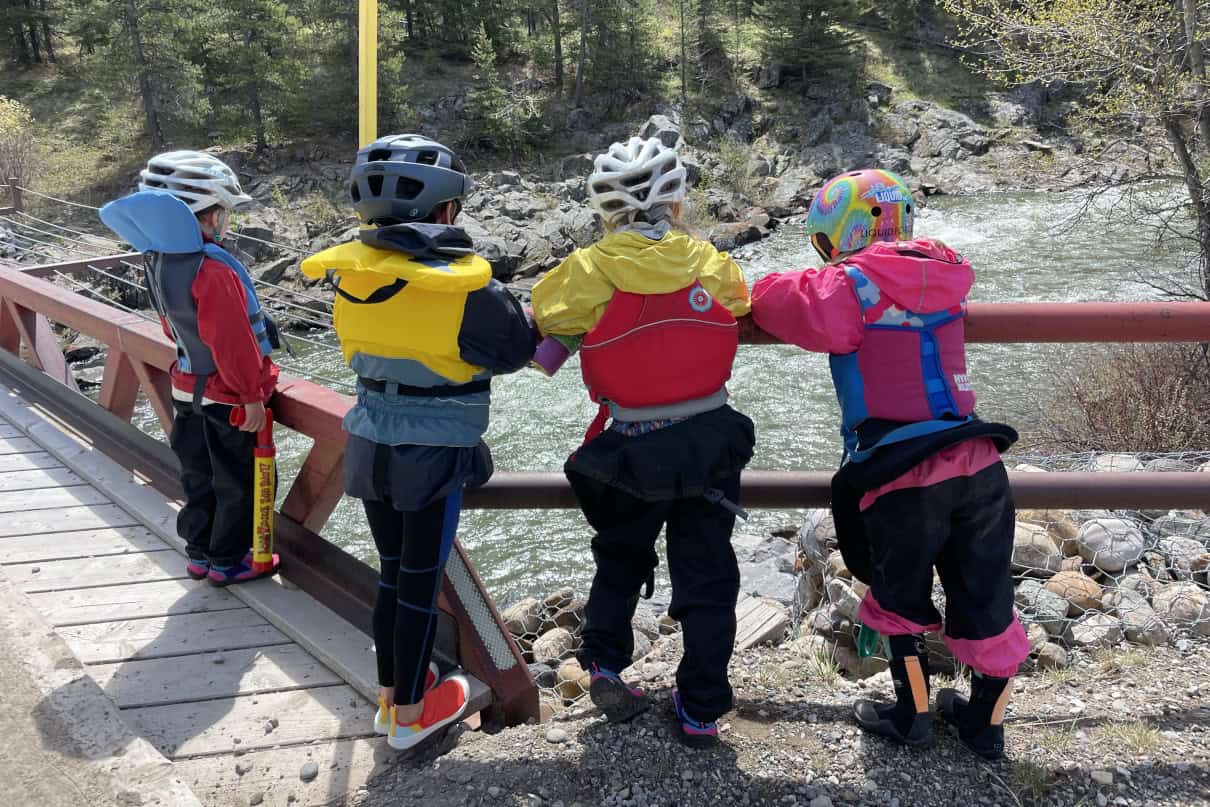
The author and kids out for a paddling adventure. | Image: Brenna Kelly
The psychology of kayaking with kids
The key here is knowing your child really well, which I am sure most of us do. We want to avoid them associating the activity we love with a negative feeling, and a helpful way to do that is by approaching kayaking with your kids using the following acronym.
You need to S.E.L it to them:
Safety—if they ever feel scared, it’s not going to last
Enjoyment—make sure it’s fun
Learning—becoming a paddler involves a life-long progression; take every challenge as an opportunity to teach your child something new.
Safety
First things first, whoever is organizing the outing needs to be very confident with the adventure you are taking them on. You are taking a risk on behalf of the child you are with, so you need to feel confident you could get them out of any danger that may come your way while on the water. Don’t let this turn you away from taking your children out at all. We do the exact same thing while driving them to daycare and school each day. We are weighing risk vs. reward here.
A good exercise would be to take mental notes on the potential risks and the potential rewards.
One more note on safety: we need to be able to let them make their own mistakes. You design the trip with the question in mind, “What’s the worst that could happen?” If you are comfortable with “the worst” your child will likely encounter, move ahead. For example, I have a four year old. He doesn’t like getting splashed or wet very much. At the end of the day, when he is tired and taking a bath, trying to wash his hair makes me feel like I am temporarily employed as a torturer. No matter how enjoyable I try to make it for him, he will scream, yell, cry and look at me like “how could you.”
All that to say, when I am taking an inventory of the possible risks for him, I try to ensure the worst possible risk is that he will get splashed. Eventually, I am hoping he becomes okay with more than just being splashed, so we can move up a level in risk for him. What next you ask? Maybe a full dunking!
If you ever get to the point where you are not confident that you are skilled or experienced enough to get your child out of the potential dangers, but you don’t want to hold them back either, find someone who is and pair your child with them. If you don’t know anyone, put them in a paddling camp or a paddling school. There are lots! This step seems so obvious when we talk about things like hockey or ballet, but it is the same for paddlesports.
Enjoyment
If we are not having fun, why are we doing it? For kids, this question is amplified a hundredfold. We need to make every day on the water fun. Ask yourself how you are going to do that, because telling a child to sit down and paddle until you say they can stop may not be their definition of fun. I’ll share four of the most available and best methods to make a kayaking trip enjoyable: snacks, laughter, the company of other kids, and seeing the opportunity to make it a game.
Snacks
Bring all the snacks.
Isn’t it weird when you are camping how much better food tastes? I am sure it’s because we are actually experiencing hunger. I remember a friend giving me some of his bagel with cream cheese and cucumber sandwich while on a paddling trip. It was the most incredible meal I had ever eaten. Of course, I made it when I got home, but it didn’t hit the same. I mean, a bagel? Not toasted? How did I even swallow that? Anyway, snacks, meals, candies, whatever you think will make someone smile.
Laughter
See the humor in everything.
Hearing laughter and seeing smiling faces forces positive memories, even if the experience is difficult. With my kids, I make sure to come equipped with a couple of new knock, knock jokes. That invites them to start joking around and although their jokes sometimes make no sense at all, the fact that they think they themselves are so funny, is funny in itself.
I also laugh at situations that most people would choose not to laugh at—while also keeping in consideration whether someone was seriously hurt. For example, let’s say my son—who doesn’t like getting splashed—accidentally walked under a downspout, got soaked, and started to cry. Ask yourself, what is it that he hurt? If his ego is the answer, then laugh away, just make sure you include them in the joke and convince them to laugh too. If I decide to leap off a jumping rock and land flat on my back and even bruising myself, that’s laughable too! Lead by example here, put your ego aside, and laugh at yourself when you do something that didn’t work out the way you had planned. It invites everyone else to laugh along with you. Cut yourself while whittling your kid’s marshmallow stick? Laugh it off. Having trouble setting up the family tent? Laugh it off. Lost a boot in the mud? Laugh it off.
Bringing other kids
Bringing more kids really speeds up the learning process and kids’ willingness to paddle.
It’s difficult to do when children are young unless you know other dedicated paddling parents, but when kids reach five and older, having other kids around is great. It helps with the preplanning and packing stage because your children will be motivated to help, knowing that their friends will be there too. Sure, the items they pack may be questionable, but that’s besides the point. And when you are on the water it is incredible to see how much more enthusiastic they become around another kid. Imagine yourself paddling with a superhero. It would be easy to give up knowing that the superhero would forever outlast you, but put another adult in your boat, and all of a sudden, your stamina and confidence in yourself will not be skewed.
Make it a game
Use what your kids are already doing to transform the experience.
One example: if you are in the boat with your child and they are lily-dipping and saying how bored they are, ask them to count how many drips come off their paddle into the water before there are no more drips left. Then, tell them to try to beat the high score; the most drips wins. Another fun game for when you are on shore is stick juggling. Grab three fairly straight sticks, put two in your hands like drumsticks, and try to juggle the third, just like a set of devil sticks. Eventually, your kids will start to get creative and make their own games, and this is where the real magic happens. Creating games also translates back into everyday life, and you’ll likely have less requests to watch TV, go on the iPad, or play video games because they’ll know how to make their own fun and engage others around them.
Learning
This one is easy because if you are doing the first two things well, the learning will happen naturally. If you and your kids are excelling at the first two things and they come easy to you now, here are some ways to facilitate the learning that is taking place already.
Highlight something that you noticed as a learned skill
Kids aren’t able to reflect too far back in their younger years, so it is difficult for them to notice that they are getting better at something. You need to highlight these accomplishments for them. Saying things like, “Wow! Did you just bring your own backpack all the way to the boats for me? That’s a huge help! Thank you!” or something like “How did you get here in your kayak? I saw you paddling in that direction. Did you turn the kayak on your own? I thought you only knew how to go straight! That’s amazing!” These types of questions require affirmation from your child and, in turn, ignite their self-confidence and feeling of achievement.
Success is addictive but sometimes it’s hard to notice in ourselves, especially if we are comparing ourselves to others. So, help them see their progress.
Mindfully consider challenges
As a parent it is really easy to say, “Don’t do that!” or “Be careful!” or flat out, “No.” But in spending a lot of time with kids and parents in an outdoor setting with inherent risks all around, I have found that many parents use these phrases as a reflex without actually considering what their child is trying to do
It also has crossed my mind that parents are saying no because they don’t want to deal with the aftermath of what could happen, and aren’t actually considering the child in the equation at all. I get it because I do it too. I just try to catch myself now.
For example, you’re on a paddling trip with friends and other children. It is the end of a long day, and you are exhausted, but you still need to set up camp, make dinner, and do it all again tomorrow. (I am already laughing in my head as I type this because it is a familiar story.) While you are wrapping your head around the monstrous list of things you need to do, your child is goofing off by standing up in a kayak t in the middle of the lake. You think to yourself, “I have done this and got the biggest bruise on my shin bone and it was sore for weeks.” You think, “When this happens to her, she is going to come crying to you and you just can’t deal with it.”
Let’s restructure this thinking for the sake of your child’s learning. Ask yourself, “What’s the worst possible outcome?” Or, “What else could happen?” And even, “What could they learn?” If you decide the reward is worth the risk, then let them do it. The beauty of being outside with no distractions is that there is ample time to reflect on our stupidity or genius and how we may do things differently next time. It is learning in its most complete form. And you will have just gifted this experience to your child. So when they come back crying from a bruised shin bone, you can say, “You’re welcome.”
Teaching your kid to kayak
It’s important to understand that kids are essentially beginners with few life experiences to draw from. The progression may first involve getting kids comfortable around water, trusting the people they are with and understanding why we are doing this (reasons you will need to provide them with at first). Here are some things that I remind my kids about:
It’s fun
More time playing with mom and dad
Offer to bring friends if you are up for it (this one works like a charm)
Excuse to eat special snacks reserved for adventures
When you are on the water, make sure to highlight the awesome and downplay the not-so-awesome…
Wasn’t that snail the coolest!
Wow you really paddled fast there!
You didn’t like that splash in the face? On the bright side, we won’t need a bath tonight
Always laugh
Comfort in and around water is sometimes a big hurdle. Think back to what you didn’t like about any watersport and consider a solution for your child before it has the opportunity to become a negative memory. Some common hurdles with paddling and possible solutions are:
Water up the nose: nose plugs
Splash in the eyes: goggles
Getting cold:
Opt for warm days for very young children
Bring dry fleece layers for backup
Bring splash tops and pants for backup
Bring a thermos of hot chocolate
Try to keep butts off the hull in cold water environments with a sleeping pad or something insulating
Getting tired quickly:
Snacks! Snacks! Snacks!
Short paddle outings at first
Adult paddle power as backup
Towing as a backup plan
Shuttle options, even on a lake, where you could get blown somewhere you couldn’t get back from. Having arrangements with a friend on standby to call for a pickup could work in this case.
Thinking about these risks is the first step to a successful day. Your children will also learn from it and start to understand how to do it themselves. With solutions to predictable challenges in place, we can move onto the actual teaching part.
It’s crazy to think that as a parent you become so many things to your children. One of them is a teacher. With anything, the more you do it, the easier it becomes, but if you don’t have much experience with teaching yet, here is a simple understanding of a learner’s progression and how you can tailor your teaching role to each stage.
Scouting rapids and taking side quests are both fun and entertaining parts of a paddling trip. | Image: Brenna Kelly
Stages of learning
Stage 1: unconscious incompetence
This refers to the saying, “you don’t know what you don’t know.” For example, even if you are an adult going on a river trip for the first time, you may not even consider that you will have to set up a shuttle. In my raft guiding days, it astonished me to hear the number of people who would think the river ended at the same place we started, yet these people were typically way more educated than me around other subjects, where I am likely the “unconscious incompetent” one. Your role as a teacher here involves lots of patience, explanations, demonstrations and celebrations when your child tries and or succeeds with the skill. Yes, even trying should be celebrated.
Stage 2: conscious incompetence
This is where the learner knows what they need to do but can’t do it yet. When playing the teacher role at this step, be careful not to remind your child what they are doing wrong too many times. They know. This is likely the most frustrating stage in the learning process. As a teacher, try to camouflage the skill they are learning by getting your child to do a drill or a game that requires it. For example, if I am learning the sweep stroke in my kayak, it may be fun to play sharks and minnows where I will need to dodge people using a sweep stroke. The goal is now having fun, and the skill is a byproduct. It’s kind of like feeding your dog medicine with a spoonful of peanut butter.
Stage 3: conscious competence
This is where the learner is able to perform the skill, but still needs to be consciously thinking about it. This is a fun stage because it is less frustrating and there is a sense of accomplishment every time they complete the skill. As a teacher, take note of the child’s energy levels because this can play a big factor in their success and personal confidence. A learner can start to believe that they have regressed back to being unable to achieve the skill, when in fact they are just tired because they have to consciously think about it every time. Reminding kids to take breaks and not be hard on themselves at this stage is a good idea.
Stage 4: unconscious competence
This is what we all aim to achieve in our learning. Once the learner get to this point, they can take on much more. Think about every skill you have learned in your life. If we still had to think about how to walk every time we wanted to walk, I think our brains would start cramping up. If someone is lucky enough to get to this stage with an entire skill set, magic starts to happen. There will be times they will be faced with a challenge that seems impossible, but all of the skills that they have mastered will unconsciously line up, leaving them the victor, without even knowing how they did it. Most people call this the “flow state”. These have become some of my most coveted memories since I can count on one hand the times I experienced my own flow state.
If you understand these stages and where your child is at with a certain skill, you will be able to decide how much direction is needed from you. Stages one to two require lots of explanation, encouragement and involvement. You will be more of an instructor whose role is to keep things fun and engaging, and reduce frustration and disappointment. Stages three and four are where mileage and creativity come in. All you need to do is continue to seek out and set up the opportunities to keep them involved.
Don’t forget to use your paddling community for support because you can burn yourself out here if you make everything your kids learn about kayaking your personal responsibility. Also consider signing your kids up for paddling camps, schools, competitions and clubs to keep them engaged and learning.
Dress For Immersion, Not Air Temperature
Your body loses heat much faster when immersed in cold water than it does when dry.
Avoid cotton clothing like t-shirts and jeans; they retain water and accelerate cooling when wet. Synthetic fabrics, or wool, are generally a better choice. If the water is very cold (60° fahrenheit or less), you should wear a wetsuit or drysuit.
What if they just aren’t into it?
If your child isn’t into kayaking, I would recommend trading them for one that does…kidding. Don’t force it. It is fun watching little humans make their own decisions and find their own path. Kayaking is our passion and your child will know that. Their passion may be elsewhere and that’s okay, and will bring you the opportunity to try something new too. But I believe that if you continue to have experiences with your children while kayaking, it is something that will shape them for the better, and they will always value sharing adventures with you.
So while I’ve got my work cut out for me trying to convince my son that water splashes aren’t going to kill him in hopes that he someday loves kayaking too, I am going to keep signing them both up for kayaking trips. If there is a complementary passion starting to spark in your little ones, even better. Use that to keep them going. Luckily for me, my daughter loves nature, so anytime we can rescue a drowning moth or wonder what those two dragonflies are doing, it’s a good day. I don’t even need to “S.E.L.” the adventure to her anymore, because she knows that kayaking means she gets to be one with nature’s little creatures.
A 1982 article in the Washington Post describes Coleman canoes as “good starter boats.” Thanks to their durability, it’s a description that still rings true today, even if the company has stopped stamping its name on new canoes.
Coleman canoes were some of the first polyethylene canoes to reach the masses. Sold through department stores and outfitters, these canoes were more affordable than the aluminum and wood-canvas canoes that were popular at the time.
At a low cost, these maintenance-free boats provided the opportunity for many families to get outdoors. They were available in different lengths ranging from 13 to 17 feet. With wide, flat hulls, these canoes didn’t win many races. Instead, they were loved by beginner canoeists, families with children and anglers who wanted a stable, reliable canoe.
Wear A Life Jacket
Everyone, even strong swimmers, needs to wear a life jacket at all times when on the water. It is extremely difficult to put a life jacket on once you fall into the water. Even a light wind can blow any paddlecraft away from you, faster than you can swim.
Always wear a USCG-approved Level 70 or Type III life jacket designed for paddling.
Coleman no longer makes canoes under their name, but you may still be able to find used ones for a great deal. These canoes are ideal for anyone looking to start canoeing or who may want a cheap one for paddling around the cottage or local pond. Although the brand has been discontinued, their models live on in Pelican canoes, which acquired the line at the start of the century.
Other companies also continue making canoes that are reminiscent of Coleman’s designs. You’ve come to the right place if you are looking to buy a Coleman canoe or a similar polyethylene starter boat. We’ve outlined the models that were made, touching on the Coleman canoe’s history while providing links to reviews and tips for finding used canoes.
Top picks: Best Coleman canoes
Coleman RAM-X 15 Canoe
Easy for the beginner to handle, yet satisfying for the more experienced canoeist. The sloping keel reduces sideslip for good tracking on lakes and streams, while allowing maneuverability for whitewater.
Length: 15’0″
Weight: 78 lbs
Capacity: 650 lbs
Maximum Width: 36″
Coleman RAM-X Scanoe
Paddle it… pole it… troll it… and add up to 5 hp motor. Wide aft provides more stability for more passengers and cargo. Narrow bow lets it move out on a stretch of fast water or sneak into a cove.
Length: 15’8″
Weight: 94 lbs
Capacity: 740 lbs
Maximum Width: 40″
Coleman RAM-X 17 Canoe
Stow in the gear, and go tripping. Tough, quiet, resilient. And lightweight enough to ride on most cartops. (No trailer to buy!)
Length: 17’0″
Weight: 85 lbs
Capacity: 740 lbs
Maximum Width: 36″
Coleman RAM-X 13 Canoe
Accommodates one or two people. Stable design for all types of water. Recessed bulkhead for storage, and carry-handles both fore and aft for easy portage. Rides on a cartop.
Length: 13’0″
Weight: 67 lbs
Capacity: 475 lbs
Maximum Width: 36″
Shopping for a used Coleman canoe?
Coleman canoes frequently turn up on classified pages and are often sold for fairly cheap. As they are nearly indestructible, a 25-year-old canoe in decent condition is still an excellent option for going out fishing or poking around calm waters. Canoes hold their value well, but you will likely be paying less than $500 for these boats.
Coleman made different styles of canoes through the years that they were in production. The Coleman 13, 15 and 17 models were most popular, with the model number indicating each canoe’s length in feet. They built all of these canoes to be durable and inexpensive.
In the early 2000s, Pelican Sport, the Quebec-based recreational kayak manufacturer, began producing Coleman canoes. They started using their own proprietary RAM-X high-density polyethylene, selling the canoes as the Coleman Ram-X series in 13, 15 and 17 feet. These are probably the used Coleman canoes you’ll find today.
Eventually, Pelican swapped out the Coleman branding for their own, and they made minor changes, like adding cup holders and a third bench seat in the middle of some models. If you’re looking for new canoes similar to the old Coleman models, look at Pelican. They only build two models, but the Pelican 15.5 is a direct descendant of the Coleman 15 canoe.
One of Coleman’s innovative and beloved models was the “Scanoe.” This wide, square-sterned boat was designed as a cross between a skiff and a canoe. It was wider than other square-stern canoes at the time and could be paddled or else mounted with a small motor. It’s sometimes called a “Scout Canoe,” and you can find similar new models made by Old Town.
In addition to finding them online, you might find old Coleman canoes that have been sitting under cottages or in backyards. Try posting a “wanted” ad on a community board. Some people may have one sitting around that they are happy to clear out.
Know The Local Hazards
Check navigation charts before you launch.
Check with those who have local knowledge of man-made and natural hazards, e.g. low-head dams; sweepers, strainers and undercuts; tides and currents; and rocks and shoals.
Although we’ve touted the durability and toughness of these canoes, you still should thoroughly check the boat for any damage. If you’re planning on mounting a motor on the square-stern Scanoe models, make sure that the transom board on the back is solid enough to support the mount. If not, you may need to reinforce it with ½-inch plywood.
Coleman canoes are made of polyethylene plastic on an aluminum frame. Major damage worth worrying about would be cracked gunwales or hull damage. At a glance, any damage to the gunwales is easily noticeable. Pay special attention to the thwarts running across the canoe. These pieces are essential for maintaining the canoe’s structural integrity and overall shape. They are pretty easy to replace with another aluminum or wooden bar if they are broken.
Polyethylene is a solid material and resistant to abrasions and collisions with unexpected rocks. Dents and dings will appear along the hull, but these are superficial and not cause for concern. If you are worried, you can retroactively add keel strips to the bow and stern for an extra layer of protection. This is an easy, fun project that anyone can do in a day.
For more tips on what to look for when selecting any used canoe, read our article How To Buy A Used Canoe.
Want to know more about Coleman canoes? Read on to get answers to common questions.
Does Coleman make good canoes?
When they were being produced, Coleman canoes had a reputation for being durable and inexpensive. Better options exist if you are looking for a lightweight canoe to carry and portage, but as a “beater” boat that requires no maintenance, Colemans are great.
Do they still make Coleman canoes?
The Coleman brand was discontinued, but the spirit of inexpensive polyethylene canoes lives on with their successor, Pelican. Pelican still makes select models, and other canoe builders like Nova Craft and Old Town also make inexpensive polyethylene canoes.
Who makes Coleman canoes?
For a while, Pelican Sport was making Coleman-branded canoes. Later, they assumed the Coleman designs under the Pelican brand.
Coleman canoe models
Beginning in the 1980s, Coleman made recreational canoes in lengths of 13, 15 and 17 feet. In the mid-80s, they introduced the “Scanoe” which was designed as a canoe/skiff hybrid. In the late 1990s, Coleman rebranded their canoe models, with Coleman 13 becoming the Vantage, Coleman 15 becoming the Journey, and Coleman 17 renamed the Odyssey.
When Pelican took over production, these canoes were renamed RAM-X 13, 15 and 17, since they used the new material.
Coleman canoe weight
When Coleman canoes were first introduced to the market, their main competitors were aluminum and wood-canvas canoes. Plastic canoes are lighter than wood-canvas canoes and don’t require nearly as much care on or off the water. The main selling point of polyethylene was the cost and durability.
Aluminum is similarly indestructible but often lighter than plastic. Both materials are heavy compared to modern composite boats that come in at a fraction of the weight. Colemans are therefore heavier than most other canoes of similar lengths, with 15-foot canoes weighing more than 80 pounds.
Coleman canoe weight capacity
The weight capacity of a Coleman canoe depends on the canoe’s dimensions, and some canoe manufacturers caution against strictly looking at the capacity numbers. Instead, consider the water conditions, weight distribution and overall feeling of the canoe when determining if it is overloaded or not.
You want to pack the canoe in a manner that keeps the weight as low as possible, rather than stacking gear high in the center.
Coleman canoe dealers
As Coleman no longer builds boats, you’ll want to find a Pelican dealer for the modern-day version of Coleman models. Many outfitters stock polyethylene options if you’re looking for a reliable, low-cost starter canoe.
Coleman canoe material
Coleman canoes were made with polyethylene sheets bent around aluminum frames.
What type of plastic is a Coleman canoe?
Coleman canoes were originally made with polyethylene plastic. When Pelican took over the canoe production, they introduced the Coleman RAM-X, which uses their proprietary polyethylene. RAM-X is lighter than traditional polyethylene and equally as strong.
Are Coleman canoes made of fiberglass?
Coleman canoes are made of polyethylene plastic. Models made by Pelican, the “RAM-X” models, use Pelican’s RAM-X polyethylene material.
Coleman canoe price
Even when they were new, Coleman canoes were marketed as inexpensive, entry-level canoes. A fair price for a used one in perfect condition is still less than $500.
Education: Get Some!
Take a paddling safety course from the American Canoe Association (ACA), your local paddling shop or outfitter, or other reputable source.
Take a boating safety course from the U.S. Coast Guard Auxiliary, U.S. Power Squadrons® or your own state’s boating agency.
Take on-the-water skills training.
Compare Coleman canoes
Coleman canoe vs Pelican
If you can’t find a Coleman canoe, look to the popular big-box brand Pelican Sport. Pelican Sport took over Coleman’s canoe designs, although some have been phased out in recent years. They still build three models of heavy-duty plastic canoes at reasonable prices. Pelican now uses RAM-X material for their canoes, which is slightly lighter than polyethylene.
They make two models currently, a 14’9’’ two-seater and 15’6’’ three-seat canoe. If you come across older Pelican canoes, they will be the same polyethylene construction as Colemans used to be. The square-sterned Pelican Bayou 160 is their take on the original Scanoe.
Old Town vs Coleman canoe
One of the oldest canoe builders in America, Maine-based Old Town still makes some polyethylene canoes that are very similar to Coleman models. There are options of single-layer polyethylene on the Saranac models, or the heavier, more durable three-layer on the Discovery Series.
Select Old Town canoes also have yokes for easier portaging. Check out the Old Town Discovery Sport for a square-stern model from Old Town.
After you line a canoe the first time around that usual portage, your watch and back will thank you for the discovery. Using guide lines to control the descent of a canoe through moving water is an age-old art that can provide a welcome alternative to portaging.
Think of lining rapids as the great compromise. Lining lets you avoid a rapid that is too shallow or tight and technical to paddle, without having to shoulder your load and hit the trail. When lining properly, you use ropes and the force of the current to steer your canoe safely down sets.
Once you’ve come to recognize its potential, you may find yourself lining rapids that you would normally have carried around.
How to line rapids in a canoe
Set up
The simple way to tie a bridle
Fold back eight feet of rope on the end of your line.
Tie a double overhand knot halfway up the folded section of rope so that you have a big ‘Y’.
Tie each of the short ends of the ‘Y’ to either side of the canoe’s seat, positioning the center knot under the canoe at the keel line.
With a bridle at both the bow and stern, and the load slightly rearranged so that the downstream end of your canoe is heavier, you will have a very stable setup.
The ideal rigging requires two 20-metre throw bags and a bridle consisting of a three-metre length of rope with a loop tied at the halfway point. Using a bowline, tie one end of a throw rope to the loop in bridle, slide the bridle under the hull and tie each end off inside the gunwales at a thwart or seat. The loop should be near the keel line and at least a metre from the stern of the canoe.
With this bridle set-up you can control the canoe from below the waterline. Though lining a canoe with the stern line attached to a grab loop near the deck is possible (not to mention common) a strong pull on the grab loop from an angle can flip the canoe (many readers are nodding knowingly right now). The bow rope can be attached to the grab loop of the canoe since it will only be used to control the canoe angle.
If you don’t trust yourself to re-pack throw bags after each use then use a fixed painter on the bow. It should be of large diameter (so it is easy to grip) and both buoyant and free of knots (to reduce the chances of it getting jammed between rocks). 1/4- to 1/2-inch braided floating rope works well.
The length of the lines is dependent on the river and personal preference. Shorter lines are easier to manage but may leave you grasping for a runaway canoe. Longer lines allow you to move the canoe further into the current but may result in tangles if you only use a fraction of their length. Thirty-to forty-foot lines are a good compromise.
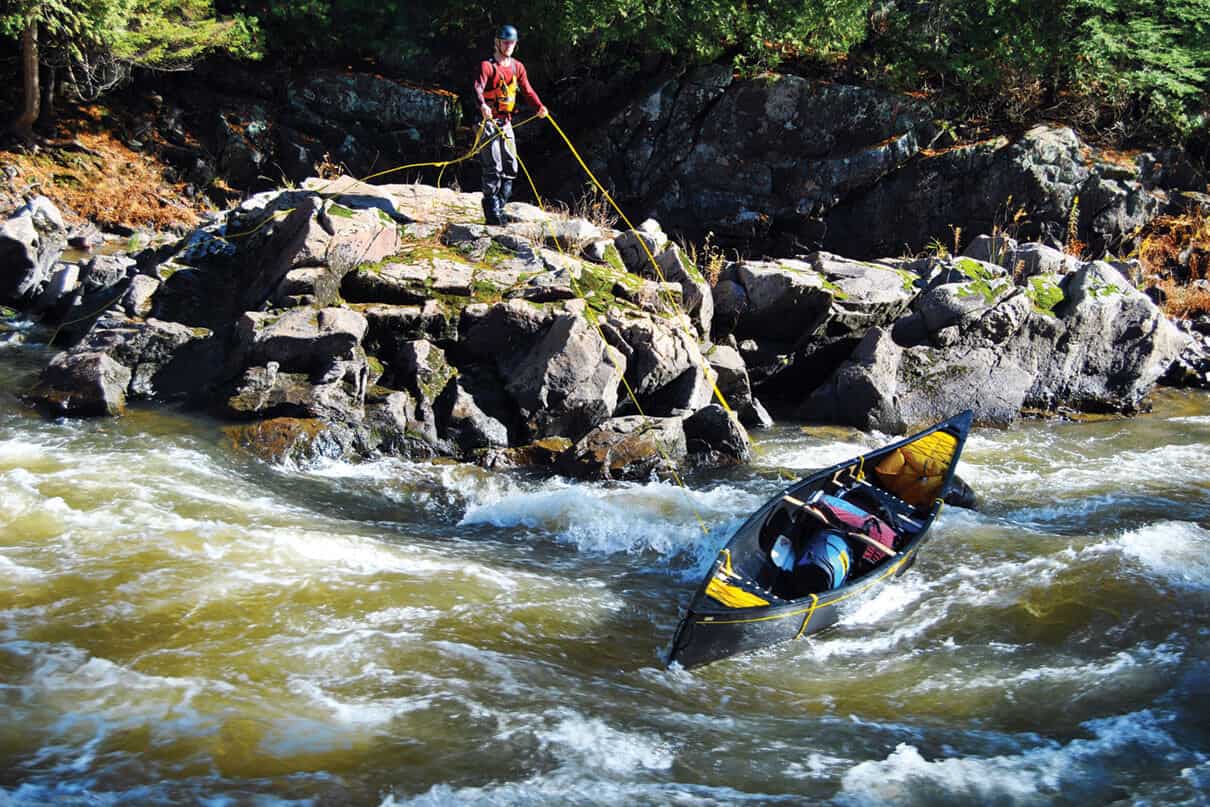
Leading lines. | Feature photo: Johno Foster
Safety
Whenever rope and currents mix you need to be prepared. Both paddlers should have a knife handy in case the rope gets tangled. Leave any excess rope in the bag or in loose coils in your hand. You should be wearing a PFD and if you trip with a helmet there is no sense having it in the canoe and not on your head while you scramble over wet rocks.
Starting line
Push the canoe out into the current and let it float downstream until the stern rope becomes taut. Try not to let all the rope out. By pulling on the downstream rope while the upstream rope is taut, you will set an angle just as you would in a back ferry and the boat will ferry away from shore. To move the boat toward shore release the downstream rope and pull in on the upstream rope. The canoe’s angle will change and the current will push the canoe toward you.
By keeping pressure on the downstream end you can have the canoe ferrying as much as 45 degrees out into the current below you.
Adjust the angle until the canoe is lined up, then slowly walk downstream while keeping the ropes taut to control the angle and the canoe’s position.
Too many people risk broken ankles and capsized canoes by relying on luck and quick feet when lining. With this under-the-hull bridle set-up, lining can be less about speed and recovery and more about control and finesse.
Much like paddling rapids, lining is a mental game. Practising in light current with only a few obstacles present, you can learn with how the canoe interacts with the lines and the water. You need to work with the river rather than against it. The same can be said of lining with a partner—effective communication is essential.
To read more on the subtleties of this technique, check out Garrett Conover’s comprehensive book Beyond the Paddle and Bill Mason’s classic Path of the Paddle.
Mark Scriver is a Black Feather guide and the author of Canoe Camping, An Essential Guide. Johno Foster is a seasoned Black Feather guide who would rather paddle through most rapids but knows when to toe the party line.
This article was published in Issue 73 of Paddling Magazine. Subscribe to Paddling Magazine’s print and digital editions, or browse the archives.
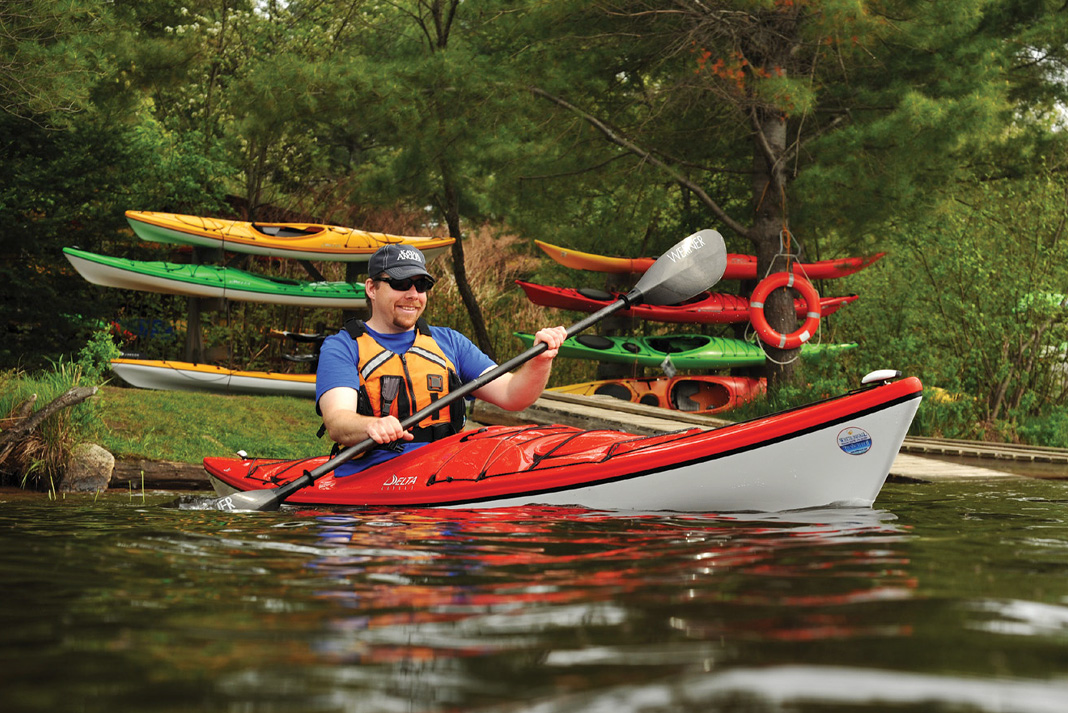
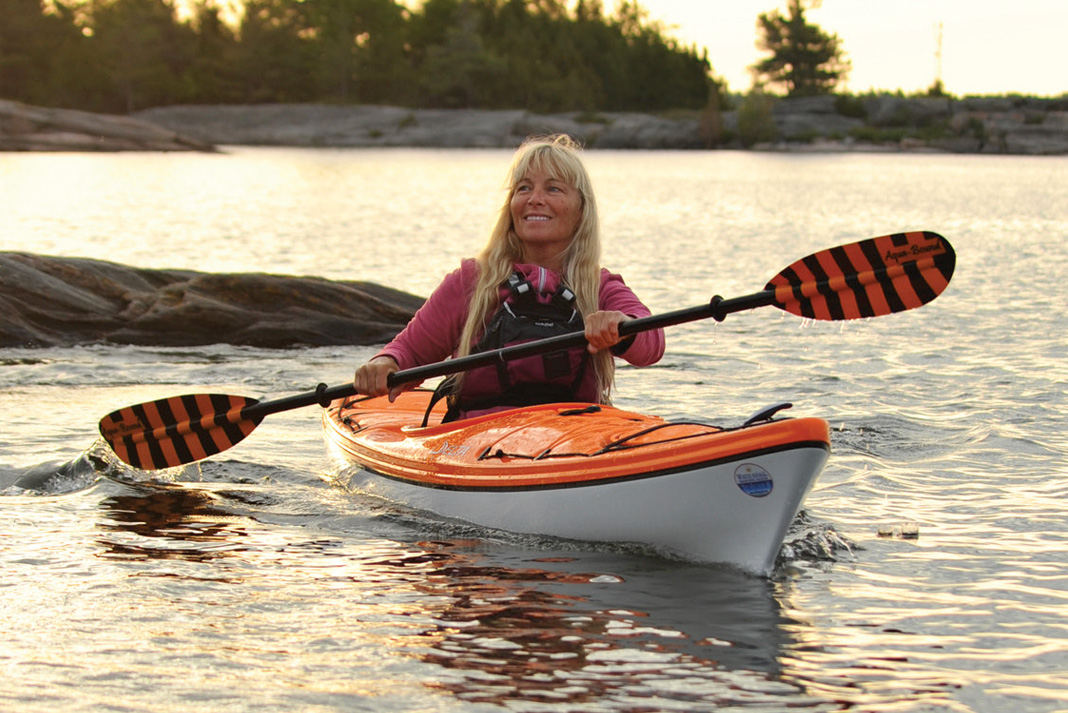
Whether you’re Inflatable paddleboarding, canoeing, kayaking, rafting or drift fishing, you need a place to keep some gear close and dry. It’s critical that, whether you are on an afternoon float or a weeklong trip certain items on your packing list, such as phones, key fobs, snacks, cash, or a box of flies, not only remain tucked away in a waterproof place but are always accessible when you need them.
There are plenty of options when it comes to dry bags, including roll top backpacks, duffels, and hard cases, however, when considering versatility, this article asserts there may be none more helpful than our old friend from the 80s, the fanny pack. Also known in its recent renaissance as the hip or waist pack, and initially a comeback kid in the modern festival scene, the fanny pack has infiltrated paddling, not to mention travel and leisure. On a board, it can be clipped below your life jacket for ever-present accessibility. For a short side hike, it can be slung over a shoulder. And with any watercraft, it can be tucked away under a bungee or in a hatch just like a small dry bag.
In this article, I’ve compiled a list of the top waterproof fanny packs in the industry and crash tested them in the gnarliest, wettest water sport of all—rafting. Read on to discover how each performed while field tested by a professional guide, what unique features stood out on each waist pack, and which specific water sport each pairs best with.
Everyone, even strong swimmers, needs to wear a life jacket at all times when on the water. It is extremely difficult to put a life jacket on once you fall into the water. Even a light wind can blow any paddlecraft away from you, faster than you can swim.
Always wear a USCG-approved Level 70 or Type III life jacket designed for paddling.
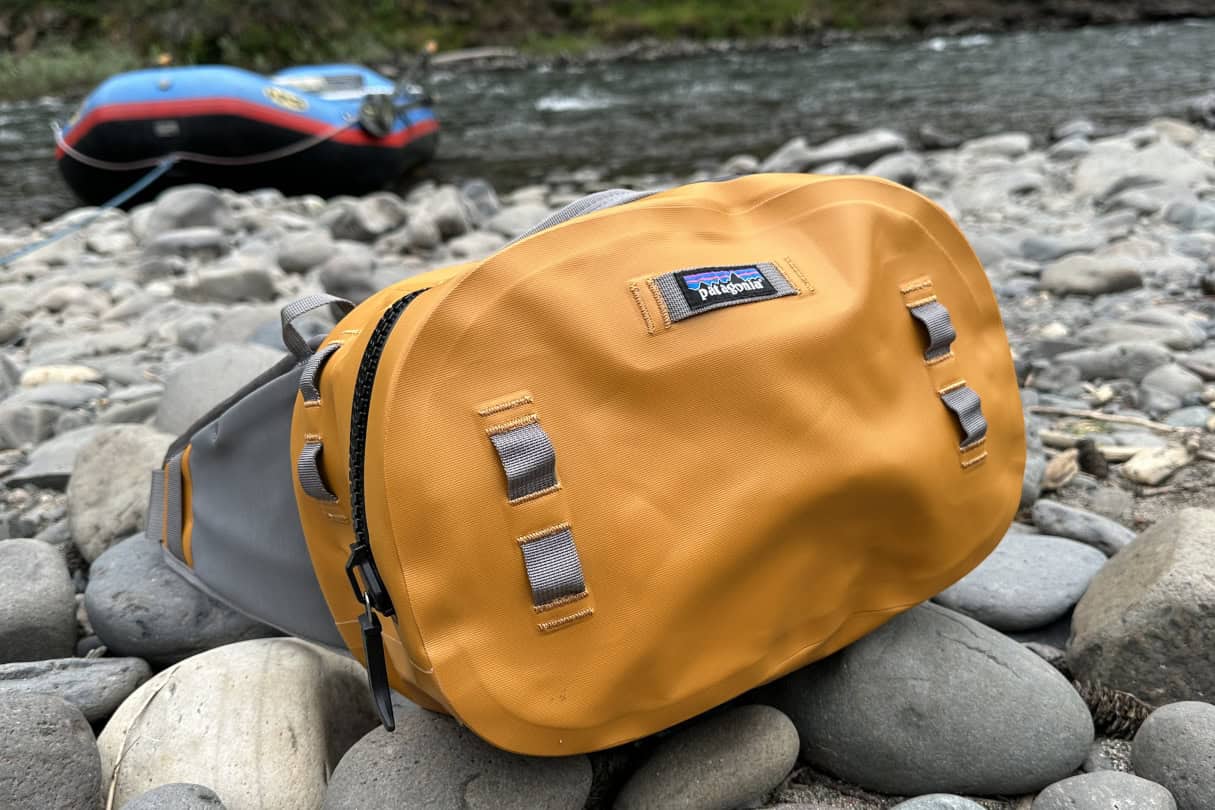
Best fanny pack overall
Patagonia Guidewater Hip Pack
Image: K.M. Collins
Patagonia Guidewater Specs
Capacity: 9 Liters
Rating: Submersible
Construction: Recycled nylon plain weave with a PU face coating and a TPU back coating
Waterproof, dustproof, and fully submersible—the Guidewater was intended for angling, but this hip pack’s ability to cross over into other water sports and everyday use is uncanny. Its zipper is identical to those manufactured for industry-leading dry suits as well as its seam seals and fabric.
The Guidewater is ergonomic by design, sitting comfortably on the hip. It offers an optional shoulder strap to distribute weight and two external, adjustable loops at the bottom of the pack designed to hold a breakdown fishing rod. These loops double as external storage for your rain jacket or outerwear as you swap layers throughout the day.
In testing, I used this pack as my day bag on the Grand Ronde in eastern Oregon. Just what is a guide such as myself carrying in a day bag? A map, chapstick, emergency toilet paper, wag-bag, mobile phone, Garmin InReach, speaker, electronic cables, backup battery and more. In addition, I am opening and closing my pack innumerable times while on the water each day. The ease of a zipper, such as on the Guidewater versus a snap closure wass a universe apart. And for good measure, I routinely submerged this waist pack throughout each day.
Reasons to buy
Just about everything proof
Made from recycled materials
The company’s well-known “Ironclad Guarantee” on repairs and replacements
Consider another if
Cost is factor
You’re seeking a more compact storage size
Bottom Line
The Guidewater submersible hip pack has the backing of a trusted legacy outdoor brand and can keep all your goodies dry for days on end.
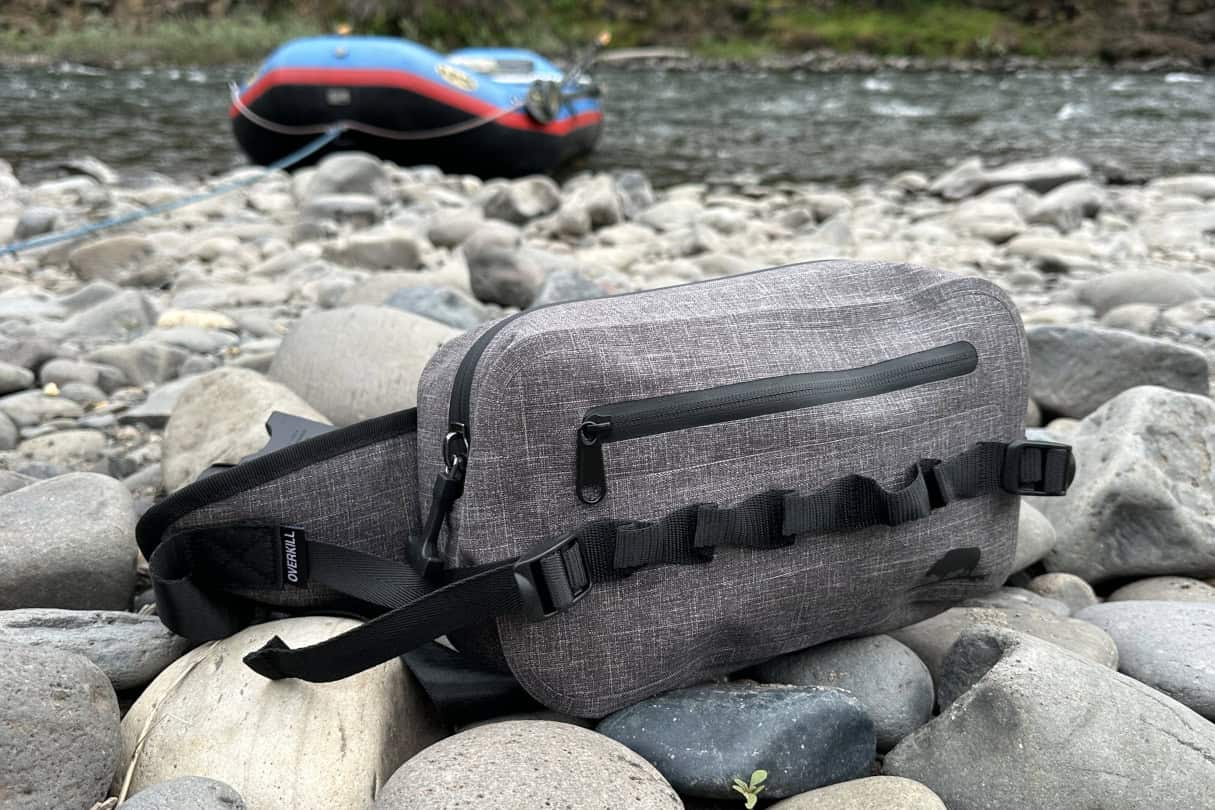
Considered a lightweight waist pack, the Overkill by Atoll was created with a blend of durability, style and thoughtful design. You can even choose from five colors: army green, black, heather grey, navy or safety orange.
Atoll’s intent of this pack is for use on an inflatable paddleboard. It stows under deck bungees without taking up too much room among the rest of your strapped-down gear. You can clip it around your waist when carrying your board to avoid extra trips or awkward juggling. And, if it fits below your style life jacket, you can keep it on your person for your entire outing.
I also found the Overkill to be the perfect auxiliary first aid kit. For many commercial whitewater companies, a major medical kit stays on the sweep boat at all times, and a secondary med kit is created in a fanny pack, which can accompany guides and guests on a hike or travel with the boats taking off ahead of the group to secure camp. I stashed gauze, bandages, and other items which would be rendered useless if damp or soggy in the pack, and left it in the footwell of my boat for three days while intermittently pulling out supplies every now and then. At take-out everything was just as dry as at the put-in. Part of the reason this pack is so dry is that it also utilizes the same zipper used for dry suits
My only regret with the Overkill was not snagging it in the safety orange.
Reasons to buy
Low cost compared to similarly designed packs
Balances storage capacity and compactness
Resistant to oil and grease as well as abrasions, scuffs and scratches
TPU construction means no PVC smell
Consider another if
A brand’s time established in the outdoor market is a major factor in your decision
Bottom line
Atoll is a paddleboard company and they’ve built a paddleboarding-specific waterproof waist pack that fits the bill and is also capable for other users.
Carry A Waterproof VHF Radio, Use Your Phone Only As A Backup
A handheld VHF marine band radio allows you to communicate with the Coast Guard and other boat traffic. Use Channel 16 only for hailing and emergencies. The radio should be waterproof, because it is virtually certain to get wet.
A cell phone, even if in a waterproof case or sealable bag, might not work, so don’t rely on it as the primary means of emergency communication.
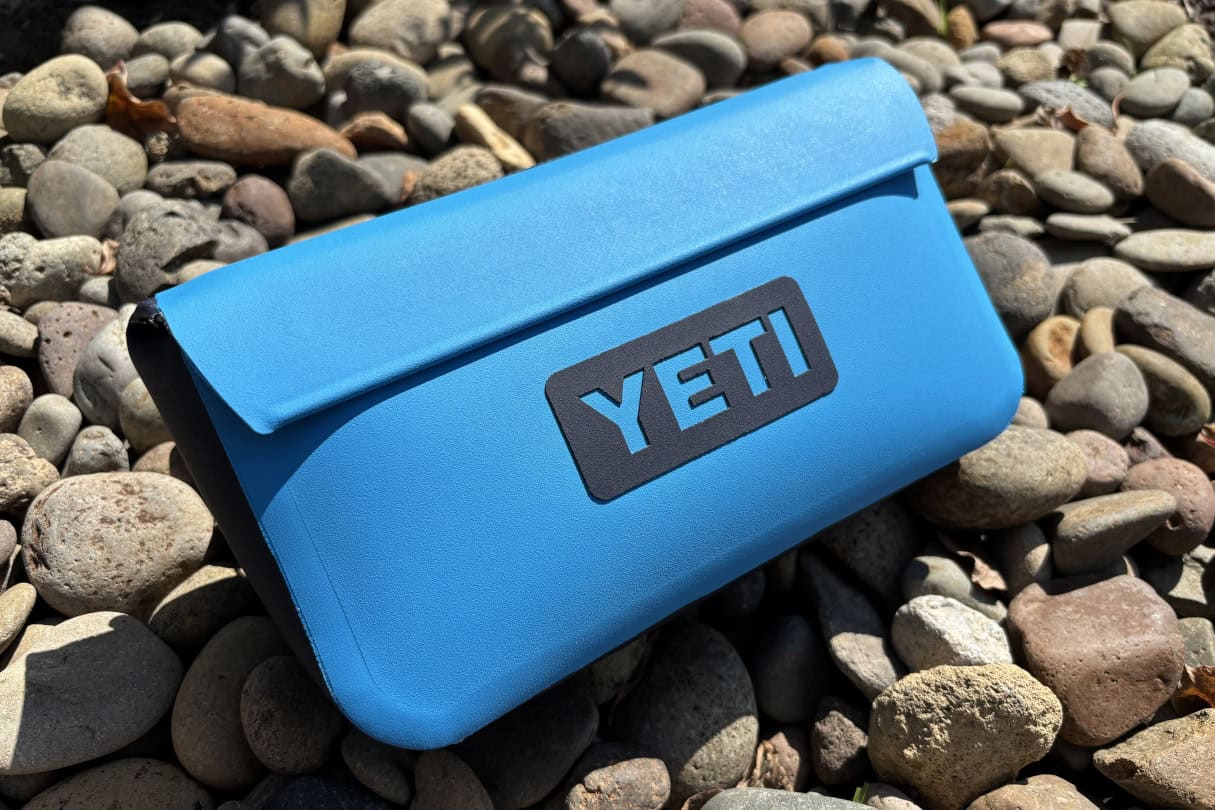
Easiest to access waist pack
Yeti Sidekick Dry
Image: Joe Potoczak
Yeti Sidekick Dry Specs
Capacity: 1 Liter
Rating: Submersible
Construction: Dryhide shell
Price: $45.00 (Sideclick waistband sold separately)
Yeti’s Sidekick case is a Transformer, and I’m obsessed with its multiple uses. Not only can this fully waterproof storage compartment be used during any water-based activity, it can be attached to a cooler or fixed to a raft by the velcro bits on the back. In addition, the Sideclick strap is available separately, which turns it into a proper waist pack. In fact, because of the webbing slots on the back of the Sidekick, you can use any strap you prefer or have at your disposal attach it to.
This is a truly multi-use gear case like no other. The Sidekick is just at home on a paddleboard or raft as it is strapped to a bike or on a cooler at a concert.
Best of all, the magnetic waterproof closure makes access to contents easier than any other product on this list.
Reasons to buy
Slim design
Magnet closures for handy ease of access
A “Transformer” that combines with other outdoor gear and Yeti products
Consider another if
You foresee issues using the magnetic seal instead of a zipper closure
Bottom Line
The Yeti Sidekick is made to handle class V, though it also seamlessly integrates into the everyday river life.
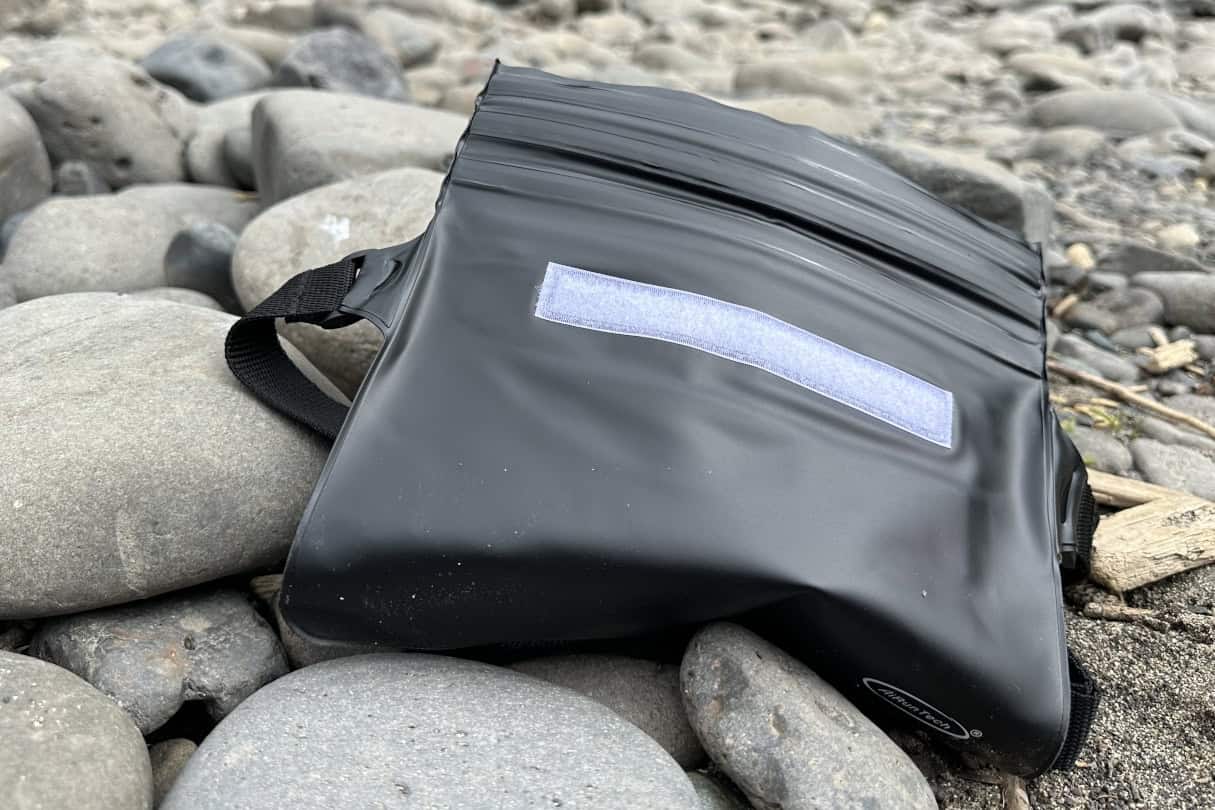
The best reason to purchase the waterproof fanny pack by AiRunTech is the price point. If you have a tight budget and you need a waterproof case for limited items to get you through one or two trips, this product will get the job done.
One consideration is that the AiRunTech is a hybrid between a fanny pack and a phone pouch, though it doesn’t have a clear window for phone photography. It has three Ziploc-like, press closures to access anything inside. To secure your valuables, paddlers will need to be sure all three closures are sealed, and you should test-submerge the pouch before use.
Reasons to buy
It is incredibly affordable for limited use or a last-minute solution
Consider another if
You want a durable waist pack for many uses or multiple seasons
You have the means to upgrade to another option
You want to ensure you have enough storage capacity for your size phone and other items
Bottom Line
The AiRunTech Waterproof fanny pack will get the job done for a few bucks in a pinch.
Wear The Appropriate Leash When Stand Up Paddleboarding
Always wear a leash on open bodies of water like lakes, bays, and oceans. Due to the risk of snags and entrapment, leashes should only be worn on rivers if they include a quick release attached to your life jacket.
Waterproof fanny pack buying advice
The number one priority paddlers are looking for in a waterproof pack is that it is in fact going to keep your gear dry. The last thing you want is to spend money on a bag, for it to fall of your paddleboard or raft and later open it up to find a stew of your belongings. Waterproof is a tricky word to throw around when it comes to interior dryness, and what you are often looking for that is submersible. This usually translates to a dry bag or pack with a rating of IP67 or IP68. This means the pack can be submerged under a meter of water for 30 minutes or more.
Beyond this, you probably want a waist pack that is not only submersible but fits and is comfortable to wear. If you can try packs on before buying this is the best way to find out.
You also want a pack that will not only fit your waist, but store well on your boat or board. I larger capacity pack will hold more gear but is both bulky on you and under the bungees of a paddleboard. While a slim pack will be low profile but be more scarce on space when trying to cram it with snacks, phone and safety gear. Take stock of what you plan to carry and what this looks like with the capacity of various packs.
Lastly, waterproof fanny packs come with multiple types of closures. Specialty zippers are the most commonly used because they offer a low profile and closure that is considered submersible. Zippers can be tough to open and close however, and need to be maintained with a lubricant over time. Yeti’s magnetic closure is unique and enjoyed by many users. Budget packs may have a press-to-seal zipper like many may be familiar with from sandwich bags.
How we tested
The fanny packs in this article were first selected through researching what products were widely available on the market. Next, the waterproof fanny packs selected were tested, on-the-job, by the author, a professional guide, while on a four-day trip down the Grand Ronde River for Little Creek Outfitters. Packs were filled with critical gear like first aid supplies, maps, phones and satellite messengers, then put to work. All packs kept these items dry for up to three hours of intermittent submersion in the chaotic currents of the Grand Ronde. The author found that because all waterproof fanny packs were indeed waterproof as advertised, evaluation came down to unique product features and versatility in multiple sports and leisure activities.
Why trust us
K.M. Collins has been writing about rivers for over a decade and paddling them for longer. She has guided on the Lower Wild and Scenic Rogue, Owyhee, Deschutes and Grand Ronde with some of the most well-respected companies on the West Coast, and has assisted in teaching river courses. Collins is meticulous about rigging her paddling crafts with the best possible gear for her kit, because as a guide, she’s learned the last thing you want is for your gear to fail you when you need it most.
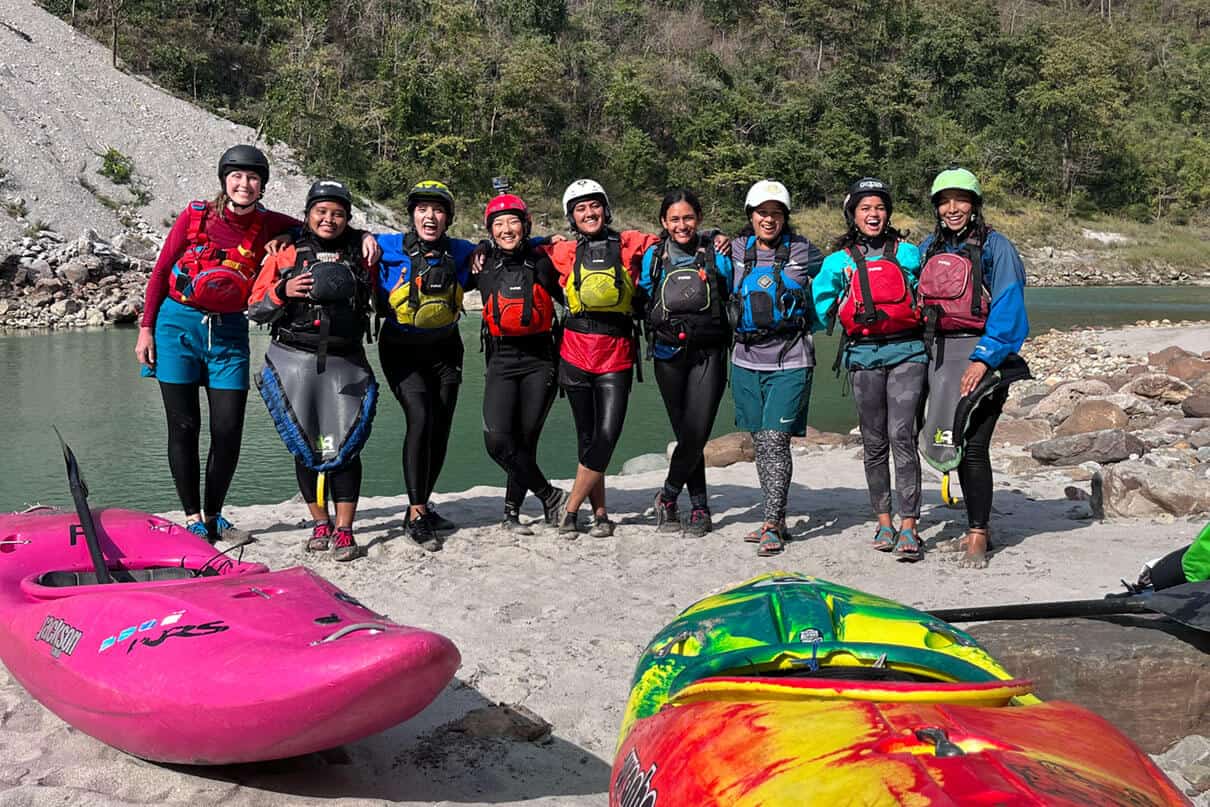
“It’s about giving somebody the same experience that I get to experience on the river,” says Naina Adhikari (fourth from right). | Feature photo: Harendra S. Rawat
In April 2023, eight women launched their kayaks into the icy waters of the Himalayan Ganga River. Led by India’s top female kayaker, Naina Adhikari, it was the first all-female kayaking expedition of the river. Over three nights and countless rapids, a movement was born: Ganga Girls.
Inside India’s first all-female kayaking revolution
Three years prior, I received an Instagram message from Adhikari. I knew of her as “that kayaker girl from India,” but we had never met. She had responded to a post I made about sexism in the whitewater industry, saying it resonated deeply.
While I’d faced inequality—being paid half as much as male champions at freestyle competitions—Adhikari’s experiences were far more harrowing. “In India, if I’m on an expedition, I have to worry if anybody is going to misbehave with me because they’re drunk… I have to worry if there is a man who is trying to hit me because he’s frustrated from a raft trip.”
Until speaking with Adhikari, I didn’t realize how privileged I was to have a full women’s class to compete with. Or how lucky I was to kayak with women and to feel safe with my male kayaking partners. I decided I wanted to meet her and learn her story.
“It’s about giving somebody the same experience that I get to experience on the river,” says Naina Adhikari (fourth from right). | Feature photo: Harendra S. Rawat
In 2022, NRS sponsored Adhikari to go kayaking in Chile, making her the first female Indian whitewater kayaker to go on an international kayaking trip. I remember looking behind me after the last rapid of our first run on the Futaleufú River. Adhikari followed my friend, Hailey, and me down the rapids with tears streaming down her face. When I asked what was wrong, she erupted with a giant grin: “I’ve never followed women down a river before.”
Adhikari learned to kayak at 13 but was one of the only female kayakers in all of India, so she paddled with men. With a smaller frame, she questioned her abilities and strength on the water. But given the chance to paddle with women—to watch bodies like hers move through rapids—Adhikari thrived.
“When there is female representation, then we think if she can, I can too,” Adhikari says.
While in Chile, we volunteered with Chicas al Agua, an organization providing free kayak instruction and environmental education to local girls, with an all-female coaching staff. In a culture that typically celebrates machismo, learning from women is a big deal.
With the chance to not only paddle with other women for the first time, but also mentor them, Adhikari’s world expanded.
“When I was in Chile, I was not worried about anything else, I was just enjoying kayaking every day. I got this sense of belongingness that, wow, this is home. Being around your kind of people who understand you and who understand the challenges,” she says.
Back in India, Adhikari couldn’t shake that feeling. She wanted a crew—so she built one. She gathered a group of women, helped some of them learn how to kayak, and inspired others to do the same. In April of 2023, they launched the very first all-female expedition of the Ganga River.
“What I’m trying to create is a healthy environment,” said Adhikari. By organizing an all-female trip in a country where it is almost unheard of for women to participate in or lead expeditions, Adhikari is trying to break free from the cultural norms.
“In our society, it’s already very hard being out there and doing what you want as a woman,” she explains.
For most of the women, the two Ganga Girls expeditions were their first multi-day kayaking trips. Adhikari said the expeditions gave the women the confidence to go beyond traditional gender roles. Some of them now hold jobs, some are river guides, and all have continued kayaking.
Adhikari’s vision for the future of Ganga Girls goes far beyond simply teaching women to kayak. Her ultimate goal is to form an NGO that introduces survivors of human trafficking to the river.
“This is something that gives you so much self-confidence because if you can control your boat in the river, then you can also control your life outside. You can do what you want to do,” says Adhikari.
A film about Naina Adhikari and the Ganga Girls is touring in the 2025 Paddling Film Festival. Find a screening near you at paddlingfilmfestival.com.
This article was published in Issue 73 of Paddling Magazine. Subscribe to Paddling Magazine’s print and digital editions, or browse the archives.
“It’s about giving somebody the same experience that I get to experience on the river,” says Naina Adhikari (fourth from right). | Feature photo: Harendra S. Rawat
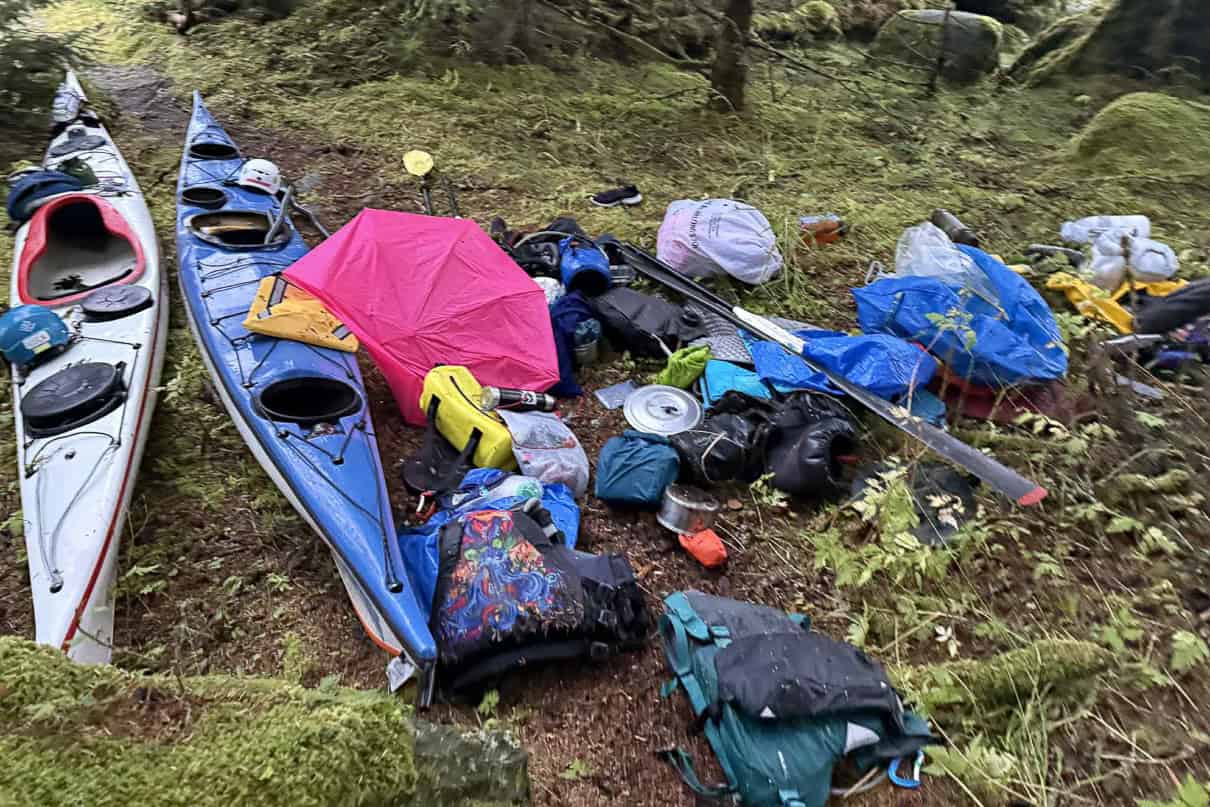
Gear salvaged in the aftermath of the Tracy Arm tsunami. Image courtesy Billy White.
On day 78 of kayaking the Inside Passage, a trio of sea kayak guides and instructors woke at 5:45 in the morning to a rush of water that missed their tent by inches.
“I think when a lot of people think of a tsunami they think of a rogue wave,” explained Billy White, sea kayak guide and expedition member. “But this was almost like a flash flood, as if the ocean just moved up several feet and then came at you all at once.”
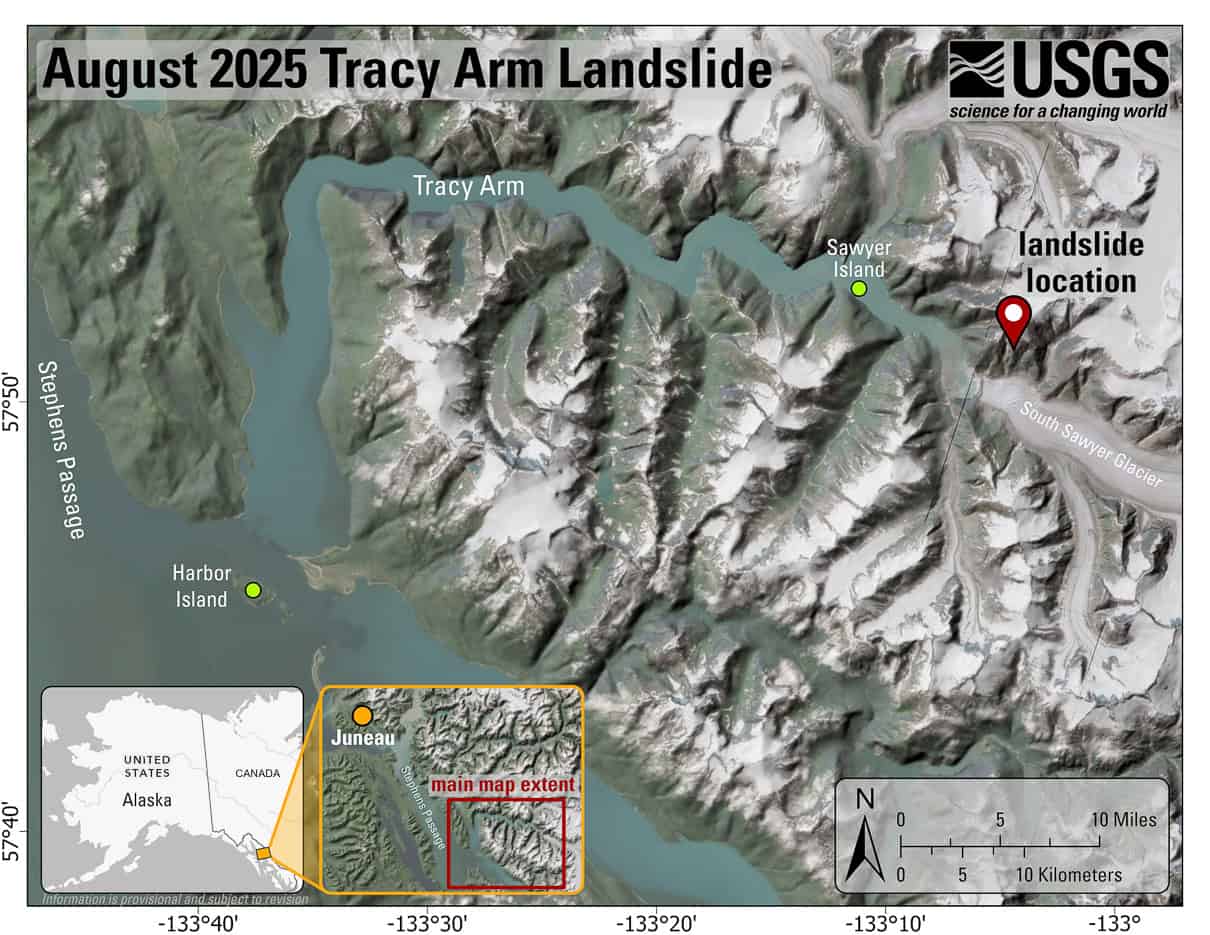
Diagram of the Tracy Arm landslide depicting both the origin of the tsunami at the South Sawyer Glacier and Harbor Island where the kayakers were camped. Image: USGS | Landslide Hazards Program
White along with friends Sasha Calvey and Nick Heilgeist began their journey up the Inside Passage, a classic sea kayaking route that runs roughly from Seattle, Washington to Skagway, Alaska, on May 24, 2025 from Washington’s San Juan Islands. On the morning of August 10, the team was camped on Harbor Island in Holkham Bay at the mouth of Tracy Arm, a long fjord with an entrance about 74 kilometres (46 miles) from Juneau, when a tsunami triggered by a landslide at the end of Tracy Arm swept through their camp.
Tracy Arm Tsunami sweeps through expedition kayakers’ camp
“I got woken up by my friend Sasha saying ‘get out of the tent’. And I’m half asleep. I stumble out of the tent and there’s a wall of water that’s rushing by,” shared White. “[The wave] had washed away all of our boats, our gear and our tarp.”
A landslide above the South Sawyer Glacier had raced down the steep mountain slopes into Tracy Arm on Sunday August 10 at 5:26 in the morning. The Landslide Hazards Program reported that preliminary interpretations of photos kayakers took indicate that the resulting tsunami reached heights of nearly 30 metres (100 feet) at Sawyer Island, a small island deep in the fjord, and the resulting tsunami was recorded on a coastal tide gauge in Juneau at 36 centimetres (14 inches).
Landslides that trigger tsunamis in Alaska’s fjords are relatively common, according to the Landslide Hazards Program, with the especially notable Lituya Bay landslide in 1958 creating a tsunami with a maximum height above sea level on shore of 530 metres (approximately 1740 feet).
Surviving a backcountry tsunami
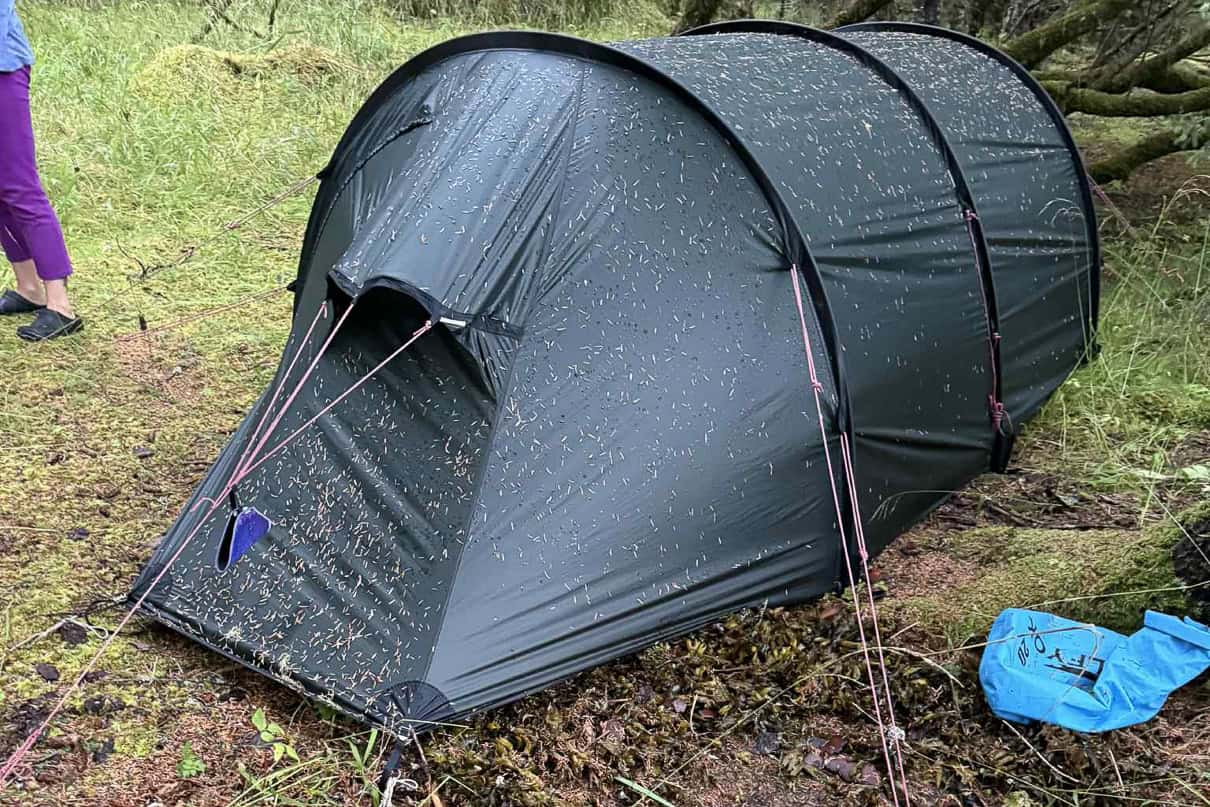
White estimated that the group had camped in the woods 20-25 vertical feet (approximately six to eight metres) above the high tide line and their gear was stored 10-15 vertical feet (approximately 3-4.5 metres) above the high tide line at the mouth of the forest. The kayaker’s account and photos indicate that the wave missed their tent by inches, and White expressed relief that the group chose to camp in the woods rather than on the beach near their gear.
Seaweed left just outside the kayakers’ tent by the wave. Image courtesy Billy White.
“I’m really glad we went back in the woods,” said White. “We definitely would’ve died if we hadn’t.”
Luckily, Heilgeist’s kayak was used as an anchor for their tarp and some of the group’s gear got caught in the kayak, including White’s marine radio. The team found Heilgeist’s boat about four feet up in a tree and balancing on a rock. White also shared that had the team not recovered the radio, they always keep the Garmin with them in the tent, so they could’ve gotten out a text for assistance if needed.
“My boat was down on the cliffs by the beach so we were able to run and grab it,” said White. “Unfortunately Sasha’s was out in a giant whirlpool.”
After collecting their scattered gear, the team brought it all to the forest to take stock of what had happened. At this point, they didn’t know they’d experienced a tsunami, and didn’t know if another wave could be coming.
After the Tracy Arm tsunami
“We placed a pan pan call out into the void on a marine radio and we were really lucky that there was a boat about three nautical miles away and they were able to come pick us up,” said White.
The team was rescued by The Blackwood, a yacht that does trips around Alaska.
“It was a very surreal experience because we’d just been camping for 78 days and then we get picked up by this gorgeous charter yacht with a chef…it was very disorienting,” White shared. “It was very impressive, the rescue, because at that point the water was still quite turbulent… I would say six to seven knots of current forming these giant whirlpools and so they sent their chase boat through those whirlpools to come grab us.”
Gear salvaged in the aftermath of the Tracy Arm tsunami. Feature image courtesy Billy White.
While White and Heilgeist’s boats were damaged but recovered, Calvey wasn’t so lucky – the team saw her boat circulating in a whirlpool shortly before it vanished.
“We lost Sasha’s boat and then all of us… I lost a bunch of gear and a lot of our group gear is gone, so that’s definitely the hardest thing.” White explained. “All being guides, we use our gear for our livelihood.”
Overall, White reflected that the incident emphasized the importance of training for the worst case scenario, practicing rescues, and knowing radio protocols.
“Make sure you know how to operate your radio and how to place an emergency call,” said White, adding that they would consider sleeping with their radio in the future. “That would probably be my biggest takeaway. Know what to do when disaster strikes. That’s why we practice our rescues… make sure you have that drilled into your head because when it actually happens it might be 5:45 in the morning stumbling out of your sleeping bag.”
Despite an unfortunate early end to their Inside Passage expedition, the team hopes to return and complete the final leg of their journey beginning at Tracy Arm and heading to Glacier Bay in the future. Find their GoFundMe to offset the cost of new gear here.
Just passing through. | Feature photo: Kaydi Pyette
As dozens of folksy sayings attest, you can make your own weather forecast from easy atmospheric and environmental observations. You don’t need a weatherman to know which way the wind blows.
A paddler’s guide to predicting the weather
“Wind from the east, weather a beast, wind from the west, weather is best.”
Changes in wind direction hint at coming weather. A counter-clockwise shift in wind direction (“backing” in mariner parlance) predicts approaching low pressure with its attendant low clouds, strong winds and miserable weather. A clockwise shift in wind direction (known as “veering”) is a sure sign of approaching high pressure, with fewer clouds, lighter winds and pleasant weather. Wind typically backs from west to east and veers from east to west.
Just passing through. | Feature photo: Kaydi Pyette
“Mackerel sky and mares’ tails make tall ships carry low sails.”
Mottled, fish-scale altocumulus clouds and cirrus streamers indicate moisture and unstable air—and rain within 24 hours.
“When sounds travel far and wide, a stormy day will betide.”
Humid air is better at transmitting sound waves.
“If the moon has a halo around, we’ll soon tread on deluged ground.”
A halo around the moon or sun is caused by ice crystals in high cirrus clouds, which form as a cirrus cloud flattens ahead of a warm front. A halo is often the first sign a low-pressure system is approaching, and that rain is 18 to 36 hours away.
“Red sky at night, sailor’s delight. Red sky at morning, sailors take warning.”
In the evening, red clouds above and to the east mean the sun is shining through clear skies in the west—the direction of approaching weather. Conversely, red sky at sunrise means clearing in the east but unsettled weather approaching in the west—often a sign storms will linger.
“When smoke descends, good weather ends.”
Your campfire provides a reasonable forecaster for the next 24 hours. A low-pressure system approaching makes smoke absorb moisture in the air and sink, enveloping your campsite. Smoke rises in a high-pressure system.
“When leaves show their undersides, be very sure rain betides.”
Rising humidity and shifting winds can cause tree leaves to flip before a storm, revealing their paler undersides. Some flowers may close to protect their pollen, a subtle sign of nature preparing for rough weather.
Birds fly lower before storms because the insects they feed on stay close to the ground in low-pressure, humid air. High-flying birds usually signal good weather.
“If your muscles all ache and itch, the weather fair will make a switch.”
Aches and pains can worsen as barometric pressure drops—a subtle but common sign of a coming weather change.
This article was published in Issue 73 of Paddling Magazine. Subscribe to Paddling Magazine’s print and digital editions, or browse the archives.
Just passing through. | Feature photo: Kaydi Pyette
As a sea kayak guide, I rarely see a group out for a day or multi-day trip without at least one Delta kayak in the mix. Why? They’re darn good boats. Delta is a Canadian, paddler-owned company that sets out to do one thing well: create quality touring kayaks. They were early adopters of thermoforming, and chose to focus exclusively on this novel process rather than dabbling in composites or rotomolding. Delta has been building recreational and touring kayaks in Maple Ridge, British Columbia, since 2006.
Thermoformed kayaks balance durability and weight at a reasonable cost. Delta’s mastery of the thermoforming process—which involves heating sheets of durable ABS/acrylic laminate and vacuum-forming them into the kayak molds—shows in their beautifully finished and lightweight kayaks. Delta’s proprietary SolarKote acrylic outer layer gives their kayaks a gleaming, glossy finish and superb UV resistance, while the robust ABS inner layer is nearly indestructible.
Inside the hull, Delta kayaks are renowned for their high storage capacity and exceptionally comfortable seating systems. These systems allow paddlers to adjust themselves up, down, forward, backward and nearly every other configuration you can think of. Cushiony foam is thoughtfully laid out to drain and ventilate well, great for long days in the cockpit. With high volumes and large openings, storage space is never an issue in Delta hatches.
Delta’s lineup includes everything in the touring range, from 10-foot day tourers to 17-foot expedition kayaks. If you’re looking for a lightweight single or tandem touring kayak, there’s likely a Delta that’s a great match for you.
This article will run through a few of our favorite Delta models and help you find your next kayak with buying advice and field-tested reviews.
“The shortest and lightest of Delta’s touring kayaks at 14 feet and just 45 pounds, it’s positioned as the easiest to own for paddlers balancing space, weight and cost. If you are looking for a compact touring kayak that can handle diverse waters and won’t break the bank, the Delta 14 is a superb solution at an exceptional value.”[ Read full review ]
“Delta’s designers finessed two cockpits into the Traverse’s 17-and-a-half feet—a length more typical of solo sea kayaks than tandems. As veterans of tandem bicycles and boats know (and the uninitiated soon discover), cockpit proximity is one of the finer points of double design. Too close together and unsynchronized paddle strokes amount to a jousting match. The 17.5 T, we are relieved to report, gets paddler positioning just right.”[ Read full review ]
Delta Kayaks 17
The 17 By Delta Kayaks. | Photo: Virginia Marshall
“Whether you’re starting out on your journey or you’re a seasoned paddler, larger folks looking for a lightweight touring kayak will appreciate Delta’s commitment to bending plastics. With its sophisticated looks, affordable price tag and hardwearing construction, the thermoformed 17 is built for the long haul. From the top down, the 17’s deck illustrates Delta’s expertise when it comes to shaping plastic sheets. Molded-in bungee clasps help secure the new press-lock hatch covers—even easier to use than previous iterations thanks to their single gasket seal—and recessed grooves for bungees keep the deck super sleek and snag-free…”[ Read full review ]
“Stable and well behaved, the 12S embodies Delta’s West Coast touring design ethos—beginner-friendly, efficient and capable of hauling all your gear—scaled down in a compact package. The multi-chine, V-shaped hull and full, flared bow confidently handle bumpy conditions, while offering satisfying—if not speedy—cruising capabilities on calmer waters.”[ Read full review ]
Shopping for a used Delta kayak?
Buying a used kayak is an excellent way to get the most out of your budget. Delta’s timeless touring designs and robust construction make shopping for a used Delta a great option. Look for secondhand Delta kayaks on used marketplaces like Craigslist, Kijiji or Facebook Marketplace, but be aware that these popular boats often sell quickly. Setting up an email alert for the keywords “Delta Kayak” notifies you as soon as one becomes available.
Searching for retired demos or rentals is another way to get your hands on a used Delta. If an outfitter near you rents Delta kayaks, chances are they will be replenishing their fleet as the kayaks get older—ask if they are planning to do so at the end of the season. Renting a boat is also a great way to test how it fits and performs. If the fit is almost there, Delta sells padding kits that are compatible with all of their seating systems.
Delta’s thermoform plastic construction is UV-, abrasion- and impact-resistant, and nearly maintenance-free, but be sure to thoroughly inspect any used boat before buying. Superficial scratches are not an issue, but repairs may be needed for deeper gouges into the inner material. Check the deck (top) and hull (bottom) for cracks and deformities (which will make the kayak paddle less efficiently). Also inspect the bulkheads, hatches, skeg or rudder (if applicable) and outfitting for signs of excessive wear or damage.
For more tips on what to look for when selecting a used kayak, read our article How To Buy A Used Kayak.
Photo: Courtesy Delta Kayaks
Delta Kayaks buying advice
Delta’s construction method sets these kayaks apart from many other touring kayaks. The thermoforming process involves heating sheets of ABS plastic laminate and vacuum-forming them into the kayak mold. The deck and hull are molded separately, then joined together to form the finished kayak.
The outer layer of Delta’s proprietary plastic laminate is protective “Solarkote” acrylic, which provides resistance to abrasions and harmful UV rays. A key advantage of thermoform construction is that it creates a lighter and sleeker kayak than traditional rotomolded plastic, but more resilient to scratches and impacts than a fiberglass layup.
Recessed deck fittings and flush-mounted hatches add to Delta kayaks’ sleek aesthetic. In addition to looking sharp, these features reduce the chances of damaging the kayak during transport and make it easier to re-enter the kayak from the water. Subtle details like this also indicate that the company has put lots of thought and feedback from paddlers into their designs.
Although Delta focuses exclusively on touring kayaks, there are many options within their lineup to suit a wide variety of paddlers. Delta kayaks are divided into four categories: Adventure Rec, Light Touring, Touring and Performance Touring.
Adventure rec
Adventure Rec are the shortest kayaks, aimed at beginner and casual kayakers. With 10-foot and 12-foot options available, the Delta AR is the company’s recreational touring model. These boats have a roomy cockpit for easy entry and exit and a wide, catamaran-style hull at the stern for lots of stability.
Premium outfitting, bulkheads for safety and sealed hatches for watertight storage make the Delta AR a solid step up from other entry-level recreational kayaks. Read a full review of the Delta AR here.
Light touring
Light Touring kayaks are the next step in Delta’s progression. These include the Delta 12S and Delta 12.10. Light touring kayaks are perfect for paddlers who want a boat that is the size of a recreational kayak, but performs more like a sea kayak. These boats balance nimble handling and good glide with no more length than is necessary.
This makes the kayak easier to turn on the water and saves space wherever it is stored. Light Touring kayaks have features found on longer sea kayaks, like decklines and thigh braces, delivered in a space-efficient package.
Touring
Delta’s Touring category moves into traditional sea kayak territory. The Delta 14, 15.5 GT and 17.5 (Tandem) kayaks fall under this category. The longer length and higher volume of these boats makes them best suited for coastal paddling or touring on large lakes. They feature a smaller cockpit, where the paddler’s thighs engage with the hull for superior boat control.
The watertight bulkheads and hatches have ample space for all the gear needed on overnight trips. There are options for rudders or skegs in the Touring category.
Performance touring
Photo: Courtesy Delta Kayaks
Performance Touring kayaks get a little longer and are equipped to handle whatever conditions you may encounter on the open coast. These sea kayaks—which include the Delta 15S, 16 and 17—offer top of the line performance and ample storage capacity for intermediate and advanced paddlers planning extended trips. Like all Delta kayaks, they use thermoform construction for a great blend of durability and light weight.
Just like any kayak you are considering, it is crucial to “try before you buy.” Head to your local paddling shop and chat with one of the staff there—they know boats. Describe your paddling goals, and take the kayak out for a spin to make sure it fits and performs as expected.
Still wondering if Delta kayaks are right for you? Here are answers to some of the most common online questions about Delta kayaks.
Are Delta kayaks good?
For someone looking for a durable yet lightweight touring kayak, Delta kayaks are a good option. At mid-range prices, they won’t break the bank. Delta also has a reputation for comfortable kayaks with customizable seating options. The best way to know if a Delta kayak is a good fit for you is to try it out. For further comfort, additional padding can be purchased specifically for Delta’s seating system to really make it your own.
Where are Delta kayaks made?
They’re available across North America, so where are Delta kayaks manufactured? Delta kayaks are made in British Columbia, at Delta’s Maple Ridge headquarters just outside of Vancouver.
Delta kayaks warranty
All new Delta kayaks come with a 3-year limited warranty; be sure to register your kayak when you buy it. This warranty covers any defects from faulty materials or workmanship.
Delta kayak dealers
Delta kayak dealers can be found in nearly every province and state. Use Delta’s dealer locator to find one near you.
Does REI sell Delta kayaks?
REI sells Delta Kayaks and is an authorized dealer. Each store will have a different inventory. Delta notes on their website that although the products may not appear on the REI site inventory, they are carrying Delta kayaks and accessories.
Delta kayaks cost
How much are Delta kayaks? Delta kayak prices vary depending on the model, but range from $995 USD / $1,095 CAD to $2,750 USD / $3,000 CAD. Prices can also vary based on shipping costs and location.
How much is a Delta kayak in comparison to other similar boats? Delta kayaks are priced mid-range: less expensive than fiberglass or composite kayaks, but more pricey than most polyethylene boats.
Delta kayak material
What is a Delta kayak made of? At first glance, the glossy coat and two-tone colorway looks like fiberglass, but Delta kayaks are made with a patented blend of ABS and acrylic plastics. Sheets of this laminate material are heated and vacuum-formed into molds made with computer-assisted design (CAD) programs.
The result is a durable, attractive and lightweight kayak designed with the assistance of cutting-edge tech for machine precision.
Compare Delta Kayaks
Eddyline vs Delta kayaks
Like Delta, Eddyline kayaks are made exclusively from thermoformed plastic. Eddyline calls their material Carbonlite, which produces kayaks with a similar balance of durability and light weight to Delta kayaks. Where Delta kayaks are manufactured near Vancouver, British Columbia, Eddyline builds their boats in Burlington, Washington.
Delta produces an extensive range of rec touring and touring-specific boats, while Eddyline offers a line of angler-dedicated sit-on-top kayaks along with their touring and recreational options. Both companies produce top-of-the-line thermoform kayaks; if you’re seeking a good variety of sit-on-top and sit-inside recreational kayaks, or a thermoform fishing kayak, look to Eddyline.
If you want a wider selection of full-size touring kayaks, choose Delta.
Boreal vs Delta kayaks
Boreal Design kayaks are ubiquitous among rental fleets across North America. They have a boat for everybody, with recreational, touring and expedition kayaks. Boreal Design produces their kayaks overseas, with polyethylene and thermoformed plastic kayaks made in Shanghai and composite kayaks built in Estonia.
They offer a massive catalogue of kayaks ranging from 12-foot recreational kayaks to 21-foot tandems. Comparing Delta Kayaks to Boreal Design, Delta offers a smaller range of touring-focused models, exclusively made with thermoformed ABS. Choose Boreal Design if you want a wider variety of touring designs and materials.
If you prefer the lightweight, affordable durability of thermoform construction, you can’t beat Delta kayaks.
Delta vs Seaward kayaks
Both Delta kayaks and Seaward kayaks are designed and manufactured in British Columbia. Seaward has been building quality touring and expedition kayaks since 1986, the early days of recreational sea kayaking. They specialize in fiberglass and Kevlar composite kayaks.
Seaward’s lightweight, high-capacity composite kayaks land at a higher price point than Delta’s thermoformed plastic kayaks. In terms of design, Seaward offers a more extensive touring and tandem lineup, while Delta makes many more boats less than 16 feet, suitable for day touring and recreational paddling.
If you are an avid paddling enthusiast ready to make the investment in a quality composite kayak, Seaward offers many fine choices. Choose Delta kayaks if your paddling budget is a bit tighter, or if you are a more casual recreational paddler.
Photo: Courtesy Delta Kayaks
Delta kayak reviews
Remember, the first step in choosing a kayak is considering the type of paddling you aspire to do. Reading expert reviews will allow you to evaluate how each kayak handles and how it performs for the intended paddler and conditions.


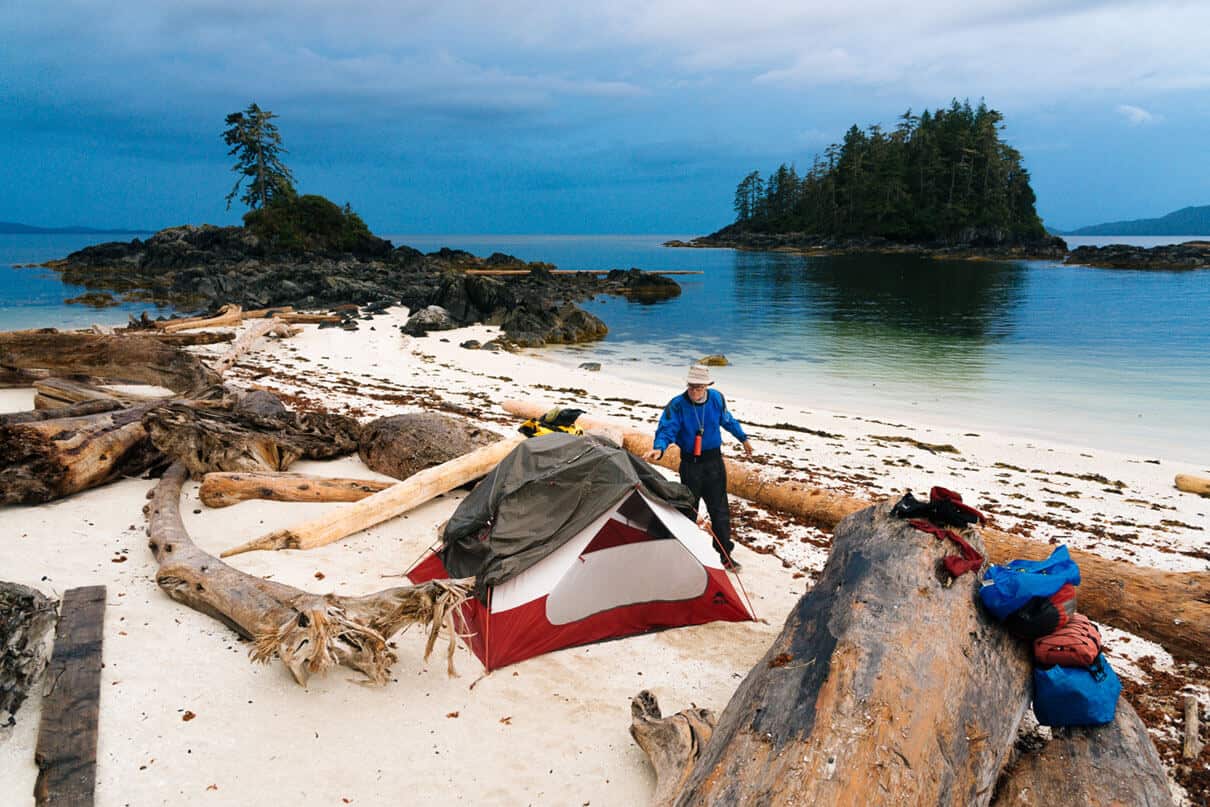

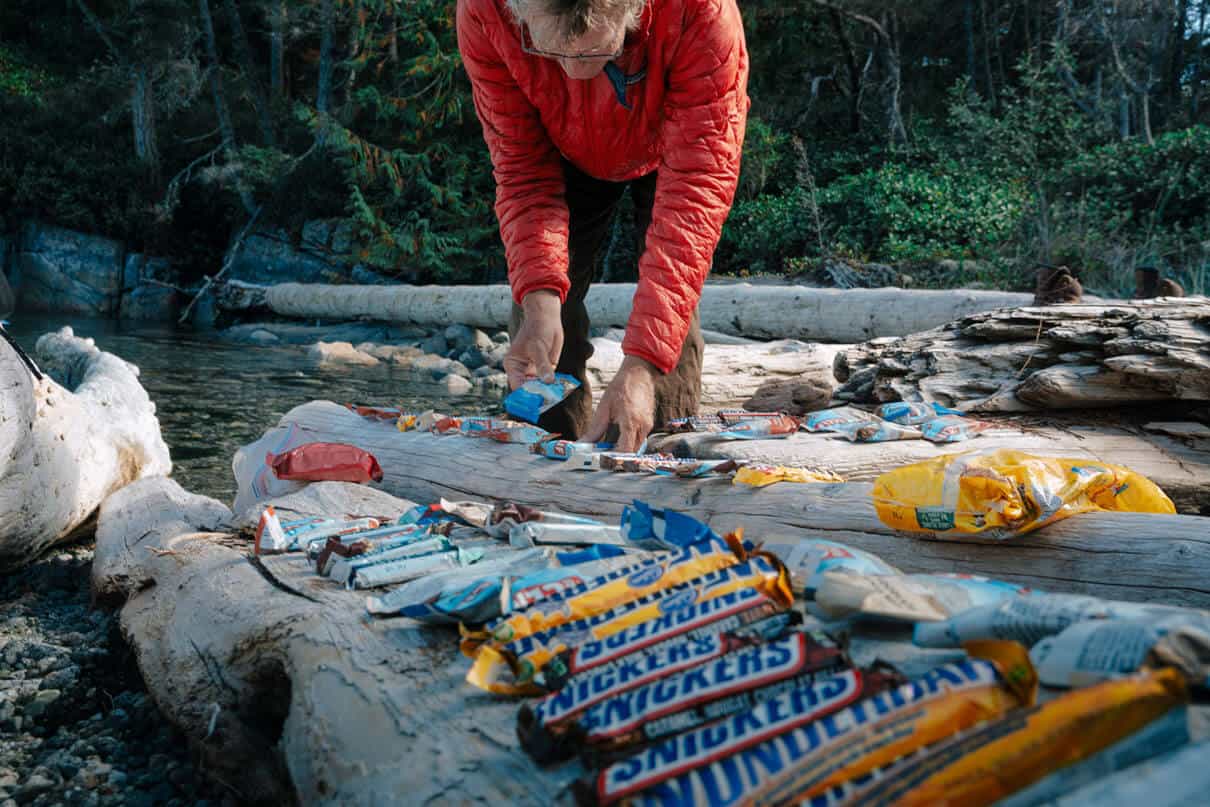


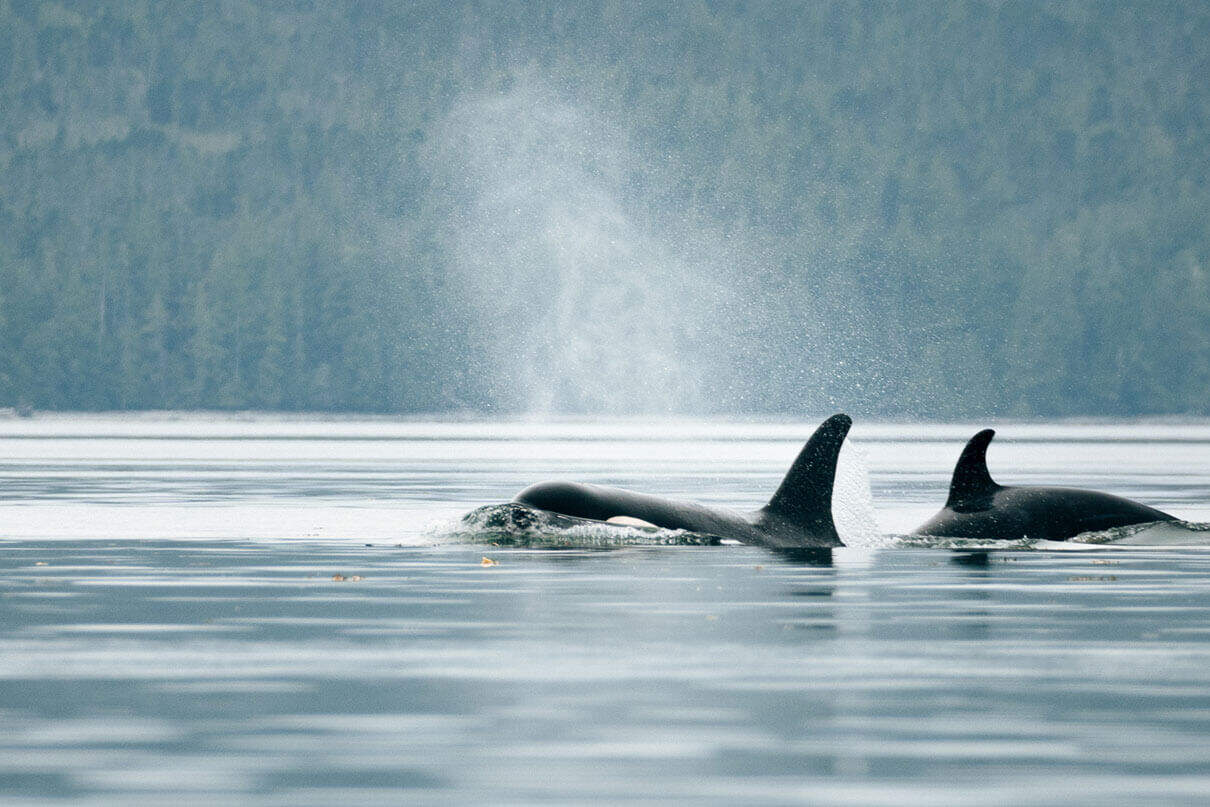
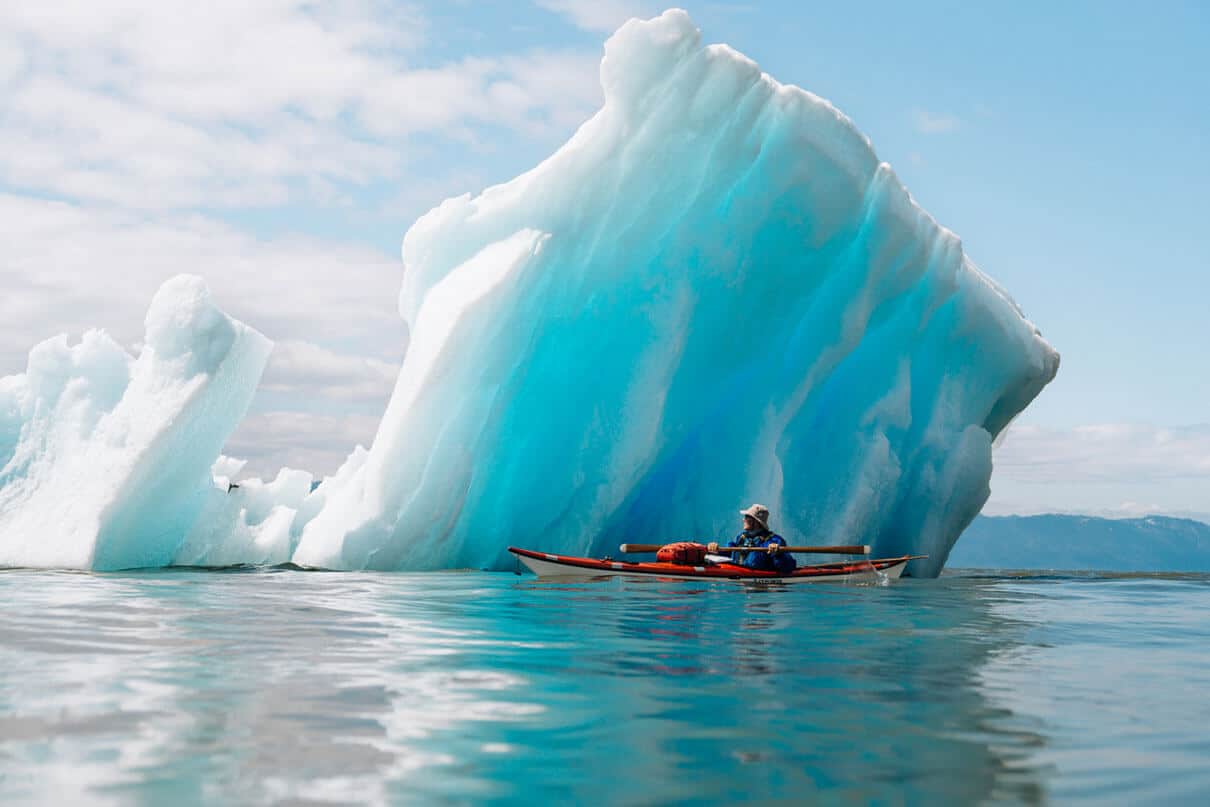
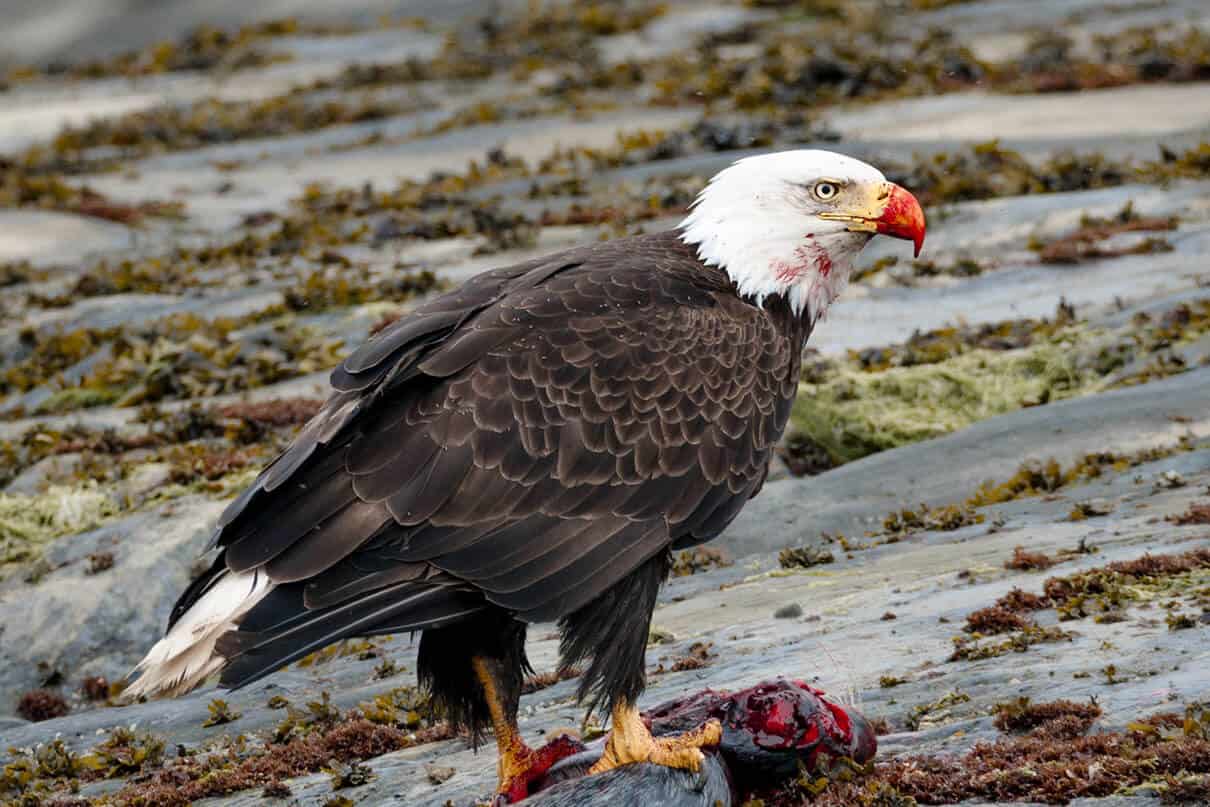
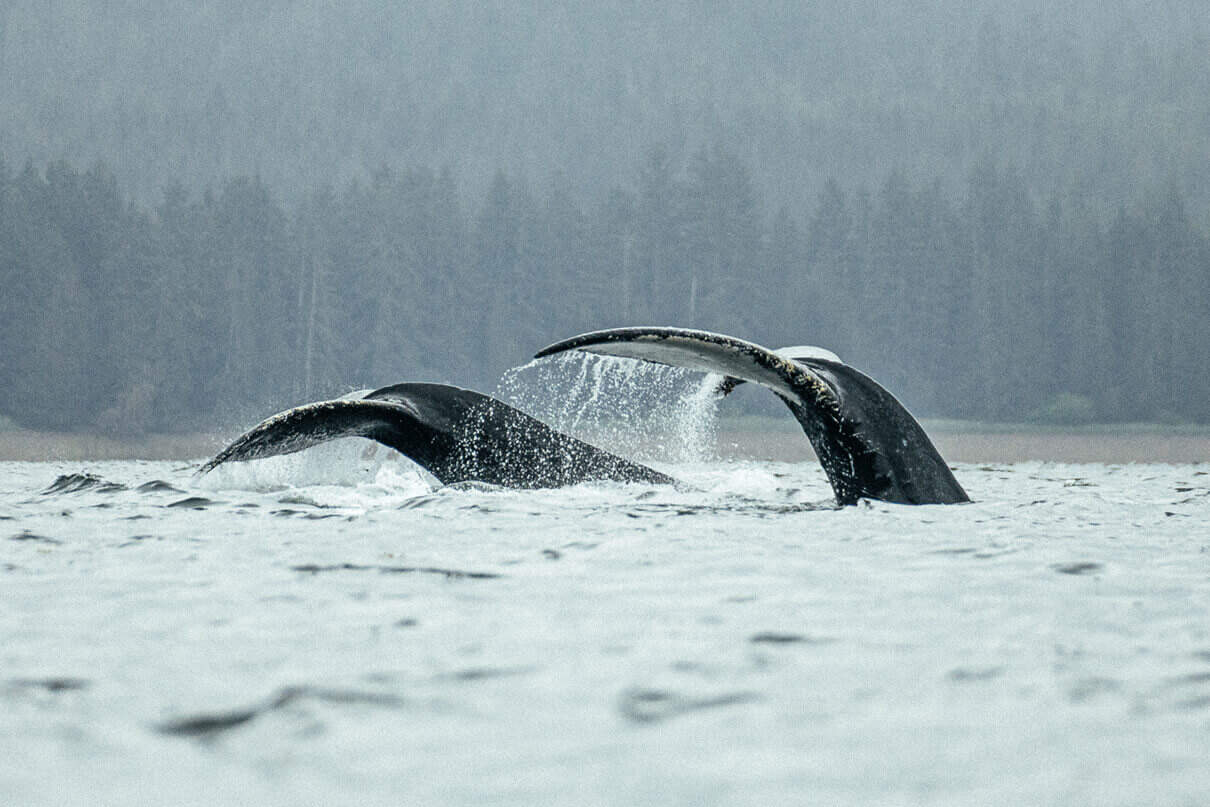
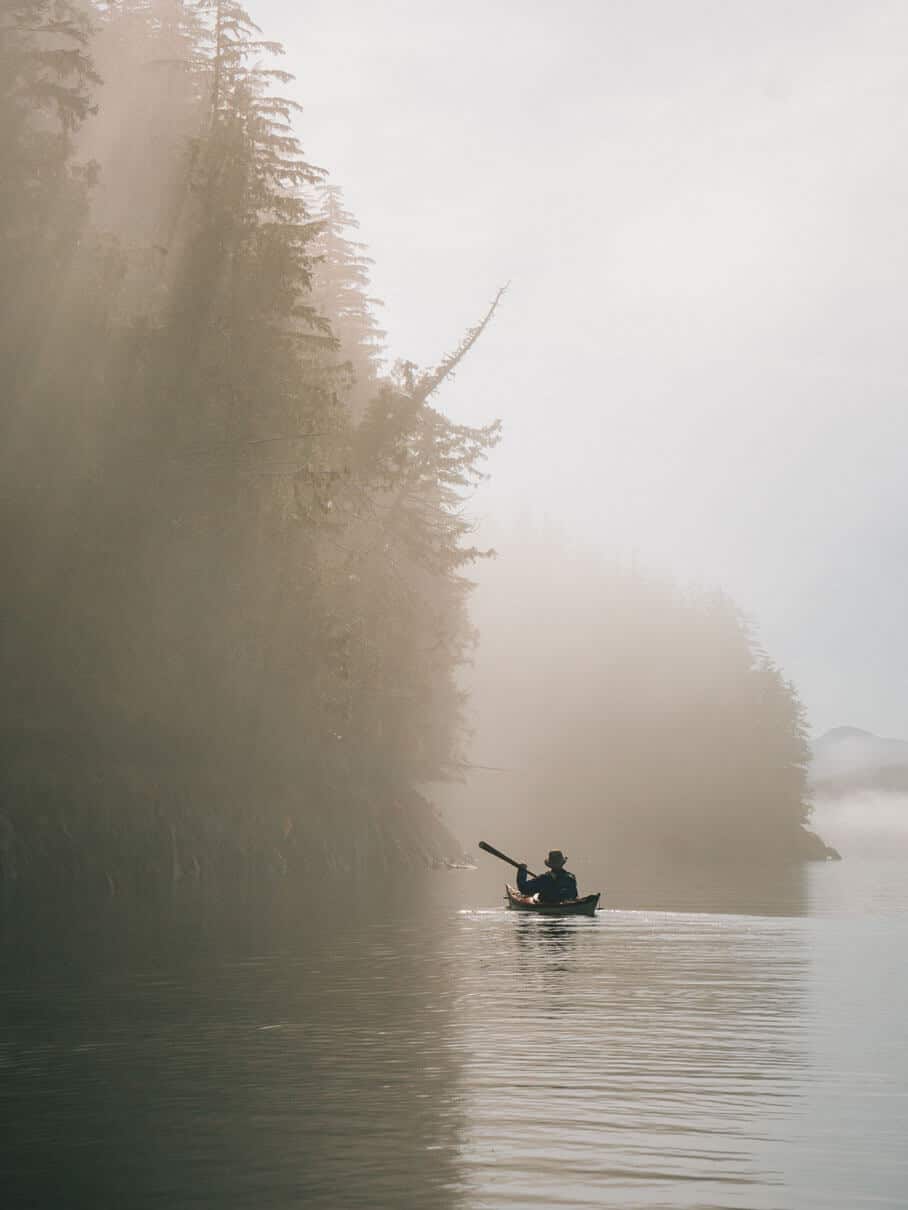

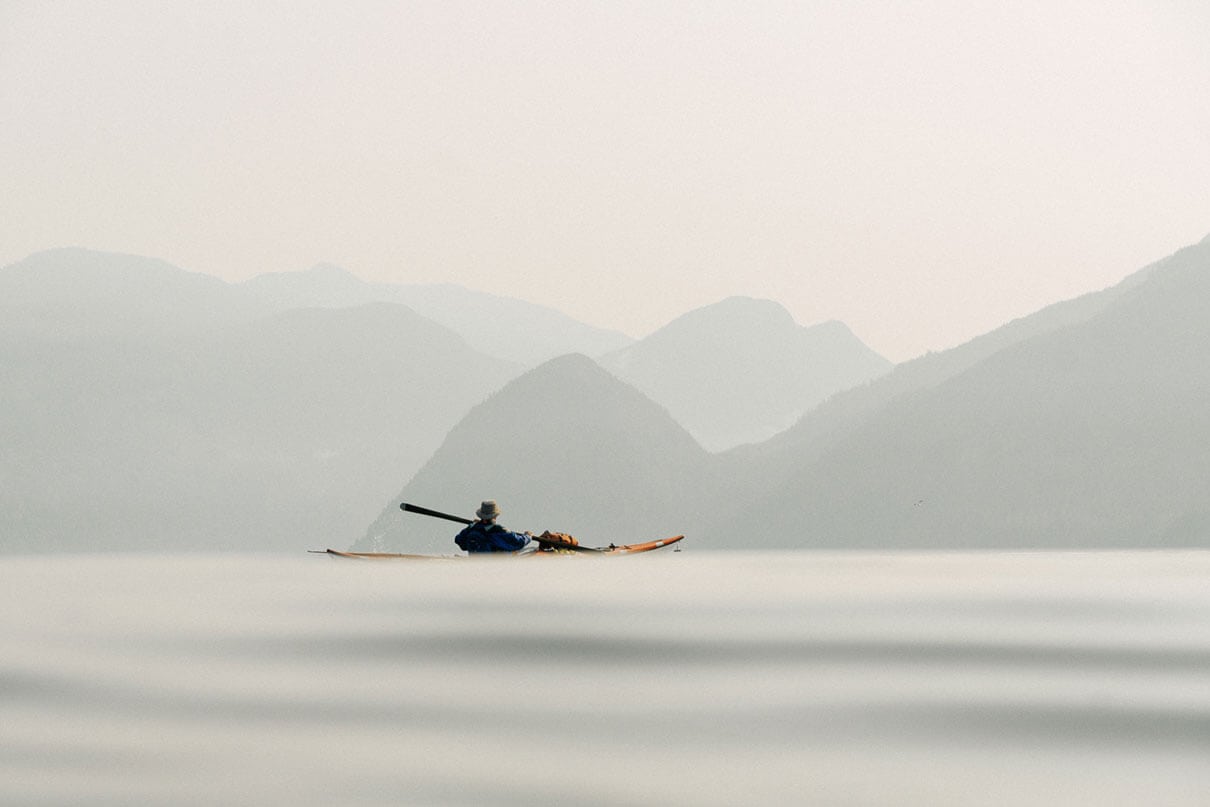
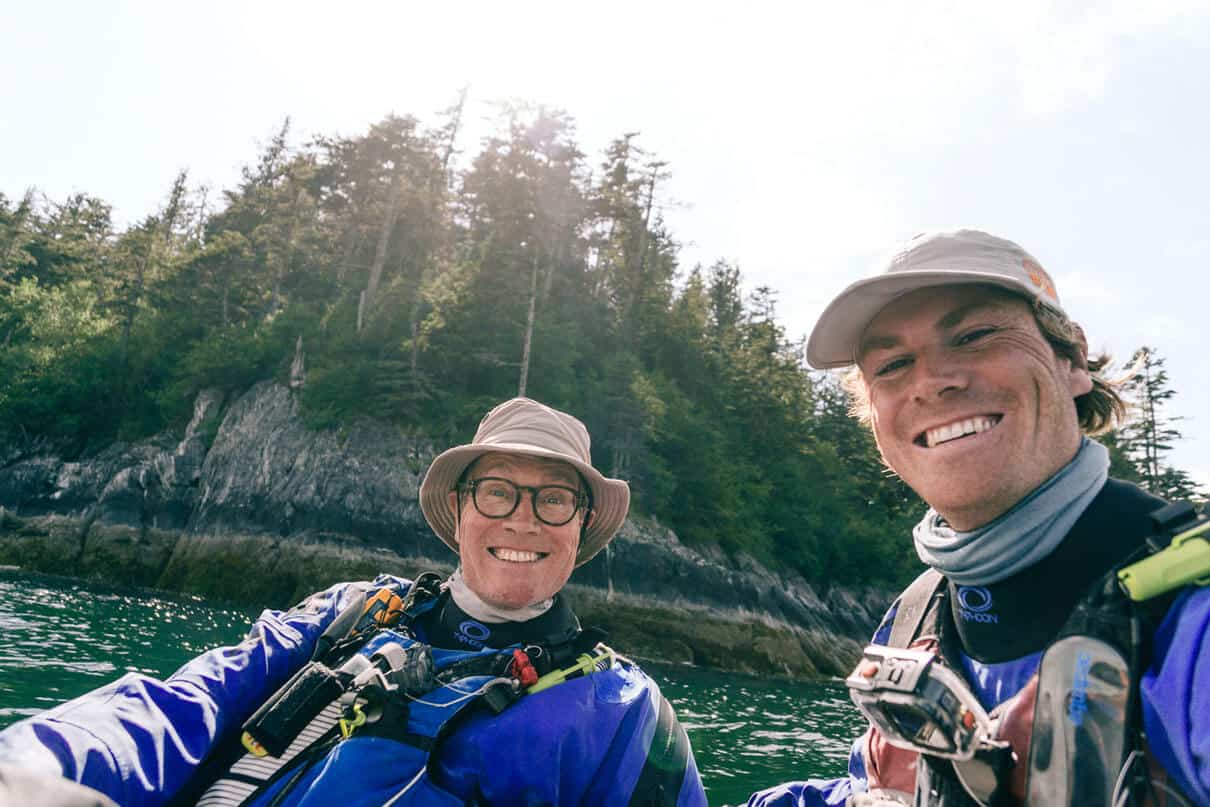

 This article was published in Issue 73 of Paddling Magazine.