Home Blog Page 268

Woods’ Dream Job Competition

Woods' Dream Job Competition
[iframe width=”560″ height=”315″ src=”https://www.youtube.com/embed/x815jQgKJFY” frameborder=”0″ allowfullscreen ]

Does a grueling 24,000 kilometer journey through the harsh wilderness of the TransCanada Trail sound like fun to you? Want to get paid to hike, paddle and horseback ride for five months straight? For two lucky Canadians, a new contest launching this week could fulfill those dreams.

Woods Canada is embarking on a search for its next brand ambassadors in its Ultimate #DreamJob competition. As part of the experience, two explorers will have the chance to work and travel together across Canada from the West Coast to the East Coast, while using and testing the latest in Woods outdoor gear.

Each week, the explorers will travel to unique destinations, produce compelling content and share their love of the Canadian outdoors with social channels. From May to September, they will kayak, camp and have a one-in-a-lifetime experience, all while getting paid. Sounds pretty great, right?

For full job description and to apply, see here.

Skill: Carve Beautiful Canoe Blades

Good to know. | Photo: Canoeroots Magazine staff

While the idea of carving your own paddle may intimidate some, it’s attainable by anyone with the right tools and willingness to learn. Follow this step-by-step approach to produce a paddle you can be proud to use and show off.

Needed

  • Wooden plank or paddle blank
  • Pencil
  • Band saw or jigsaw
  • Sandpaper (various grits)
  • Honed spokeshave
  • Epoxy, varnish or oil
  • 8 to 16 hours 

Get Started

After determining paddle length, choose an appropriate one-and-a-quarter-inch by six-inch plank. Pencil in a centerline on both faces. Draw your paddle profile, including blade, shaft and grip—tracing a favored paddle is fair game. Cut the profile on a bandsaw, then draw a centerline along this new edge, bisecting the width of the paddle.

The Blade

Shape your blade by beveling with a spokeshave from the centerline of each face to the edge. Work to achieve a thickness of three-eigths-of-an-inch on the lower third of the blade, tapered from a thickness of five-eigths in the middle third. The upper third of the blade should taper to the width of the shaft. Leave a spine on the centerline in the upper third of the blade. When the blade is the desired thickness, round the edges.

Tip: The sharper the edges the easier the blade enters the water. However, they are more easily damaged.

Grip and Shaft

Using a spokeshave, shape the grip. Pencil in lines along the lengths of all four sides of the shaft, halfway between the centerlines and the shaft edges. Using these guide lines, use a spokeshave to remove the four edges of your square shaft, creating an new octagonal shaft. Now remove those eight edges and continue shaping the shaft to a soft oval that fits your hand comfortably.

Finishing

Use a piece of 80 grit sanding cloth to remove tool marks and give an even shape. Sand again with 120-150 grit paper to remove the 80 grit marks, then 220 grit sandpaper to finish. Consider a light stain on white woods, such as ash. Finally, finish with an exterior grade polyurethane/spar varnish or marine oil.

Starter Kit

The Canadian Canoe Museum offers would-be woodworkers a starter kit that includes a honed spokeshave, cherry paddle blank and the book Canoe Paddles: A Complete Guide To Making Your Own. Order at www.canadiancanoemuseum.com.

For more detailed instructions click here.


Canoeroots Magazine CoverThis article first appeared in the Spring 2015 issue of Canoeroots and Family Camping magazine.

Paddler Advocates are Back with a Vengeance

Reflections: Paddler Advocates are Back with a Vengeance | Protest like it's 1993. Photo: Ray Smith / Times Colonist

Sea kayaking has always been strong on tradition. Paddlers revive old Inuit techniques, build boats from designs in museums, and retrace long-ago expeditions. But we have another important tradition that we neglected until recently: being a force for conservation.

In 1954, a paddler and retired chemistry professor named Harold Bradley teamed up with a group of river runners to save the Yampa River from dams in what is now Dinosaur National Monument. The campaign transformed a modest outdoor club into a household name in conservation: they’re called the Sierra Club. A decade later, river guide Martin Litton led a campaign to keep dams out of the Grand Canyon.

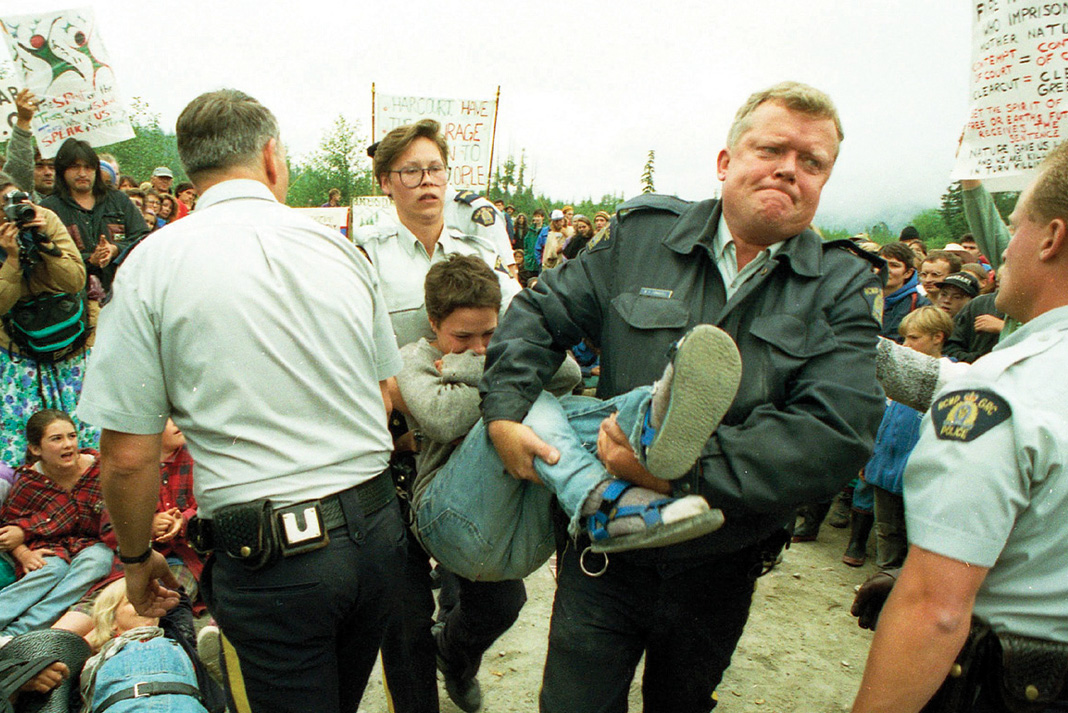
More recently, in 1993, sea kayakers joined forces with environmentalists and First Nations to save Vancouver Island’s Clayoquot Sound from wholesale logging. The protests marked the largest act of civil disobedience in the nation’s history, and preserved what is now one of the world’s best-known paddling meccas.

Then conservation abruptly disappeared from the paddling community’s agenda. Kayakers turned inward, focusing narrowly on the sport. In 2006, I was even told by a local paddling club that I couldn’t make an announcement about a campaign to protect natural areas, because it might be “divisive.”

Why the retreat? Ironically, one reason was success. Led by the likes of Litton, Bradley, David Brower and Edward Abbey, with roots firmly in outdoor exploration, the first wave of conservation won major victories in the ‘60s and ‘70s. Those victories created environmental laws that relied on science and legal action for enforcement. The need was suddenly for ecologists and lawyers who could appeal timber sales, file Clean Water Act suits, and protest obscure agency procedures.

About the same time, the sport of kayaking was growing and manufacturers and clubs found themselves maneuvering for customers and members. In this increasingly competitive environment, many feared alienating one side of the conservation debate.

After a two-decade hiatus, however, kayakers are re-embracing the art of advocacy. Conservation groups reached the limit of what they could achieve through law and science alone, and returned to mobilizing passionate people. In Portland, paddlers made headlines in 2012 by arranging their crafts into a giant “350” on the river (the amount of carbon dioxide the atmosphere can tolerate without cataclysm). From student Anna Gleizer’s 2012 circumnavigation of Siberia’s Lake Baikal to study water quality and climate effects, to the Sitka Conservation Society’s trips to survey wilderness areas and watchdog timber sales, paddling and advocacy have merged once more.

Reflections: Paddler Advocates are Back with a Vengeance | Protest like it’s 1993. Photo: Ray Smith / Times Colonist

We’ve also made the leap from raising awareness and collecting data to the hard-nosed work of changing policy. Letters and emails from paddlers helped shift the Forest Service from logging toward wilderness protection in Alaska and pushed a river-mining moratorium in Oregon.

Modern paddler-activists have another powerful tool at our disposal: the technological democracy of the Internet. One example is Out of Sight, Out of Mind, a marine debris campaign created on the cheap by kayak instructors using Facebook and Kickstarter.

In the next few years, I predict that kayakers’ resurgent conservation ethic will find the sweet spot between freewheeling awareness-raising and more coordinated strategies needed to create marine reserves, regulate pollution and pressure policymakers.

Back in British Columbia, paddlers of all stripes are once again on the frontlines of a pivotal battle. The stakes are every bit as high as in ‘93: the Enbridge Northern Gateway pipeline to Kitimat would transform the wild Central Coast into a tanker freeway vulnerable to a Valdez-size oil spill. The lost tradition has returned just in time.

Longtime contributor Neil Schulman celebrates kayaking’s diverse heritage in Reflections.


This article first appeared in the Spring 2015 issue of Adventure Kayak magazine. Subscribe to Paddling Magazine and get 25 years of digital magazine archives including our legacy titles: Rapid, Adventure Kayak and Canoeroots.

3 Tricks For Great Audio With Your Action Camera

Man kayaking and wearing GoPro on his hlmet
Take your adventure videos to the next level by recording higher-quality audio.

The popularity of action cameras is steadily increasing, as are the number of action videos on the web. However, a very important part of the video-making process is being neglected by both manufacturers and consumers alike.

Over the last couple of years I’ve gained experience in audio recording while making my sea kayak films, but the methods presented in this article are applicable in any situation where you want crisp monologue despite the hostile environment. “Plug and play” waterproof audio solutions don’t exist, but in this article I’ll show you three different setups I’ve come up with.

The three waterproof audio recorder setups all require you record the audio separately and sync it with the lesser-quality audio recorded on your action cam.

The setups are:

1. Recorder in a condom

Audio recorder in condom

A rather cheap and versatile option is to seal a normal audio recorder in a condom. I use the popular Zoom H1 Stereo Recorder, but this trick applies to any audio recorder that’ll fit in a condom.

The thin yet tough membrane of the condom allows most of the audio waves through, and the device can still be operated as usual. Although this article mainly focuses on monologue, this recorder also works really well for recording ambient sounds.

How to use

  • Clean the condom of any lubricants with a paper towel
  • Roll the condom on and tie a knot
  • Apply the windscreen and you are ready to clap (to make syncing audio easier later)
  • When outdoors, always use a fur/windscreen to avoid wind noise. In my experience the Redhead windscreen is the best option for the Zoom H1 recorder.
  • Keep the windscreen dry and bring a spare
  • Tie a lanyard to the recorder

Pros

  • Economical
  • 10 hours of recording time on a AA battery
  • Small
  • Versatile
  • Surprisingly durable
  • Fast setup

Cons

  • Plastic cabinet picks up noise
  • Can’t monitor audio with headphones when condom is on
  • Condom blocks the highest frequencies
  • Condom can rip open
  • More prone to pick up wind noise
[ Paddling Buyer’s Guide: View all electronics for paddling ]

2. Waterproof lavalier microphone

Audio recorder in waterproof bag

This setup gives you a lot better audio quality but will cost you almost the same as your action cam. It’s a combination of the VT500 Water from Voice Technologies—a waterproof lavalier (lapel) mic that can withstand temporary submersion— and the Zoom H1 recorder—kept dry in a drybag from Aquapac, which can also take a short plunge.

How to use

  • The Aquapac has a special watertight opening that allows cables to run through, for use with waterproof earphones to monitor the audio
  • The input level in the Zoom H1 should be set at 30 to 40
  • The microphone can be positioned with a clip about 20 to 30 cm beneath the talent’s mouth. In some cases I have used PVC tape to secure the mic to the PFD.
  • In my experience, it’s best to keep everything ready in a watertight box and as soon as you’ve finished recording, return everything to the box. This way you’ll keep the fur dry and the cables protected from any mishap.
  • Always use a fur/windscreen on the mic and bear in mind that the audio recording will be useless if the fur gets wet—so always bring some spares. I use the ones from Rycote when working with lavalier mics and then tie an elastic band around the bottom of the fur to avoid losing it should I go overboard!

Pros

  • Good audio quality
  • Waterproof
  • Durable microphone picks up less wind noise

Cons

  • More costly
  • Takes time to set up

3. Smartphone with lavalier microphone

Smartphone in waterproof bag.

This setup is not entirely waterproof, but will give you good audio results at a fairly cheap price. The combination is similar to the example above, but your smartphone is used as the recorder and kept safe in a smaller Aquapac. The microphone is a Røde Smart Lav+.

This lavalier is designed for smartphones and gives you really decent sound at a very reasonable price. Also, the fur that fits this lavalier is a lot more affordable. Røde gives you three windscreens for the same price as one from Rycote. The fur protects not only the audio from any wind noise, but also the mic from the first splashes of water.

How to use

  • Download the Røde Rec APP and set sample rate to 48,000 hertz. When back home, export the recordings as a .wav file. Alternatively, use the standard memo app on your smartphone.
  • Invest in a package of Røde Mnifur Lav
  • Set phone on flight mode
  • Position the microphone 20 to 30 cm beneath the talent’s mouth
  • If you want to monitor your audio while recording then you can invest in a Røde SC6 adapter that allows you to plug in headphones while recording
  • Warning: If using this setup in the water, I would strongly advise you bring an extra means of communication in case your smartphone runs out of battery or is dropped accidentally

Pros

  • Reasonably priced
  • Good entry-level mic
  • Picks up little wind noise
  • Monitor audio
  • Cheap accessories

Cons:

  • Not a waterproof mic
  • Drains smartphone battery
  • Touchscreen can be difficult to operate if wet

It is a hassle to record audio out in the field, and you constantly make mistakes, but you also learn something new every time. The real pay-off comes when you present your rugged adventure video without the audience ever noticing the audio.

Thor F. Jensen is an award-winning filmmaker, illustrator and adventurer based in Denmark.

Kokatat’s Polartech Power Dry Liner

Photo: Dawn Mossop
Kokatat’s Polartech Power Dry Liner

Nothing beats a onesie when you’re trying to stay warm. Kokatat’s Polartech Power Dry Liner is a warm, stretchy layer to sandwich between your base layers and drysuit. My favorite feature: the women’s version has a drop seat compatible relief zipper.

Mens: $160, Women’s: $175 | www.kokatat.com

RPv17 rgb

This gear review first appeared in the Spring 2015 issue of Rapid magazine.


Video Skill: How to Make a Flip Line

Photo: Screen Capture
Screenshot of a group of whitewater paddlers, with one holding a red flip line.
[iframe width=”560″ height=”315″ src=”https://www.youtube.com/embed/s2y2Bt7l2wE” frameborder=”0″ allowfullscreen ]

From NRS:

“A flip line, or guide belt, made with a length of webbing and a locking carabiner, has many different uses for kayakers, rafters and canoeist. In addition to helping flip an overturned raft, you can use it to make a rescue anchor, boat tether, rescue harness, etc. Swiftwater rescue instructor Jim Coffey shows how to build yours.”

Video Skill: Equipping Your PFD for Rescue

Photo: Screen Capture
Screenshot from this NRS video featuring Jim Coffey showcasing whitewater rescue gear such as a throw bag, pulleys and carabiners and a whitewater pfd.
[“https://www.youtube.com/embed/jd6GL5tmQh0”]
An easy copy and paste to equipping your PFD for Rescue

Whitewater rescue gear should be included in your purchase of a whitewater canoe or kayak as it is only a matter of time before you or your paddling buddies are in a situation that will require some, if not all of what is shown in this video produced by NRS and whitewater guru, Jim Coffey. Not only is it important to own and bring this gear with you on the river, it is important to know how to use it effectively and to ensure that those you paddle with know how to use it as well. As Jim Coffey says “wearing a quick-release rescue PFD is only the beginning of getting prepared for rescue situations on the water. Experienced rescuers equip their life jackets with pulleys, prussics, crib sheets, carabineers and other essential items.”


Video Skill: How to Quickly Coil a Throw Rope

[iframe width=”560″ height=”315″ src=”https://www.youtube.com/embed/mcHoXpHi5yU?list=PLqAWcG4wIk6NaN1cOLKXd-a37HHRLAuyk” frameborder=”0″ allowfullscreen ]

From NRS:

“Knowing how to quickly coiling your throw rope for a second toss is an essential swiftwater rescue skill. Here’s a trick to help you make a fast, tangle-free second throw.”

Gear Favorites for a New Season

Gear Favorites for a New Season

With all the new gear and gadgets hitting the water this spring, it’s easy to end up in a daze of bling and cha-ching. As editor of Kayak Angler magazine, I have my pick of the newest and hottest swag. But each season, these five favorites are in my kit and on my kayak…


PM FieldTest thumbContinue reading this review in the April 2015 issue of Paddling Magazine, available on your desktopApple or Android device.


Video: Learn the Scoop Sea Kayak Rescue

Photo: Screen Capture
Leon Somme helps his paddling partner Shawna Franklin into her sea kayak using the scoop rescue.
[iframe width=”560″ height=”315″ src=”https://www.youtube.com/embed/wE5y_DW2h04?list=UUyNgITuDZ_YWn3BqtBWMxug” frameborder=”0″ allowfullscreen ]

In this episode, presented by Adventure Kayak magazine, Shawna Franklin and Leon Sommé of Body Boat Blade use the “belly down, hug the boat” method as a more stable, easier approach to this rescue. They have also incorporated the super simple “Haggerty Handle” for the rescuer who may struggle to right the victim’s boat. Watch it, then try it!

The scoop rescue is a fast and effective way to get an incapacitated paddler back into their kayak. In this video demonstration, presented by Adventure Kayak magazine, Shawna Franklin and Leon Sommé of Body Boat Bladeuse the “belly down, hug the boat” method as a more stable, easier approach to this rescue. They have also incorporated the super simple “Haggerty Handle” for the rescuer who may struggle to right the victim’s boat. Every variation of sea kayak rescue has its’ own specific application and the scoop rescue is no different. It was developed as one way to assist tired paddlers who had exited their kayaks and were too incapacitated to re-enter under their own power. Utilizing the body weight and natural force of both paddlers, it is a low impact rescue that reduces the chances of muscle strain or continuing paddler fatigue. Watch this video demonstration.

Stay tuned for more skills videos with Body Boat Blade International in this series, presented by Adventure Kayak, and watch more techniques on our YouTube channel.