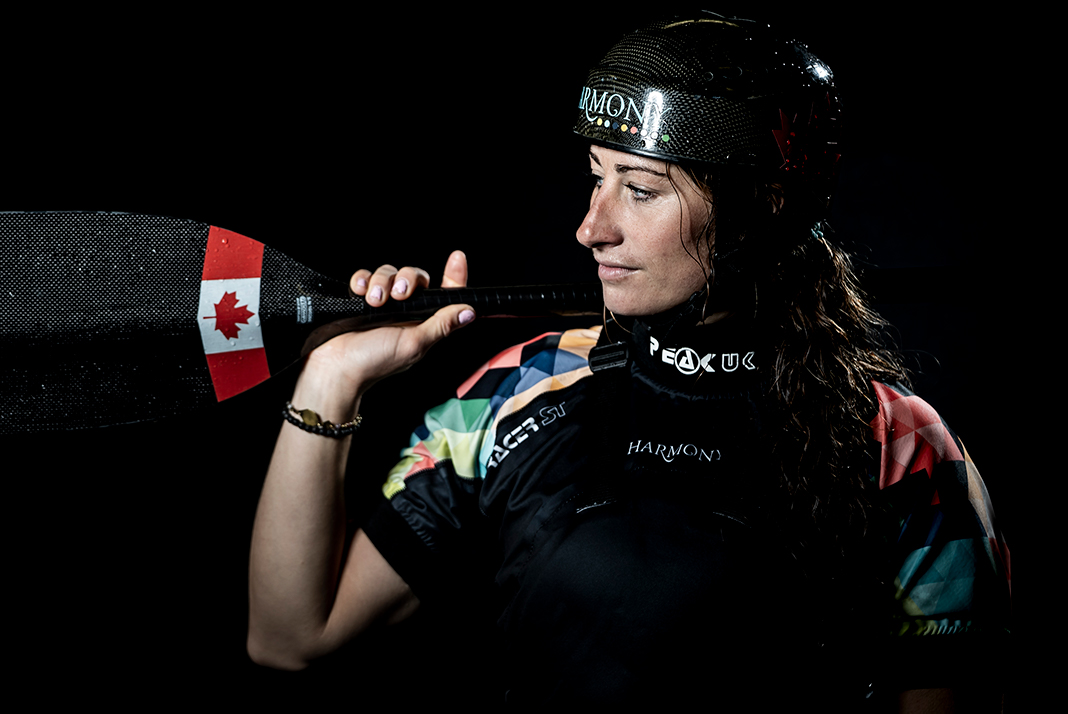
Goddess of the sea in her natural habitat. | Photo: Jaime Sharp
When Freya Hoffmeister asked me to accompany her on part of her quest to circumnavigate North America, I jumped at the opportunity. We would paddle down the California coast through the Channel Islands, an 11-day blip in a 30,000-mile journey she expects to take 10 seasons to complete.
I was curious what it would be like to paddle with this powerhouse. I heard stories about Freya from all over the world—mostly about an unrelenting speed demon—and had met a couple of men with broken hearts and egos from their time with her. Would I keep up? Could I last? Were there more than great white sharks to worry about on this trip?
Freya was looking to make more than just miles on her North American odyssey. On previous journeys, she paddled solo and unsupported, including around Australia (2009) and New Zealand (2007), and around South America over four years (2011-2015). She’s gone from doing trips in one continuous leg to having them broken up over years. On this epic trip, and for the first time, she asked other paddlers to join her for segments.
After meeting up at the Lumpy Waters sea kayak symposium in Oregon, we traveled south to our put-in at Port San Luis, California. Swell built as we set off from our placid beach and worked south down the rugged coast under the California sun. At the end of our first day, we came in through dumpy surf, smashing sand and spray up the beach. It took multiple attempts to leave the next day, and Freya asked me to help launch her, signaling someone who wasn’t beyond asking for assistance.
Despite two lovely days paddling in the sun on a pulsing Pacific coast, things changed when we reached Point Conception. Not only were we paddling in one of the most active great white shark areas—later we met a local shark researcher who told us he saw two huge sharks in the area we had paddled through 35 minutes earlier—we had timed it perfectly for sundowner winds ripping offshore from the point late in the day. Heavy winds, whitecaps and building onshore swell had us scraping into a military base behind a severely exposed breakwall where people on the dock helped pull our gear and kayaks up a ladder.
Most nights, we settled into a great campsite as the sun set and awoke to thick fog. Crossing from the mainland out to San Miguel Island was a 23-mile slog on surprisingly calm seas. As the sky darkened at the end of the day, we found ourselves paddling amongst playful sea lions as we landed on a beach to find camp.
The Channel Islands are one of the wildlife wonders of the world. As we paddled through the exposed group of islands over the next few days, giant elephant seals and the curious sea lions often covered the beaches and little foxes came by almost nightly to inspect our camp and kayaks.
[ Paddling Buyer’s Guide: Find everything you need for a sea kayaking trip ]
It’s an area of intoxicating beauty and harsh climate. I increasingly found Freya—the self-proclaimed goddess of the sea—like the sea herself. Strong, steady and ever-present, but also harsh and unrelenting at times. Despite our frequent disagreements, we laughed a lot and enjoyed not having to babysit each other on the ocean.
While she claims not to be a speedy paddler like many stereotype her, she does declare an absolute love and joy for efficiency. To many, this could be interpreted as a love for speed, and it certainly made me feel slow and clumsy in camp at times. Despite previous longer and more challenging expeditions, when we paddled off East Anacapa Island and landed in Malibu on the mainland after 10 days together, I was grateful for the journey yet tired emotionally and physically.
I had lived, I had kept up, but keeping pace with Freya is no walk in the park. Like the ocean, she is a force of her own.
Jaime Sharp is a professional photographer and sea kayak guide. Freya Hoffmeister paused her North American circumnavigation on March 21, 2020, due to the coronavirus crisis.
Goddess of the sea in her natural habitat. | Photo: Jaime Sharp
Popular camp slogan: WHAT ARE YOU DOING THIS SUMMER? Campers: AHH... NOTHING. | Photo: Scott MacGregor
Before I foundthe official notice in my inbox, I saw my daughter’s Instagram story. A collage of six photos, all girls her age, nine of them, her cabin group. In the photos, they are sitting on the swim dock shoulder to shoulder. They are in massage circles, arm-in-arm on the playing field and piggybacking. They are elbow to elbow on long benches in the dining hall with 130 more boys and girls who are more likely to abide by the five-second rule than they are any strict government policies on physical distancing. It would be an unenforceable rule and incontestably counterculture to what makes summer camp awesome. And so, this will be the first summer ever in its 67-year history that Kate’s summer camp will not come alive with campers, councilors and campfire songs.
It’s not just overnight camps that are canceled this summer, of course. The outdoor industry, as we know it, has been mothballed, at least for the spring. Health experts agree social distancing is best from a not-spreading-the-virus perspective. But there are going to be unforeseeable long-term emotional and cultural consequences. How we interact in the outdoors may never be the same.
My dad was years ahead of his time. He was a born and raised social distancer. And he passed this down to my brother and me. He was a truck driver and a mechanic, a hunter and a fisherman. He could put anything back together and skin a buck, but he wasn’t a hugger.
“I love you son,” was implied and understood with an extra jug of windshield washer fluid and a stoic nod as I drove off to a four-year outdoor recreation university degree program to start my new life as a born-again, albeit awkward, hugger.
Having spent 25 years living among paddlers, skiers, mountain bikers, climbers and hikers, I now appreciate the physical connection and closeness of our friendships. It is part of the culture and one of the unspoken and underappreciated benefits of the outdoor community.
Research suggests being close together triggers the release of the feel-good hormone, oxytocin. Oxytocin is good for us, and levels rise when we hug, touch or sit around campfires well within the now recommended six-foot social distancing guidelines.
Our pre-COVID touchy-feely hippy outdoorsy cultural normal enhances our psychological resources, such as optimism, self-esteem and mastery. We typically hold more favorable expectations about the future, have a higher overall evaluation of self-worth and believe we can determine our behavior and bring about desired outcomes. Every summer camp and outdoor program website promises this. But they often attribute it to their 1,000 pine-scented acres, climbing walls, guitar lessons, skits, kayaking, polar bear dips and wilderness canoe trips.
Maybe.
Or maybe it’s not the activities or nature at all. Maybe it’s as simple as all the human interactions happening within a close physical distance. Judging by the photos Kate shares on Instagram, it probably is. It’s probably good her camp is canceled. It wouldn’t be the same six feet apart.
[ Paddling Buyer’s Guide: Find everything you need to make sweet summer memories here ]
Also canceled this summer are the outdoor industry trade shows. For the first time in the history of this magazine, our editors will not be traveling to convention centers to preview next year’s paddling and camping gear.
That’s okay; I don’t think we’re ready either. Now that we can’t hug hello or even shake hands, it’s not just the kids who need to find a new normal. I don’t think we’re emotionally ready for the toe-heel-tap, or worse, the socially responsibly but so ’90s finger pistol guns.
It’s too soon. It’s going to take a while to go back a generation or two and remember how to say I love you without a hug.
Scott MacGregor is the founder and publisher of Paddling Magazine. At the time of printing, the province of Ontario has prohibited all overnight camps from opening this summer.
Popular camp slogan: WHAT ARE YOU DOING THIS SUMMER? Campers: AHH… NOTHING. | Photo: Scott MacGregor
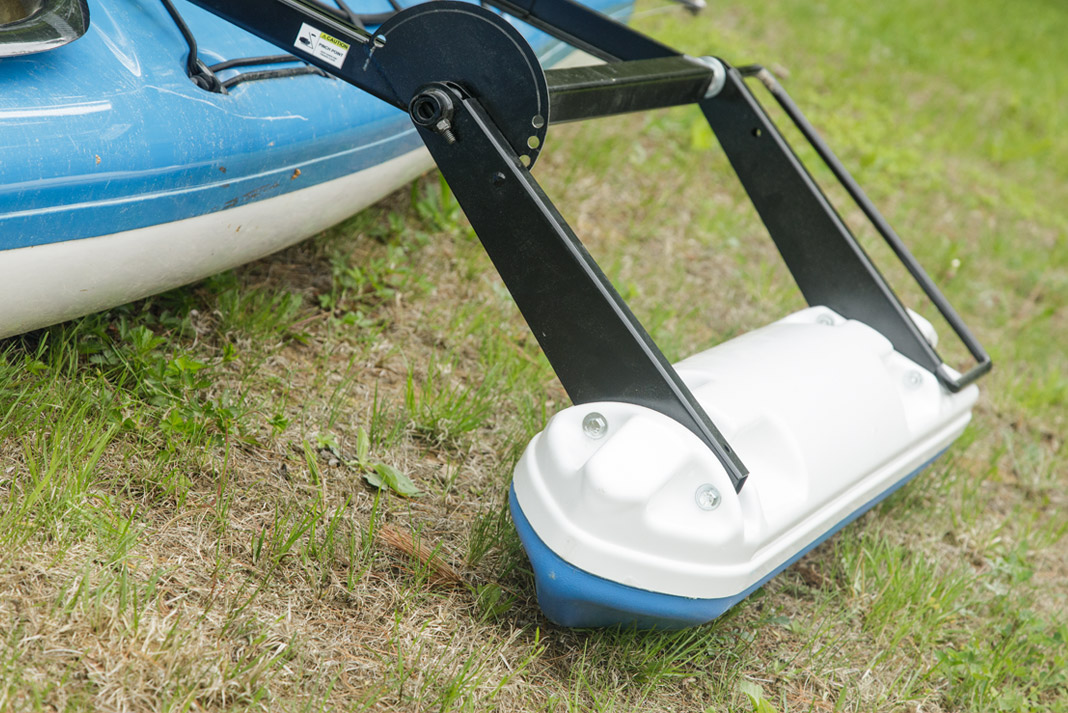
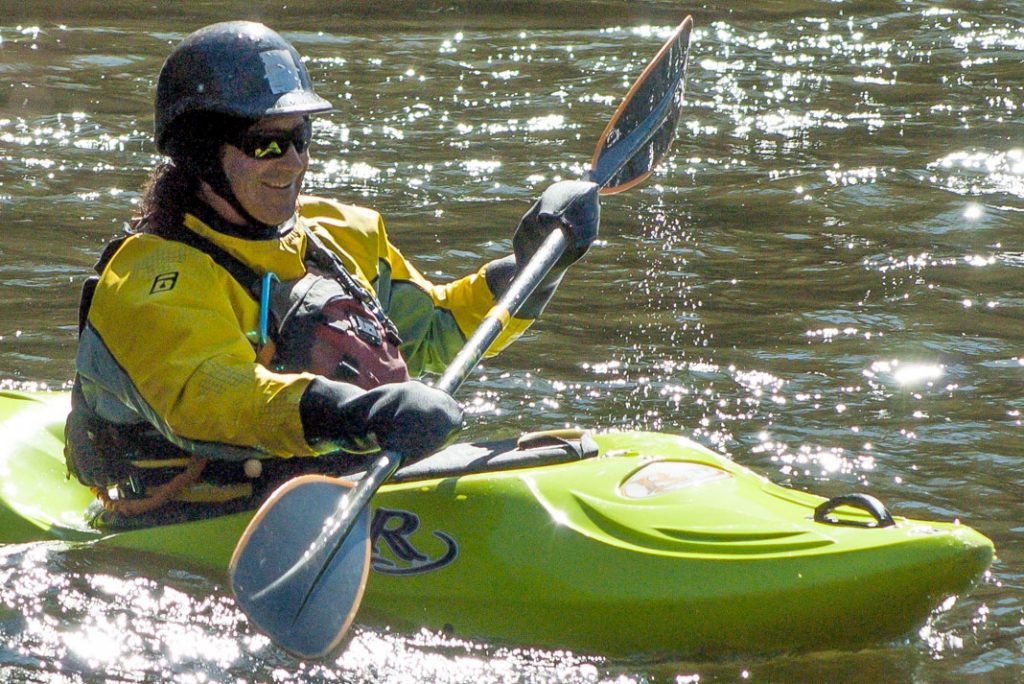
There are many reasons you may want to improve the stability of your kayak.
If you find yourself thinking, “This kayak just isn’t steady enough,” you just might be in the market for an outrigger. What are kayak outriggers? Simply put, they’re like training wheels for a kayak; they’re flotation devices that essentially widen the bottom of your boat, giving you more stability. They usually take the form of an arm protruding horizontally from the side of your kayak with some kind of pontoon at the end.
But why would you want them? Remember, they’re all about stability. There are a number of situations in which you may find your boat simply isn’t stable enough. Perhaps you’re on a long stretch of water where using a sail would be absolutely perfect, but you know rigging a sail up would compromise your stability. Outriggers can help with that. Or, maybe you’re just starting to get into kayak angling, but don’t feel totally stable rigging up rods, reeling in fish and taking your catch off the hook in your boat. An outrigger would help with that.
If you’re tall, heavy and always feel unstable in a kayak, then you can already imagine—an outrigger would help with that. And if you simply don’t feel safe in a kayak, an outrigger would help.
There are many reasons you may want to improve the stability of your kayak.
Types of kayak outriggers
Kayak outriggers, also known as kayak stabilizers, come in a couple different variations. The main two are inflatable or solid kayak stabilizer systems. Inflatable outriggers use inflatable pontoons that have a bladder with a tough outer membrane. They’re easy to store, are lightweight and can be inflated using your mouth; however, they are susceptible to punctures from rough terrain or your fishing equipment.
Solid kayak stabilizer kits use solid floats to offer more stability. Often made of PVC, these things are rugged and can be bashed off sharp rocks without concern. Of course, they’re a bit more difficult to store than inflatable options, and tend to be more expensive and heavier.
Most outriggers are highly adjustable, allowing you to find the right spot on your boat for them. Horizontal arm lengths vary as does the attachment method.
How to find the right outrigger for your kayak
If you’ve decided you need outriggers, you probably have all kinds of questions, one of them being, “How long should a kayak outrigger be?” Generally outriggers are between 30 to 36 inches long. They’re usually placed about three-quarters of the way toward the stern, just behind the seat. This keeps them out of the way of your paddle. Of course, this is all up to personal preference.
There are also some outriggers that lift out of the water, providing you with the ability to easily switch between paddling with or without their assistance as conditions change.
How to install outriggers on a kayak
There are a couple different mounting options, some easier than others. Some require you to drill a couple holes in your boat, some don’t. It’s certainly something to consider when shopping for outriggers.
Of course, it’s best to make sure the kayak stabilization kit is compatible with your boat before purchasing it. Any of the reputable outriggers will come with installation instructions. Following their directions, you’ll often have to drill a couple holes in your boat. If you’re totally uncomfortable doing this, your local outfitter should be able to do it for you.
Remember, you can’t un-drill holes! First, figure out the right location on your boat and mark it. When you’re ready to begin drilling, start with a smaller drill bit and switch it out for gradually larger ones to ensure you get the hole in just the right spot.
[ Paddling Buyer’s Guide: View all kayak stabilizers ]
DIY kayak outriggers
Of course anything you can buy, you can make yourself. A DIY kayak stabilizer is totally in the realm of possibility for the avid handyman (or woman!). You can build them from all kinds of materials available at the local hardware store: PVC plumbing pipe, old water bottles or crab pot buoys. You can even go full MacGyver and build it out of bubblegum and duct tape!
The great school of Youtube is probably your best teacher on this. A quick search will give you all kinds of results—some are 18 minutes long, some are six minutes and all have varying levels of useful information. Our best advice? Watch them all and take the best tips from each. Just make sure you test the stability of your homemade outriggers close to shore on a calm body of water before fully putting your trust in them.
Choosing challenge, simplicity and smallness in the face of modern comforts is the kayaker’s most counterculture act.| Photo: Harry Daley
I’ve been settling in for winter by picking up a musty hardcover, Seekers of the Horizon: Sea Kayaking Voyages from Around the World. California paddler Will Nordby edited the 11 stories within and released the book 30 years ago.
Nordby took his inspiration from an even older book, Folbot Holidays by Jack Kissner, published in the 1940s, which he found in a used bookstore when he was a new kayaker. “I like to think my anthology represents a passing of the torch for the current generation of kayakers,” Nordby mused at the time. “Perhaps some future generation might discover it in a used-book store.”
Ha! Nordby could not foresee my generation would be far more likely to instead discover his book thanks to an Internet search algorithm. Then have it shipped across the continent via a reseller on Amazon.com.
Much has changed since the time of Nordby’s stories—the opening tale describes an emergency kit with “dimes for the telephone”—but I’m amazed by how much the kayaking experience has not, even as our technology has advanced.
To arrive at this conclusion, first I had to actually read the book. I want to say I eagerly devoured Seekers the second it appeared in my mailbox. Instead, I treated it like radioactive Kryptonite. It got stuffed into my wardrobe, buried in a pile of clothes. Then it moved to my bedside table, then to my desk, collecting dust.
All the while, I was busy keeping away from a sea kayaking book of my own. This year, I had resolved to finally write about my 80-day kayak trip down Canada’s West Coast way back in 2002. After 17 years of gestation, I figure the thoughts should be about the right vintage now.
This might be surprising coming from the writer of a column about kayaking in a paddling magazine, but the very idea of reading a book—let alone writing one—about kayaking struck me as totally dull. I know how all these stories go, including my own. There’s some bad weather, minor mishaps. Some cold and discomfort. Lots of references to meals eaten. Clumsy attempts to describe the indescribable landscape. And then some canned revelation about how meaningful it all was. Ho-hum. I just remembered I have laundry to do.
Months later, when I finally launched into reading the first story about Paul Kaufmann’s regular paddles in San Francisco Bay, I was enchanted with an insight into a kayak journey which happened 50 years ago. Surprisingly antiquated and yet refreshingly familiar.
Kaufmann uses a wooden paddle, pigskin gloves and rests his feet on a piece of sheepskin and repurposed conveyor belt. He ties a plastic dog leash to his coffee thermos so he can fetch it from deep inside his kayak, presumably before bulkheads and day hatches arrived on the West Coast. He’s the guy who packs dimes for the telephone. There was hardly anybody paddling under the Golden Gate back then. And yet, every feeling he describes—gradually growing comfortable with the water and, over time, being changed by it—is familiar. He could be writing today. He could be a fellow paddler, a friend.
Reading an actual book in public, I stand out.
Choosing challenge, simplicity and smallness in the face of modern comforts is the kayaker’s most counterculture act.| Photo: Harry Daley
“What is that thing?” someone looks up from their phone to ask, and I have to wonder if they’re serious.
The pain of reading nowadays is palpable, like the slowness of walking when used to driving. Or the difficulty of running when out of shape. It’s not unlike the beginning of a trip, feeling a little bit uncomfortable in the new element, and shocked by the slow pace.
“Maybe in the age of the smartphone, reading a book about kayaking is a revolutionary act,” I suggest to my wife one evening. “Maybe writing a book about kayaking is a revolutionary act—maybe kayaking itself is a revolutionary act!”
“Oh, come on!” she scoffs in a voice she reserves for making fun of dumb things men say. “If you said this in public, people would throw tomatoes at you!”
Okay, revolutionary may be too strong a word. But kayaking is certainly going against the grain. Maybe in this Anthropocene epoch of extinction, the time to do things slowly is endangered too, succumbing to the destruction of mental habitat, the psychological wildness razed by chronic overstimulation.
[ See the largest selection of boats and gear in the Paddling Buyer’s Guide ]
Once I started thinking in terms of revolution, I saw it everywhere. To all the writers in Seekers, kayaking is a countercultural act. It always has been.
In Matthew Futterman’s recent book Running to the Edge, about the history of American distance running, he notes we forget about the sport’s rebellious roots. Back in the ‘60s and ‘70s, normal people didn’t exercise, and distance runners were a misfit band of hippies, borderline mystics chasing an elusive natural high at the limits of human endurance.
The kayaking boom was part of the same cultural moment, the one which gave rise to Nordby’s book, full of renegades battling the perceived dangers of going to sea in a tiny boat. Like firecracker Audrey Sutherland who half-swam and half-paddled surf-battered Molokai in a mail-order inflatable. “I was figuring out my systems as I went along,” she writes. “In all my reading about the sea, there wasn’t any guideline for this kind of expedition. It was all trial and error, mostly error.”
These adventures happened before kayaks were widely available, before Paddling Magazine and the Internet. Few of these paddlers had much outside knowledge of what anyone did before, or the sanctioned way to go about it. They were responding to an inner calling, deep in the human spirit, to go out and be one with the water, to make themselves tiny and vulnerable in the face of nature.
John Bauman tries to reassure the skeptical Icelandic authorities it’s not insane to paddle a kayak around their country. In the 1940s, Susan Meredith has to convince the captain of the government vessel on which she’s working along the Alaskan coast that she’s not nuts to purchase one of the local skin kayaks, which marks the beginning of a lifelong passion. Nordby eschews the plush tourist cruise to Glacier Bay, opting instead to camp out in the rain, amongst the bears.
[ Plan your next paddling adventure with the Paddling Trip Guide ]
Understated but pervasive is the thread of defiance and pride at doing this most unconventional thing, nose-thumbing at the bystander’s judgment that taking to big water in such a small, slow boat is boring or dangerous. “You’re crazy to be out there in that thing,” each writer is told.
Every one of these writers is a rebel paddling against the current of civilization, a free spirit choosing the hard way, choosing challenge, simplicity and smallness over the mainstream default toward the comfortable, easy and safe. This pattern of challenge-seeking forms the tapestry of a meaningful life.
If revelation comes at the end of a kayak trip, or the end of the story, it’s the payoff for doing things the hard way. In these days when there’s too much fighting between those who say we have to give things up and those who refuse, it’s helpful to remember sometimes less is more, and with great challenge comes great reward.
It reminds me of a quote from Bohemian-Austrian poet Rilke in another book I’m plodding through: “If only we arrange our lives in accordance with the principle which tells us we must always trust in the difficult, then what now appears to us as the most alien will become our most intimate and trusted experience.”
Choosing challenge, simplicity and smallness in the face of modern comforts is the kayaker’s most counterculture act. | Featured photo: Harry Daley
Using the proper handwear is essential for paddling in different seasons.
Want to keep paddling into autumn and winter, but can’t seem to keep your hands from freezing? Want to paddle all summer in the sun, but don’t want your hands to shrivel up and look like prunes at the end of the season?
It’s time to get yourself some kayak gloves!
[ Paddling Buyer’s Guide: View all paddling handwear ]
Do you need gloves for kayaking?
There are several reasons to wear gloves while kayaking. Sun protection, wind protection, cold protection, or maybe even protection from calluses and blisters are just a few of the reasons to wear kayak gloves.
When kayaking in weather colder than 0° Celsius (32° Fahrenheit), some sort of kayak gloves, mittens or pogies are absolutely essential. They become necessary for not only comfort, but also safety. If your hands are too cold to pull your sprayskirt, or grab onto rocks on the river bank to hold onto, then you become a burden on your paddling partners. If your hands are too cold to operate a throw bag, then you are unhelpful in a rescue situation. Thus, if you are paddling in the winter when it is cold, kayak gloves are essential.
Using the proper handwear is essential for paddling in different seasons.
Types of handwear for kayaking
Gloves
Kayak gloves are made out of durable neoprene. They work just like any other pair of gloves, and keep you warm by trapping body heat against your skin.
Some people also like to use kayak gloves in the summer as a layer of protection against the sun. Most of these gloves come as the fingerless type, with the tips of the fingers being free to tackle any task that may come up.
For a good pair of warm kayak gloves, check out the NRS Maxim Gloves.
Advantages
One of the advantages of using kayak gloves as opposed to mitts or pogies is that they retain your dexterity. You will still be able to do simple tasks with your fingers, like buckling your helmet or unzipping your PFD pocket. You will also be able to safely use a throw bag in case of a rescue. Some find that gripping the paddle is easier in gloves than in mitts.
Disadvantages
A disadvantage of using kayak gloves is that they tend to be less warm than mitts or pogies. Because your fingers are spread apart rather than bunched together, they produce less heat and lose heat faster than they would in mitts or pogies.
[ Paddling Buyer’s Guide: View all paddling gloves ]
Pogies
Pogies function in a similar way to kayak mitts, but instead of being attached to your hands, they are attached to your paddle. Pogies use a velcro system that wraps around the paddle shaft, allowing the paddler to fully grip their paddle with their bare hands, while having their hands fully covered and protected by a neoprene layer.
Advantages
Pogies are advantageous to use in cold weather where you will need to have access to your fully-functioning fingers as fast as possible. Pogies are good for paddling harder whitewater in cold weather as you will not lose any dexterity in your fingers, and will be able to perform rescues just as fast as if you didn’t have anything on your hands.
Disadvantages
Pogies are disadvantageous because they increase the weight of your paddle by quite a bit. This isn’t as noticeable when you are just doing a short stretch of river, but the weight does become noticeable on longer river trips or multi-days paddling trips. Pogies are also not as good for playboating or freestyle kayaking, as they will become water-logged if you are flipping over frequently.
How to use kayaking pogies
Kayaking pogies are fairly simple to use once you get used to them. Simply un-velcro each pogie so they are both laying open, then wrap each pogie around your paddle shaft where your hands normally sit. Re-velcro each pogie together so each pogie sits on the paddle shaft nice and snug. Your pogies should be able to be moved around the paddle shaft if you take your time to move them, but they should be snug enough on the shaft that they don’t slide around randomly while you are paddling.
For a good pair of pogies, check out the NRS Mamba Pogies.
[ Paddling Buyer’s Guide: View all kayaking pogies ]
Mitts
Mitts are the warmest type of kayak handwear you can purchase. As long as you keep your body moving and your blood pumping, your hands will be kept warm in below-freezing temperatures while using mitts.
Advantages
The advantage of using mitts is the warmth. Hands down the best warmth you will get in any sort of kayak handwear.
Disadvantages
The disadvantage of wearing mitts is that you will have next to zero finger dexterity. Simple tasks like buckling your helmet or unzipping your PFD will require you to remove your mitts. Removing your mitts will then expose your fingers to wind, snow, rain and cold, thus actually making your fingers colder than they would be in gloves.
You will also have to remove your mitts in the case of a rescue situation, as you will be unable to operate a throw bag or river knife while wearing mitts. The task of removing your mitts will make you slower to the rescue.
With this said, NRS does make a pair of mitts with open palms. The NRS Veno Mitts aid in paddling grip and also give you easy access to your fingers. You won’t have to take the mitts completely off to access your fingers—just the top part of the mitten.
For another good pair of kayak mitts, check out the NRS Toaster Mitts.
[ Paddling Buyer’s Guide: View all kayaking mitts ]
Materials
Kayak gloves, mitts and pogies built for warmth are all made of neoprene. The neoprene traps water against your skin and uses body heat to warm your hands up. The warmest mitts will have at least a 3-millimetre-thick neoprene layer. Pogies will have 5 millimetres or more. Kayak gloves aren’t always as warm as the other options, so make sure to check how thick the neoprene is before purchasing.
Kayak gloves built for sun protection are normally made out of polyester, with some neoprene bits added around for fit.
What to wear in different seasons
When paddling in summer, the Mustang Survival Traction Open Finger Gloves are a good option to keep your hands protected from the sun.
On a chilly autumn day, when the weather hasn’t quite reached zero degrees yet, a pair of kayak gloves will do just fine.
In winter, it’s time to break out the mitts and pogies when the temperature drops below freezing. Mitts will be better for days on the water when you will be flipping over quite a bit. Pogies will be better for when you are running harder whitewater, and want easy access to your fingers.
Kayak gloves, mitts and pogies should be cared for just as carefully as you would care for your drysuit. They should be removed from your paddling bag every evening and dried out, just like you would dry out your drysuit after paddling.
Kayak gloves and mitts tend to wear out around the thumb, right where you grip your paddle. If holes develop around the thumb area of your mitts or gloves, simply sew them back together with dental floss, add a dab of aquaseal, and they will be like new!
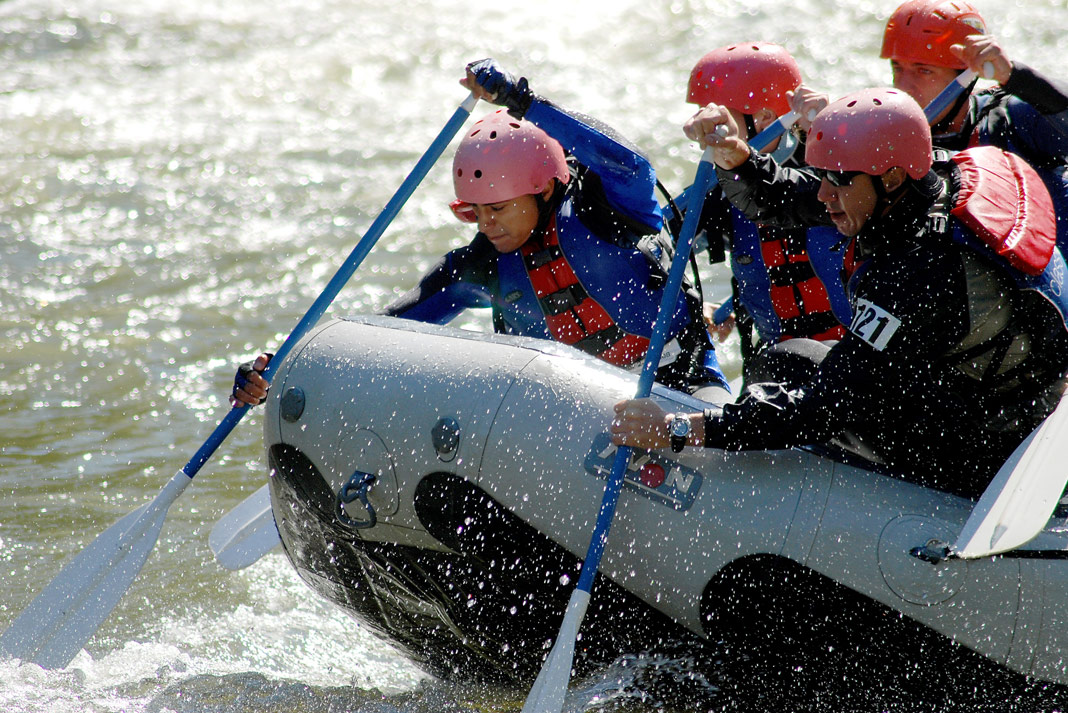
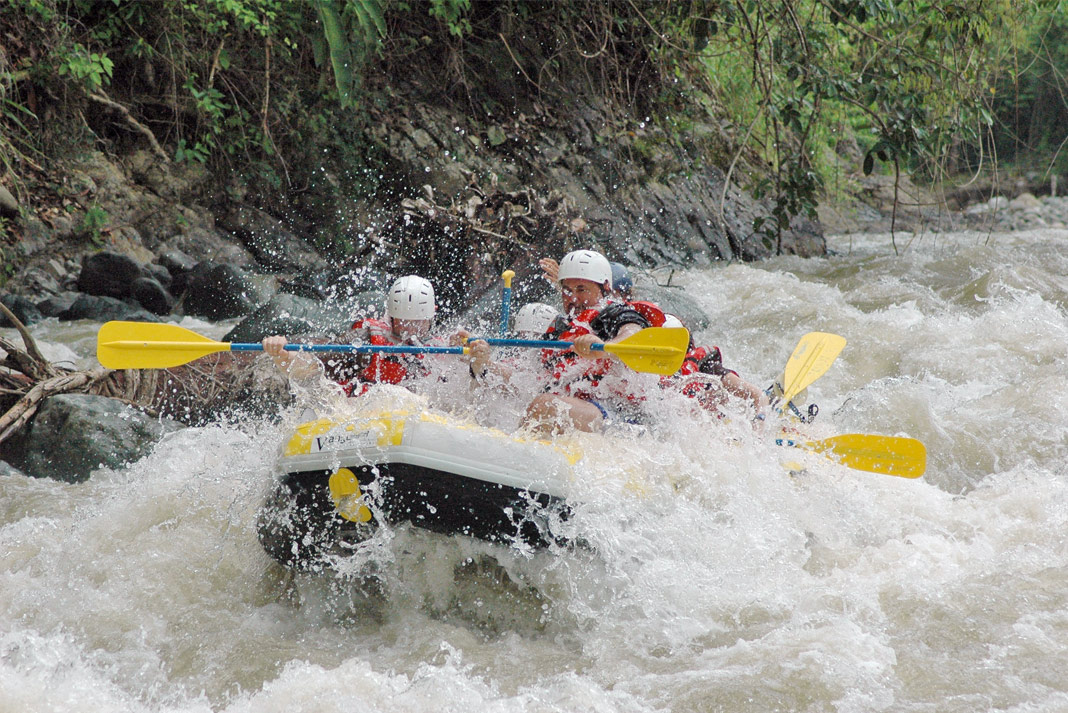
Whatever level of excitement you're looking for, there's a whitewater rafting trip out there for you.
If you’ve never been whitewater rafting, then you really should put it on your bucket list. It’s an amazing way to see a river, experience the power of whitewater and have a great day with friends old and new.
If you have an adventurous spirit, you might not be too concerned about what’s involved in a rafting trip. Paddling hard, working as a team and getting absolutely soaked? Sign me up. However, if seeing pictures of rafts launching off waves makes you a little nervous, this guide will help put you at ease by going over everything you should expect from a trip. Including letting you know that you don’t have to go on a wild ride your first time out.
What is whitewater rafting?
Whitewater rafting is a recreational activity where a group of people paddle down a river in an inflatable raft. It’s a popular thing to do on rivers that are appropriate for it, so wherever such a river exists there will be outfitters. These outfitters provide all the expertise, gear and information on how to paddle the river safely. It’s a really fun experience that just about anyone can do. While you can buy your own raft and get into the sport on your own terms and time, the majority of people choose to go the outfitted route.
Whatever level of excitement you’re looking for, there’s a whitewater rafting trip out there for you.
What is the difference between whitewater rafting and black water rafting?
Whitewater and black water rafting are seriously different things—black water rafting involves taking a raft down rivers that are in caves. It’s a pretty niche sport and isn’t something you find at your regular tourist destination.
Whitewater rafting, on the other hand, can be found all over the place. Any place that has jungle treks (think Costa Rica) probably has whitewater rafting options. The same goes for big rivers, like the Ottawa in Canada or Colorado in the United States. Whitewater rafting involves paddling down whitewater (the rushing, splashing waves look white and are therefore called whitewater) rivers.
What are the levels of whitewater rafting?
Each river presents different obstacles and conditions (and these obstacles and conditions can vary depending on the time of year). The size of the waves and the presence of waterfalls and whirlpools make some rivers harder to paddle than others. As such, river guides had to come up with a system to grade these features.
River ratings go from class I to VI. Class I rapids are found in moving water that gently pushes a boat and make for an easy, relaxing paddle. Class VI are the rivers you see in Red Bull kayaking videos with massive waterfalls, narrow canyons and huge waves.
Generally, whitewater rafting trips stay in the class II to IV category.
What size rafts are there?
There are a couple different raft sizes and how many people are in the raft will depend on the time of year and how busy the rafting company is. That said, the usual numbers are about six to eight people per raft. Some outfitters will also have larger rafts that can accommodate up to 12 people.
Why go whitewater rafting?
Imagine rolling over a wave, darting between some rocks and then smashing through the next six-foot wave of warm water on a hot summer day. Imagine doing that with your best friends, laughing and screaming at the thrill of it all. Whitewater rafting is like spending the day at a water park made by mother nature. And, of course, you’ll also get to see some amazing scenery in a place not too many people are privy to. It’s a super fun way to while away a day with friends or family.
[ Paddling Trip Guide: View all rafting trips ]
How do you prepare for whitewater rafting?
If you’re going with an outfitter, there isn’t much you need to do to prepare. The outfitter will provide all the gear and pre-instruction, and your on-board guide will supply you with direction on the river. You’ll just need to listen, paddle hard, and be ready to get wet and have a good time.
If you’re scared of rushing water, then you’ll need to mentally prepare for that. The guides will take good care of you though, and you can be sure their number one concern (after your safety) is that you are comfortable with what’s going on.
What should I bring for rafting?
Your outfitter of choice will have an FAQ page on their website telling you what to bring. Check with them the day before you go and pack whatever it is they suggest. You’ll generally want an extra pair of clothes and towel for after the paddle, and maybe some food and drink for afterward as well. You can leave these items in your vehicle, or send them in the shuttle vehicle to the pick-up location.
If you wear glasses, bring a strap to attach your glasses to you. And don’t forget to apply waterproof sunscreen before heading out!
What to wear whitewater rafting
One of the most frequently asked questions is, “What should I wear while whitewater rafting?” And it’s a great question. You’re definitely going to get wet. Owl Rafting, a company that sends thousands of people down the Ottawa River every year, gives this advice: Wear sneakers, sandals with a heel strap or water shoes—they don’t allow flip flops or Crocs.
In terms of clothing, going for athletic pants and shirts (read: quick-dry, non-cotton material) is your best bet. Wearing a bathing suit underneath these items is also a good idea as it will allow you to dry out faster once you’re done. On cold days, wool socks and wool or fleece sweaters with a windbreaker are recommended. On top of this, nearly everywhere that has cold water temperatures will rent wetsuits.
How do you stay warm when rafting?
If you’re really concerned about staying warm while rafting, the best thing you can wear is a wetsuit. Most outfitters will rent wetsuits for an extra fee and the extra comfort they provide is well worth the money. Simply put, if you get cold easily, rent a wetsuit.
What do you wear under a whitewater rafting wetsuit?
If you’re going on an outfitted tour and you’re using a rental wetsuit, the ideal clothing underneath is a rashguard. This is basically a form-fitting shirt made of swimsuit-like material. If you don’t have a rashguard, just wear a bathing suit or boardshorts underneath. You want the neoprene of your wetsuit as close to your body as possible to stay warm.
Can you wear Crocs whitewater rafting?
Most outfitters will say heck no to Crocs. The problem is you’ll lose them. Same goes for flip flops. If you do wear sandals, they need to be an active style of sandal with a heel strap.
What are the best shoes for whitewater rafting?
The best shoes for whitewater rafting are the same shoes that are the best for whitewater canoeing and kayaking—sport specific shoes that drain well and can handle being soaking wet are best. That said, designated paddling water shoes are pricey. Your next best option is an old pair of sneakers that won’t get really heavy if they’re wet. You’ll be walking over rocks, roots and rough ground, so having more support than dollar store water shoes is preferable.
What to expect on a whitewater rafting trip
Most whitewater rafting days involve some sort of orientation/safety meeting. You’ll watch a video and/or listen to instruction, get geared up and then get in the boat (though sometimes you will need to be shuttled to the put-in first). Depending on how long your tour is, you’ll head downstream for anywhere from one to six hours.
How to whitewater raft
Outfitters will provide instruction before you get in the boat, and once you’re in it too. Sometimes you’ll have a canoe-style paddle, other times you’ll be told to just hang on! Rest assured, river guides do this every day, all summer long, and they know how to keep you happy and safe.
How to steer a whitewater raft
Rafting guides do most of the steering during a whitewater trip. They’ll be using two oars, set up like a row-boat (only facing forward) and will do the majority of the heavy steering. Sometimes, you’ll be given a canoe-style paddle to help out, but it depends on the river, the group and the outfitter.
Is whitewater rafting dangerous?
Of course anything like whitewater rafting involves an element of risk, but outfitters spare no effort to keep their clients safe. Bumps and bruises happen, but serious injuries are few and far between.
How many people die from whitewater rafting?
While there are deaths from whitewater rafting, the numbers are negligible. The statistics are about six deaths per 2.5 million rafters.
What happens if you fall out while water rafting?
Do you fall out whitewater rafting?
Your guides will generally avoid having you fall out of the raft. That said, the safety meeting at the beginning of the trip will prepare you with how to handle such an accident.
What happens if you fall out?
During the safety meeting you will be told what to do if you fall out of the raft. They’ll tell you how to swim in rapids and where to exit the river or flow of water. Your guide will also yell instructions to you on what to do. If you do fall out of the raft, make sure you know what’s downstream, take actions to avoid anything dangerous, and then look to your guide for instructions. They’ll either come get you and pull you into the boat while still on the water, or in rare circumstances they’ll ask you to swim to shore and then they’ll come get you.
How do you stay in the raft when whitewater rafting?
Your guides will tell you the best way to stay in the boat while whitewater rafting, but the best advice is to brace your legs as well as possible and hold on. If you’re not using a paddle, you can simply hold onto the boat as tight as possible. Anticipating what the boat will do when hitting rocks or waves and counteracting the movements will also help.
Who can go whitewater rafting?
Whitewater rafting is fun for the whole family. Outfitters often take kids as young as 5 and the maximum age will depend on any preexisting health conditions. It’s best to ask this question of your outfitter right off the bat.
Is there a weight limit for rafting?
The easy answer is no. Most outfitters claim there is no weight limit for paddlers.
How old do you need to be to whitewater raft?
Many outfitters will take kids as young as 5 years old, but more difficult trips may have higher age limits or a minimum weight limit.
Should I go whitewater rafting if I can’t swim?
Outfitters are prepared for non-swimmers and have had non-swimmers in the past. Just let the company know and you’ll be fine.
Whitewater rafting when pregnant
This is one of the few restrictions when it comes to whitewater rafting. Nearly everyone can go rafting, except pregnant women.
How much is whitewater rafting?
Half-day whitewater trips range from outfitter to outfitter. That range goes from about $80 to $120 per half day.
How much to tip a whitewater rafting guide
As fun as river guiding may seem, the good guides work their butts off to keep their clients happy and get paid very little. These guys and gals rely on tips to fund their off-season adventures. A tip of $5 per person in your party will go a long way for these river heroes.
Where to go whitewater rafting
There are endless options for places to go whitewater rafting. Choosing where to go depends on a bunch of things. If you’re looking to do nothing but raft for three weeks, then maybe the Grand Canyon is the best bet. If you’re looking for an afternoon of fun this summer, then look to outfitters close to where you live. There are outfitters throughout North America, so there’s probably somewhere within a couple hours of where you live. If you are looking to go on vacation to a place that also has whitewater rafting, places like Costa Rica are a great option.
This is obviously a tough question to answer and no list is final. But some of the world’s most popular places include the Salmon River in Idaho, the Alsek River in Canada, the North Johnstone River in Australia and the Rio Upano in Ecuador.
Where is the best whitewater rafting in the US?
Some of the best places to whitewater raft in the U.S. are the Colorado River (the Grand Canyon!), the Gauley River in West Virginia, the Salmon River in Idaho and the Rogue River in Oregon.
Most outfitters run their season from mid-spring until late-summer. This is when the rivers are at their highest and warmest. This obviously depends on what part of the world you’re in, though!
When is the best time of year to go whitewater rafting?
Water levels dictate seasons for whitewater rafting, so most outfitters run between mid-spring to late-summer. The water will be the highest and most exciting in the early spring, but also the coldest. There also won’t be many people doing it that time of year. As the summer progresses, the water will get warmer and the crowds are likely to get bigger.
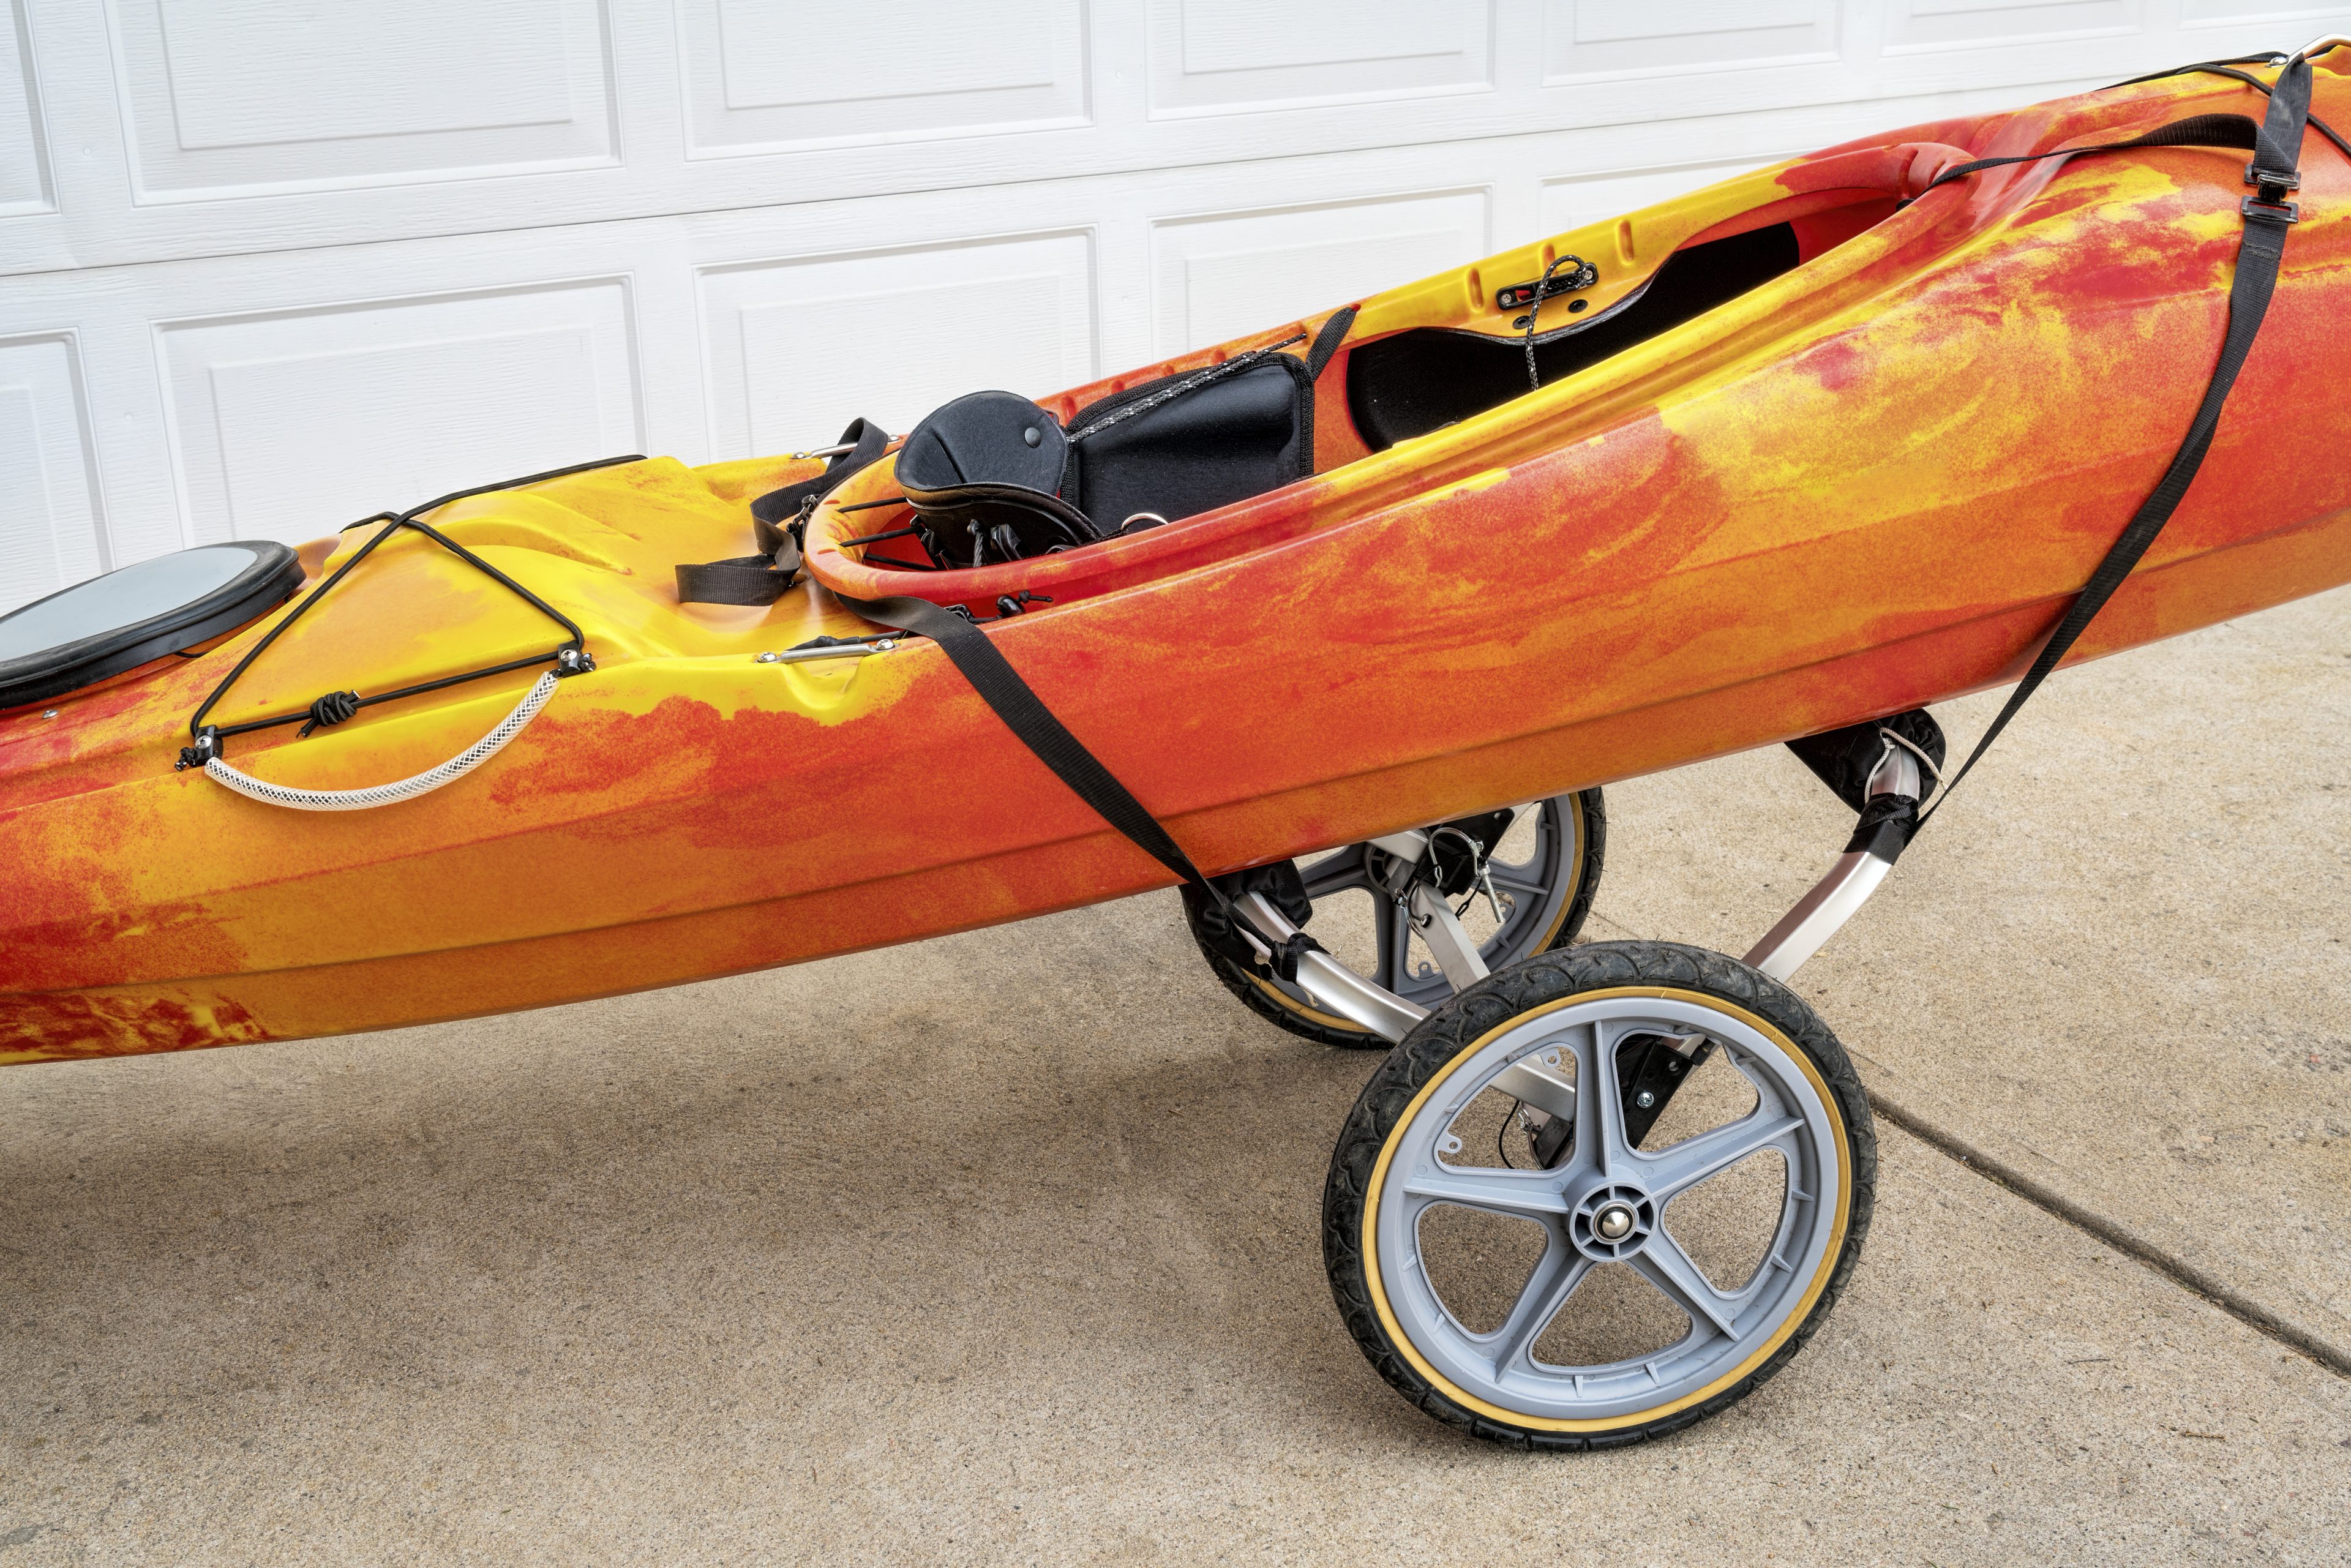
Take your pick of a variety of kayak carts and make getting to the water that much easier.
If you’ve ever had to carry a kayak more than 50 feet—especially by yourself—the idea of a kayak cart has probably already come to your mind. What is a kayak cart? Basically it involves putting wheels on your kayak so you can roll it around. Kind of like a wheeled caddy for a golf bag.
Hopefully you don’t have to lift your kayak very often, but if you do, say from the car to the put-in, or perhaps your house to the put-in, the idea of a kayak cart is pretty darn appealing.
Take your pick of a variety of kayak carts and make getting to the water that much easier.
Types of kayak carts
Kayak cart, kayak trolley, kayak dolly. It doesn’t matter what you call it, they all do the same thing—they get your boat to the water more easily. There are a few different styles of kayak carts, so choosing one can be a tricky prospect. Once you start looking for one, the number of options becomes overwhelming.
[ Paddling Buyer’s Guide: View all kayak carts ]
Trolleys
Trolleys are generally composed of an aluminum or plastic frame that supports the hull of your kayak and is affixed to two wheels.
A popular type of kayak trolley is the C-Tug. These carts generally feature 7- to 10-inch wheels affixed to a platform that hugs the bottom of your kayak and is held in place by a strap around the body. They’re great for uneven or sandy terrain. Because they strap to the middle of your boat, they take the majority of the weight, making it easy to wheel it around.
Some other great kayak trolley options:
All-Terrain Super Duty Cart, by Suspenz
KC7, by The Kayak Cart
KC10, by The Kayak Cart
KC11, by The Kayak Cart
Heavy Kayak Cart, by Wilderness Systems
Solid Wheel Cart, by Sea to Summit
WideTrak ATB Large Kayak/Canoe Cart, by Malone Auto Racks
Dollies
Kayak dollies are usually designed like a boat trailer. They are wider than a trolley and can sometimes be longer, extending the full hull of your kayak. These are great options for tandem kayaks, larger kayaks or kayaks that are loaded up with gear.
Some great kayak dolly options:
Hobie Dolly, by Hobie
Dolly with STD Wheels, by Trailex
Small Aluminum Dolly, by Trailex
Tandem Axle Universal Dolly, by Trailex
Universal Dolly, by Trailex
Scupper carts
While you could use your C-Tug for both your kayak and canoe, scupper carts are kayak-specific and only work on boats that have scuppers. Scuppers are holes usually found in the deck of a sit-on-top kayak to allow for water drainage. Kayak scupper carts have two arms that fit in these holes from underneath. This is a great option if you have scuppers on your boat.
Some great kayak scupper carts:
Sit-on-top carts, by Sea to Summit
Trax 2-30 Plug-in Cart, by Hobie
Trax 2 Plug-in Cart, by Hobie
Original Plug-in Cart, by Hobie
Motorized options
Of course, once you’ve thought of and/or used a kayak cart the next question is, does anyone make a motorized kayak cart? So far there aren’t any on the market. If you delve into the world of angling forums and beyond, you’ll find some people have made these themselves. If you’re a tinkerer, feel free to send us a video of your creation!
How to choose a kayak cart
Like buying any sporting equipment, a kayak cart needs careful consideration. What’s your budget? What’s the weight of your kayak? How often are you going to use it?
Kayak carts range from around $50 to over $1,000, so budget is a major factor. If you’re using it all the time and lifting a heavy, fully-loaded tandem kayak, perhaps you need to spend a bit more. If you’ll only use the cart three times over a summer, you can probably get away with a cheaper, smaller solution.
Storing the cart can also be an issue. You don’t want a six-foot-long kayak trolley in the middle of your condo living room all winter long, do you? Speaking with your local paddling outfitter is always a great way to get an idea of what product is best for you.
How to use a kayak cart
The kind of kayak cart you choose to go with will determine exactly how your kayak cart works. But they basically all work the same.
It’s best to place the cart close to where your boat is. If you’re lifting the boat off a vehicle, be sure the cart is somewhere close by (but not so close it gets in the way of lifting the boat off). Lift the boat off the vehicle (or the ground) and onto the kayak cart. Use the attachment devices supplied by the manufacturer to secure the cart to the kayak. Then you either grab the kayak cart handle, or the bow handle of the boat, lift and pull the boat in the direction you’re headed.
As always, anything you can buy, you can also build yourself. A quick Google search will send you down the rabbit hole of how to build one yourself, and YouTube can supply you with videos on how to do the same. The key to any DIY project in the internet age is to pick and choose from all the available options to get what you want.
Wheels are the most difficult thing to come by, but sourcing online is easier than ever. Many people use PVC plumbing pipe to build the frame of their kayak cart. Good luck with it and please send us a photo of your completed project!
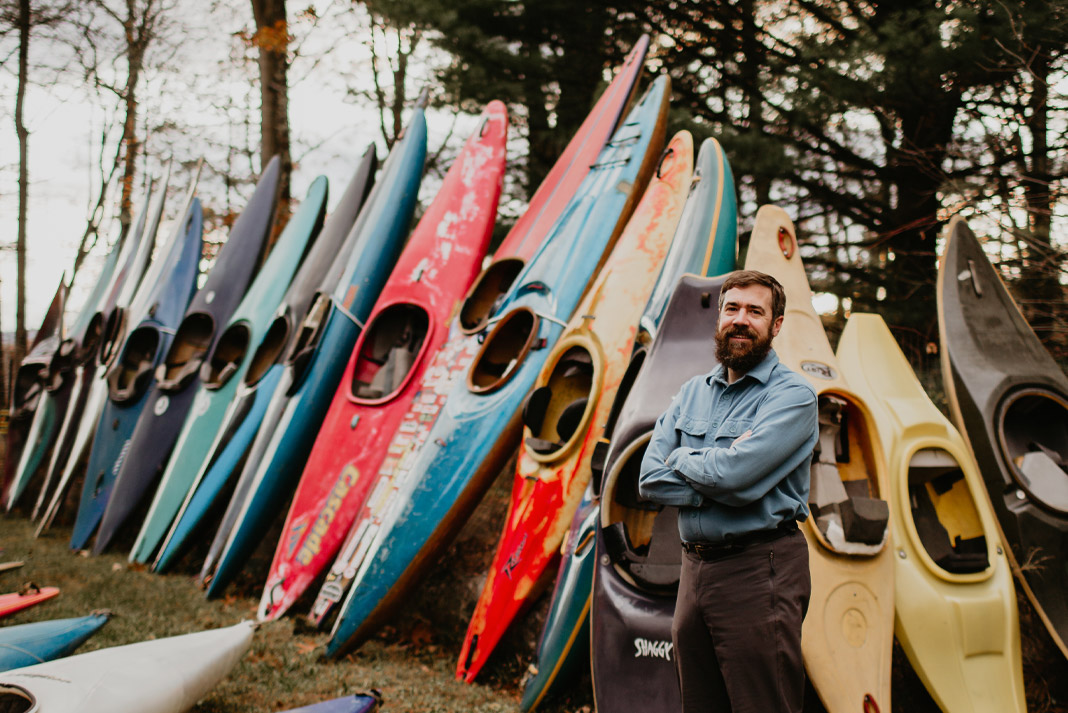
Cultural custodian Adam Pearsall with his impressive collection of C1s at his home in Glen Falls, New York. | Feature photo: Joe Vogel
A few winters ago, a midnight creeper broke into a barn in upstate New York and stole a 12-foot, plastic C1 canoe. Tracks in the snow indicated the direction the thief fled. It wasn’t too long before the boat’s owner, Adam Pearsall, found the boat, a Perception Slasher, discarded in a snowbank.
“They had tried to use it as a sled but decided to dump it instead,” Pearsall says. “It just goes to show, no one likes the Slasher.”
Inside Adam Pearsall’s fascinating collection of niche whitewater crafts
If Pearsall doesn’t seem too upset at almost losing a boat, it may be because he has a lot of them. How many? So many he doesn’t know.
“I have dozens of C1s,” says Pearsall. “It used to be I owned more than I had had birthdays, but now I’m 43, and I’m not sure that’s true anymore.”
Pearsall has amassed the largest collections of actual and, more importantly, virtual C1s on the planet. He’s not a hoarder, more of a historian. Pearsall hasn’t counted them because his passion is to preserve, not possess.
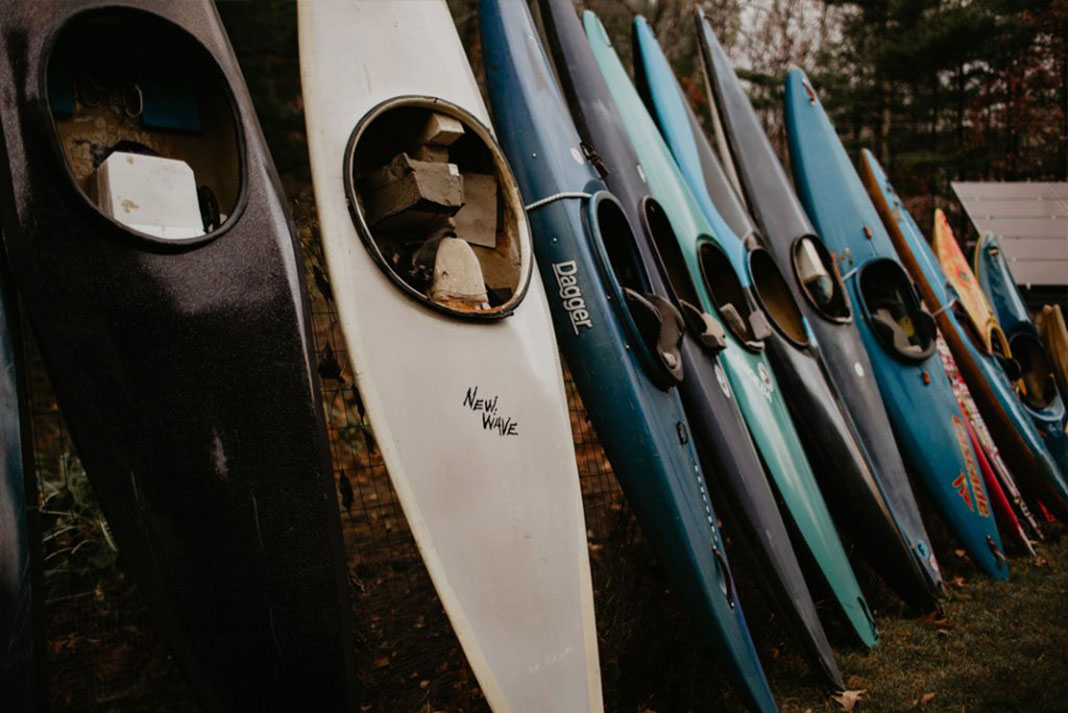
If the name Perception Slasher didn’t ring a bell, don’t feel bad. Decked canoes from 1991 don’t tend to be household names. But maybe you are curious. What does it look like? And why does no one like it?
There’s only one place to go for those answers. Pearsall’s website hosts a virtual museum with exhibits on hundreds of canoes—mostly decked, some open—and the much-loved C Forum discussion group canoeists have called their own since 2001.
Add it all up—his collection of boats, the sprawling virtual museum and the authoritative online forum—and Adam Pearsall has to be seen as the chine on which the C1 community pivots.
The Slasher counts among the 124 C1 designs that have their own entries on the Cboats website. Look under S for Slasher and you’ll see photos, specs and production information. Also, pointed user comments reporting this plastic boat “feels heavy to slalom lovers and edgy to rec boat users.” Not quite the boat that does everything well.
Still, the Slasher remains an important part of Pearsall’s collection. It takes its place under the covered racks on the side of his house, where he moved the boats when the barn proved unsecure, with all the other models, many of which may never touch a river again. For Pearsall, they represent the collected wisdom of the sport he loves.
Cultural custodian Adam Pearsall with his impressive collection of C1s at his home in Glen Falls, New York. | Feature photo: Joe Vogel
Preserving a slice of history
That love started at age three, when his father started taking Pearsall down the Perry Ehlers rapid on the Hudson River near their house in upstate New York. Forty years later, Pearsall now paddles the same stretch with his 10- and seven-year-old children in the annual Hudson River Whitewater Derby. Somewhere in between, Pearsall found he was most comfortable in the cockpit of a C1.
While guiding rafts on New York’s middle Moose one summer in the mid-1990s, Pearsall traded in his kayak for a Dagger Cascade, a pioneering plastic C1 design. “I actually got two boats,” recalls Pearsall. “My friend sold me the Cascade, and made me take his Slasher. He hated that boat.”
“Before this history is lost, could we try to save it? Otherwise, without a record, how long would it last?”
In 1999, when he was fresh out of college, he bought one of the first Dagger Atoms, novel for being a purpose-built C1 from a major boat manufacturer. As might be expected, he dutifully sold his Cascade (and gave away the Slasher), but this was the year Scott Wilkinson organized a big C1 love-in in Washington, D.C. called the Concordia. It was an event that affected Pearsall and made him regret releasing his Cascade—and, yes, the Slasher.
The Concordia was well attended by luminaries of the discipline, including Davey Hearn, John Lugbill, Charlie Walbridge, Paul Mason and Mark Scriver. Seeing all these single-blade stalwarts, and such a variety of boats on display, Pearsall started thinking of posterity.
“It dawned on me; here was a slice of history,” says Pearsall. He was talking about the boats, the people who made them, and those who paddle them. “Before this history is lost, could we try to save it? Otherwise, without a record, how long would it last?”
Pearsall was, at the time, recently out of college and working seven days a week as a computer consultant. He didn’t have much time to paddle, but he did see some benefit in learning computer language HTML.
[ Browse the largest selection of boats and gear in the Paddling Buyer’s Guide ]
“I thought it would be great to have a virtual museum of all the boats we could find information on,” says Pearsall.
As it happens, he had a friend he had met at the small but prestigious Colby College in Maine who already knew HTML.
“I was quickly told my HTML was hideous,” says Pearsall, who later switched careers to work in financial services.
His former classmate and future software engineer, Kenneth Sarzynski, showed more promise.
“Together, we started CBoats.net to catalog all the boats we could,” says Pearsall. The present tally is 324, a full 124 of those being C1 designs. The rest are C2, OC1, OC2 and converted kayaks, a category that could expand toward the infinite, considering how much more common kayaks are than C1s.
“We were trying to save the pictures, the information, the stories, the knowledge,” says Pearsall. “If someone ever says, ‘I wonder what a Perception Sage looks like…’ Where else would they find out?”
Pearsall says one of his favorite Cboats.net archive entries is of the composite-hulled Magnet. The bullet points show it was produced in 1993 by Valley Mill, but the reader comments below paint a fuller picture. A 300-word note from Frank Billue recounts how he and Paul Richey had started with a Perception hull and proceeded to rebirth it as a brand new boat.
“[We] designed it in our garages back in 1993, [spending] hours laying wood strips and planing out the hull shape, then we’d go to the Payette [River] and try it out, discuss the chine, hull shape, width, deck and go back to the garage to add gelcoat or shave off some wood… I remember the excitement when our production boats got shipped. They came as just a hull and deck like they were just out of the mold. We had a blast cutting off the flanges, seaming up the halves, and cutting and laying up the cockpit rim. But the real blast was paddling it, carved like a slalom boat, and surfed like a dream.”
“A certain boat may have been a terrible design,
but I still want to know about it.”
“I aimed to save those slices of history,” says Pearsall. “Otherwise, you’d never know who these guys are.” Or where the designs came from.
Pearsall says he’s drawn to history in general, taking an interest in the years that have passed around his Hudson River home near Glen Falls, New York.
“I like to run around the woods and search out old farms. I’ll come across the old buildings and machinery left behind. When I do, it speaks to me. It’s the same with boats.”
“A certain boat may have been a terrible design, but I still want to know about it,” says Pearsall, expressing curiosity about what its influences were, and why it didn’t work. “It could have been an important part of the historical record.”
Pearsall’s lineup of C1s includes more than 90 percent of recreational C1 designs commercially released. | Photo: Joe Vogel
Single blade community finds a home
Pearsall and Sarzynski registered Cboats.net in 2001. It was born in the 21st century, but relied on technology bearing little relation to what powers the processors of 2019.
“This was the world of dial-up modems,” remembers Sarzynski, now living in Colorado. “When I was designing the website, every page had to be small enough for someone on a slow Internet connection.”
“We had to resize thousands of images, so I wrote some code to do that,” remembers Sarzynski. “But my conversion wasn’t very good. A lot of the photos came out small and very grainy.”
Pearsall and Sarzynski are the first to admit the site needs an overhaul. If the virtual museum was never polished to a high sheen, that’s because only a year after the two launched the website intended to archive boat designs they greatly expanded its scope (and workload) by taking over the C Forum chat group that had formed around the Concordia event three years prior.
Organizer Scott Wilkinson was still maintaining the event’s message board as the only outlet for dedicated C1 networking on the net, but he was losing the battle against pop-up ads.
When Pearsall and Sarzynski dug in to migrate the pre-existing C Forum material to Cboats.net, they quickly felt swamped.
“In those days, the message boards were akin to a single webpage that contained all the comments forever,” explains Sarzynski. “We wanted to take each topic and put it into its own room, by making it a structured, database-driven forum.”
[ Plan your next paddling adventure with the Paddling Trip Guide ]
And the only way to do that was to copy and paste. Neither man would even attempt a guess at how many hours they spent on that task—hours that were very much unpaid.
Pearsall explains they were collecting advertising revenue for a few years, but after a while, he realized it wasn’t worth trying to make money off it, even if just to cover their hosting costs. There are still ads on the site. Pearsall considers them legacy ads, honoring a partnership that once was.
“I knew it was a good community, I just wanted to support it,” says Sarzynski of his volunteer hours. He and Pearsall, and a small group of moderators have done just that for 18 years now, with weekly maintenance sessions to try to stay ahead of the bots, the Nigerian Prince scam artists and, Sarzynski wonders aloud, the Russian election meddlers.
Though some of the photos remain grainy, and appear doubly so on today’s high-resolution monitors, Sarzkynski is at peace with the level of polish, mostly because he thinks the paddlers are.
“It could be more up to date, I suppose, but the community doesn’t seem to need video-playing, JavaScript widgets giving automatic updates to a phone,” he observes.
That belief is backed up by the 116,511 posts on 17,302 different topics that have helped bind single-blade paddlers together over the last 20 years.
It’s an irreplaceable and consistently useful repository of information, according to Davey and Jennifer Hearn. Davey Hearn won multiple world championships in C1 slalom racing over a 26-year career. Since 2005, he and Jennifer have owned Sweet Composites, where they sell all the materials needed to build or outfit a composite boat.
“We are always referring people to the C Forum,” says Jennifer. “When people get into fine details, like how should they convert a hull, what seat height should they have, I always say: ‘Check out the C Forum.’ It’s all there. Why reinvent the wheel?”
As someone with 21 boat designs to his name, Davey Hearn says any student of boat design owes a debt to Cboats.net.
“With a little detective work, you can trace design aspects back through the ‘70s and ‘80s,” says Davey. “It’s invaluable to have it all together there in one place for people to see.”
Seeing with a collector’s eye
Considering the reach of the C Forum and the comprehensiveness of the virtual museum, it’s easy to overlook the third aspect of Pearsall’s contribution to the world of C-boating, the collection of actual boats he’s built up over the last two decades.
They may not get used much, but the roughly 40 C1 models he has stacked outside his house account for more than 90 percent of the recreational C1 designs ever released commercially.
Pearsall’s attraction is more than academic.
“I tend to like sharp chines and low volume boats,” says the reigning downriver champion of the Hudson River Whitewater Derby.
“I follow the lines from bow to stern and visualize the path water travels along the hull. I want to understand why boats work, and I want to help save that knowledge. It’s one thing to have a photo, but you can’t replace sitting in a boat and understanding, ‘This is how it paddles.’”
Pearsall says he’s spent about $25,000 on the collection, and it’s almost complete. He can name five models he still wants to acquire. Some of the more obscure ones he hopes to find before someone retires them and turns them into garden planters.
“There are designs I’ve only seen old catalog sketches of, I’ve never seen them come up for sale.”
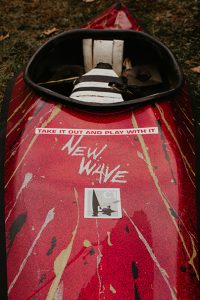
The New Wave’s asymmetrical hull is notable for looking like an angular banana. | Photo: Joe Vogel
As it stands, the collection remains the first destination for anyone wanting to track down notables like the New Wave Oxygen. Designed by freethinker Corran Addison, it’s an asymmetrical hull that looks a little like an angular banana. Paddle it one way if you are right-handed. Left-handed paddlers need to turn the seat around and head in the opposite direction.
The way Kalin Pallet sees it, what Pearsall brought to C-boating was every bit as innovative as the Magnet and much more influential.
Pallet was a frequent poster to Cboats.net from the beginning. Based in Whitehorse, Yukon, whitewater canoeing has been so central to his life he named his business development agency Eddyline.
Palin remembers meeting Pearsall at that formative Concordia event in 1999, and many times since.
“Adam was the quirky guy who showed up with crazy helmets, but turned out to be just a rock-solid human being, and over time, a cornerstone of the community.”
“Adam had the vision. He understood there was something special here, something that should be preserved to help new people understand how we got to this moment in time. Others may have felt the same way, but Adam said, ‘Let’s embrace technology to document and archive it.’”
Pallet believes Pearsall should be credited with bringing the community closer together. “It gave single bladers our very own corner of the net, where we didn’t have to explain ourselves. So many events have happened as a result of people meeting there online.”
True as that may be, there’s no denying fewer people are virtually bumping into each other there these days.
Pearsall says that, from a traffic point of view, Cboats.net peaked around 2009, “Just before the Facebook paddling groups took off.”
He says he has mixed feelings about Facebook groups. He understands the draw of social media, but the archivist in him can’t help but point out that it’s hard to know how the information shared between paddlers will be saved. What’s more, you can’t search for specific things you are wondering about.
“Information can tend to get buried on Facebook,” says Pearsall. “In comparison, there is a high signal-to-noise rate on our site.”
There isn’t a trace of bitterness in his voice as he compares his labor of love to the multi-billion-dollar behemoth draining away his users. He insists he doesn’t mind if the ephemeral chatter is elsewhere.
As long as people are aware of his site, then they will be able to use it for its original purpose. Then it won’t become history. It will just continue to be about it.
Ian Merringer is a former editor of Rapid magazine.
This article was first published in Issue 60 of Paddling Magazine. Subscribe to Paddling Magazine’s print and digital editions, or browse the archives.
Cultural custodian Adam Pearsall with his impressive collection of C1s at his home in Glen Falls, New York. | Feature photo: Joe Vogel
Miami Beach is on a barrier island, which lies between the Atlantic Ocean and Biscayne Bay. | Photo: istockphoto.com/SiegfriedSchnepf
Miami is Florida’s second-largest city, but it is the smaller island city of Miami Beach across the bay drawing in paddling tourists. Miami Beach’s vast Atlantic sands sweep past the most extensive collection of Art Deco buildings on the planet and you might rub shoulders with international models and celebrities. Thanks to perpetually cheap flights, Miami is the perfect place from which to base a southern Florida paddleboard adventure.
Stay
Whether basing yourself in Miami South Beach or downtown, you’re spoiled for hotel choice. Choose a South Beach hotel to be close to the best sunset paddling but expect the highest prices.
When To Go
Sneak in a winter getaway—high season here—between November and mid-March. Summer gets hot, humid, buggy and stormy.
Diversions
You can explore the city on two wheels with the convenience
of Miami Beach BikeShare. Don’t miss the colorful murals in the Wynward district.
Snacks
Take inspiration from Miami’s Latin American population and snack on a Cuban
sandwich with a cafecito.
Beware
Despite typically balmy
temperatures, storms
brew rapidly, especially in
summer. Beware of the danger of lightning strikes and from rain and windchill.
The Miami Beach strip is packed with tourists and beachgoers during the day but really shines after dark along legendary Ocean Drive. If you have just an hour or two, rent a board from one of several South Beach outfits, then explore the canals and view the sunset on the west side of the island. At dusk, when the reflections of Miami’s high-rise city lights shimmer in the waters of Biscayne Bay, explore along Ocean Drive to catch the fever-pitch vibe of the ever-sizzling scene.
With one toe dipped in saltwater and its back to the swamp, Miami is a gateway to two especially precious paddling areas: the Florida Keys and the Everglades.
If you have a half-day:
Zip a couple of minutes down the bridge to Virginia Key and take a deep breath with a peaceful SUP yoga class to stretch out. Follow it up with a relaxing paddle along the shore with the skyline of the hectic city at arm’s length. Rentals are available at both ends of Virginia Key.
If you have a day:
Travel south to Key Largo where you’ll find the Pennekamp Coral Reef State Park Visitor Center. With nature videos and a 30,000-gallon saltwater aquarium, you’ll get a glimpse of what’s under your board. Then, with Radabob Key offering shelter from the Atlantic, explore the maze of mangrove channels in a world of exotic birds and fish. Scan the clear water for eagle rays, or peek between the mangroves to spot roseate spoonbills and shy night herons.
If you have a weekend:
Miami backs onto the largest tropical wilderness in the United States and Everglades National Park. Overnight in quirky Everglades City and select sheltered watery passages, perhaps along the Turner River and beyond. Follow mangrove tunnels, pools and lakes and watch for swallow-tailed kites and Calusa Indian shell mounds. Weather permitting, venture between the keys to the remote sandy Gulf shores of islands such as Picnic Key for a 14-mile round-trip adventure, typically replete with dolphins and pelicans.
[ Plan your next paddling adventure with the Paddling Trip Guide ]
If you have a week:
For a SUP adventure to remember, thread the Florida Keys from Key Largo to historic Key West. Travel light and find accommodation and restaurants within yards of shore along the Florida Keys Overseas Highway. Keep closer to the Atlantic or the Gulf for best conditions. Weave a secluded route between the smaller keys, gliding through mangrove channels past hidden beaches and over glassy shallows of every shade of green and blue. Begin at Key Largo for a 100-mile journey, or start at Miami and add 40 miles. Launch closer to Key West for a shortened trip.
Miami Beach is on a barrier island, which lies between the Atlantic Ocean and Biscayne Bay. | Photo: istockphoto.com/SiegfriedSchnepf
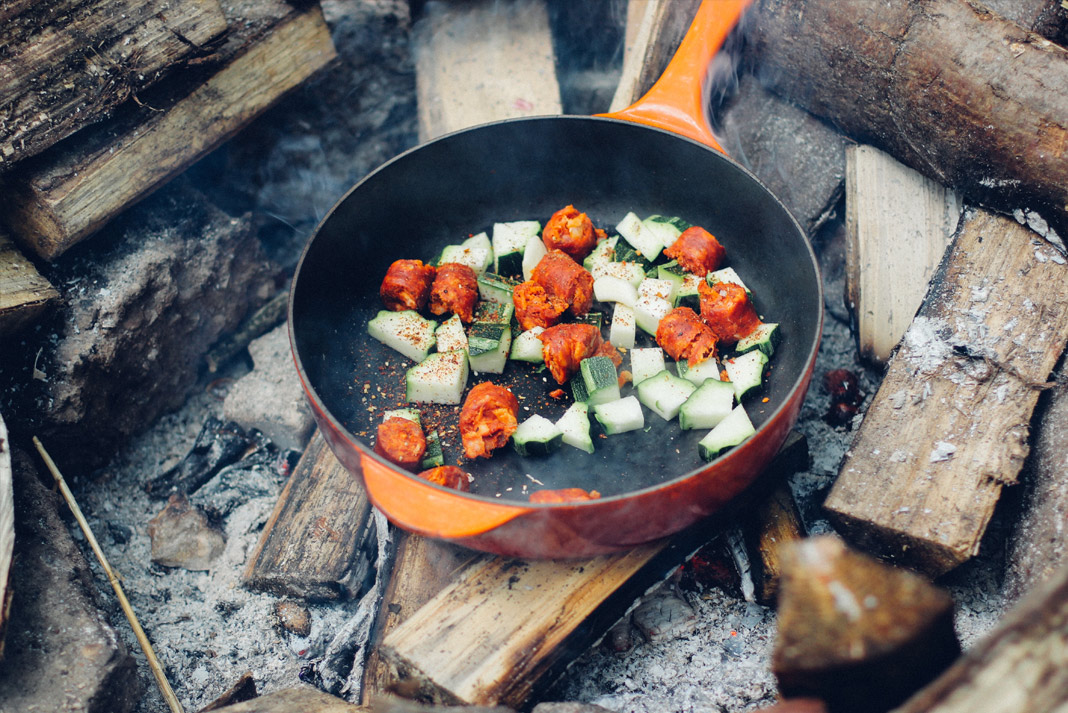
There's nothing better than eating a delicious meal after a day of paddling or hiking.
Do you want to know the secret to cooking camping meals? With the right gear, prep and knowledge, your camping meals don’t actually have to be any different from your at-home kitchen meals. Anything you can cook at home, you can cook while camping. You just have to know how to do it!
Camping food ideas
The main things to consider when figuring out meals for your camping trip are what food to bring, how you will pack it and how you will keep it fresh.
If you are car camping, my advice is to pack two separate food containers—one being a cooler for veggies, meat or anything perishable, and the other being a large box for canned goods, dry goods, spices and non-perishable items. The best way to keep food fresh in the cooler is by reserving one-third of the cooler space for a large ice block, emptying the melted water from the ice out of your cooler twice daily, and replacing the ice block every three days.
There’s nothing better than eating a delicious meal after a day of paddling or hiking.
If you are camping in the backcountry and don’t have space for a cooler and a large dry goods box, it is best to skip most of the perishable items. You should still pack veggies and hard meats and cheeses, but you must keep in mind the length of your trip and how long they will stay fresh. Going on a three-day backpacking trip in October? Your veggies, salami and cheese will be good to go for the whole trip. Going on a three-week kayak camping trip in June? You might just want to pack those perishables for the first few days, then plan for non-perishable foods after that.
Another thing to consider when deciding what food to bring camping is waste. No matter if you are far into the backcountry or car camping five meters away from a rubbish bin, the less waste you produce the better! This is why I always try to create camping recipes that produce as little waste as possible.
Finally, if you have any dietary restrictions, do not fret! Just like cooking in a kitchen, it is easy to make substitutions for any food intolerance or restriction you may have. You might have to do a bit more research to find the lightest-weight option out there, but it will be possible.
Campfire meals
Cooking over a campfire can have advantages and disadvantages.
Advantages
One advantage of cooking over a campfire is the elimination of carrying a stove. If you are trying to pack as light as possible, campfire meals might be your go-to. All you need is some dry tinder, wood and something to create a spark or flame (matches, lighter, fire starter, etc). You can then place a barbecue grate over the fire to cook meat and veggies, or skewer sausages on sticks and roast them over the fire.
Another advantage is the ability to cook with a Dutch oven. A Dutch oven is a large cast-iron pot with a cast-iron lid that you can use just like a regular kitchen oven. You simply fill the Dutch oven with whatever you are baking or cooking, place it over hot coals on a campfire, and set hot coals on the lid. With this method, you can bake/cook cinnamon rolls, cakes, roasted veggies, baked potatoes and even a whole roasted chicken!
Disadvantages
One disadvantage of cooking over a campfire is that it’s not always a feasible option. Many parts of the world have fire restrictions. Some areas have high fire danger due to drought, and have thus banned all campfires. Some national parks have banned campfires out of safety management practice. And some areas simply don’t allow them due to land management policies. Either way, it is important to heed these rules, so these areas remain open to public use.Another disadvantage to cooking over a campfire is that a Dutch oven is HEAVY! Dutch ovens are often reserved for car camping and rafting trips. Essentially, you should only bring one camping if weight isn’t an issue.
If cooking over a campfire isn’t your cup of tea, there are numerous options for camping stoves you can purchase. Anything from a small one-burner stove that weighs five ounces, to a large two-burner stove and grill can be purchased for camping.
[ Paddling Buyer’s Guide: View all camp kitchen accessories ]
Camping breakfast ideas
Want the easiest camping breakfast possible?
Boil two eggs, then use the hot water you just boiled the eggs in to make coffee and two packets of instant oatmeal. Add a banana with peanut butter if you still need more calories. High in protein and fibre, low in prep time and cleanup. If you eat the oatmeal straight out of the instant oatmeal packets they come in, you will literally only have to clean your coffee mug and spoon.
Want something with a bit more substance?
I like making toast over a camp grill or on a camp stove, then topping it with avocado, a fried egg (also cooked on a camp stove), and some nuts and seeds. This covers your carbohydrates, protein, and fats, and takes very little prep time. Add a piece of fruit on the side for a bit of a sugar boost in the morning.
Want a lightweight camping breakfast?
Instant oatmeal packets with powdered milk, powdered peanut butter, and dried fruit. Add a bit of honey or cocoa if you need a bit more flavor. It weighs next to nothing and will keep you full until lunch.
Want a breakfast you can cook over a campfire?
Simply skewer some sausages on sticks and roast them over the fire. And if you’re looking for something sweet, you can cook up some cinnamon rolls in the Dutch oven for a bonus.
The best camping lunches are the easiest lunches. You want to fit your lunch in a daypack or small drybag, so it is easily accessible on your adventures throughout the day. Sandwiches, snacks and easy soups are all good options.
If you are more keen for a big lunch on the river, you can always partake in Canada’s traditional “shore lunch.” A shore lunch is a wild fish fry on the edge of the river with fish that was just caught from the river itself. You’ll need to come prepared for this with fishing supplies, a skillet and stove, oil or butter, breading or flour for the fish, and any seasoning you prefer. Some good side dishes to go along with your shore lunch include potatoes, rice and veggies.
If you aren’t keen on fishing and setting up a stove for a shore lunch, other options include salami and hard cheeses, peanut butter and jelly sandwiches, trail mix, and hard-boiled eggs. Keep in mind nutrition requirements while packing your lunches in the backcountry. Don’t forget to get ample amounts of protein for energy through the rest of the day, and try to get some greens and fruit in there as well. Dried hummus with carrots is a good way to check both the protein and vegetable boxes in one.
Camping dinner ideas
The best camping meals for dinner are not camping meals at all. They are simply meals. Whatever you like to cook for dinner in your kitchen can also be cooked while camping.
One of the easiest camping dinners is a vegan stir-fry. Simply chop up an assortment of vegetables, saute them up with sesame oil and soy sauce, add some chickpeas or beans for protein, and serve with rice. Sprinkle sesame seeds and spring onions for more flavor.
The cheapest camping dinner also happens to be the cheapest camping breakfast. I call it “egg smash.” Simply put a bunch of random ingredients in a pan—veggies, beans, cheese, salami— cook it up, add a few eggs, and scramble it up! Easy and cheap.
If you are heading far into the backcountry and will no longer have perishable items with you, an easy backcountry camping dinner is macaroni and cheese (or any form of pasta with sauce) with dried beans or lentils added for protein.
It is extremely important on long backcountry trips to make sure you are getting an adequate amount of protein, even if it sometimes means a bit more weight in your backpack or kayak. Easy protein sources are cheese, nuts, beans, salami, lentils and nut butters.
Don’t forget the most important part of your camping dinner: dessert! Pack yourself a bar of high-quality dark chocolate to enjoy with tea after dinner. The better the chocolate, the less you will need, so get the good one!
You don’t need to spend massive amounts of money on specialized protein bars to get your snack on while camping. Anything that is portable and ready-to-eat can be a good camping snack. The higher the calorie content, the better!
Here are some of the best and easiest snacks to bring into the backcountry:
Hard-boiled eggs
Pretzels
Salami
Hard cheesesNuts
Dried fruit
Dark chocolate
Gummy candies (obviously)
Pre-cooked bacon in a plastic sandwich bag
Chocolate chip cookies
Bananas (or any type of fruit)
Anything dipped in peanut butter (carrots, oreos, apples, dark chocolate, cookies, pretzels…)


 This article was first published in Issue 60 of Paddling Magazine.