For nearly 40 years, Quebec manufacturer Rhéaume has carved a niche in the canoe industry, but you’d be forgiven for not recognizing the brand’s name. For much of its history, Rhéaume quietly crafted canoes for some of the industry’s most well-known brands instead of promoting its own name. More on that in a moment.
In the ’80s, it was a chance encounter that saw Rhéaume’s founder, furniture maker Alain Rhéaume, venture into the uncharted waters of canoe manufacturing.
“He met a couple of people who saw what he was doing with furniture and asked if he could build them a canoe,” says Rhéaume’s marketing manager, Benjamin Gonzalez Rosell. Without prior experience in canoe craftsmanship, Alain plunged into research, poring over every canoecraft book he could find. That first canoe was a revelation, marking Alain’s pivot from furniture to founding a canoe factory.
Initially, Rhéaume’s production was solely focused on cedar canoes. However, by 2010, the company recognized the shifting market demand toward lighter canoes and transitioned away from its cedar roots.
“People were looking for something more comfortable than a 75- to 80-pound canoe on their backs,” says Rosell. This led Rhéaume to venture into the composite business, which now makes up 90 percent of its manufacturing.
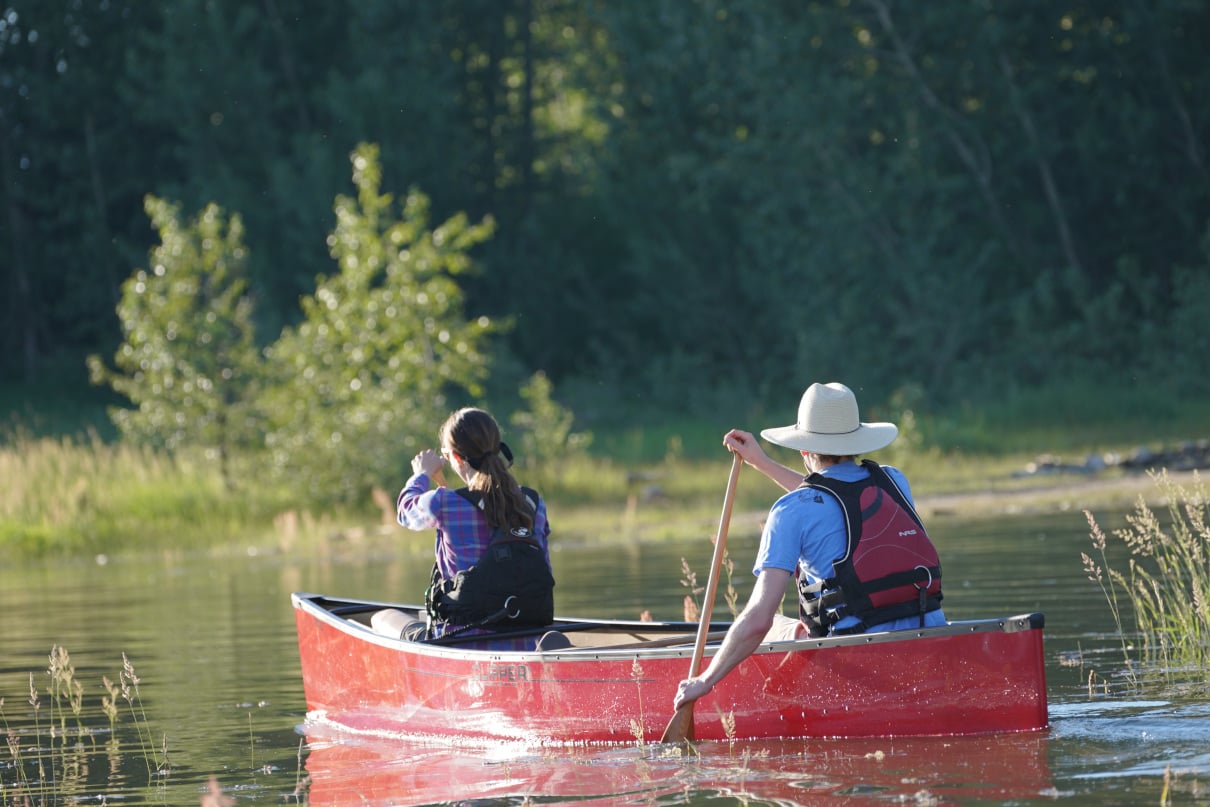
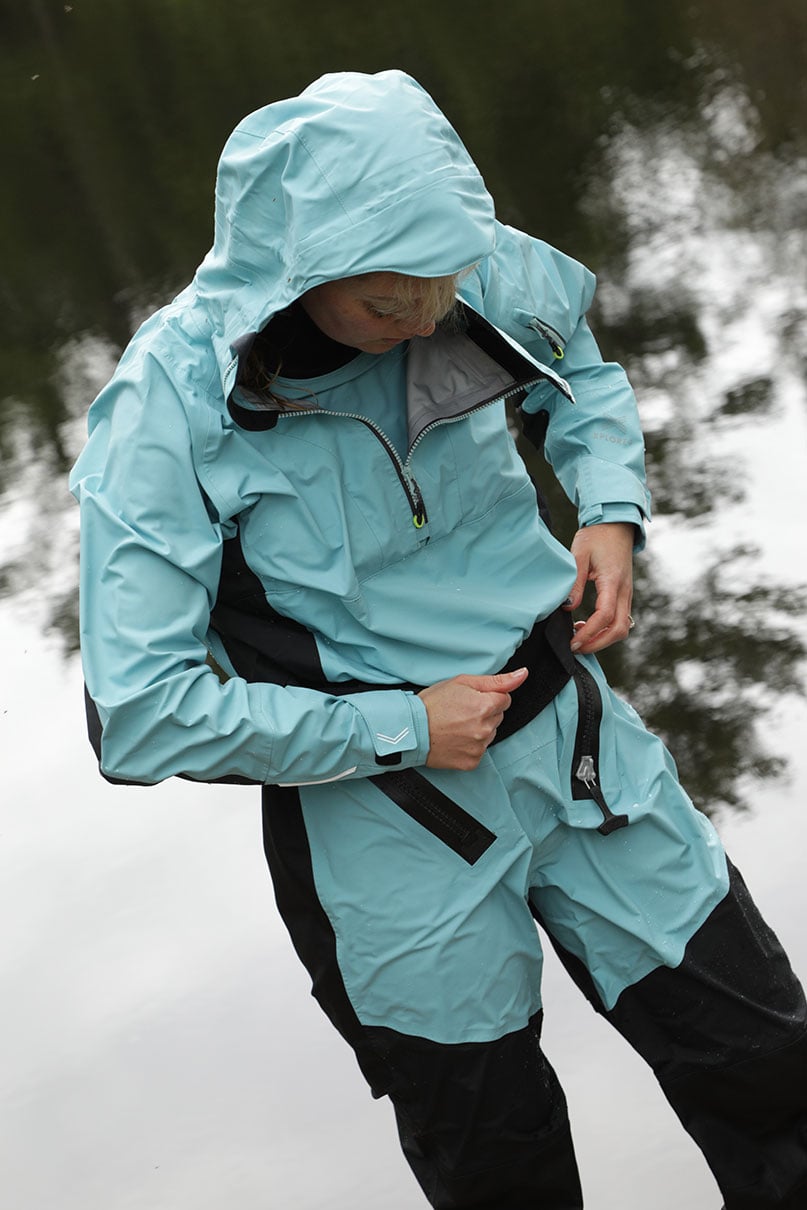
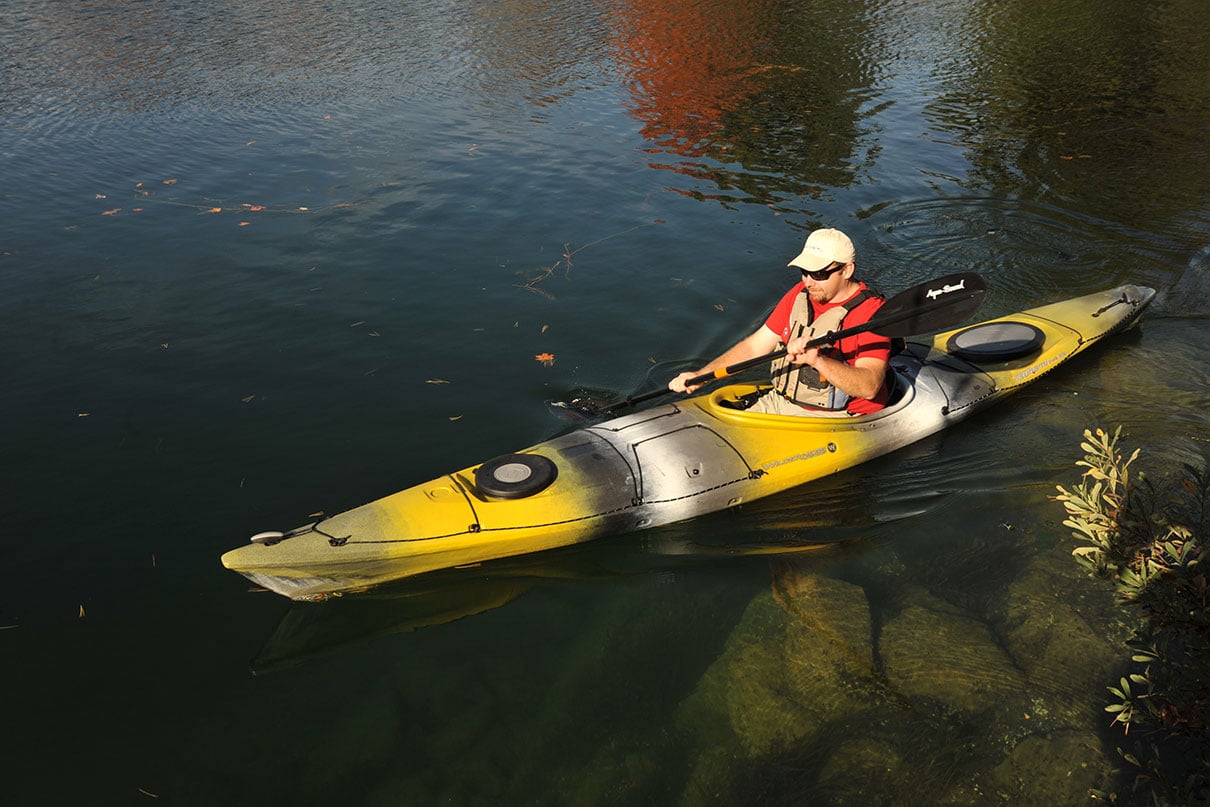
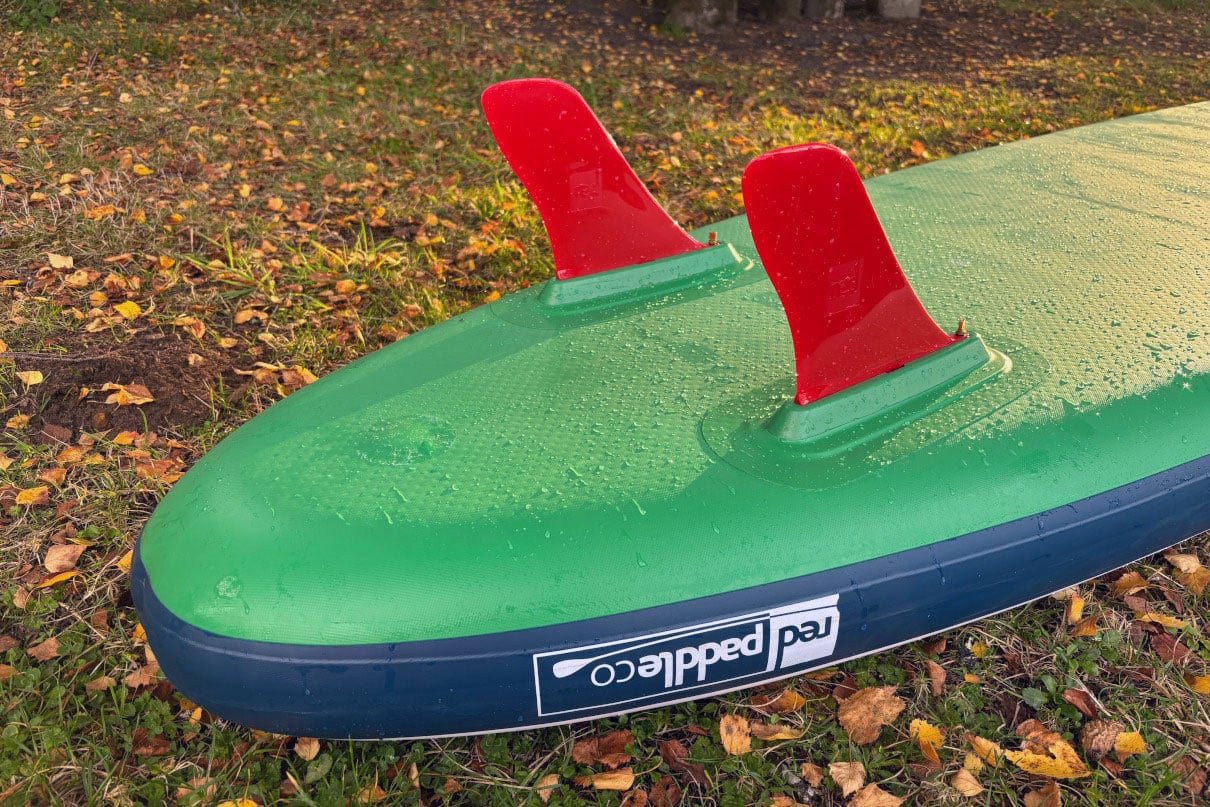
With a beam of 38 inches, the Explorer 16 offers reassuring stability for all paddlers. Developed from Rhéaume’s popular Huron model in red cedar, the Explorer 16 in Kevlar retains the classic features of the Huron while offering a weight and cost more paddlers will find accessible. | Photo: Kaydi Pyette
Rhéaume may already make your favorite canoe
Prior to the pandemic, Rosell estimates 95 percent of Rhéaume’s canoes were manufactured for other brands, sent across North America and Europe, and at various times sold under notable names such as Eddie Bauer, Old Town Canoe, L.L.Bean and American Trader.
“With the pandemic, people started contacting us directly to buy, and that’s how business has grown in the last couple of years,” Rosell says. He estimates 40 percent of the canoes are now sold directly to consumers under the Rhéaume brand name, while the remainder are still manufactured for other companies.
Why do so many legacy canoe brands knock at Rhéaume’s manufacturing facility door? “We are very meticulous with our process,” suggests Rosell, highlighting time-honored techniques and investment in quality automation. He adds founder Alain is still very much involved in the manufacturing cycle. “He supervises everything; he works with our crew so that they learn from him. He does all the quality assurance himself.”
Rhéaume’s operation moved to a new facility in St-Tite, Quebec, after a devastating fire in 2017 burned down the original factory. Today, the facility bustles with 15 to 20 full-time employees, producing 30 canoes a week.
At the heart of Rhéaume’s lineup of nine composite canoes is the bestselling Explorer 16. Its classic lines are drawn from its cedar predecessor, the Huron, which Alain designed in 1987. Though the Huron remains one of Rhéaume’s most popular cedar canoes, its transition to composite materials and reincarnation as the Explorer 16 has broadened its appeal—and shaved 30 pounds off its frame and $2,000 off its price tag, too.
Though it looks like a pretty cottage canoe, don’t let the Explorer’s beauty fool you—it’s a versatile canoe, ready to handle any lakewater challenges you throw its way and suitable for all sorts of adventures, from serene fishing to backcountry family trips. Before COVID, Rosell tells me the Explorer was most popular with the sportsman crowd but has since achieved new popularity with families.
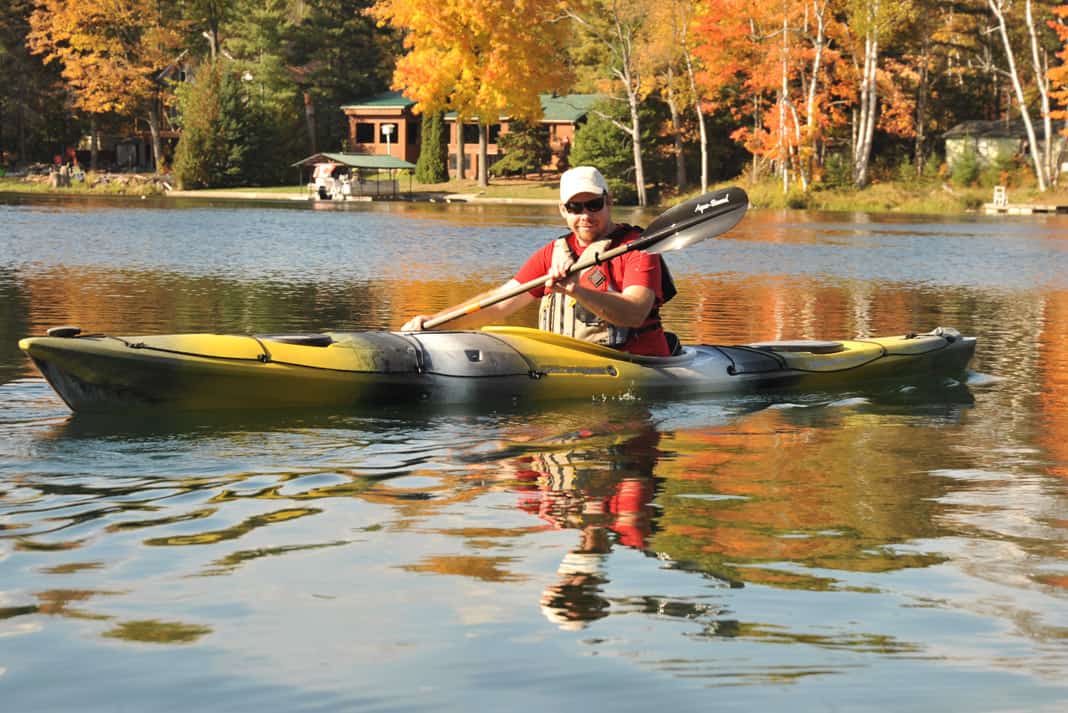
Rhéaume’s family-friendly Explorer 16 is a charming and versatile lakewater companion. | Feature photo: Geoff Whitlock
Paddling the Explorer 16
On one of my day trips with the Explorer 16, my mom joins in the bow and immediately notes how stable it feels, its beamy 38-inch width quickly putting her at ease. Rosell says the Explorer is the most stable canoe in Rhéaume’s fleet. In addition to its width, the flat-bottom hull curves into generously rounded chines and provides excellent primary and secondary stability.
The beautifully curved bow and stern are roomy and provide lots of space for legs, kids, dogs, gear and anything else you can dream up. Combined with a stated 1,000-pound capacity, the Explorer is an ideal paddling companion to fill to the gunwales and venture off for a long weekend or more. Just watch out for rocks, please, I tell my mom, as I keep a cautious eye on preserving its immaculate cherry red finish.
An optimum all-rounder in its design, the Explorer tracks well thanks to a minimal rocker while maintaining good maneuverability. It offers an easy-paddling feeling canoeists of all experience levels will love, especially as it feels quick and light as it glides across the water.
Our tester featured a Kevlar layup with a layer of basalt and innegra weave for increased durability, however, the Explorer 16 is also available in fiberglass and carbon. Given Rhéaume’s history in cedar canoe manufacturing, it’s no surprise the wood craftsmanship on the Explorer is exquisite. Its cherry trim adds elegance and warmth, and annual oiling would be a small effort to preserve its beauty.
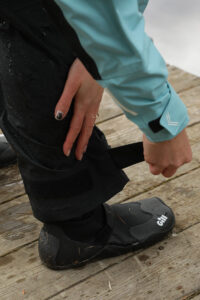
Our tester model featured Rhéaume’s standard and ergonomic webbed seats, but for an additional $300, trippers can opt for a sliding seat. The kneeling thwart on the Explorer 16 is a $100 upgrade. | Photo: Kaydi Pyette
The oiled cherry deep dish yoke is comfortable on the shoulders, contributing to an easy carry on long portages. | Photo: Kaydi Pyette
The Explorer 16 in Kevlar weighs between 40 and 42 pounds with cherry trim or 39 to 41 pounds with composite gunwales. Webbed seats, a deep dish carrying yoke and a kneeling thwart rounded out the outfitting on our loaner model. The Explorer is also available in a 14-foot version for day-trippers and soloists.
This article was first published in Issue 72 of Paddling Magazine. Subscribe to Paddling Magazine’s print and digital editions, or browse the archives.
Rhéaume’s family-friendly Explorer 16 is a charming and versatile lakewater companion. | Feature photo: Geoff Whitlock
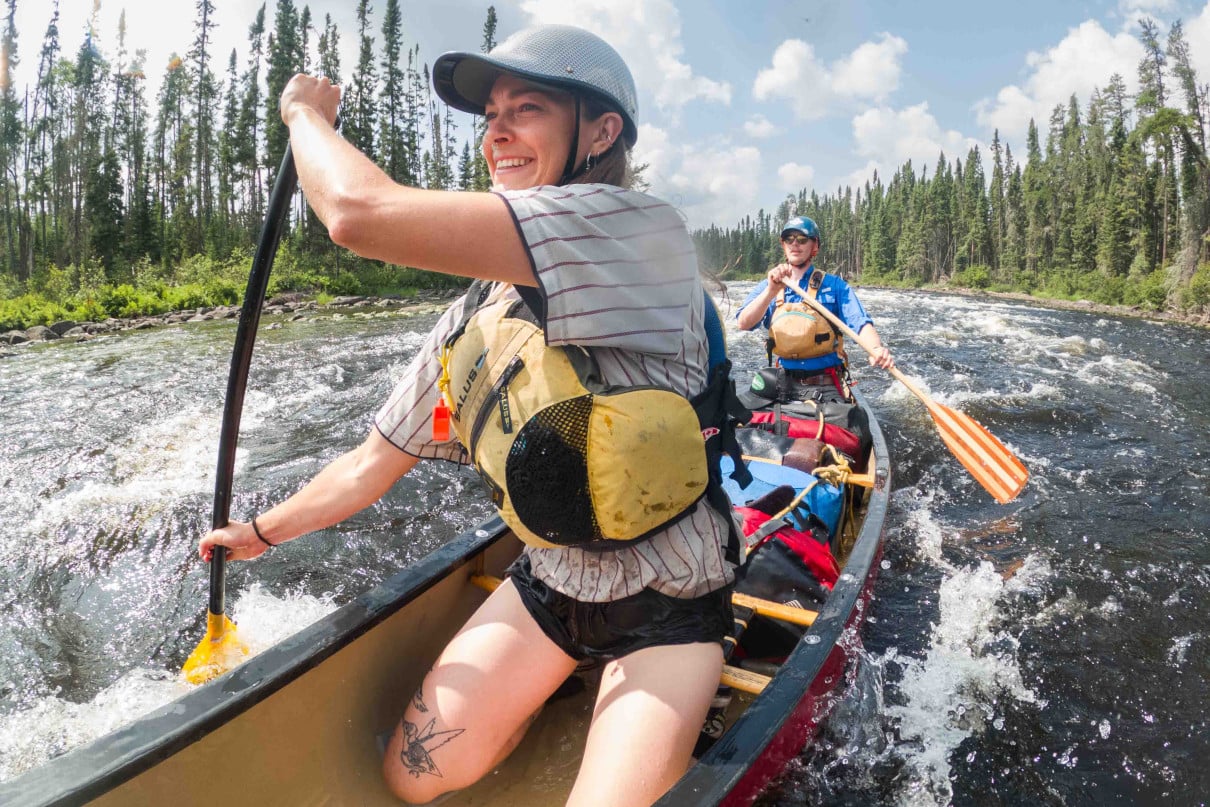
Kneeling through rapids is an easy way to increase your stability in the canoe. | Feature Image: Colin Field
There is no better way to get on the water and get away from it all than in a canoe. Canoeing is simple, efficient and has a relatively low barrier to entry. And, once you have the basics down, you can go just about anywhere.
In this article, I’m going to go over the basic questions you might have when learning how to canoe. Like learning most things, however, reading about something is much different than doing it. Taking a lesson from a qualified instructor can make the learning process go more smoothly and will help give you confidence on the water.
How to launch a canoe
Where to sit in a canoe
Before you just jump into a canoe all willy-nilly, there are some things you should have figured out, like where the bow (front) of the boat is and where the stern (back) is. You should also figure out who’s sitting where. The easiest way to figure out where the bow of the boat is, is to look at the seats. The end that has the larger space between the end of the boat and the seat is the bow—if you try to sit in the rear seat as a front seat, you’ll see the issue very quickly as there won’t be much room for your legs.
Oh the places you’ll go once you learn how to canoe. | Image: Scott MacGregor
The majority of steering comes from the stern of the boat, so between you and your partner, you should probably put the more experienced paddler in the stern. In an ideal situation, the heavier of the two paddlers should be in the rear, but paddling experience can override this rule.
If you’re paddling solo, you’ll want to move forward in the boat. You want your weight somewhere closer to the middle of the boat, so the bow isn’t in the air being blown around by the wind. If you have a symmetrical canoe—which means the bow is the same shape as the stern—you can sit backwards on the bow seat and paddle the canoe “backwards.” This is sufficient to get your weight farther forward in the boat. Other times, you’ll need to sit closer to the yoke (centered on the canoe). It will depend on conditions and the boat itself.
Canoes are pretty stable once you’re in them, but it’s getting into them some people find tricky; that’s because while stepping in, your center of gravity is high. The lower you can get it to the bottom of the canoe, the more stable the boat becomes.
If you’re launching from a beach, it’s best to sit the canoe perpendicular to the shore. With the bow of the boat in the water, one person can stabilize the canoe from the stern as it rests on shore, while the bow paddler walks in the canoe up to the bow seat. Be sure to stay low and use the gunwales for support, with your feet close to the center line of the boat, then sit down. Once the bow paddler is seated, the stern paddler can push the boat until it floats, then step carefully into the boat and onto the stern seat.
Getting in a canoe from a dock or rocky shoreline is a little more difficult, but still quite easy if you are careful and methodical in your movements. Position the canoe parallel to the dock or shore. One person stabilizes the boat while the other steps into the canoe. While stepping in, remember to stay low. As you step in, remember to step into the center of the canoe one foot at a time.
If you’re doing either of these launches as a solo paddler, the actions are similar, but you don’t have the partner to stabilize for you. Be sure to reach to the far gunwale to help equalize your weight before stepping in and step one foot at a time into the center of the boat. It’s helpful to enter near the stern of the boat, where it’s narrower, and then move forward.
How do I get out of a canoe?
Getting out of a boat on a shallow beach is the same process as getting in, only in reverse. Paddle the boat into shore, perpendicular to the shoreline. The bow person steps out of the boat and stabilizes it for the stern paddler who, in turn, walks to the front of the boat, then steps out in the shallower water.
Getting out of a boat on a dock or rocky shoreline is also the reverse of getting in. One partner will stabilize the boat by grabbing the dock, while the other will stand up slowly with their hands on the gunwales and feet in the center of the boat. That person will step from the boat to the dock carefully and methodically. Then they’ll stabilize the boat while their partner exits.
As a solo paddler, you’ll need to stabilize the boat by grabbing the outer gunwale and the dock, slowly stand to a crouched position in the center of the boat, and then carefully step up and onto the dock.
Kneeling is an easy way to increase stability in your canoe. | Feature Image: Colin Field
Kneeling vs. sitting
Kneeling and sitting are about your only two options while in a canoe. And while sitting is the more comfortable of the two options, it isn’t always the best choice. Here’s why. When you’re sitting in a canoe, your center of gravity goes onto the seats, so it’s considerably higher than if you are kneeling. When you’re kneeling, your weight is on the bottom of the boat, essentially below the waterline. The higher your center of gravity is, the more likely you are to tip.
That said, few canoeists (probably only the ones on younger knees) can kneel all day. It’s okay to switch from one to the other during a long paddle; just remember that everything is more stable if you’re kneeling, so when you see some waves or technical paddling coming up, drop to your knees for an action stance.
It’s an easy DIY project to add kneeling pads to your paddling stations.
To properly hold a canoe paddle, you want one hand on the top grip—also called the butt of the paddle—and the other hand on the shaft, closer to the paddle’s blade. The butt end of the paddle will be shaped to fit your palm, while your bottom hand should grasp the shaft thumb-side up. If you’re paddling on the left side of the boat, your right hand will be on top of the paddle; if you’re paddling on the right side, your left hand will be on top.
How to paddle forward
With your hands in the proper position and with a slight bend in your elbows, rotate your torso in the direction of your top hand. Plant your paddle blade in the water, then punch your grip hand forward and down, creating a lever with your lower hand, while rotating your torso to put some bodyweight behind the punch. Your lower hand will guide the blade back, along the side of the canoe. Once the blade has passed your hip, slice it out of the water and return to your starting position.
Remember to keep the paddle vertical in the water—you want your grip hand to be out over the water. This technique harnesses the large and powerful muscles of your core versus the comparatively weak ones in your arms and shoulders. If your arms start to feel tired, it’s usually a sign you’re not employing the proper technique.
The most efficient way to paddle forward is for both canoeists to paddle in sync. This means the stern paddler will need to match the cadence of the bow paddler’s strokes, and the bow paddler will need to do their best to make smooth, consistent strokes. Paddlers should paddle on opposite sides of the canoe and communicate when they want to switch sides.
How to paddle backward
Guess what? Paddling backward is just like paddling forward, only in reverse. Why would you want to paddle backward? All kinds of reasons. Maybe you want to avoid something downstream. Maybe you just want to go backward for a bit. Give it a try and have it in your back pocket as yet another paddling skill.
Image: Scott MacGregor
How to steer a canoe
Steering a canoe is pretty easy once you have the right techniques dialed. As stated above, the stern paddler is mostly responsible for steering the canoe. The way many first-time canoeists will steer a canoe is by simply switching which side of the boat they are paddling on. After all, more strokes on one side of the boat will turn the boat in the other direction. However, this isn’t a very efficient way of steering your canoe.
The first canoe stroke you’ll want to learn is the J-stroke. This stroke is useful for both keeping your canoe on course and turning. If you and your canoeing partner are paddling on opposite sides of the boat in sync, in theory this should mean your canoe will travel in a straight line. However, if the stern paddler is stronger than the bow paddler, after every few strokes the canoe may start to turn away from the side the stern paddler is paddling on. Instead of switching sides to correct the direction of the boat, the stern paddler can use the J-stroke.
In essence, the J-stroke involves beginning a normal forward paddle stroke and then turning the power-face (the side of the blade facing the back of the canoe) away from the canoe. The easiest way to do this is to rotate the hand holding the top of the paddle so the thumb is pointing down. The blade can then be pried out away from the boat, depending on how much of a correction needs to be made.
The J-stroke can also be used to turn the canoe in a new direction. If the stern paddler is paddling on the left side of the canoe, the J-stroke will enable them to turn the canoe to the left. In this situation, if the stern paddler wished to turn the canoe to the right, in theory they could switch sides and perform the J-stroke on the right side of the boat. A much easier technique, however, is to perform a sweep stroke.
The sweep stroke is often used by solo paddlers, but a partial sweep stroke can also be useful to tandem paddlers. The stern paddler will plant their paddle out 90 degrees from their body and, using their core strength, will draw the paddle back in an arc through the water until it reaches the back of the boat. This will turn the boat away from the side the stern paddler is paddling on.
How to move your canoe sideways
By using draw and pry strokes, two paddlers can easily move their canoe directly sideways in still water. While the bow paddler uses a pry stroke, the stern paddler can use a draw stroke on the opposite side of the boat, or vice versa depending which direction you want to move.
Start a draw stroke by rotating your upper body to the side you’re paddling on. Plant the blade in the water, even with your hips. Keeping your hands stacked, and with the power-face of the blade facing the boat, draw the paddle into your hip. This motion will cause the boat to move toward the paddle.
A pry stroke is the opposite. The paddle starts beside the boat and is pushed away, causing the boat to move away from the paddle.
Paddling a canoe by yourself can be challenging, there’s no doubt about that. Paddling in a straight line is the biggest challenge. To avoid switching from side to side every other paddle stroke, you’ll need to learn some of the classic paddle strokes, like the J-stroke.
As previously mentioned, if you’re using a two-person canoe, you’ll also need to get your body weight more forward than normal. This can be accomplished by paddling the canoe stern-first, sitting backward on the bow seat, or sitting closer to the yoke.
Paddling a boat by yourself is a lifelong endeavor. You’ll slowly get better and the more time you spend at it, the more proficient you’ll become.
Advanced canoeing techniques/strokes
As you get better at paddling and learn more about paddling strokes, the world of paddling will open up to you. There are a lot of strokes you can work up to including the C-stroke and the low brace. You can read about some of the best canoe strokes to learn here: 7 Canoe Strokes That Will Make You A Better Paddler.
What to do if your canoe capsizes
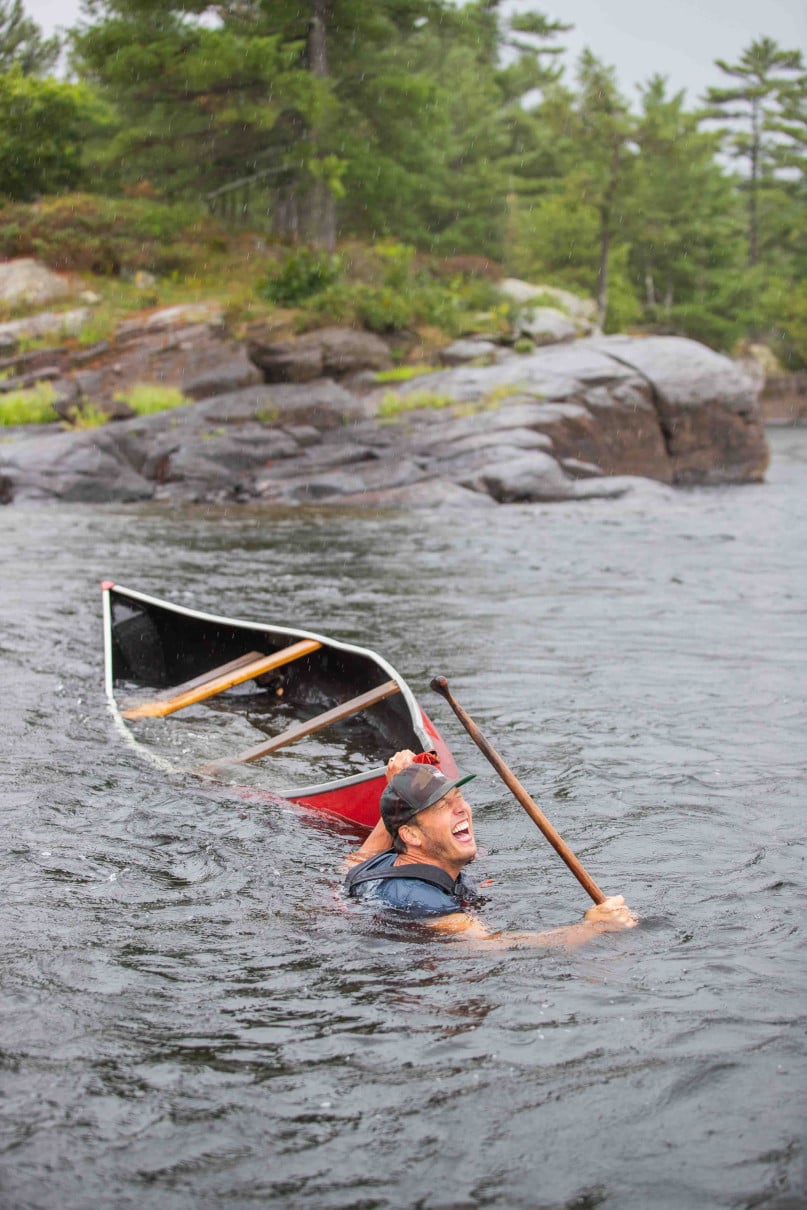
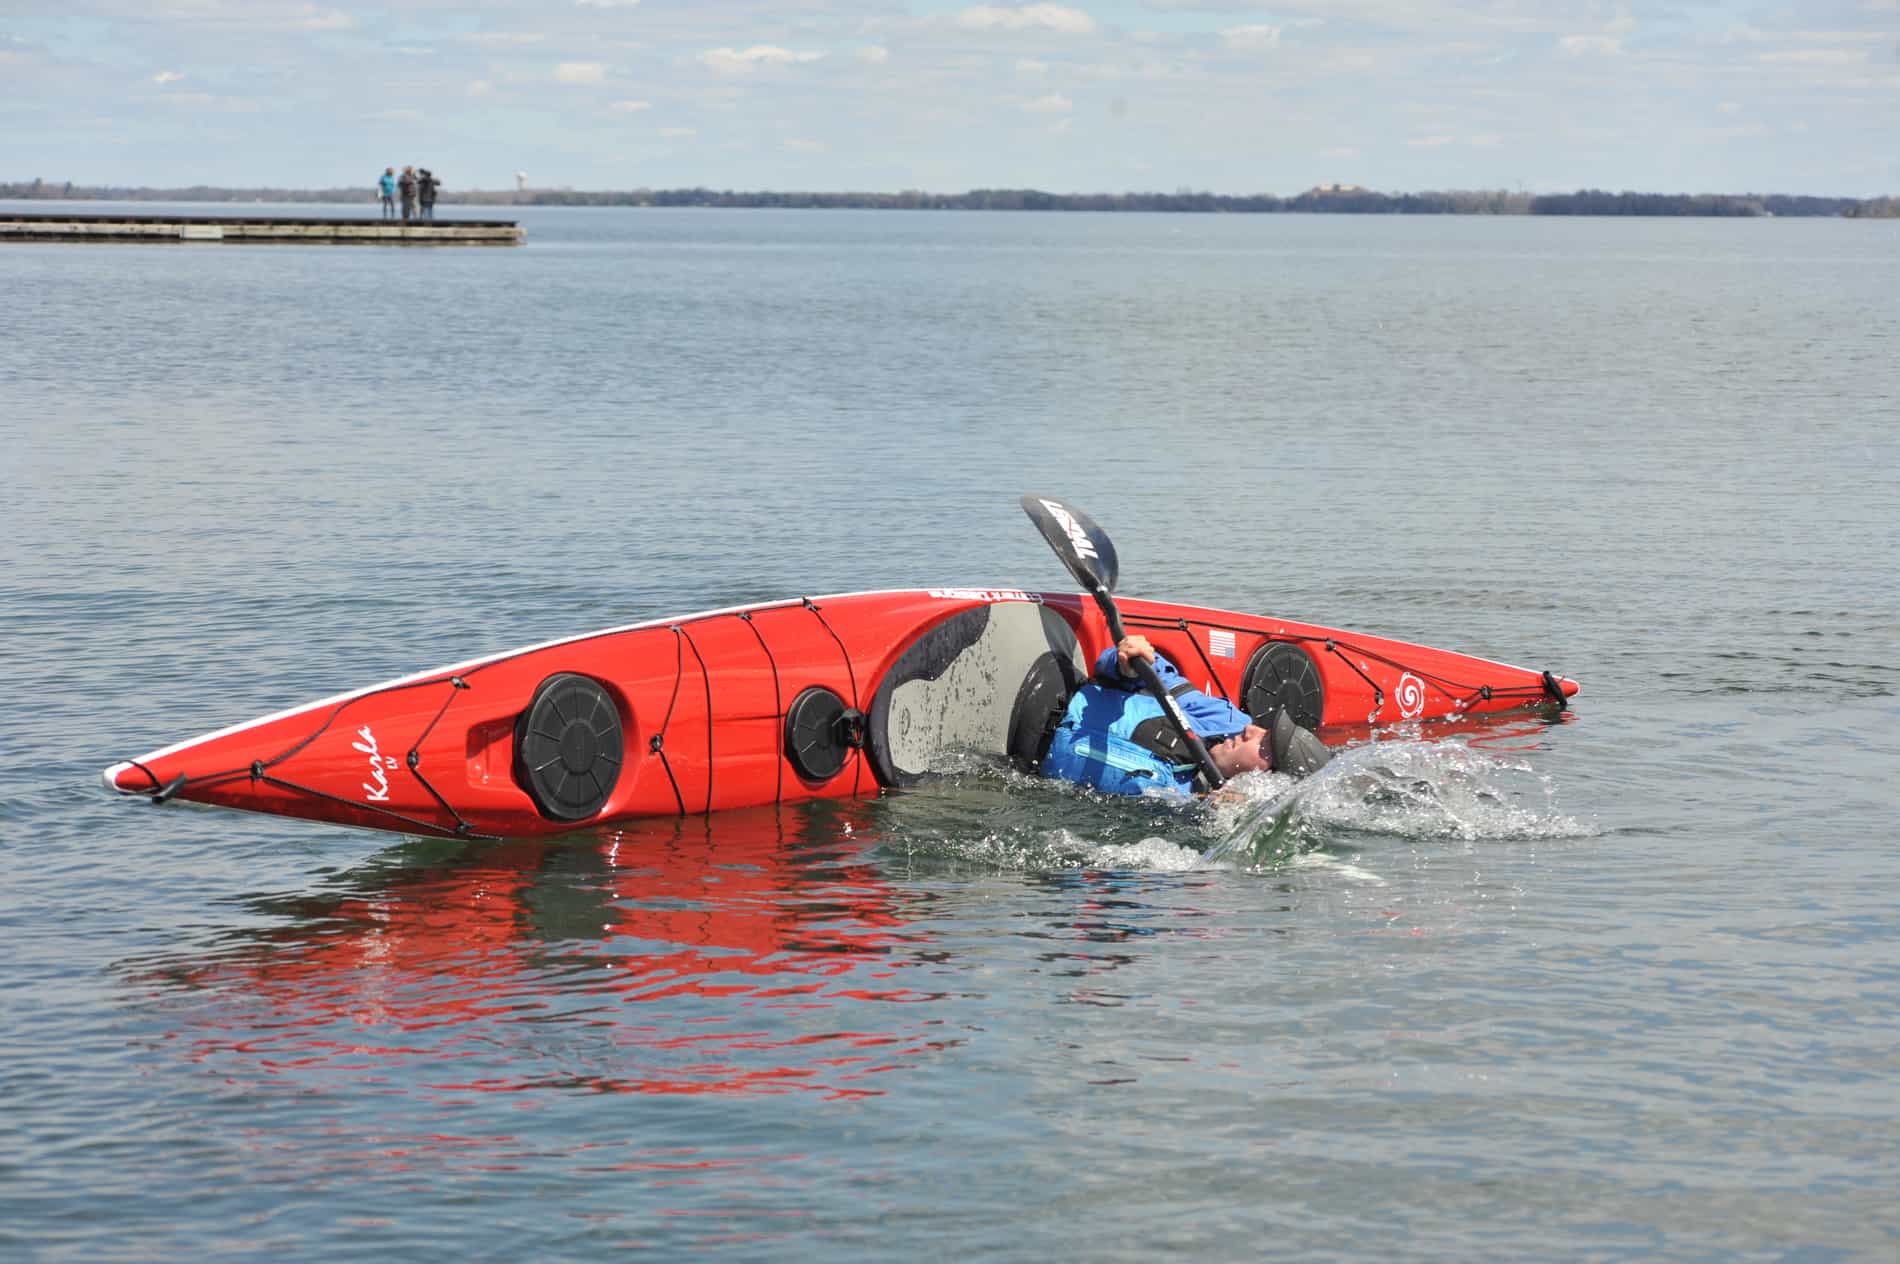
Flipping happens, and that’s okay. | Image: Colin Field
Do canoes flip easily?
It’s surprisingly difficult to tip a canoe on flatwater. Once you’re in and are positioned with your center of gravity low, the canoe will be quite stable. If you can avoid grabbing the gunwales (which effectively raises your center of gravity), you should be fine. Don’t be afraid to try wiggling your hips to see how a canoe feels when it is tipping side to side. Counteract your lower body with your upper body and you’ll see you can tip a canoe quite far without flipping it.
How to not tip a canoe
Generally a canoe will capsize due to paddler error—someone stood up or grabbed the gunwales, or the canoe got turned sideways in some fast-flowing water.
If you’re concerned about tipping your canoe, you’ll need to spend some time in one to get over the fear. Canoes are surprisingly stable once you’re in them. Time spent in the boat will quickly reassure you that this isn’t some circus balancing act. Anyone can balance a canoe.
Follow these simple tips and you’ll have no trouble keeping your canoe upright. First, as stated earlier, kneel on the floor of the canoe, as this is the stablest position. Once you gain some confidence, you can sit on the seats and maintain stability. But it’s best to kneel if you feel nervous. From there, recall the old saying “loose hips save ships” (or something like that…), meaning if the boat tips one way, you want your core and upper body to remain upright and perpendicular to the waterline. Staying loose in your hips and relaxing will help ensure your canoe doesn’t tip.
If you do flip the canoe, not to worry. There are several ways to right a capsized canoe. If your canoe is free of gear, ensure it’s upside down. If you and your partner are strong swimmers, swim under the canoe, face each other and grab the gunwales on either side of the yoke. Tip the boat and lift one gunwale slightly to break the seal. On the count of three and with a strong kick, lift the boat into the air and flip it over. Once the canoe is upright again, you’ll be able to bail out any remaining water.
How to get into a canoe from the water
Getting back into the canoe from the water is the trickiest part and takes some practice. With your partner in the water, grab opposite sides of the canoe close to the middle of the boat. Both of you will counteract each other as you pull yourselves up and over the gunwales into the canoe.
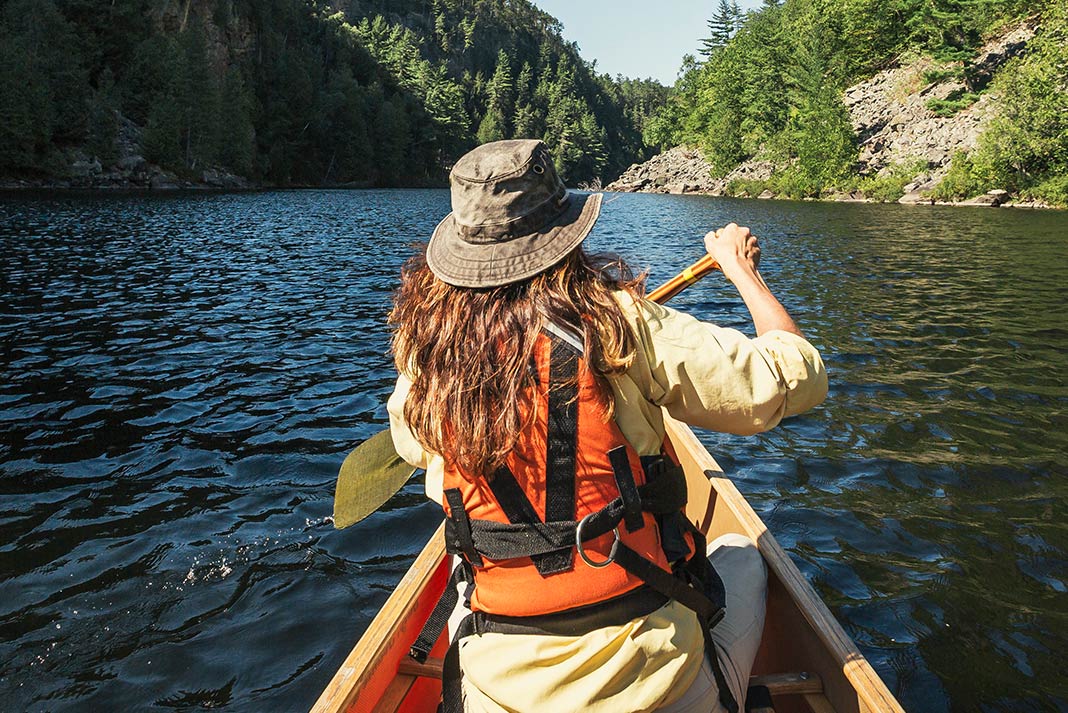
Finding the smooth water through a well defined rapid. | Image: Colin Field
Canoeing on different bodies of water and in different conditions
How to canoe a river
One of the great joys of a canoe is exploring a river in one. But there are some things you’ll need to know to do so safely. In an ideal situation, you always know what’s downstream; is there a log jam, waterfalls, a hydro dam? These are things you need to know when you put-in on a river. You’ll also need to be actively aware of any hazards while paddling. The bow paddler should keep an eye out for rocks, downed trees, and logs and communicate the location of these hazards to the stern paddler so they can steer the canoe clear.
If you’re on a slow, meandering river, you can sometimes paddle back upstream to your vehicle. Otherwise, you will need to leave a second vehicle at the take-out or arrange a shuttle.
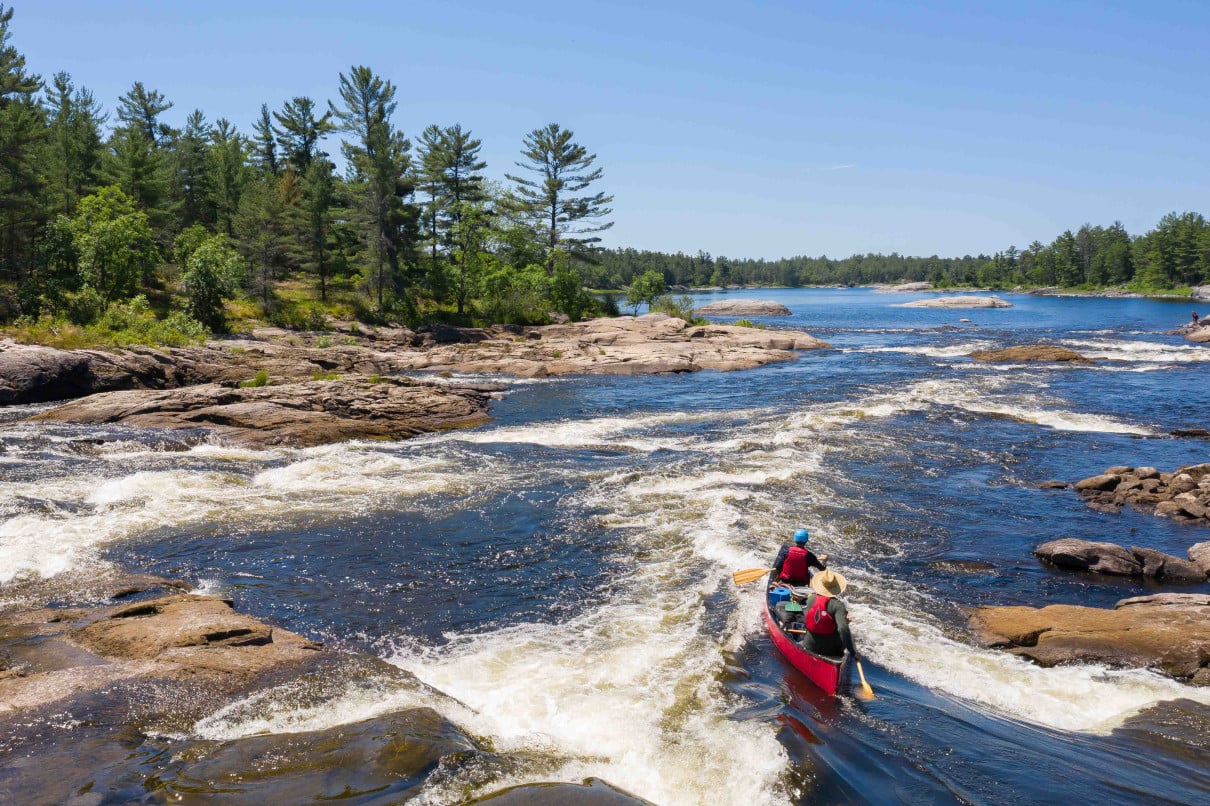
How to canoe rapids
Before heading out on any river, it’s important to know what kind of features are on your route. Some rivers might have short sections of fast-moving water with small rapids that can safely be navigated by novice canoeists. Others might have more serious rapids that inexperienced paddlers should not undertake on their own. Enlisting the company of an experienced paddler or, even better, taking a course, will ensure you learn all the techniques and safety elements associated with paddling whitewater.
That being said, there are some general tips that will help you navigate those smaller rapids. First off, you should be wearing your PFD (you should be already, but it bears repeating). You’ll also want to assume a kneeling position for greater stability. Next is reading the whitewater to find a clear path through the rapids. To do this, you’ll need to look for V’s in the water. A V that points upstream has a rock at its point, which you’ll want to avoid. A V pointing downstream shows a clear path—you’ll want to steer into the opening of the V. Keep an eye out for logs, downed trees, and any other hazards and give these a wide berth.
When going through the rapids, avoid grabbing the gunwales. Keep both hands on your paddle, and keep paddling—it’ll help you maintain your balance. If you somehow get stuck sideways up against a rock, be sure to lean into the rock to keep your canoe from flipping. You may be able to push yourself off the rock or you might have to get out. This situation can be much more serious in bigger whitewater which, again, is another reason to take a whitewater course before tackling any rivers with rapids.
Image: Kaydi Pyette
Image: Kaydi Pyette
How to canoe on a lake
If you’re looking for a quiet and serene experience, canoeing on a lake is ideal. Lakes provide the best place to learn to paddle a canoe and the best place to enjoy the true freedom a canoe represents. Of course, we’re not talking about the Great Lakes here; we’re talking about cottage-country lakes that are small and free of boat traffic and waves. This is a great place to practice your strokes and experiment with swaying the boat back and forth to test its (and your) stability.
There can still be hazards on a lake, such as rocks and downed trees, so it’s important to always be aware of your surroundings. It’s also a good idea to check for wind and weather warnings prior to heading out. And always wear a PFD!
How to canoe upstream
Most people don’t think paddling upstream is much fun, but sometimes it has to be done. If you have to do it, the thing to realize is that you want to be paddling directly into the current at all times. As soon as you start traveling to either side of the current, it’ll push your boat sideways and start sending you downstream. The stern paddler really needs to focus on the direction of the boat, while the bow paddler provides the majority of the power.
What it looks like to line a canoe through a rapid. | Image: Colin Field
If you just want to sit still and maybe make a few casts with a fishing rod, then you’ll need to anchor your canoe. River anchors between eight and 15 pounds work well. Two anchors, one dropped off the bow, the other off the stern, will help stabilize the boat and minimize drift. Use a quick-release knot to tie the anchors to your canoe grab handles or thwarts.
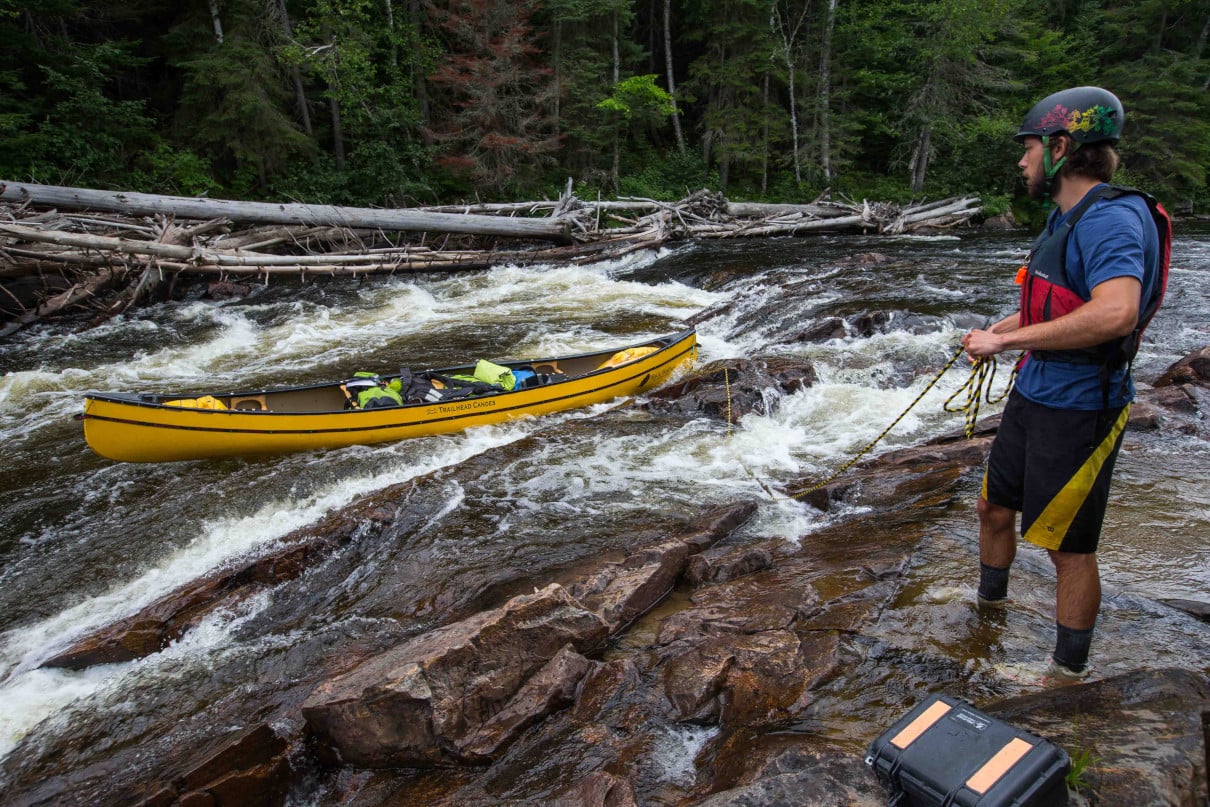
How to line a canoe
Sometimes you’ll find sections of river that are beyond your comfort zone to paddle. At these spots you have two options: portage the boat and all your gear, or line the canoe. Lining a canoe involves tying a rope to both the stern and the bow of the boat. With one paddler holding each rope, they walk along shore, gently guiding the canoe through the water. It’s a technique that gets easier with practice and can save you a ton of portaging pain.
Freya Hoffmeister Circumnavigates South America. Featured photo: DW News | YouTube
World class expedition kayaker Freya Hoffmeister is searching for two paddling partners to join her on the adventure of a lifetime this summer. For a month between May and September of 2025 you could join one of thegreatest kayak expeditions of all time— have you got what it takes?
As part of her North American continent circumnavigation, Hoffmeister will be paddling from New York to Labrador summer 2025 and is seeking companions for the journey.
Here’s what it takes to join a world class kayak expedition
Requirements include intermediate to advanced paddling skills, ability to paddle about 25-30 miles (40-50km) per day (25-31 miles) , willingness to paddle one of Hoffmeister’s Freya kayaks, ability to maintain a pace of five to six kilometers per hour, and ability to pee afloat according to Hoffmeister’spost on Facebook.
Additional requirements include “no grumpy faces”, occasionally paddling to music and singing, cooking your own meals as well as a small contribution to kayak transport logistics. Hoffmeister will handle the navigation, trip planning and written documentation of the journey.
Overall, Hoffmeister is looking for what anyone would want in an expedition teammate— someone with skills that match the route, with a positive attitude and willingness to work through discomfort, and a participatory team member rather than someone looking for a camp chef and guide.
While there were no obvious takers in the comments, the most common question on the Facebook posting was “how exactly does one pee while afloat?”
Answers ranged from pee funnels to simply peeing in your boat; from urine bottles to catheter solutions.
There’s no magic answer to how to pee from your sea kayak, but another expedition kayaker, Justine Curgenven, offers a few suggestions: pee on a sponge, use a funnel into a bottle, or raft up with a friend and pee between the two kayaks.
Circumnavigating North America
Freya Hoffmeister is no stranger to long expeditions—in fact, she is perhaps the most accomplished expedition sea kayaker in recorded history. Hoffmeister has circumnavigated Iceland, Australia, South America, and Ireland. While currently on the search for paddling teammates, in the past Hoffmeister has tackled a large portion of these expeditions solo and unsupported.
This most upcoming trip is just a small piece of her current mission: a circumnavigation of the North American continent. This 30,000-mile route will likely take 10-12 years in total to complete and began in March of 2017. Hoffmeister’s approach has been to tackle the north loop of the continent in the warmer half of the year, and the south loop of the continent in the cooler months.
With a pause in March 2020 during the onset of the coronavirus crisis, Hoffmeister’s journey is now back on track.
Currently, Hoffmeister has completed the western coast of the continent as well as a large portion of the Canadian Arctic. Future plans include expedition kayaking New York to Labrador summer 2025 and continuing where Hoffmeister left off at Ciudad del Carmen Mexico on the south loop in November 2024.
Hoffmeister advises paddlers looking to dive into the realm of big paddling expeditions to start small, paddle near home, and choose good paddling partners.
This isn’t the first time calls for expedition teammates have been made through Facebook— in November 2022,endurance paddler West Hansen shared “Teammates wanted for Northwest Passage kayak expedition: Must be able to sea kayak in very cold, turbulent waters for 12 to 20 hours at a stretch… Expedition will potentially take 4+ months… While venting is accommodated, whining won’t be tolerated. No pooping inside the tent, regardless of the weather.”
Much like Hoffmeister, skills on the water, positive attitude, and ability to handle your own bodily functions ranked as desirable expedition mate qualities.
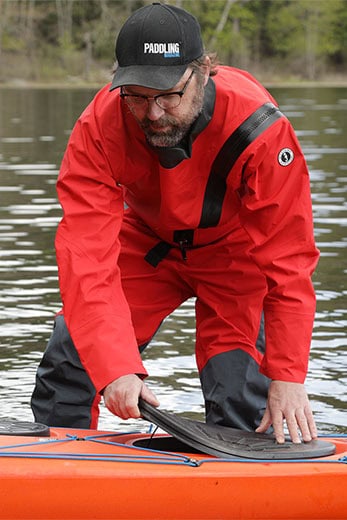
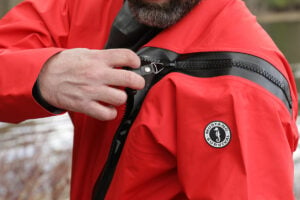
A drysuit is probably the most expensive paddling item you’ll buy after your kayak or canoe. It’s also the only investment that will double the length of your paddling season.
Well worth it.
There is an old saying: buy it nice or buy it twice. Drysuits are that kind of purchase. Pricier suits will typically get you more features, better performance in extreme conditions and extra product support after your purchase. Not every paddler needs a top-tier suit, but every cold water paddler needs reliable immersion protection. As a rule of thumb, the American Canoe Association recommends immersion protection when the temperature of the water you’re paddling on is lower than 60°F (16°C).
We gathered the newest suits from six industry-leading brands and one dubious top seller from Amazon. Here’s how they measured up in function, fit, breathability, durability, comfort, waterproofness and weight.
Mustang Survival’s brand-new Quadra is a minimalist-style, multipurpose drysuit that performs well without bells and whistles and is priced at a beginner-friendly price.
Best suited to recreational paddlers, the men’s large Quadra offered a roomy and relaxed fit on our 6’2″, 200-pound tester. An adjustable external waistbelt helped keep the suit and extra fabric tucked in place. The waterproof and durable three-layer Marine Spec BP fabric and latex gaskets are the same as those found on other Mustang suits, and we know from experience they perform well in extended field tests. We especially love the heavy-duty Cordura panelling on the seat and knees. The Quadra’s lack of a relief zipper will be a deal-breaker for some, but totally okay for paddlers who are out on the water for shorter sessions and not wearing their drysuits all day.
Photo: Michael Hewis
If you like the style of this suit but long for a relief zip, upgrade to Mustang’s Hudson. The Hudson also boasts internal suspenders and removable internal foam knee pads, which are great for kneeling on rocky shores while loading your kayak and crawling around on raft frames. The Quadra is available in both men’s and women’s models.
The 7Figure drysuit is reliable and robust. It combines polyester’s performance with nylon’s durability, offering a breathable, lightweight shell made from recycled water bottles. The naturally hydrophobic polyester also reduces drying times off the water.
The sleek 7Figure manages to be fitted without being restrictive. The men’s large was well suited to our 6’2″, 180-pound tester, and is probably best for tall, leaner body types. There was no loose material around the waist, lower legs or wrists, so no need for cinching Velcro tabs. Less loose material also means less drag in the water.
Photo: Michael Hewis
When it comes to durability, the 7Figure adds tough nylon in the form of its bomber Devil’s Club material in high-wear areas like the seat, hips and knees. If you predict a lot of bushwhacking in your future, you’ll probably want to opt for Immersion Research’s burlier Devil’s Club drysuit.
As for the feet on the 7Figure? They’re so thick on the sole that it feels like we could dance a jig at the put-in without developing pin holes, yet they’re still slick enough to slide into booties. We love them. And the Purple Drank color of our tester suit? Just perfect. Immersion Research is renowned for its one-year no-fault coverage with free repairs.
The NRS Phenom, constructed with Gore-Tex Pro fabric, is ideal for tackling the toughest river conditions, providing class V protection for hard chargers. Based on NRS’s bestselling Axiom, it boasts identical sweet features but now with back entry. We aren’t the only ones impressed with the Phenom—it won the award for best new apparel at the 2024 Paddling Magazine Industry Awards after being voted on by 38,000 consumers and retailers.
This sleek suit features latex neck and wrist gaskets, a five-inch-wide overskirt, Cordura panels at the ankles, and roomy integrated socks with elastic pant cuffs that easily pair with tall booties. As on the other whitewater-focused suits in this lineup, the volcano-style overcuffs cover more surface area from the wrist to the hand, reducing water contact with the gaskets underneath.
Photo: Michael Hewis
Our women’s medium loaner fit our 5’8″, 140-pound tester, though it took a bit of wiggling to get it over wide hips. We found the Phenom has a slightly more fitted feel compared to Kokatat’s women’s medium Icon, but only by the smallest margin.
Gore-Tex Pro promises long-lasting performance and is known for its best-in-class waterproof, windproof and breathable properties. During our early spring testing, the air was hot, and the water was cold. For high-output paddling and portaging, there’s nothing like it.
The Kokatat Icon was first developed with input from EJ and Dane Jackson and joined the brand’s regular lineup in 2013. A decade later, the Icon is still pushing the limits of performance.
The Icon has had some slick upgrades over the years. Most recently in 2023, Kokatat tweaked the leg pattern to provide more articulation for increased movement and improved comfort, as well as new drop-seat zipper routing for better in-boat comfort.
The Icon is almost identical to Kokatat’s classic Meridian but offers a rear-entry shoulder zip. While mastering the rear zip solo requires some yogi flexibility, many paddlers prefer it because it stays out of the way and reduces bulk on the chest.
Photo: Michael Hewis
The Icon we tested in a women’s medium was a little long in the leg but otherwise an ideal fit on our 5’5″, 150-pound model. Constructed with lightweight, rugged and durable Gore-Tex Pro material, the Icon also features an adjustable overskirt, Gore-Tex Pro socks, latex gaskets and neoprene punch-through over cuffs. Kokatat’s custom sizing option costs extra but is a solution for paddlers who don’t fit the brand’s standard measurements. Lengthen or shorten sleeves and legs, adjust the torso, change sock and gasket sizes, and even add more pockets.
While this is the priciest suit in our lineup, the longevity of Kokatat’s drysuits is legendary. Two Paddling Mag staffers have kept their Kokatat drysuits alive for more than 20 years.
Avid sailors have trusted Gill Marine for 50 years. In the last decade, Gill has broadened its horizons to focus on all watersports, including paddling. So, while the versatile Verso was born from sailing, its foul weather cred also makes it well suited to kayaking, canoeing and paddleboarding.
This women’s-specific design of the Verso was released in fall 2023. The unique dual-purpose entry zip, stretching from upper thigh to mid back to upper thigh, makes for easy donning, doffing and pee breaks. The size eight suit seen here was tested by a 135-pound, 5’7″ model and offered a relaxed fit designed to accommodate thermal layers underneath with unrestricted movement. Velcro closures at the waist ensure everything stays in place.
Photo: Michael Hewis
The Verso is made with Gill’s exclusive Xplore+ three-layer waterproof and breathable fabric. The inner neoprene dry seal gaskets at the neck and cuffs effectively kept water out during swim tests.
The only hooded option in this lineup, the Verso’s hood offers excellent protection against rain and wind. We love the soft fleece inner chin guard and ventilation holes for when conditions truly suck. On the water, we found the stowed hood toggle can be a bit finicky to release. While a hooded design isn’t ideal for those who do most of their paddling wearing a helmet, for everyone else, the Versa is a versatile, budget-friendly design.
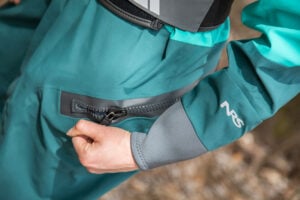
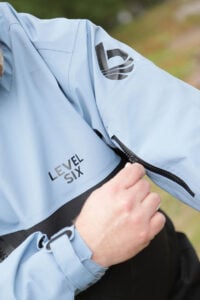
As the first “forever chemical” bans soon sweep the United States, the Loki from Level Six is the first drysuit on the market to be both PFAS-free and made from recycled materials.
The Loki is a latex- and neoprene-free version of Level Six’s Cronos. Released in spring 2024, the Loki was designed with recreational paddlers and shoulder-season canoe trippers in mind. Our extra-large men’s tester was a little long in the leg, but an otherwise good fit on our 5’11”, 220-pound model.
Photo: Michael Hewis
The team was quite taken with Loki’s Lycra gaskets, which are coated with polyurethane and covered by neoprene cinches. How waterproof the seal is depends on how tight the cinch is. Tighten it before rapids and loosen it for lengthy flatwater stretches. The gasket material is soft, supple and comfortable around the neck and wrists. It was designed with input from Level Six’s local fire department, which was looking for a more comfortable system first responders could wear all day.
Level Six is making waves for its early adoption of eliminating PFAS from its drywear to “protect our waterways, environment, health and factory workers.” The big question: Can PFAS-free drywear deliver high-performing, breathable suits? In our initial testing—and with adequate gasket cinching—the bone-dry Loki is living up to the hype.
“Well, it’s not as bad as I expected.” This was high praise for the Pro Ultra King-Q during the unboxing of our Amazon purchase.
On closer inspection, we had more than a few questions about materials and craftsmanship. First, the product information for the King-Q claims the suit is made of “abrasion-resistant nylon” but the tag inside the suit declares it’s polyester. And instead of being reinforced with Cordura or similar, the suit’s reinforced areas are simply another layer of polyester—in the chest and upper thighs but not the butt or knees. The webbing and buckles on the overskirt feel cheap, and the overskirt is just a couple inches deep.
As for the unisex fit? More suitable for a tall and leggy adolescent. Even our slimmest staff member couldn’t squeeze in.
Once inside out, we found the seam tape on the wrist gaskets and neck gasket—which doesn’t have a manufacturer stamp—was lifting. Pulling at the neck gasket seam to mimic the tension when putting the drysuit on, we could see the seam tape lifting farther and pulling away from the gasket.
And then there are the King-Q’s socks. Instead of fabric socks, this suit was fitted with glued and taped neoprene socks. Not only is neoprene not breathable—hello, sweaty feet—but the seams were lifting here, too. We predict this suit won’t last even a few outings without leaking, let alone a full season. And several of the reviews agree.
This article was first published in Issue 72 of Paddling Magazine. Subscribe to Paddling Magazine’s print and digital editions, or browse the archives.
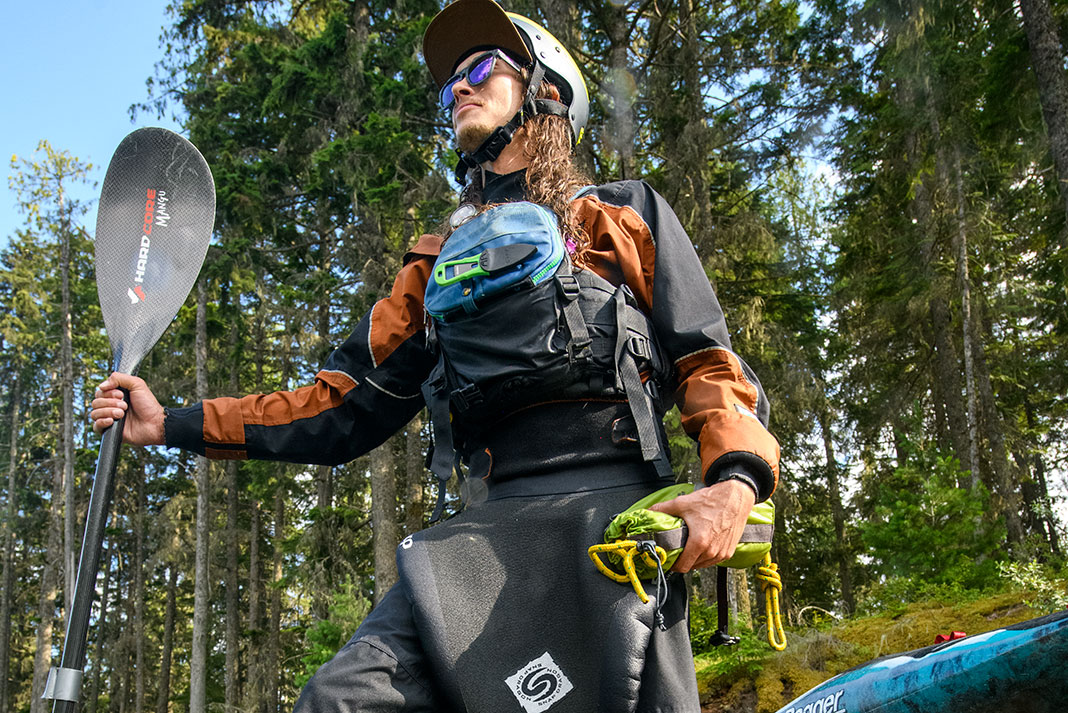
Kayak touring, whitewater boating and canoe tripping are hard on gear. Invest in quality gear that will withstand your adventures. | Feature photo: Jeff Priest
Originating in the tidal waters of the Far North, the first kayaks were both works of creative ingenuity and tools of surgical precision. Fast forward a few thousand years and it seems not much has changed. Indigenous people used these sleek, enclosed boats for hunting and travel through icy seas. Today’s paddlers seek out a wide variety of waters on which to challenge themselves and their agile craft—from sheltered passages to rocky, wave-tossed coasts and everything in between.
Kayak design and materials have continued to evolve, with many different niches branching out of those early vessels. This means kayak touring has never been more diverse or accessible, but it also means we’ve never had more options to choose from. In North America, there are fine models available from both domestic and imported brands. Selecting a shortlist of the best kayaks for touring is no easy task. My goal with these top picks is to not only share what I believe are some of the finest options out there, but also provide you with some key considerations when making your choice.
The Explorer is a dependable companion in rougher waters. | Photo: Autumn Lachine
Nigel Denis Kayaks Explorer Specs
Length: 17’6”
Width: 21”
Weight: 58 lbs
Recommended Paddler Weight: 150–220 lbs
Price: $4,585 USD
Why I love it
When it comes to elite expedition kayaking, few boats rival the Nigel Dennis Explorer for proven performance, endurance and pedigree. When the going gets tough, the tough get this NDK classic.
The Explorer’s upswept bow and stern, narrow beam and clean, functional deck layout are informed by the classic British interpretation of traditional Greenland hunting kayaks. From this base DNA, designer and renowned expedition paddler, Nigel Dennis, refined the shape and layup to address the unique challenges of extended journeys on remote, exposed coastlines. The Explorer has been the kayak of choice for circumnavigations in some of the roughest and least accessible waters in the world: Britain, Ireland, Iceland, New Zealand, Antarctica, South Georgia Island and the Aleutian Islands. The boats are handmade in North Wales, using a resin-rich, field-repairable composite construction that’s built to withstand the abuse of expedition paddling. But the real reason I love the Explorer is this isn’t a one-trick pony—I’ve spent weeks in the saddle on self-supported kayak camping journeys on open waters, surfed heavy currents and overhead waves, and danced lightly among rock gardens on countless day trips. Whether I was out for an hour or a week, the boat felt responsive to my inputs, carving graceful turns and remaining speedy and stable in sloppy conditions.
Twenty-five years after it was first introduced, the Explorer continues to embody the spirit of venturing into the wild unknown. Its intuitive handling and composure in any conditions ensure all paddlers feel like great explorers.
Reasons to buy
You want a kayak that’s expedition-ready but still fun to paddle on shorter trips.
A hull and rocker profile made to maximize touring efficiency in rough waters.
Custom colors, hatches and layups, including weight-saving carbon/Kevlar.
Consider another if
Your camping kit includes items like a suitcase stove, barrel bag and multiple Dutch oven options.
You prefer a highly adjustable seat system to a minimalist cockpit.
Bottom line
Whether you are planning an expedition of your own, or just looking to cover some miles and play along the way, the Explorer is a dependable companion as you paddle into rougher waters. See the Explorer again on Paddling Mag’s list of the best kayaks.
The Stellar S14 G2’s versatile combo of speed, light weight, premium materials and tour-ability is hard to rival in the 14-foot class. | Photo: Kaydi Pyette
Stellar S14 G2 Specs
Length: 14’
Width: 24.4”
Depth: 13.6”
Weight: 38 lbs (Advantage)
Capacity: 342 lbs
MSRP: $3,495 USD (Advantage)
Why I love it
With all the performance and safety features of a full-size sea kayak finessed into a compact package, light touring kayaks excel at spontaneous day trips and weekend adventures on any waters. Awesome, right? The Stellar S14 G2 takes a great thing and makes it even better—a lightweight light touring kayak. Because anything “light” should be, well, light.
Stellar’s background in building Olympic rowing shells and fast surfskis is evident in the construction, design and speed of the S14. Available in three sizes and four sleek and stiff composite material options—ranging from 40 pounds to just 30 pounds—the S14 trims up to 30 percent off the weight of its lightest rivals. The shallow-V hull is optimized for speed and quick acceleration with a narrow, knife-like bow and minimal rocker to maximize waterline. Soft chines reduce drag and have a smooth, continuous feel, making it easy to initiate gentle edged turns. The S14 is unquestionably among the fastest 14-foot kayaks on the water, cruising at a steady four or five knots and easily keeping pace with longer touring kayaks. The cockpit is comfortably appointed for all-day tours and there’s ample space in the watertight hatches for packing camping essentials.
Fast and light doesn’t mean experts only. Stellar moved the widest part of the hull behind the cockpit for added volume and stability, making the S14 G2 a beginner-friendly light touring bullet.
Reasons to buy
You want an ultralight compact touring kayak you can solo carry and transport with ease.
Surf ski-inspired hull makes this 14-footer as fast as the average 16-foot touring kayak.
Adjustable skeg and wider beam for user-friendly tracking and stability.
Consider another if
Advanced composite construction is out of your budget.
You want a boat you can drag, drop and generally abuse (check out rotomolded plastic options instead).
Your idea of the perfect day tour involves heavy surf and rock gardens.
Bottom line
The Stellar S14 G2’s versatile combo of speed, light weight, premium materials and tour-ability is hard to rival in the 14-foot class.
The Wilderness Systems Tsunami remains popular 20 years after its launch thanks to features that meet new paddlers where they are without limiting where they can go. | Photo: Virginia Marshall
In 2004, Wilderness Systems released what has become one of the most well-traveled and best-selling touring kayak designs of all time, the Tsunami. Over 20 years—and numerous updates—later, the user-friendly Wilderness Systems Tsunami continues to be a top choice for those starting out in this sport.
This is a kayak that makes you feel capable and at ease from the moment you sit in it. Why is that special? Plenty of kayaks in the recreational touring market are designed to optimize stability, but many do so by simply offering wider and flatter hulls. The Tsunami pairs a shallow V hull with flared sidewalls for fearless stability without sabotaging touring efficiency. In other words, it feels very secure without feeling like a barge. The boat’s multi-chine hull profile has two defined edges in each chine that act like secondary and tertiary keels, lending the Tsunami its trademark tracking and predictable handling. New paddlers can point the kayak where they want to go, and it gets there.
That feeling is vital for first-timers, but just as valuable is the kayak’s capacity to grow with your skills. The Tsunami is a refreshing beginner kayak—one that inspires instant confidence while promoting more advanced skills like edging and bracing.
Reasons to buy
Plenty of stability to inspire confidence without limiting skill development.
Three sizes to choose from, with fully customizable outfitting.
Burly rotomolded polyethylene construction holds up to heavy use.
Consider another if
You are looking for a lightweight kayak that is easy to solo lift and carry.
Hull speed outweighs stability and predictability.
You feel more comfortable with the open deck of a sit-on-top kayak.
Bottom line
Beginner doesn’t mean basic; the Wilderness Systems Tsunami remains popular 20 years after its launch thanks to features that meet new paddlers where they are without limiting where they can go.
The shortest and lightest of Delta’s touring kayaks at 14 feet and just 45 pounds, it’s positioned as the easiest to own for paddlers balancing space, weight and cost. If you are looking for a compact touring kayak that can handle diverse waters and won’t break the bank, the Delta 14 is a superb solution at an exceptional value.
Available with a skeg or rudder, the 14 embraces Delta’s West Coast touring design ethos: user-friendly, efficient and more than capable of hauling all your gear. This diminutive kayak delivers crazy capacity—over 200 liters—and the large hatches make it dead easy to pack in the luxuries. The relatively long waterline assists with tracking and efficiency, making for satisfying cruising capabilities. Delta’s outfitting focuses on personalized comfort with a fore- and aft-adjustable seat. This ability to fine-tune the seating position means the 14 fits a wide range of paddlers well. While there’s inherent value in a kayak that’s versatile and easy to paddle (you’ll use it more), even more persuasive is Delta’s expertise in plastics thermoforming. Delta has been working with acrylic–ABS laminates for nearly 40 years—refining their designs and shaping process to optimize strength, weight and aesthetics.
Reasons to buy
You want to fool your friends into thinking you splurged on a composite kayak.
Moderate V-shaped hull and well-defined chines are beginner-friendly with good stability and predictable edging.
Less than two-thirds the cost as compared to other touring kayaks of a similar size and weight.
Consider another if
Rock-bottom pricing takes priority over comfort, performance and durability.
You are looking for a packable folding or inflatable kayak.
Bottom line
The Delta 14 is a downsized touring design that offers the look and feel of a composite boat at a fraction of the cost. Simply put, you won’t find a lighter, better-looking kayak at this price point.
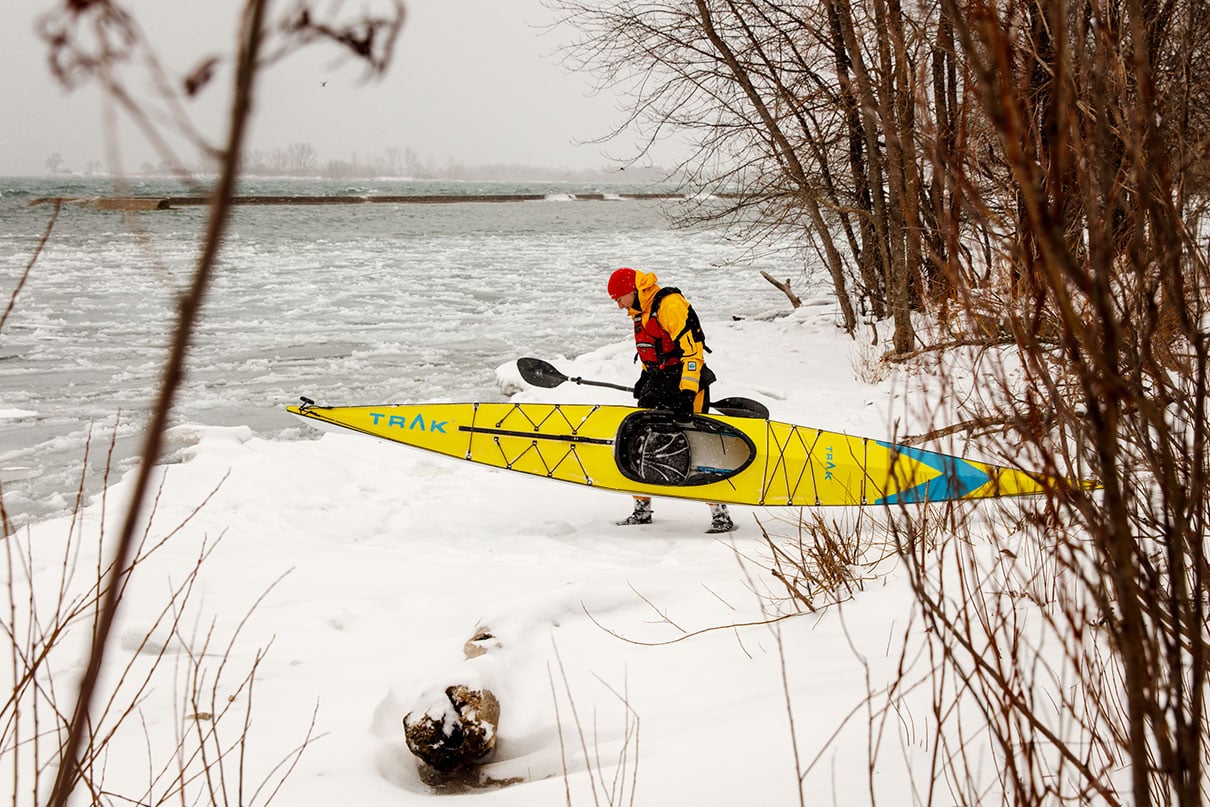
Equally suited to world travelers and urban dwellers, the TRAK 2.0 epitomizes go-anywhere versatility. | Photo: Joel Clifton
TRAK 2.0 Specs
Length: 16’
Width: 22.5”
Weight: 44 lbs
Cockpit: 16.5” × 30.5”
Packed: 56 lbs
Size Packed: 41” × 19” × 9”
Payload Capacity: 350 lbs
MSRP: $3,850 USD
Why I love it
How can a folding boat that resembles an ultralight plane crash out of the bag and goes together in just 10 minutes look and paddle like a high-performance sea kayak? In a genre plagued by head-scratching assembly rituals and lacklustre paddling, the TRAK 2.0 is a slick and sporty standout.
The TRAK 2.0’s bow and stern frames use shock-corded aluminum poles and snap-in carbon fiber ribs for intuitive assembly. If you’ve ever pitched a tent, this step is simple. Next, the frames are fitted into the burly polyurethane skin. Every folding kayak requires some technique for tensioning the skin around the frame, and TRAK’s clever hydraulic jacks are the easiest system I’ve tested. The jacks also allow you to change on-water performance on the fly: pump the keel lever to adjust rocker for playful maneuverability or straight tracking; use the two side jacks to compensate for weathercocking by adding a slight side-to-side curve to the waterline. Once assembled, the TRAK 2.0’s drum-tight skin, full deck rigging and graceful lines mean it’s all but indistinguishable from a hard-shell kayak. The boat feels inspired by traditional skin-on-frame Greenland designs, with hard chines and a shallow-V hull that prioritizes carving and glide over initial stability.
TRAK 2.0’s rolling travel bag makes short work of international terminals and exotic ports, but it’s not a package you can simply throw over your shoulder when it suits. There are unquestionably lighter—and certainly cheaper—packable kayaks to choose from. But for go-anywhere capability that performs like a hard-shell kayak, there’s the TRAK 2.0.
Reasons to buy
You want a packable kayak that is also a superb general-purpose touring and ocean play kayak.
Expedition-ready bow and stern floats can be packed with tripping gear for multi-week adventures.
Comfort and capability rivalling your favorite hard-shell kayak.
The P&H Scorpio is a do-it-all, plastic touring and expedition kayak that’s built to last. | Photo: Adventure Kayak Staff
P&H Scorpio Specs
Models: LV | MV | HV
Length: 16’8” | 17’2” | 17’6”
Width: 20” | 23” | 24”
Weight: 60 | 64 | 68 lbs (CoreLite X)
MSRP: $2,599 USD
Why I love it
One of P&H Kayaks’ classic designs, the P&H Scorpio is a high-performance, full-size touring kayak with bombproof polyethylene construction and an affordable price tag. What’s not to love?
Manufactured at P&H’s factory in Great Britain, the Scorpio comes in two different types of construction: the brand’s proprietary CoreLite triple-layer polyethylene and a lighter and stiffer CoreLite X option. Both make for a heavy-duty kayak with much better rigidity and durability (i.e. it won’t dent on your roof rack or warp on a hot day) than standard PE plastics, with CoreLite X rivalling composites for overall stiffness. The Scorpio is also available in three sizes to fit a wide range of paddlers—a svelte LV option for smaller folks, standard MV and spacious HV that can accommodate paddlers up to 6’6”. The Scorpio combines a speedy, 17-foot shallow-V hull with rounded chines for responsive edging and superb secondary stability. Intermediate paddlers can expertly hold a deep edge for faster turns, while novice kayakers can feel confident easing the Scorpio into more challenging waters. P&H’s sturdy and adjustable outfitting makes it simple to dial in cockpit fit for even more dynamic handling and all-day comfort.
A quality plastic touring kayak is one that still looks and feels great 10 or even 20 years after you purchase it. That’s the difference between a well-made boat like the P&H Scorpio and other cheaper, lower spec plastic kayaks.
Reasons to buy
Premium P&H CoreLite X construction for a top-of-its-class rotomolded plastic kayak.
Expedition-ready with four watertight hatches and keyhole cockpit for a drier-sealing spray deck.
You dream of harnessing the wind and sailing your kayak. The Scorpio deck features a reinforced footing for P&H’s Code Zero sail system. A nifty Skudder—or skeg-rudder hybrid that aids steering control and crosswind sailing—comes standard.
Consider another if
A 17-foot sea kayak is too much boat for your needs—the P&H Virgo is a compact touring model for easy handling on short to medium journeys.
You need a lighter kayak for solo lifting and loading on your vehicle (consider thermoform plastic construction).
Low cost outweighs longevity and performance.
Bottom line
For a small premium, the P&H Scorpio is a do-it-all, plastic touring and expedition kayak that’s built to last.
Innovative design meets stylish personal expression in the Karla. | Photo: Owen Marshall
Current Designs Karla Specs
Length: 15’3”
Width: 21.5”
Depth: 11.5”
Weight: 52 lbs
MSRP: $3,995 USD
Why I love it
The Current Designs Karla is hands-down one of the most maneuverable and lively touring kayaks I’ve ever paddled. Her creator, Danish designer Jesper Kromann-Andersen, believes a kayak should respond as a natural extension of paddler input. I couldn’t agree more.
Intermediate and advanced paddlers would be hard-pressed to find a more intuitive kayak. Want to scribe turns and carve wave faces? Stay loose and avoid purling while surfing? Slalom through rock gardens and thread currents with graceful agility? Unlock more challenging rolls and balance braces? With her narrow beam, the most rocker of any Current Designs kayak and generous volume in the bow, Karla gives you the keys. And what’s more, she does so while remaining surprisingly efficient. Unlike some dedicated ocean play kayaks, Karla’s shallow-V hull is actually fun to paddle on day tours and quickly covers the distance between you and the waves. Current Designs enhances the boat’s wide-ranging appeal with a variety of composite lay-ups blending lightweight stiffness and strength. On bumpy waters, where a kayak’s secondary stability is what keeps it right side up, Karla feels rock-solid. Her hard chines are at home with any degree of edging.
Innovative design meets stylish personal expression in the Karla. Like Kromann-Andersen, I think kayak touring should always feel playful. That’s why I love this boat, and why it’s the kayak that spends the least time on my rack.
Reasons to buy
Generous rocker and bow volume surfs like a dream.
Three hatches, a deck pod, compass recess, skeg and surprising hull speed add versatility for touring.
Robust, well-placed cockpit elements create a positive fit for edging, bracing and rolling.
Consider another if
You want to slide over rocks and barnacles with a second thought (consider a plastic playboat instead).
Your local waters don’t offer rough water exposure and a more touring-focused kayak would better serve your need for speed (check out Karla’s big sisters, the Current Designs Prana and Sisu).
Bottom line
Karla puts a smile on your face, whether gaining confidence in the surf or messing about on calm water.
Kayak touring can look very different depending on where and how you paddle, but if you can only own one kayak, buy the boat that you will enjoy on the waters you paddle most of the time. For example, an expedition kayak probably isn’t the best choice if you mostly enjoy after-work jaunts on your local river. You also want a kayak design that you feel comfortable in, but doesn’t limit your ability to progress your skills.
If your local waters consist of sheltered bays, quiet rivers and inland lakes, look to a compact light touring kayak that is easy to store and transport and encourages you to get out more often. If you’re progressing into more exposed waters and currents, or dream of exploring wilderness coastlines, it may be time to invest in an ocean play design to develop your rough water skills or an expedition kayak capable of making those extended journeys. If you are new to the sport and staying upright and feeling stable are your priorities while you get the basics down, consider one of the many user-friendly kayaks geared more towards beginners. And if you want to travel with your kayak to exotic or hard-to-access locales—or simply need a boat that you can store in your closet—a packable or inflatable is going to be the best fit for your lifestyle and aspirations.
As you spend more time kayak touring, you are going to gain a better appreciation of where you want to go with the sport. What types of waters call to you? What parts of the experience of being in a kayak do you most enjoy? Just as your responses to these questions may change over time, your sense of the type of kayak you want to paddle may evolve as well.
The kayaks in this article were chosen through years of accumulated experience with numerous touring designs, as well as the input of our contributors and longtime editors through our extensive boat reviews.
Former Adventure Kayak editor Virginia Marshall.
Why trust us
Longtime Paddling contributor and former Adventure Kayak editor Virginia Marshall has paddled touring kayaks for 20 years, exploring coastlines on the Great Lakes, Atlantic and Pacific oceans and Tasman Sea. When she’s not writing about kayaking, she works as a sea kayak instructor trainer and wilderness guide.
Writer Virginia Marshall paddles the Current Designs Karla during a 20-day personal trip on Lake Superior. | Feature photo: Kaydi Pyette
[Editor’s note: The events in this video took place prior to 2024 Hurricane Helene.]
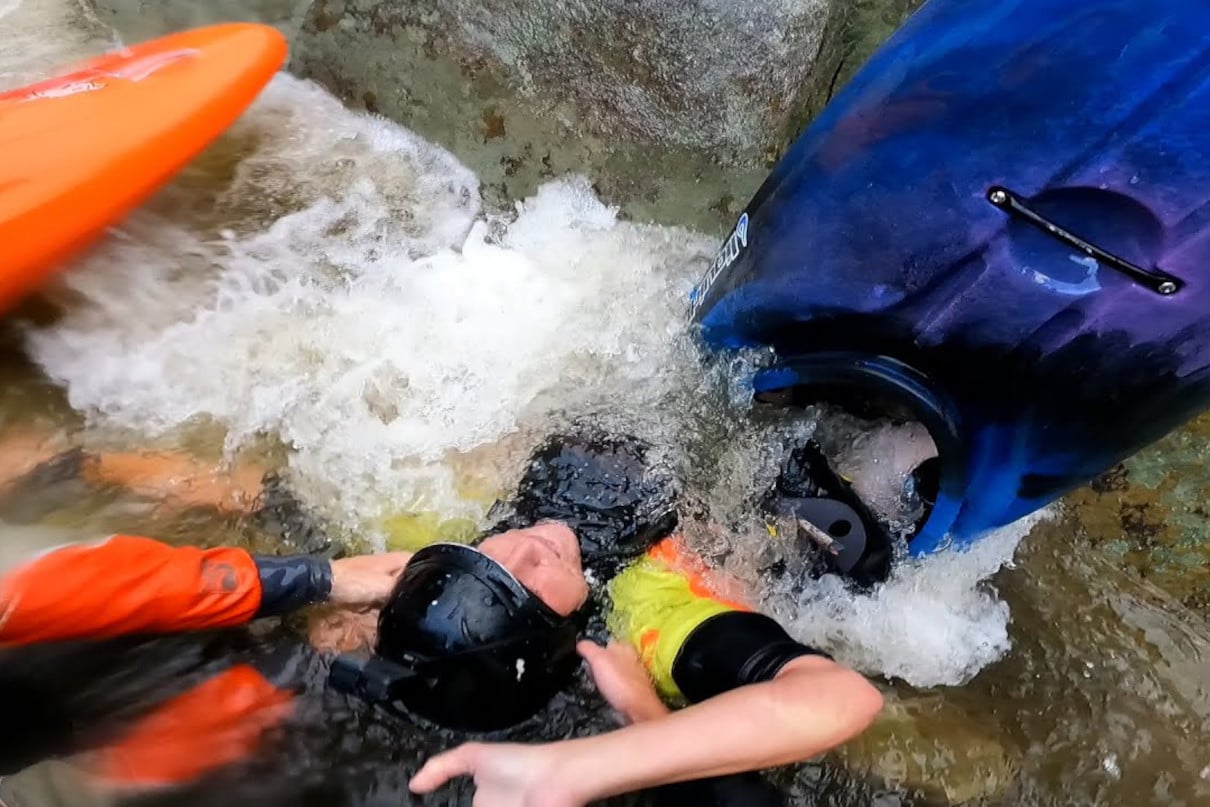
The Linville Gorge is one of the most impressive stretches of whitewater in the eastern United States. Seventeen miles of class V falling down the Blue Ridge Mountains of Western North Carolina at an average descent of 110 feet per mile. Through this stretch, the Linville River cascades over bedrock waterfalls and forces itself through cracks between huge boulders choking the riverbed.
The wilderness character of the Linville draws the desire of the most experienced whitewater paddlers. Meanwhile, the dangerous geology of the river continually demands respect no matter your ability. This humbling fact was shown firsthand in a rescue video recently published by Ben Atherton from an incident that took place in the fall of 2021.
“The one thing that saves people’s lives is getting your hands on them.”
Kayaker pinned in a siphon on the Linville Gorge
Atherton and his regular river running accomplice Josh Huber had rallied with a group for an after school lap down the Linville, which they had both run previously. In the video, we watch Huber enter Jailhouse rapid, a class IV+ drop according to American Whitewater.
“The middle of that rapid is a huge siphon, a jailhouse,” Atherton reflects on the incident and the fitting name for the precarious boulder garden. “Josh’s spot used to be good to go, but it had changed.”
As Atherton shares, Huber reaches a section of the rapid where it appears there is no clear path to exit. He is then pushed toward a corner which turns out to be a dangerous rock sieve, or in this case a siphon—a spot where the water flows under rocks like a funnel going who knows where before it eventually rejoins the rest of the river. The force of the current builds on the stern of Huber’s kayak, stands it up, and begins to push Huber under the rocks.
Rescuers pulling kayaker out of siphon on the Linville River. Image: Ben Atherton | YouTube
Against river and time
Within moments of Huber being pinned, his paddling partners Ben Atherton and Bernie Engelman are nearby to recognize the situation and act.
Engelman is still climbing out of his kayak as he grabs a hold of Huber’s lifejacket and reassures the paddler they’ve got him. Simultaneously Atherton leaves his kayak in a calm spot and wades out, reaching Huber and blasting his whistle.
“[Expletive] the whistle dude, we need to get him,” Engelman communicates to his fellow rescuer. Atherton’s whistle blasts to communicate with another paddler in their group are important, the equivalent of calling in backup. Engelman, however, recognizes the dire significance to having immediate contact with Huber before he’s pulled any deeper—complicating the effort.
“The one thing that saves people’s lives is getting your hands on them,” Atherton, who is also a kayak instructor, shares as he looks back at Huber’s rescue and his years of experience since. It’s a point he tries to get students to remember if nothing else when it comes to the reality of the scenario.
They quickly have Huber stabilized above the water, preventing him from drowning. Atherton and Engelman slow down their process and avoid breaking Huber’s leg as they extract him from the kayak.
All told, from the moment the paddler is entrapped in the siphon, to the time he is out of his kayak and standing is less than one minute—with barely a moment underwater.
“Yo, tell him I’m alive,” Huber tells his rescuers to communicate to the rest of their party as he’s standing waist-deep in the river. Then the reality of the situation flows from Huber’s tone as he repeats himself. “I’m [expletive] alive.”
“I was 17 and feeling invincible,” Atherton reflects on his perspective before his friend’s rescue. “That was the first time I’d ever seen something like that. I don’t even think it sunk in until years later.”
What stands out most in the rescue are the decisive actions and composure of the rescuers, and of Huber himself. They communicate clearly with each other and the entrapped, and do what is needed in the moment to save his life. Huber’s leg wasn’t broken but it was injured, and the rest of the paddle out became stressful knowing they were running out of sunlight with miles remaining in the gorge.
As old and permanent as rivers seem, they change regularly, big and small. A run like the Linville Gorge can see movement of rocks following even a modest high-water event. Atherton shares the rapids in the Linville Gorge are notorious for shifting. Slow-moving rivers can also see changing hazards like fallen trees from one day to the next. All the reason kayakers constantly survey stretches of river and monitor their paddling group.
The rescue video published by Atherton also took place before recent historic flooding ripped through Western North Carolina. In the time ahead, kayakers will begin to access classic stretches like the Linville. They’ll encounter sections of whitewater completely altered by the flood waters, and with it, entirely new hazards.
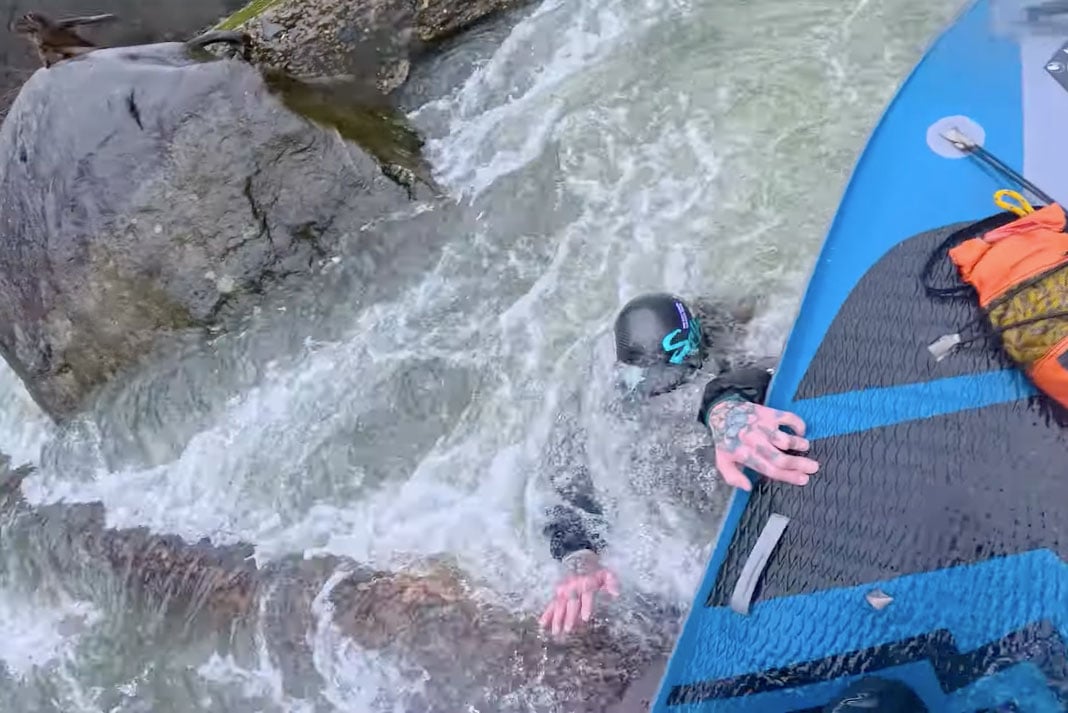
Grace Zeller lands helicopter on remote rock shelf in the BWCAW; image courtesy of Tony Maynard
On May 18, 2024, around midnight, Minnesota Department of Natural Resources pilot Grace Zeller landed her helicopter on a rock shelf in the Boundary Waters Canoe Area Wilderness (BWCAW). The mission: begin the evacuation of injured canoeists.
Overall, Zeller would make two flights into the BWCAW, transporting three medics and two canoeists. Because of her actions, Zeller was recognized in September for lifesaving efforts beyond the call of duty and awarded the Minnesota Department of Natural Resources Division of Enforcement Lifesaving Award.
Canoeists swept over falls in the Boundary Waters Canoe Area Wilderness
It was around 4 p.m. on May 18 when brothers Erik and Reis Grams watched their friends, Jesse Haugen and Kyle Sellers, approach Curtain Falls on Crooked Lake in the BWCAW. They witnessed the canoe move closer to the falls, then turn parallel to the falls, and then capsize. Immediately, Sellers went over with the canoe; Haugen, according to a report in the Minnesota Star Tribune, appeared to be standing in chest-deep water at the lip. None of the four were wearing PFDs or life jackets.
The Grams brothers approached cautiously, hoping to pull their friend from the top of the falls. Seconds later, all three went over the 30-foot cascade.
Erik Grams and Kyle Sellers survived the incident, sustaining a range of injuries including broken bones and hypothermia. Jesse Haugen and Reis Grams were missing.
Downstream, canoeists Tony Maynard and his friend Nick came upon Erik Grams and Kyle Sellers and immediately recognized the situation was serious. Maynard hiked back to high ground at the portage, where he remembered he had cell service, to call 911 to initiate the rescue. Later, Maynard and his friend also used a Garmin InReach to communicate with first responders as the rescue continued.
In all of this, there was a fifth member of the party with Sellers, Haugen and the Grams brothers, who had elected to sit out for an afternoon of fishing from shore. The group of five had paddled into the Boundary Waters with just two canoes, and were camped upstream of the falls. Maynard made a trip back upstream to let the friend know what had happened before returning downstream to his camp and the survivors before dark.
As the night wore on, Maynard and his friend focused on staying with the survivors, communicating with search and rescue and keeping the fire going. Sometime before midnight, they received a message through the Garmin InReach that a helicopter was coming.
Rescue in the remote Boundary Waters Canoe Area Wilderness
At the other end of the EMS system, in Brainerd, Minnesota, pilot Grace Zeller received a call in the night to see if she was willing and able to fly. She knew something bad had happened deep in the BWCAW, and there were no other aircraft available or able to access that location, but little was known beyond that.
“When Grace originally landed, she came in on the southwest side of the island and landed on a little tiny rock right in the middle of the river, and they couldn’t get to land from that rock,” Maynard explained.
“They had to go back up again and bring it to the other side of the little island and there’s just the perfect tiny little spot to land a helicopter. She was able to fit there and get them out that way. It was something I’ll probably never see again.”
Zeller made two trips into the BWCAW, first transporting an injured Sellers and two medics, then Erik Grams with an additional medic about an hour later.
In the morning, a float plane came to retrieve the group’s fifth member and volunteers from the St. Louis County Rescue Squad streamed in to begin the search for Jesse Haugen and Reis Grams, who were still missing.
Haugen’s body was recovered on May 31 and Reis Grams’ on June 2, 2024.
Overall, the St. Louis County Rescue Squad logged almost 6,000 hours during the rescue and recovery of the canoeists, making this the largest operation in the all-volunteer squad’s history.
According to Maynard, the information he provided to rescuers included the number of people involved, their injuries, location and landmarks, resources available and resources needed, and the fact that there were two people still missing.
“They needed to know where we were in the vicinity of Curtain Falls. They were able to see us probably a couple miles out because we had a fire going,” Maynard added.
After the incident, Maynard said he’s a lot more diligent in wearing his PFD on the water, and paying closer attention to conditions.
“I’m wearing it everywhere, even on a pond,” Maynard said.
According to Rick Slatten, captain of the St. Louis County Rescue Squad who responded to the incident, of the over 500 water fatalities in the squad’s history, less than three percent were wearing life jackets.
Pilot Grace Zeller receives state lifesaving award
On September 16, 2024, Zeller was honored for her rescue efforts above and beyond the call of duty with the Minnesota Department of Natural Resources Division of Enforcement Lifesaving Award.
“Normally, we’re just the search party. We don’t really get involved in the rescue part,” said Jacob Willis, Chief Enforcement Pilot, in a DNR video highlighting Zeller’s award.
Both Erik Grams, Kyle Sellers, and members of their families were present for the award ceremony.
“Most rescue pilots or EMS pilots, they don’t even get to know if their patient made it,” said Zeller following the award ceremony. “Not only did I get to do that, I got to meet their family members, and that is really special.”
Pilot Grace Zeller lands a helicopter in the BWCAW to evacuate two injured canoeists swept over a waterfall. | Featured photo: Tony Maynard
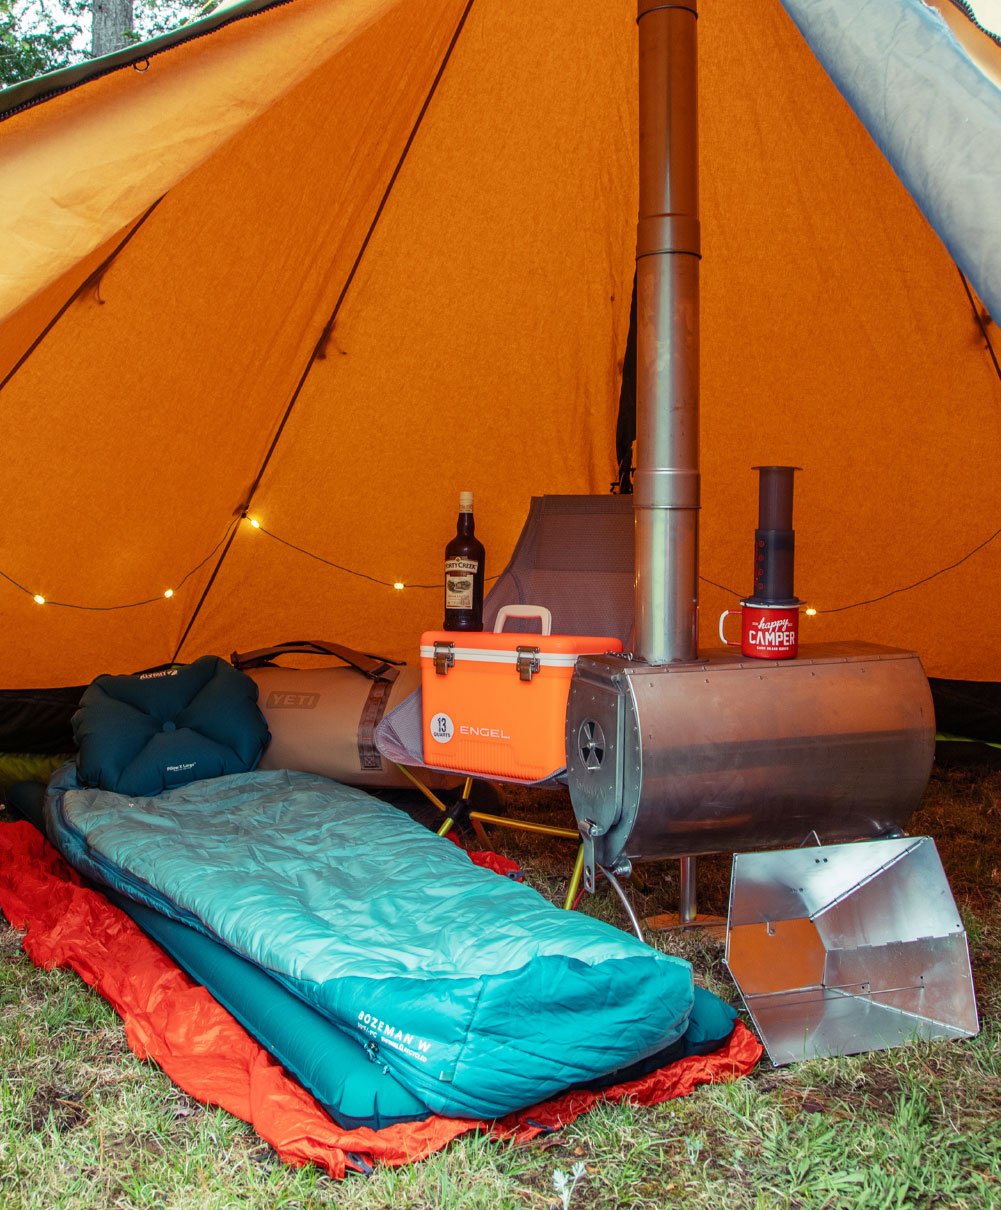
Make yourself at home. | Feature photo: Michael Hewis
Some campers are content with a bivy sack and a bag of oatmeal. If that’s not your style, you’re in the right place! From a four-season tent that feels like a portable palace to a luxury sleep system that elevates your shuteye, these 12 wilderness camping essentials make sure you’re not quite roughin’ it in style.
12 essentials for wilderness campers who crave comfort
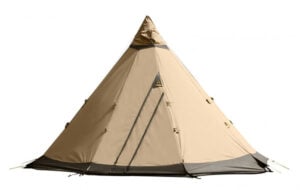
A versatile four-season tent for not-so-lightweight camping, the traditional Safir 7 offers such comfort and livability you’ll be tempted to bring it on all your adventures just because it’s so cool. The Swedish design is crafted from breathable cotton polyester impregnated with a long-lasting water repellant, making it resilient to challenging weather. We tested the Safir in pleasant spring conditions, but it has also withstood storm-force gales on glacial icefields.
Our tester arrived in a tidy package, about 10 by 10 by 24 inches and weighing 27 pounds. After you’ve set up the Safir once, you can erect the straightforward single-pole design in under five minutes. Towering over the campsite at nine feet tall, it features standing room height and a spacious interior. The Safir 7 can comfortably accommodate six to eight sleepers or a dozen people sitting for story time.
To get the most out of your Tentipi, you’ll want to pair it with a woodstove or firepan for warmth, cooking and just because you can—more on this below. The Safir has many optional upgrades, including a removable floor, porch, drying rail and more. Available in a wide variety of sizes, fitting up to 35 people.
Referred to as the heart of the Tentipi tents, the stainless steel Eldfell Stove is designed to pair with the tipi design. Use it to cook, dry clothes, and create a warm and cozy home away from home, regardless of the temperatures outside.
The Eldfell features an extendable insulation pipe that slides over the upper stove pipe to safeguard the tent fabric. It’s stable on its feet and in strong winds, too. The Eldfell comes in one size—25 by 15 by 12 inches—but offers different chimney lengths to match various tent sizes. The stove weighs 32 pounds and comes in its own purpose-made wooden box.
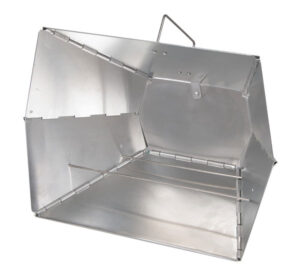
Another option for campers who want to cut down on heft is Tentipi’s collapsible Hekla firebox. It weighs just eight pounds and allows for an open fire in the tent thanks to its efficient burning design. The Paddling Mag team didn’t have the opportunity to test the Hekla, but it’s said to reduce wood fuel use by 75 percent.
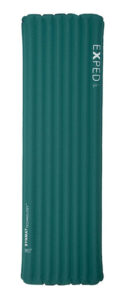
Exped’s Dura series is a jack of all trades, balancing durability, weight, warmth, comfort and packability. The 5R sleeping pad is our new go-to for any adventure; it promises a super comfortable sleep thanks to three inches of loft and whisper-quiet insulation. It also boasts a toasty 4.8 R-value, claiming to keep campers comfortable down to -4°F/-20°C, making it a solid year-round option for many. Rolls up larger than a Nalgene bottle, but not by much.
Exped’s Schnozzel Pumpbag is included. The accessory makes inflation quick and easy, inflating the pad in just three bags of air. It also keeps moisture out of the pad’s interior, extending its life. Available in mummy and rectangular shapes, as well as long and wide options. Exped’s track record of bomber reliability—our last mat is still going strong a decade later—speaks volumes.
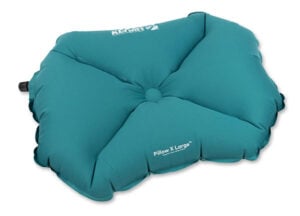
At 3.2 ounces, this pillow offers comfort at a weight you won’t even notice. Its X-shaped design cradles your noggin, perfect for back sleepers. Leave a little air out for a more comfortable feel. Stuffs down to the size of a wallet.
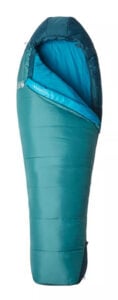
The synthetic-filled Bozeman from Mountain Hardwear is an entry-level, three-pound bag perfect for car camping. Designed for warmer weather adventures with a 20°F/-1°C limit, its generous mummy cut maximizes warmth without constriction. Its fleece-lined stuff sack can double as a pillow when stuffed with clothes. Zip together with a matching bag for snuggling.
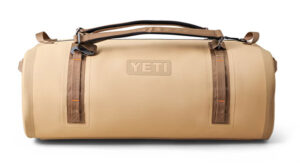
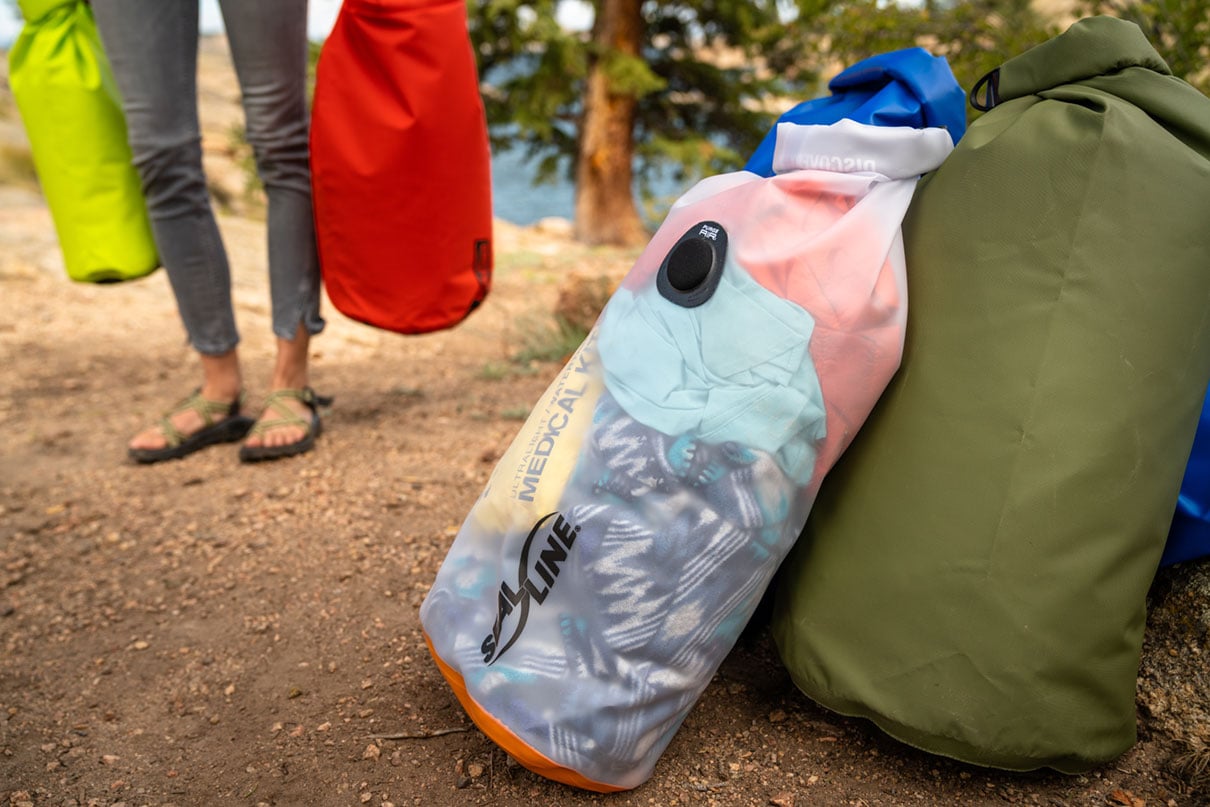
No duffle bag we’ve ever tested matches the durability and waterproofness of Yeti’s Panga. Living up to its claim of being an all-weather gear fortress, the Panga is a burly beast, made to last and dry on the inside even when dunked and dragged. Comfortable shoulder straps transform it into a backpack, making it as ideal for river trips as travel. It offers a generous interior, though the single zipper design is a challenge when packing larger items. Also available in 50- and 100-liter sizes, the Panga’s only drawback is its price. We even picked the Panga as one of the year’s best dry bags.
Easily portable, if not especially practical, our favorite thing about Mpowerd’s Luci Solar Lights is its cozy atmosphere around the campsite. The 18-foot-long string puts out 100 lumens, bringing a soft, warm glow that instantly makes your site more Instagrammable. Fully waterproof and fueled by a full day of summer sun or a six-hour USB charge, these lights keep the night alight for up to 20 hours.
We’ve been fans of Helinox since their Chair One revolutionized ultralight camp comfort in 2012. The Chair Zero Highback takes all the best of the original—a durable aluminum alloy frame that snaps together like tent poles with 100-denier polyester Kevlar-reinforced fabric—and pairs it with even more support.
At 1.5 pounds, it’s double the weight of the original but just a sixth of the weight of your typical clunky superstore camp chair. Supportive and stable, you can lean back without fear of toppling. For folks under six feet tall, your shoulders will likely rest just below the back of the chair. If you slouch down a little, you can also rest your head on the high back. For broader paddlers, the 15-inch shoulder width might be a bit tight.
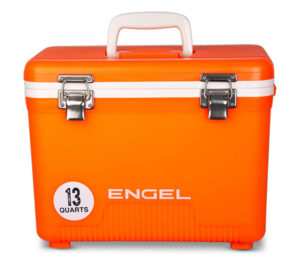
This compact, leak-proof cooler from Engel measures 15 by 10 by 11 inches, weighs 3.5 pounds, and holds up to 18 twelve-ounce cans in its 13-quart capacity. You could spend four times as much on a cooler, but this one has proven to be perfectly adequate for keeping things on ice for weekend adventures—especially when you only need your brews and brisket kept cold until tomorrow, not dinner five days from now.
Leave it to the Swedes to make a luxury item with such minimalism we want to bring it on more than our base camp trips. Handmade by craftsman Svante Fredén himself, we borrowed this 1.5-pound reflector oven from The Canadian Outdoor Equipment Co. and were impressed by its easy assembly, folds-flat compact size and spectacular snacks we easily made. No more searing your baked goods on too-hot embers or painstaking pan rotation over a gas stove. Bring this svelte little unit and eat your heart out. Think bannock, pizza, cookies, cakes, brownies and cinnamon bun rolls. Need we go on?
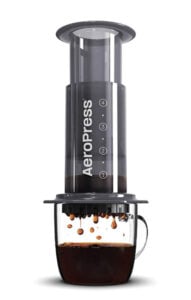
Goodbye, gritty cowboy coffee. So long, bitter instant brew. The light and compact AeroPress Original is a quick and simple way to make a cup of coffee that tastes almost as good as one your favorite barista lovingly prepares. Just add medium-ground beans and hot water, stir and press. It makes 10 ounces of regular coffee per pressing, or one to three espresso-style shots for lattes and cappuccinos. And it’s all done in about one minute.
This article was first published in the Issue 72 of Paddling Magazine. Subscribe to Paddling Magazine’s print and digital editions, or browse the archives.
Make yourself at home. | Feature photo: Michael Hewis
Many standup paddleboarders have a vivid memory of their first time encountering the sport. Maybe they witnessed someone gliding across the water at the beach, or perhaps they saw a crazy SUP surfing video on the internet. No matter how we first came in contact with the sport, the reaction is often the same: I want to try that.
As someone who introduces people to the sport, a common question I’m asked is, “How hard is it to do?” Often, people will see someone else paddleboarding and think that it’s an extremely difficult balancing act, like walking on a slackline or riding a unicycle.
However, the answer to the question is quite simple: stand up, relax and have fun. Unlike slacklining or riding a unicycle, the worst consequence of losing your balance is falling in the water. You may fall in at first, but with proper technique and a bit of practice, you’ll be exploring your local body of water in no time.
Once you do learn how to paddleboard, the most beautiful aspect is whether you cover miles, carve waves, or just sit and enjoy an after-work sunset, it soon becomes not just an activity but a way of living.
PFD (low-profile life jackets and inflatable belt packs are popular options)
Fin (integral to the board going in a straight line)
Leash (recommended on open waterways like lakes, bays and oceans; very conditional and even controversial on rivers)
Proper attire (dress for weather and water conditions)
Cellphone or VHF radio (phone should be stored in a drybag or case)
Whistle or sound-producing device
Fin configurations are often set up in single-fin, twin-fin and three-fin layouts. The reasons vary by paddling activity, but all will help your board track straighter on flatwater. | Photo: Joe Potoczak
Getting on the board
For people who have never been on a SUP before, this can be the hardest and most intimidating part once you’ve figured out how to transport your paddleboard to the water for the first time. To do so, you are going to want to find a good SUP rack for your vehicle.
A quick note: The handle in the center of the board is an important reference point we’ll use, as it’s the center of balance for carrying and standing.
We’ll start with the easiest launch point, which is a beach with a sandy bottom. Walk the board out into the water deep enough to the point where the fin isn’t touching the bottom when you push down on the back of the board. Hold your paddle across the board in front of the center handle. Next, climb onto the board on your knees. From here, you can start by paddling while on your knees to get a feel for how the paddleboard moves under you, or just take the next step (literally) and push yourself up into a standing position.
From a dock, you have to be slightly more careful because falling could lead to hitting the dock structure. Depending on the dock’s height, you can sit on the edge with your feet on the board, set your paddle onto it and then either kneel or stand up, using the dock for stability as you push off.
Have the blade exit when it reaches your feet to get the most out of your stroke. | Photo: Scott MacGregor
Some people find getting back onto the board after falling off in deeper water challenging. You won’t have the benefit of pushing off the lake or river bottom, so you’ll need to pull yourself onto the board stomach first and then, from a prone position, work yourself up to your knees and then your feet.
If you need rest, you can sit on a paddleboard. Climb onto the board, sit yourself down and give yourself a minute to catch your breath.
Finding where to stand
Knowing where to stand on a paddleboard is key to balance and comfort. As mentioned before, the handle is the center point and generally the widest part of the board, making it the most stable.
Since the handle is at the center, it also keeps your board laying as flat as it is designed to on the water’s surface. By being centered and having your board flat on the water, you produce the best glide to travel. So start with your feet shoulder-width apart in line with the handle. Later, you may need to adjust your foot positioning, especially for maneuvers and conditions.
Try to relax your legs. The more you can use your knees to absorb the movement of the water through the board, the more stable you’ll be. On calm water, shift your weight left and right to unbalance the board and learn how stable the board is.
To hold the paddle correctly, you should be able to rest it on your head and have your arms bent at around a 90-degree angle. | Photo: Raquel Bauer
How to hold your paddle
Unlike a kayak paddle, where your hands are spaced on the shaft, a paddleboard paddle should be held with one hand on top of the T-shaped handle at the end of the paddle, and the other part way down the shaft. When holding the paddle, you should be able to place it across your head and have both arms bent at a 90-degree angle.
Figuring out the exact length for your SUP paddle is a science unto itself. Some paddles are a fixed length, but many are adjustable, which is great for figuring out what length works best and for versatility. A good place to start is that the paddle should be a few inches longer than you are tall. From here you can make adjustments for board size and paddling activity.
You’ll also notice it’s common for SUP paddles to have an offset, where the end of the blade is pointed outward. Have it pointed out toward the front of your paddleboard, which is how it’s designed to provide you with more effective strokes.
Start by standing on the paddleboard with your feet even with the center handle and about shoulder-width apart. | Photo: Raquel Bauer.
How to paddle a standup paddleboard
Learning proper SUP paddling technique takes some time, but the basic maneuver is to pivot at the hips, reach forward to plant the whole blade in the water, and then move the blade toward your feet as you stand up straight. Rather than thinking about moving the water with your paddle, think of it as planting your blade in the water and then pulling your board forward.
To stay in a straight line, keep your paddle as vertical as possible as you go through the stroke, and slice the blade out of the water when it’s reached your feet. The fin of your board is largely there to keep you traveling straight. You may need to occasionally switch between paddling on the left and right side of the board until you learn correctional strokes.
The basics of turning
Wondering how to turn on a standup paddleboard? The best option for beginners to turn their paddle board is the reverse, or backstroke. This turns the board relatively quickly because the backstroke throws the brakes on your momentum, especially the side the paddle is on, and the drag helps the board spin in that direction.
Variations of reverse strokes are one of the best ways to turn the board. Here the paddler steps back to lift the nose. | Photo: Scott MacGregor
You’ll see experienced paddlers use impressive pivot turns, where they step toward the back of the board, pop the nose out of the water, and plant or sweep the paddle. As the name of the technique suggests, you can make very tight turns this way.
The pivot is a difficult maneuver for a beginner to pull off. The cross bow is more doable but can be tricky too. This is when you take your paddle from one side and reach across to the other side of the board without switching hands. Then you pull the blade and nose together like a pair of closing scissors. It’s a great turning technique that maintains some of your momentum.
Additional tips for paddleboarding
The best place to start
As you begin to standup paddleboard, you’ll start to become aware of every lake, river and pond around you because you’ll want to explore them.
Standup paddleboarders just starting out should stick to water they’re familiar with that doesn’t have a strong current, undertow or big waves. The flatter the water, the better as you learn the balance and technique of being on a SUP. Of course, even a lake or bay can change day-to-day so check weather forecasts and marine conditions to see if the day meets your ability level.
As you get more comfortable on the board, expand your horizons and enjoy the adventure that comes with gliding across bodies of water.
Practicing good vertical strokes is an essential aspect of learning how to paddleboard. | Photo: Scott MacGregor
How to get back on your paddleboard
It’s bound to happen, and safe to say we’ve all fallen off our board. Once it does, and you aren’t in a place where you can simply stand up, you may realize climbing back on is trickier than you thought. There are a few methods you can use to get back on the paddleboard.
The best way is to use the handle we keep mentioning at the center of the board to pull your chest across. Stay low until you can center and stabilize yourself and stand up from there. It’s helpful to lay your paddle parallel with the board on the far side while you climb on so it doesn’t float away.
Some people also find success going to the tail and crawling up from the back of the board. Again, stay low until you find yourself in a centered and stable position to stand up.
If you’re struggling or tired, remember your paddleboard is a giant inflatable or foam-filled flotation aid you can rest on until you are ready to climb back on or swim with it to shore. You can also have a paddling buddy put their hands on the board on the opposite side of you to hold it steady.
How to improve your balance
At first glance, standup paddleboarding appears to be entirely an arm workout, but newcomers to the sport often find it’s their legs and core that are more sore than anything.
The better your balance gets, the more the workout will shift to being about the arms or whole body. To improve your balance for paddleboarding, things like balance boards or bosu balls are extremely beneficial. Weight training to strengthen your legs will help you stabilize on the board. Wide, inflatable paddleboards also provide a good, stable platform for beginners.
Beyond that, strengthening your core, back, shoulders and arms will help make you a better, more well-rounded standup paddler.
An inflatable belt pack is a popular PFD choice for SUP. | Photo: Scott MacGregor
More on dressing for success
The lifestyle of SUPing conjures images of board shorts and bikinis, but when you are dressing for a paddlesport, you need to factor in weather, sun exposure and water temperatures in the event of falling in. In paddleboarding, there’s a high likelihood that you’ll get wet.
If you’re thinking about paddling in colder seasons, even the most experienced paddlers will wear full drysuits with sealed boots in the winter so they won’t experience the dangerous shock of cold water. Wetsuits are another good option, especially if you are coming to the sport from surfing and already have one appropriate for your water temperatures.
When it comes to personal safety, the unsinkable nature of paddleboards can be both a blessing and a curse. Many people think that because they’re paddling on a vessel that won’t sink, they don’t need to wear a personal flotation device (PFD). The problem is that accidents do still happen, and you should always be wearing a PFD—regardless of what the local marine regulations or the sometimes lenient rules at rental places might say.
A low-profile life jacket provides adequate flotation without restricting movement or bumping into your strokes. Inflatable belt-pack PFDs have become another popular option for standup paddling because they sit around your waist and are the size of a small hip pack. These inflatables come in both automatic and manual deploying designs.
The deal with leashes
The other hugely important piece of safety equipment you should almost never go without on open waterways like oceans, bays and lakes is a leash. These attach to the rear of the board and then wrap around your ankle or calf.
If you fall off your paddleboard, the leash is your lifeline. This is what keeps you attached to the board, and allows you to pull the SUP back toward you if you fall in the water. They’re crucial pieces of safety gear worn by even the most experienced standup paddleboarders.
Rivers and leashes are a different story. The use of leashes on rivers and other moving waterways is strongly debated and requires specialized gear and an understanding of considerations. The issue is, if you use a traditional leash on a flowing river and it gets snagged on an object, any current will be too strong for you to reach and release it.
Because of this danger, leashes used on a river should feature a minimum of a quick-release mechanism that is within close reach. Those who do use a leash on a river often wear these quick releases around their waist or on their life jacket. Paddleboarders considering a river leash system should consult with experienced river SUPers and have a strong understanding of implementing these safety mechanisms.
FT. MORGAN, ALABAMA — The 2024 Great Alabama 650, a 650-mile paddle race across the waterways of Alabama, concluded on October 1, 2024, at 2:45 PM. Over the 10 days, paddlers from around the world pushed their limits through rain and shine. The Alabama Scenic River Trail congratulates all participants, especially the record-setting finishers in each category, for their achievements.
Notable highlights of this year’s race include:
The 1st ever back-to-back solo winner of the race.
A new 5-time finisher of the race who joined the 3250 club.
The 1st woman to complete the course on exclusively on standup paddleboard.
The 1st person to finish the race twice exclusively on a paddleboard.
The toughness of the race is evident in the fact that only 47 percent of those who started made it to the Ft. Morgan finish line. This statistic, however, is a testament to the resilience and determination of the participants, who faced the challenge head-on and emerged victorious. Here are the official times and finishing standings of 10 people who finished this year’s Great Alabama 650:
2024 Great Alabama 650 Finishers
Race Director Greg Wingo and Trey Reaves celebrating at the finish line
Overall Winner & Male Solo 1st Place: Trey Reaves – 7d 03h 20m (first back-to-back solo winner of the race)
Joseph Bolton greeted by his dog and fans at the finish line
John Knippers arriving at the finish line
Mirko Pruefer being awarded trophy at finish line
David Miller at the finish line with trophy
Nathan Gueltzau celebrating with exclusive AL650 Finisher Patch
Male Solo Category:
2nd Place: David Miller – 8d 00h 25m
3rd Place: Mirko Pruefer – 8d 05h 38m
4th Place: John Knippers – 8d 19h 03m (completed the course exclusively on a paddleboard; first to do the course on a paddleboard last year and the only person to do it twice)
5th Place: Joseph Bolton – 8d 22h 47m
6th Place: Nathaniel Gueltzau – 9d 20h 07m
Lindsey Tilton celebrating with trophy at the finish line
Ryan Gillikin is awarded into the 3250 Club (5-time Finisher)
Female Solo Category:
Female Solo 1st Place Winner: Ryan Gillikin – 8d 18h 37m (5-time Finisher, Joined 3250 Club)
2nd Place: Lindsey Tilton – 9d 19h 35m (first female to complete the course exclusively on a paddleboard)
Jessica Nace and Candi Hill arriving at the finish line
Tandem Category:
Tandem Team 1st Place Winners: Jessica Nance & Candi Hill – 8d 22h 35m
The Alabama Scenic River Trail, host and facilitator of the race, thanks all volunteers and staff who worked tirelessly to assist in the success of this year’s race. Their efforts made the Great Alabama 650 a memorable experience for all. Race Director Greg Wingo and his company, ROAM Projects, contracted to execute the race, did a marvelous job ensuring the event’s success. Under Greg Wingo’s leadership for the 6th edition of the Great Alabama 650, the state saw record-breaking performances and attracted paddlers from around the globe. The Alabama Scenic River Trail Board and Staff congratulate Roam Projects on the professional, safe and fun atmosphere that the race staff prioritized, especially in the face of planning around the impact of Hurricane Helene.
This event would not have been possible without the generous support of our AL650 sponsors. Their commitment to promoting water recreation in Alabama through their donations has been crucial to the Great Alabama 650’s success. We extend our heartfelt gratitude to our sponsor and donors for their unwavering support for the 6th year. A full list of sponsors of the event’s 2024 sponsors is available below and on AL650.com. Companies or partners interested in sponsoring next year’s race should contact ASRT at media@alabamascenicrivertrail.com.
Trophies of the Great Alabama 650
About the Alabama Scenic River Trail
The Alabama Scenic River Trail (ASRT) maintains and promotes the National Water Recreation Trail, which stretches 630 miles, along with a network of over 6,500 miles of river trails throughout the state. The organization’s trail network spans from North Alabama mountain streams and whitewater rapids to South Alabama’s river deltas, making it one of the most varied water trail networks in the nation. Through collaborations with local partners, members, organizations, and outfitters, ASRT serves as the state’s premier paddling resource for all skill levels. ASRT works to ensure fun, safe, and welcoming opportunities for people to explore Alabama’s diverse waterways. The Great Alabama 650, ASRT’s signature race, highlights the full scope of these waterways, promoting appreciation and recognition of the state’s exceptional water recreation opportunities. Learn more by visiting ASRT.me.

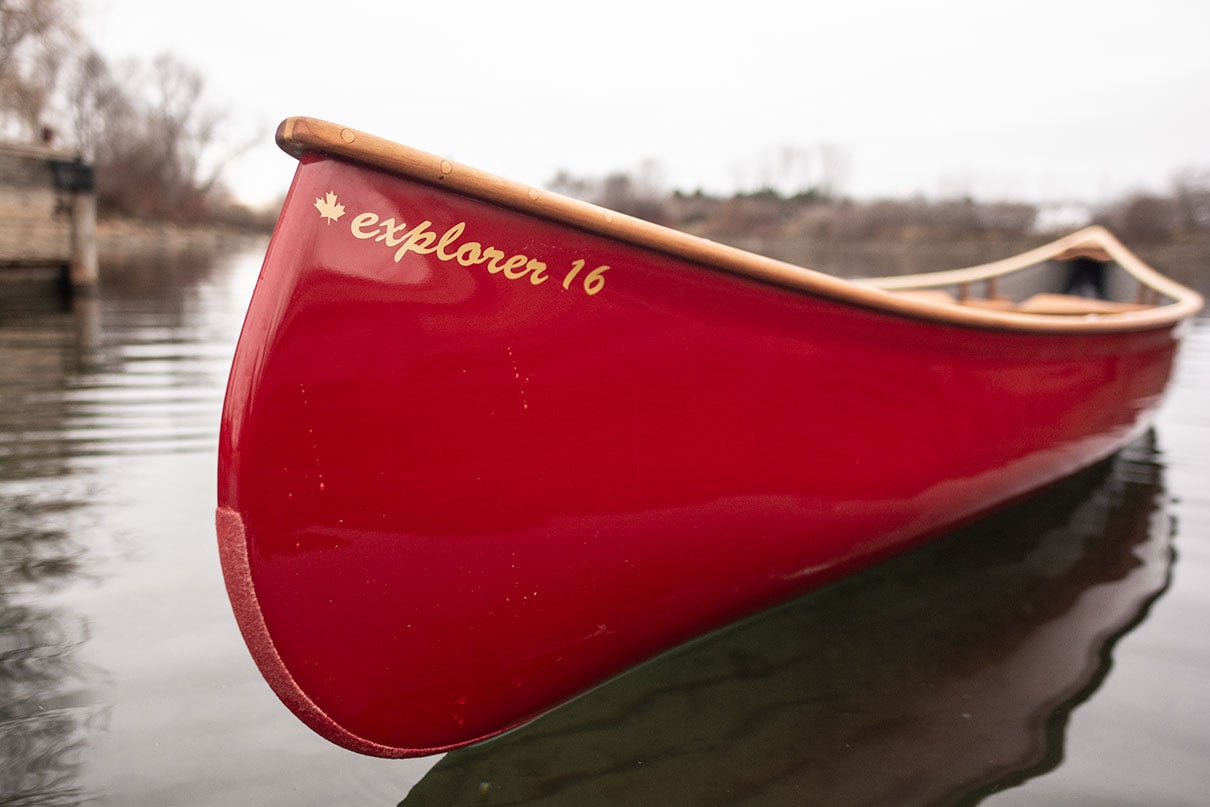


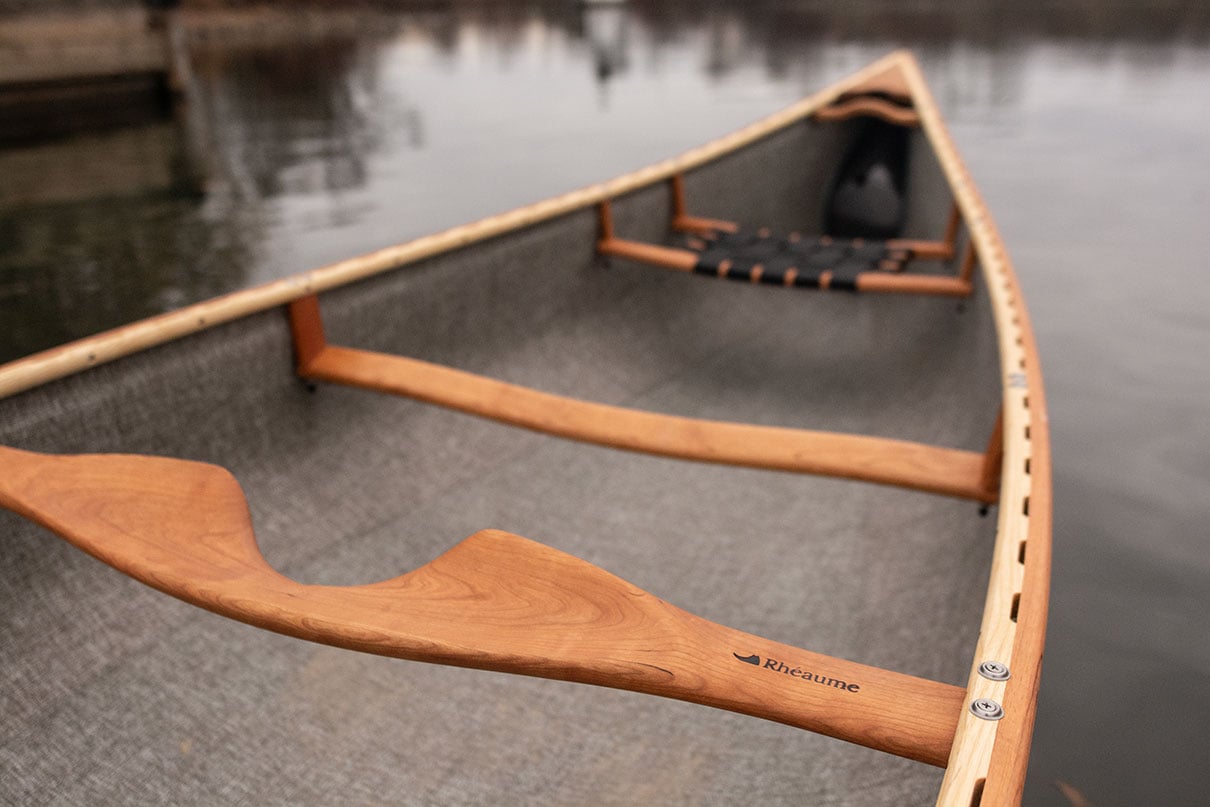
 This article was first published in Issue 72 of Paddling Magazine.