On the Hawaiian island of Kauai, you will find this distant state’s only navigable river. At 20 miles long, the Wailua River is Kauai’s largest and longest, beginning on Mount Waialeale and emptying into the Pacific Ocean on the island’s east side. With the lush tropical rainforests and beautiful waterfalls of the “Garden Island” waiting to be explored, it is not hard to see the draw of a Wailua River kayak trip.
As you can imagine, being the only navigable river out of all the Hawaiian islands means there are plenty of businesses that operate kayak tours along the Wailua. Here are some top-rated ones to check out.
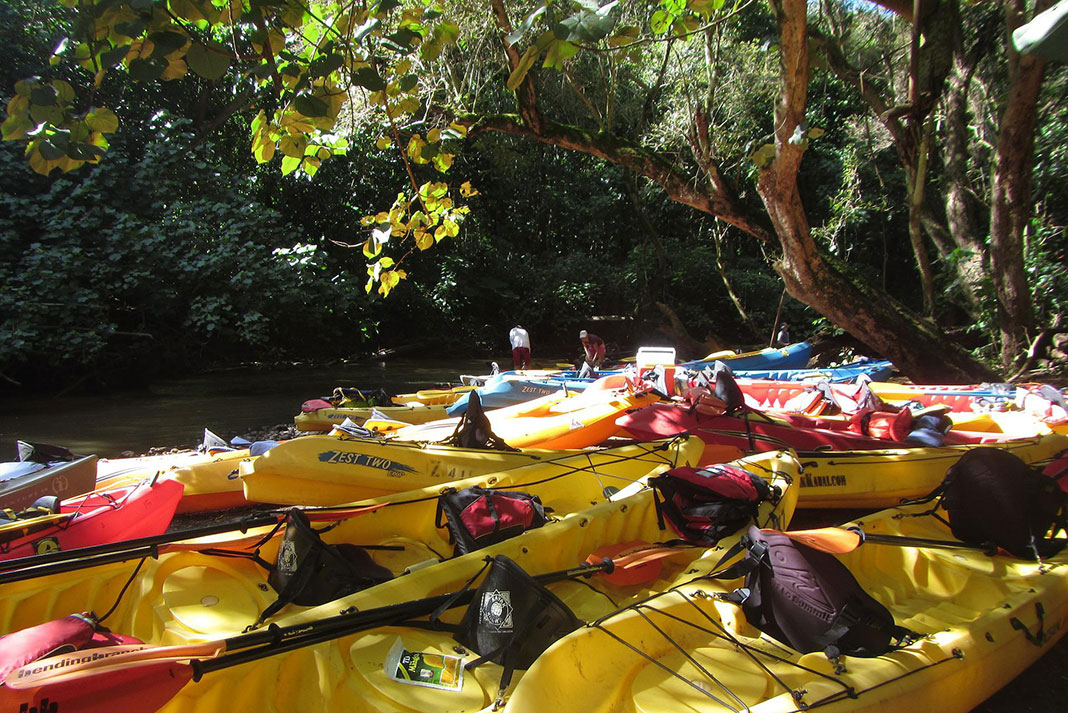
Plenty of local businesses operate kayak tours along the Wailua River. | Photo: Lois Neate/Pixabay
Kayak Wailua
Kayak Wailua offers numerous launch times Monday through Saturday, so you can depart almost any time you like, so long as it’s 1:00pm or earlier. You will be provided with a dry bag and cooler, and will depart with your guide across the street at the Wailua River Marina. From there, you will head up the river to Secret Falls, where you can enjoy a packed lunch (not provided) and swim in the pool at the bottom of the falls. This tour is perfect for beginners, including children, and prices start at $50 per person.
Ali’i Kayak
Ali’i Kayak’s Secret Falls Kayak/Hike tour is also perfect for families. Before heading out, your CPR and First Aid certified guide will provide a crash course on paddling techniques and water safety. Once you feel comfortable in your kayak, you’ll head a short two miles upriver and trek about 1.5 moderate-to-strenuous-miles to and from the falls. Tours start at $65 per person.
Wailua Kayak Adventures
Choose between a morning and early afternoon launch time and soak up the history of this sacred area of Kauai on your paddle to Secret Falls. Once you reach your destination, Wailua Kayak Adventures provides organic snacks at the falls to replenish your energy before taking a dip in the waterfall pool. Prices are $40 per child and $60 per adult and include dry bags and even hiking sticks to use on the walk to Secret Falls.
Kayak rentals
If time constraints aren’t your thing, check out some of these highly recommended kayak rentals in the area.
Kayak Kaua’i
For $95 for a double kayak, you can paddle all day on the Wailua River. Kayak Kaua’i is the exclusive outfitter for Wailua River State Park. While you rent your kayak from the Wailua River Marina, it should be noted that you will be required to car mount your kayak and drive a short distance over the Wailua Bridge to launch at the state park on the other side.
Wailua River Guides
Though their main office is located in Kapa’a, you will launch your rental kayak from the Wailua River Marina. Single and tandem kayak rentals are available Monday through Sunday.
Wailua Kayak & Canoe
Located right on the Wailua River in Kapa’a, you won’t have to worry about hauling your rental kayak with this company. Wailua Kayak & Canoe offers single, tandem and even tri-kayaks for rent. Prices begin at $50 per adult and $30 per child (5 to 7 years) and includes five hours of self-guided paddle time.
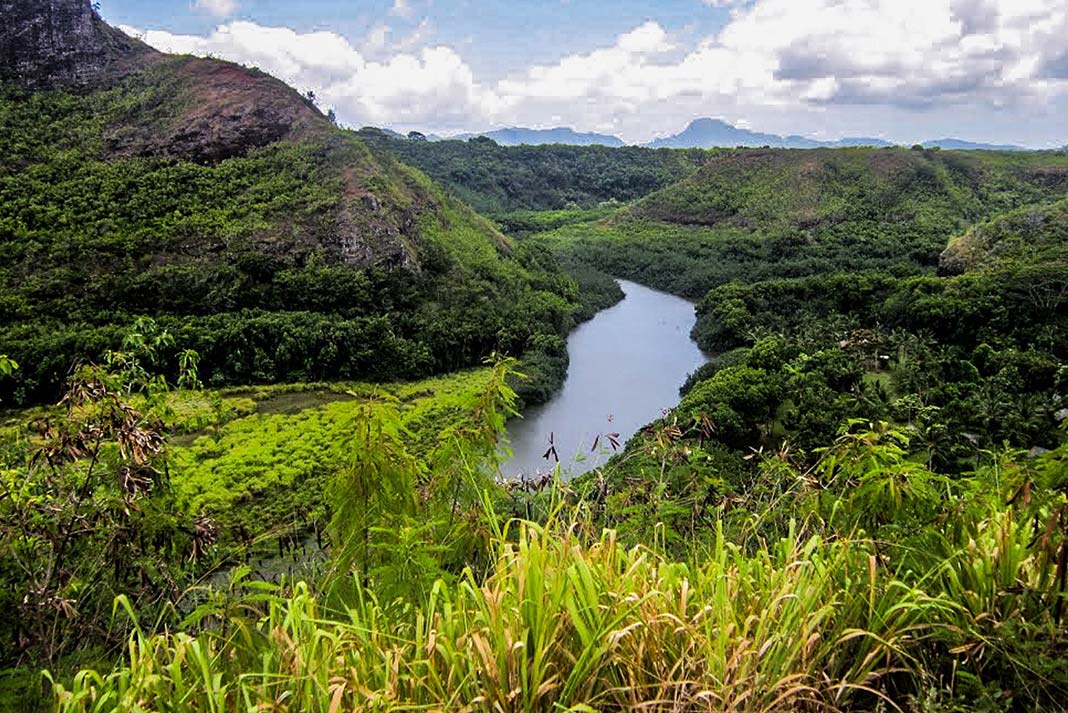
Journey to Secret Falls and Fern Grotto on this incredible river. | Photo: Michelle Raponi/Pexels
Kayaking the Wailua River without a guide
With its calm waters and fairly straightforward route, the Wailua River is a great place for beginner and novice kayakers to explore on their own. Most outfitters are more than happy to provide you with a waterproof map of the river to keep you on course.
Several put-in and take-out locations are available. These include the Wailua River State Park boat ramp, the Wailua River Marina and Kamokila Hawaiian Village. The easy-going nature of the river makes it possible to depart from and return to the same location, though it should be noted that you may be paddling into the trade winds on your route back. Most paddlers only venture a few miles out to the main attractions of Secret Falls and Fern Grotto.
There are several unique safety precautions to note on the Wailua. The southern edge and middle of the river are reserved for powerboats and barges, so paddlers are strongly cautioned to paddle no farther than 25 feet away from the north bank, both coming and going. Please be aware of the wakes these boats can produce.
As mentioned, you will likely be paddling into the wind on your return trip. The trade winds can become especially strong in the afternoons, which is one reason the majority of the local kayak tours launch in the morning.
Even if it’s not raining where you are on the river, flash flooding can occur from storms on the mountains where the river originates. If the river starts becoming muddy and murky, seek higher ground immediately.
Many people launch from the Wailua River Marina or Kamokila Hawaiian Village. Again, many outfitters will be happy to provide you with a map if you’re renting one of their kayaks. If you’re short on time, the Village is closer to the falls than the marina. The falls are about a 15-minute paddle upriver from the Village, while they’re a two-mile paddle from the marina.
When you reach the fork in the river, choose the right tributary and continue paddling for a short five to 10 minutes. Even if you don’t arrive during a time of day that’s busy for guided tours, when you will see plenty of kayaks and know where to “park,” the clearing is very obvious on your right-hand side.
The trail to Secret Falls from the bank where you leave your kayak is very well-marked as well. You will cross a fairly deep stream, which may or may not have a rope to assist you at the time, along with another small cascade along the way. The hiking portion to Secret Falls is about 1.5 miles round-trip.
Although the main attraction along the Wailua River is Secret Falls, there is another natural wonder nearby that is worth checking out while you’re in the area. Instead of taking the right fork in the river from the Wailua River Marina or Kamokila Hawaiian Village, veer left up the south fork and you will find the enchanting Fern Grotto a short ways upstream.
A former lava cave, this grotto is covered in—you guessed it—ferns, giving it a secretive feel. Nestled back in a cove surrounded by lush jungle, this attraction is easy to spot on your left-hand side.
From the Wailua River Marina, the paddle to Fern Grotto takes about four hours round-trip. You can also disembark from Wailua River State Park for a shorter trip as Fern Grotto is located within the park boundaries.
With its calm waters and fairly straightforward route, the Wailua River is a great place for beginner and novice kayakers to explore on their own. | Feature photo: Zane Persaud/Unsplash
How long does it take to kayak the Wailua River?
Although you can’t technically kayak the entire river since it begins on Mount Waialeale and there is a restricted zone near Wailua Bridge (a designated swimming area past the marina where the river meets the Pacific), you can still kayak much of the river. Also, while you can technically kayak to Kaholalele Falls on the north fork of the river, it is very much rain-dependent. If the water is not high enough, you will not be able to reach it by boat as it becomes too rocky to navigate. In a nutshell, you can easily spend a half or full day on the river exploring the spectacular sights mentioned above in the accessible areas.
With its calm waters and fairly straightforward route, the Wailua River is a great place for beginner and novice kayakers to explore on their own. | Feature photo: Zane Persaud/Unsplash
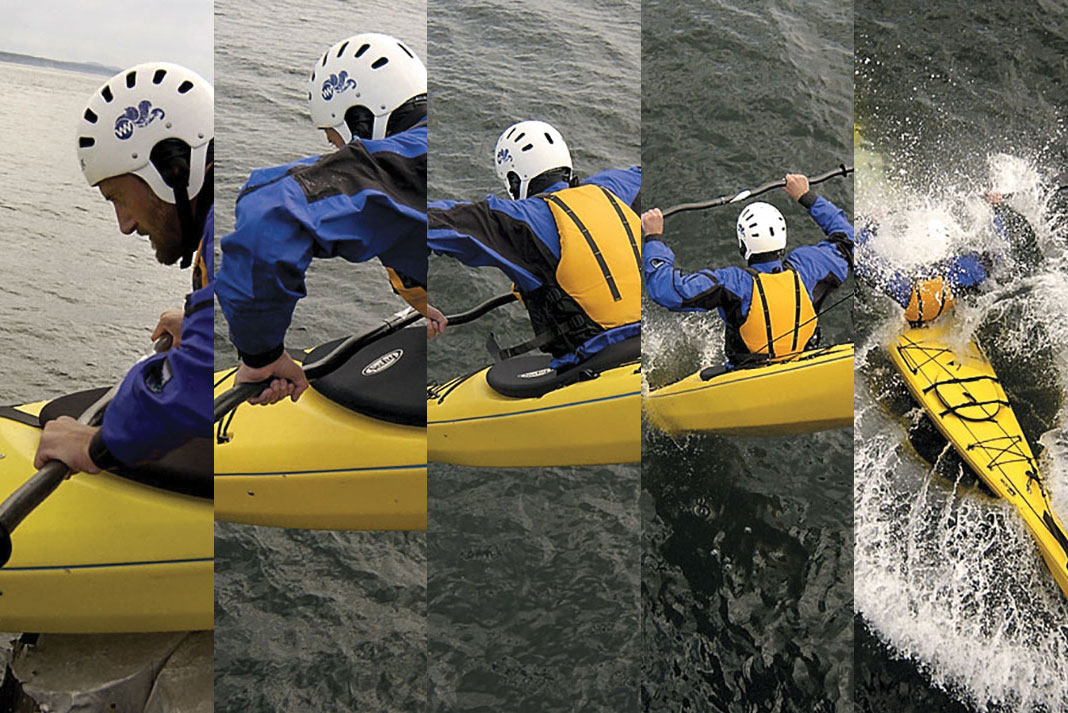
Want get more thrills out of your next whitewater run with less worry and hassle along the way? We’ve collected 30 essential river running skills to help you amp up the ride and make certain your path remains long and winding.
7 essential river paddling skills
1 Paddling never gets old and neither do the young at heart
Professional motorcycle racer Bill McKenna told Cycle magazine in 1982, “Life is not a journey to the grave with the intention to arrive safely in a pretty and well-preserved body, but rather to skid in broadside, thoroughly used up, totally worn out and loudly proclaiming: ‘Wow—what a ride!’” His words have since been quoted and used for inspiration many times by everyone from backcountry snowboarders to cancer patients, from marathon runners to piss-and-vinegar octogenarians. It’s good advice. Advice that most river runners would understand and rejoice with an “Amen.” It suggests that we should never be too fearful to try, or too old to continue.
River running never gets old. | Photo: Tom Spross/Unsplash
2 Punch holes
Like sussing out a hottie at the bar before your mates do, punching a hole takes speed, an aggressive attitude and timing. Approach with plenty of momentum, grit your teeth and lean forward, and take your last stroke just as you hit the wall (of water). You’ll need to dig deep to get a good grasp of the undercurrents and be carried through (in other words, put your blade in the green water beneath the foam pile). She, er…the hole, is all yours.
Leave that caveman’s club of a paddle behind (yes, we mean your carbon crankshaft) and strap a pair of these floppy dinner plates to your mitts. Hand paddling is the gnarly, minimalist wave of the future. Originally embraced by squirt boaters—that loony breed of underwater kayakers—as an easy and uncluttered way to get downtime, hand paddles are catching on in river running circles as well. Why? It’s a great way to learn how to feel the water. It’s also wicked training for when, and we mean when, your paddle breaks. Not convinced? Well, consider that the infamously difficult and treacherous Green River Race even has a separate category for hand paddlers.
4 Seal launch
It looks cool and it’s the most air you can get with absolutely zero paddling skills. A seal launch is sometimes the only way to drop into a run and it’s definitely the most fun.
Step 1: Pick a clear launch zone with deep water below. Hold your paddle in your control hand and push off with your other hand. Resist offers of assistance from overzealous friends and onlookers.
Step 2: Aim to pencil in at a 70- to 80-degree angle so your kayak’s rocker and buoyancy bring you smoothly to the surface. Your launch speed is the main factor in your angle of entry. Too little umph, you’ll go ass-over-teakettle. Too much and you’ll land flat and hard.
Step 3: Hold your paddle slightly over your head or alongside your boat so it doesn’t biff you in the face when you hit the water.
5 Catch waves on the fly
Save traffic jams for the drive home; this cool move will keep you out of the eddy and on the wave. As you float downstream, approach the wave facing upstream and glancing over your shoulder to line yourself up with the steepest part. Paddle hard forward against the current to slow yourself as you slip toward the wave. Lean onto your back deck to prevent nose-diving when you drop into the trough. When your bow is clear, immediately throw your weight forward and take a few strong forward strokes to stay on the wave face. Surf.
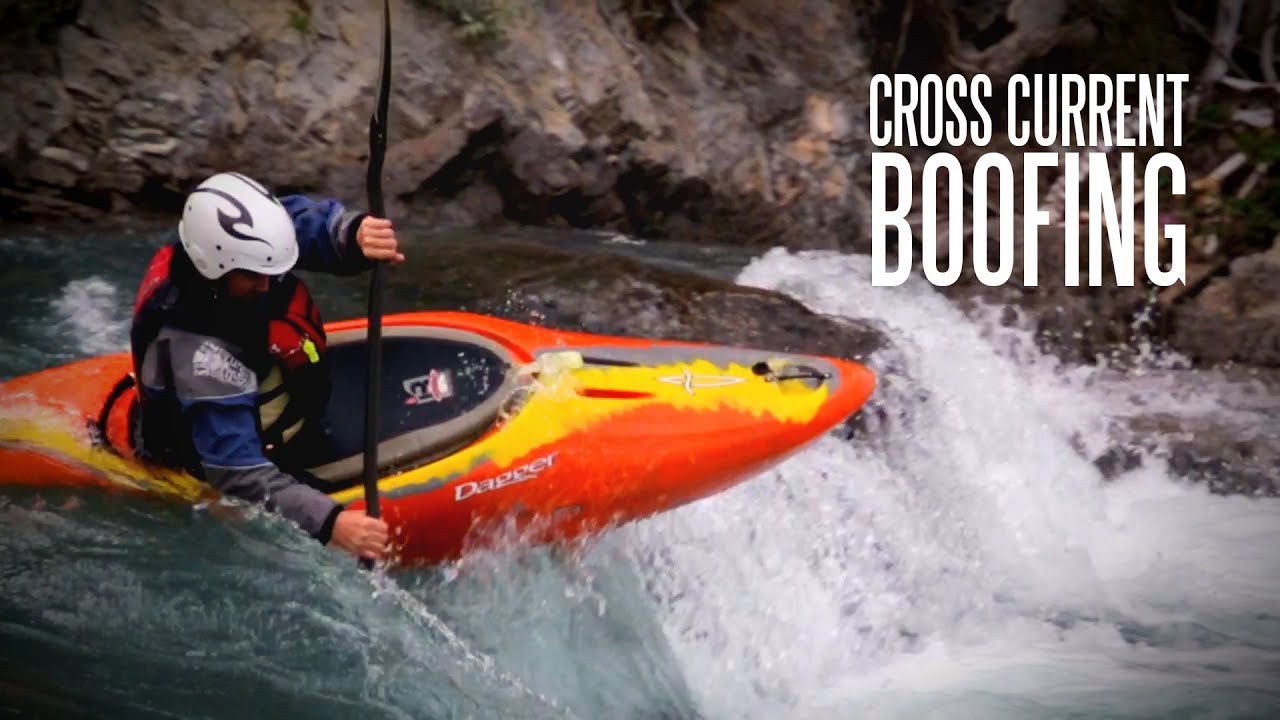
6 Boof
Every paddler’s favourite onomatopoeia is also the crux of her creeking success. Boofing allows you to clear small waterfalls, pour-overs and holes and avoid vertical pins. The boof is a two-part animal—learn it well.
Approach: You need plenty of speed to launch clear of the hole at the bottom of the drop. Head for the steepest part of the drop and aim off-centre to avoid the stickiest part of the hole. Remember that a rock at the lip of a drop can serve as a launch ramp if you hit it with just your bow.
Boof stroke: Plant this power stroke just over the lip. Picture yourself pulling against the face of the falling water. Thrust your hips forward as you pull on the paddle to lift your bow. The further you pull and thrust, the flatter your boat will land. Once clear of the lip, bring your weight forward for the landing. Have your paddle ready for a support stroke or to pull you away from the hole.
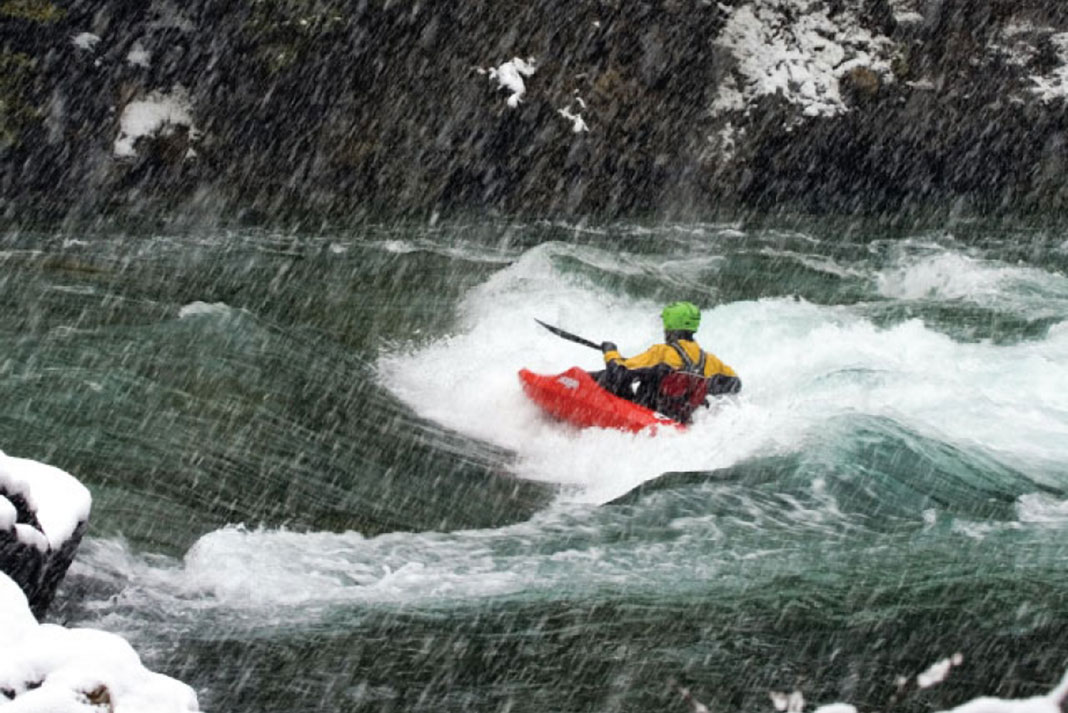
7 “It’s snowing” is not a valid reason to stop paddling
‘Nuff said.
“It’s snowing” is not a valid reason to stop paddling. | Photo: Ryan Creary
6 essential river planning skills
1 Find friends
Paddling with a mate is more fun, safer and easier on the budget than paddling alone. Like partners in mountaineering or even marriage, the best river running partner is one with whom you share trust and similar goals. For example, if one climbing partner is determined to reach the summit and the other is simply content to be on the mountain, the safety of both is threatened by the resulting frustration and hostility.
Kayaking, mountaineering and swiftwater rescue instructor Franco Ferrero emphasizes the importance of a team-focused environment, “To avoid trashings and shattered confidence, paddle with people who will support you.” It is beneficial to spend time around paddlers of different skill levels and experience, as long as expectations are discussed and understood by every member of the group. “Chances are you will put a lot of thought into the gear you take with you—why not the folks you paddle with as well?” says veteran expedition paddler Phil DeRiemer.
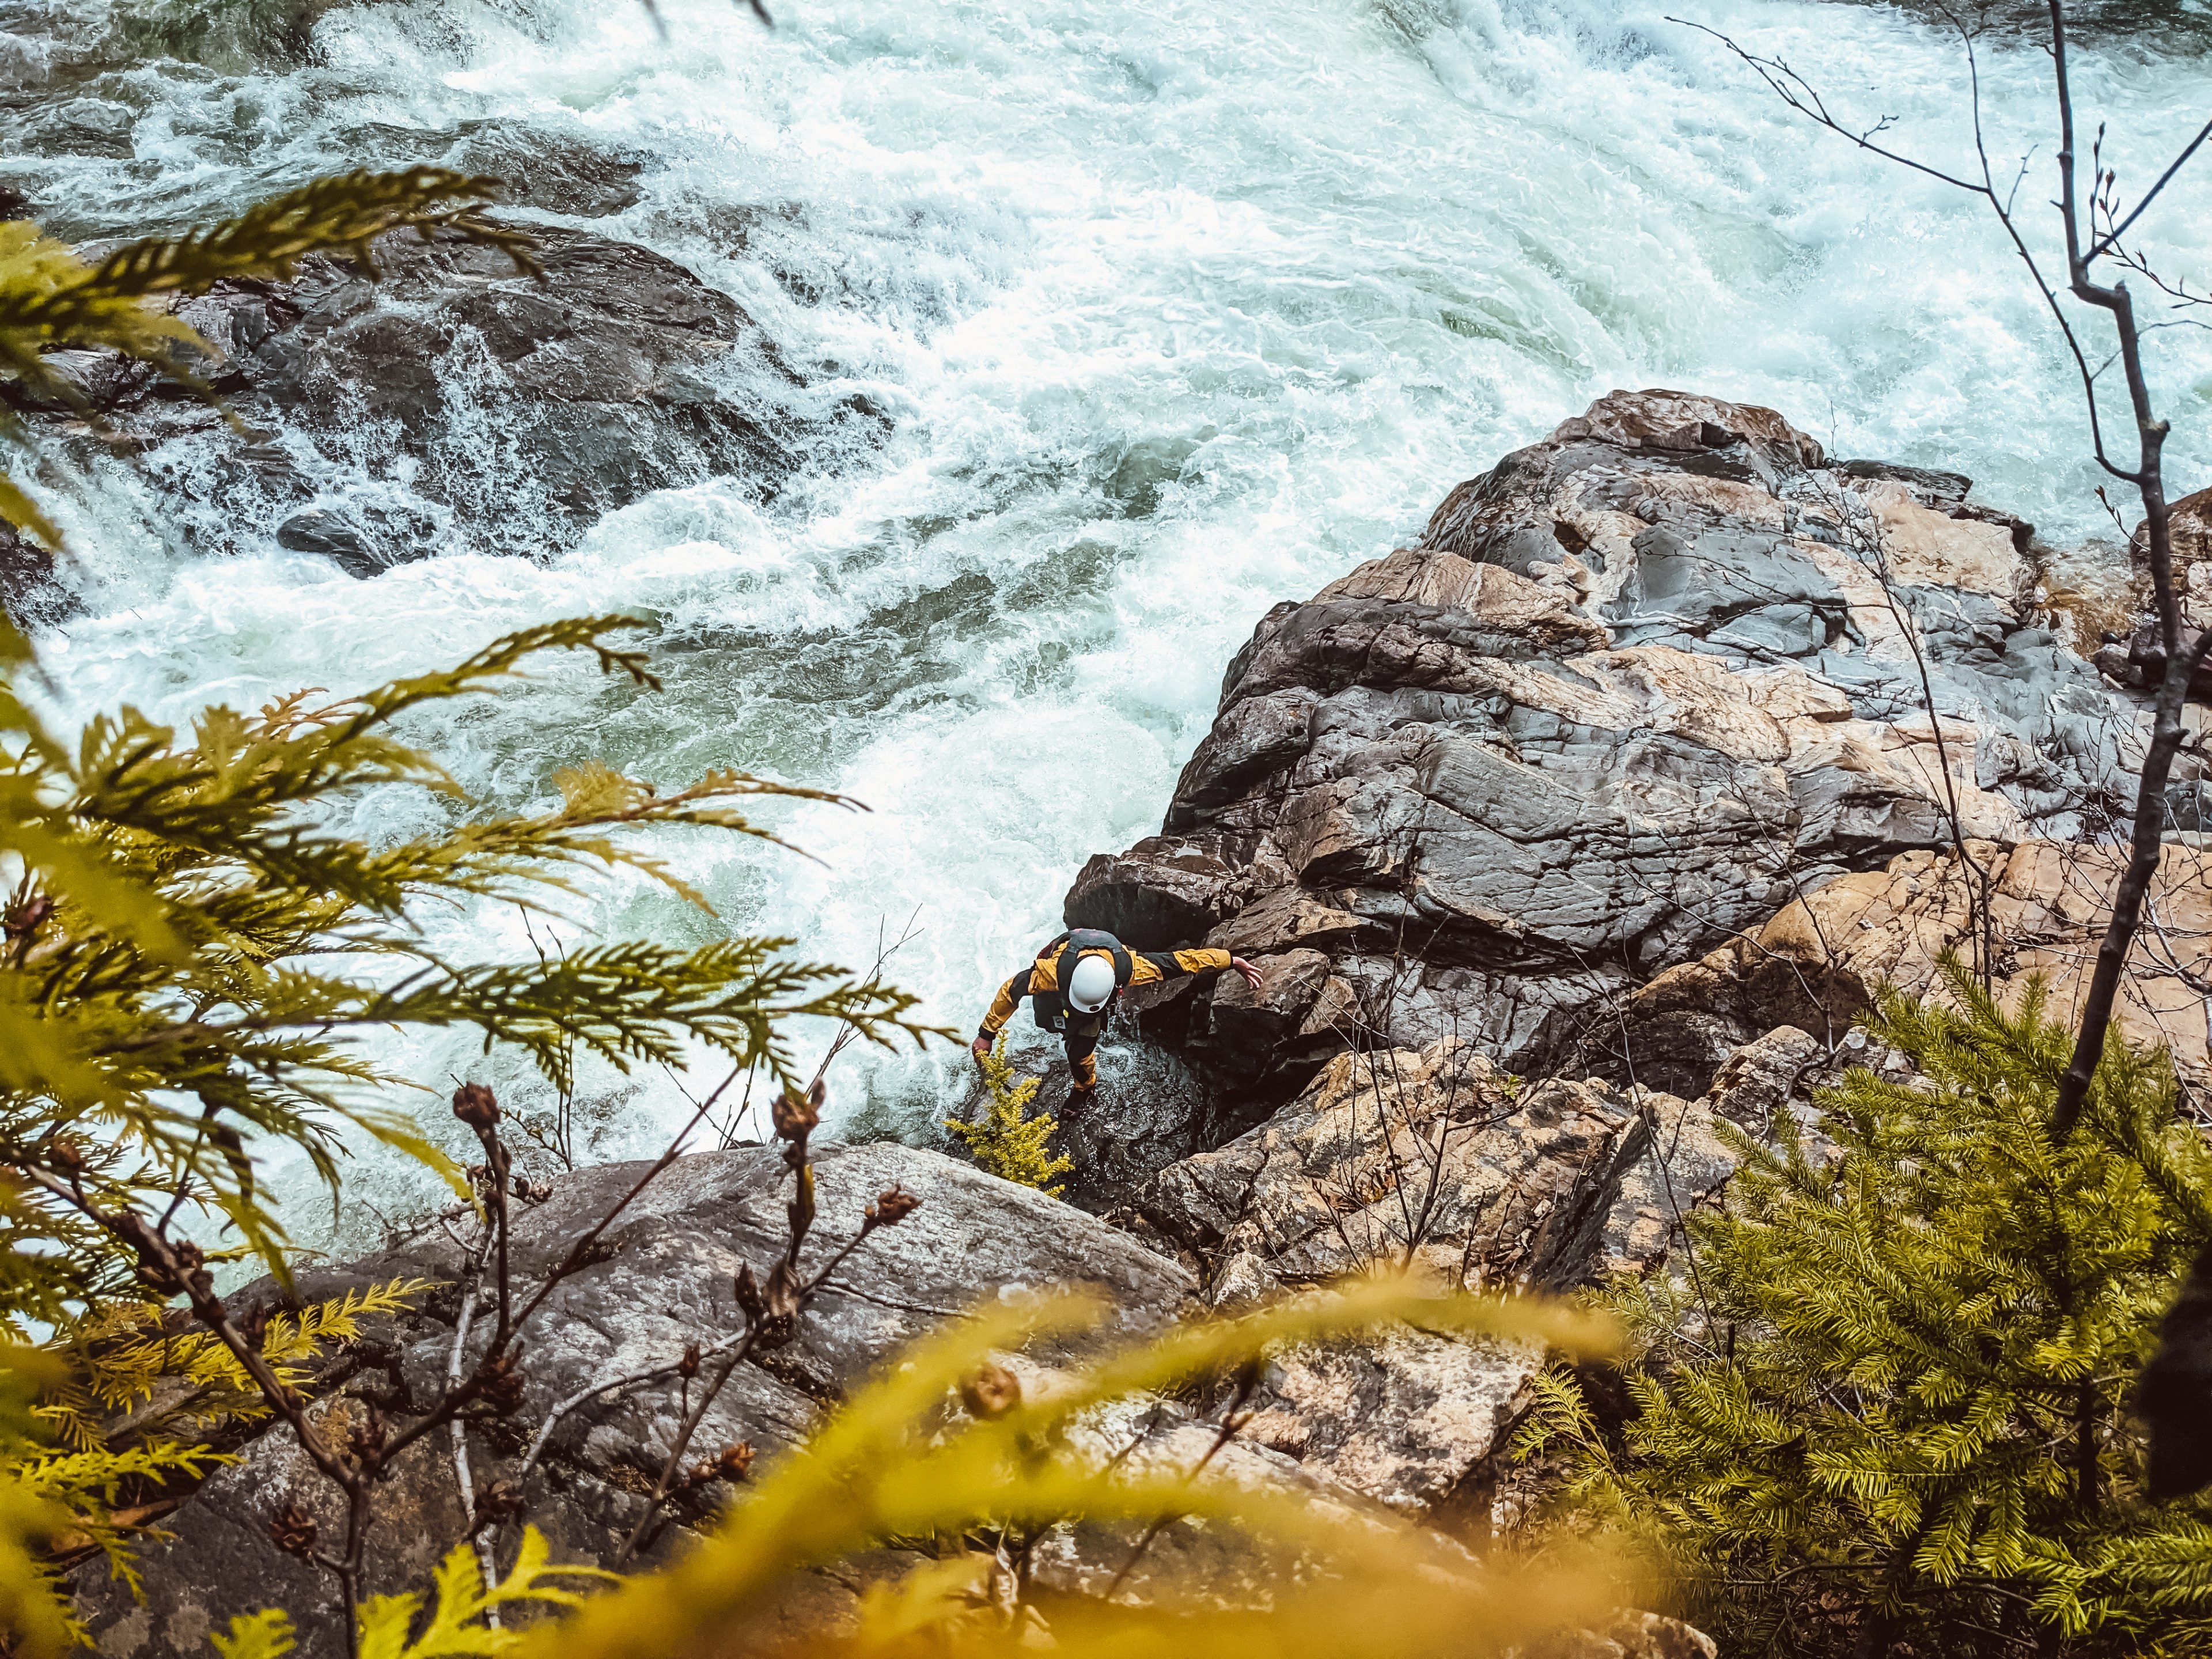
2 Take the shortest walk out
Whether you’re out for an afternoon on a local river or planning an unsupported multi-day, knowing where you can pull out if the shit hits the fan is an integral part of river running safety. Along with analyzing maps and reading guidebooks, the three-dimensional satellite imagery on Google Earth allows you to scout topography, drainages and escape routes before you leave home. But remember, says first aid professional and Rescue 3 instructor Franco Ferrero, “If something goes wrong, it is your problem, not the guidebook writer’s.” The most accurate information about a river is often gathered by chatting with locals and paddlers who have first-hand knowledge.
3 Know the flow to go
Release schedules: Don’t get swamped or stranded; many dam-controlled rivers have a regular schedule of water flows. Miss the window and you’ll find yourself hiking out.
Water levels: River hazards change dramatically as water levels change. Seasonal and daily fluctuations are created by melting snow or glaciers and rainfall. Expect higher levels on snowmelt rivers in late spring to early summer and during late afternoon when the midday sun has heated things up. River gauges and landmarks help compare current water levels to those cited in the guidebook.
Flood hazards: In his classic book Kayak, the late William Nealy stated that there are three reasons for running a river in flood: Accident (flash flood), misadventure (ignorance of water level), or choice (defective genetic programming). Let’s address the accidental flash flood. This phenomenon is most common and hazardous in narrow gorges where rainstorms can create a massive wall of water that rushes down the canyon with little or no warning. Rivers that run through broad dry washes are also dangerous, as these plains can flood unexpectedly. When considering these rivers, keep an eye on the weather in the days leading up to your trip and don’t put in if rain is forecast or the clouds look threatening. Of course, some rivers can only be run in flood, to which we’d reply, “It’s in my genes, man.”
4 Pack a boat
A few concepts to remember: If it’s not clipped in, it will eject when you do. Practice with a loaded boat. Heavy-duty garbage bags are your friends, even inside drybags. Pack heavy things like food up front, within carved-out storage compartments in the pillar or bulkhead, or right behind your seat and balanced on both sides—this keeps the ends of your boat feeling light for more control on the water. Expedition paddler and Whistler Search and Rescue volunteer Steve Whittall says, “Be creative. Customize your boat and pick versatile gear—a tarp provides shelter for your kitchen and sleeping and means you don’t need rain gear.” Keep the things you will need soonest—lunch, water purifier, cozy jumper—the most accessible. And finally, have your throw bag handy.
Planning transportation can be as simple as driving on well-surfaced roads and dropping one of your vehicles at the take-out. Alternatively, gaining access to a backcountry or international river may be a complicated web of flights, four-wheel-driving and foot-packing. In some places, your transportation can range from trains or helicopters to rattletrap chicken-filled buses or even mules. “Just driving around can be the most hair-raising part of the trip,” cautions seasoned international expedition leader Dunbar Hardy. Hardy recommends asking lots of questions—if you’re renting a shuttle vehicle for example, you may need to bring your own roof racks—and making the most of local knowledge for directions, road conditions and best put-in and take-out sites. We’d add to the list learning how to drive off-road and packing extra tow straps.
6 Hours of daylight
Know how many you have and respect this fact.
Make sure you don’t run out of light while running the river. | Photo: Jonatan Pie/Unsplash
6 essential on-river skills
1 Scout a rapid
Reading the river and choosing a good line are the essentials of keeping your run and your shorts clean. Three pieces of wisdom from the scouting sage:
Get the whole picture: Try scouting from various positions—above, below and on the other side of the rapid. Look for prominent features and landmarks so you can stay on line once you’re in the meat.
Recognize friendly features: Note nasty features, but don’t dwell on them. You’re searching for a good line down a run, not a bad one. Look for downstream Vs, eddies, troughs and any pillow rocks you can use to your advantage. Look also for the most fun or—on easier rivers—challenging line.
Master the art of visualization: Draw a mental path of where you want to go and picture yourself making the moves to hit that line. Run through the body positions and strokes you will use on land to burn them into your memory. Finally, if you can’t visualize a successful outcome, don’t run the rapid.
2 Know your limits
The dry land sneak is a perfectly acceptable alternative to running rapids. “No matter how good you get, portaging will always be a big part of paddling,” says veteran guide and paddling coach Kevin Varette. The decision to walk should be based on an objective analysis of the hazards and consequences combined with an honest self-assessment of your own capabilities. Everyone has his or her own level of acceptable risk and even skilled paddlers experience off days—trust your instincts. Professional kayaker and all-round tough cookie Anna Levesque urges anyone who feels shamed or pressured into running a rapid to reconsider. “Ultimately, you are the one who has to deal with the consequences of your actions.”
3 Be a hot lunch hero
Firing up some warm grub and a hot drink is good for your body and soul—and it’s also a great way to make friends.
Nutrition: Eating right helps you stay warm and avoid plummeting energy levels during a long day of river running. Rule number one: Don’t forgo the pasta and potato salad at lunch. Complex carbohydrates such as rice, pasta, bread and cereals provide energy that is made available to your body at a steady rate over several hours, unlike the sudden energy spike and trough produced by the simple sugars in your favourite candy bar. Rule number two: If you can’t seem to warm up, chug a hot cocoa and eat some more muffins. Early symptoms of hypothermia include shivering and exhaustion, followed by the “umbles”—stumbling, fumbling and mumbling—as you lose feeling, coordination and mental acuity.
Hydration: Humans are big bags of water. Keeping this bag topped up is a constant battle since you lose this precious resource whenever you sweat and every time you take a breath. Failing to replenish your fluids can profoundly affect your judgment, stamina and performance. Consider that a drop of just two per cent in your body fluid results in decreased group cooperation, mental deterioration and a 25 per cent loss in efficiency. To ensure that you are in top mental and physical form, you should drink at least three to four litres a day.
4 Practice good manners
Don’t be a dirtbag: Pick up your trash. If you really want to be a hero, pick up someone else’s.
Right of way: Even if you grew up in Palmer Rapids and have never seen a controlled intersection, you should learn right of way on the river: always yield to the boater heading downstream. As a downstream boater, be courteous and avoid paddlers playing below you.
Local laws: We’ve packed out our own waste in the canyons of the desert Southwest—and not because we like to spend six days with a doggie bag full of shit. Respect these laws; they protect our rivers.
Respect the river and don’t be a dirtbag—you’re just visiting. | Feature photo: Scott Stephens/Unsplash
5 It’s okay to cry on the river
Anna Levesque says so and she can kick your ass. Kayaking delivers intense experiences to which crying is a normal emotional response. Whether it’s the excitement of completing a new move, the relief of emerging unscathed from a challenging rapid, or frustration at failing to attain a goal, crying is a healthy outlet for a flood of different emotions. Don’t assume that someone is afraid or unable to “keep it together” just because she shows emotion, warns Levesque. “You don’t have to be a daredevil to enjoy the river,” says the Girls at Play guru and World Freestyle Championship medalist.
6 Respect the locals
The river is their home, you’re just visiting.
6 essential river gear skills
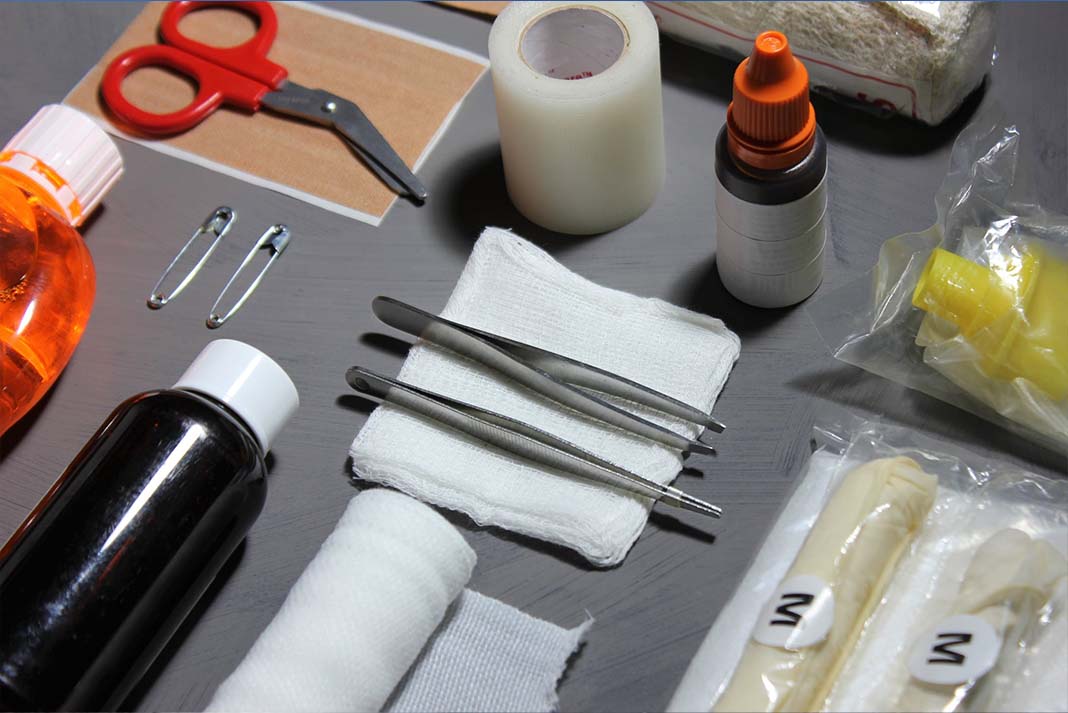
1 Build the ultimate river running kit
In addition to your boat, helmet, paddle, PFD, skirt if kayaking and the clothes on your back, here is our list of items to take on the river.
First aid kit: How many times do we have to say it? Carry one and know how to use it.
Rescue kit: Throw rope (50–75 feet); tow line—stretchy cow tail attached to quick-release belt; pin kit (see essential rescue skill #3, below); plastic pea-less whistle; knife or shears; breakdown spare paddle and, of course, duct tape.
Personal gear: Nose plugs; small drybag with extra insulating layer, headlamp and lighter in case you are stuck out longer than expected; water bottle; lunch and extra energy bars.
Additional items for overnights: Sleeping bag and pad; tent, tarp or bivy sack; repair kit—multi-tool and Seam Grip or similar flexible, waterproof glue; water purification and more food; cook pot, stove and fuel; bowl and cutlery; camp clothes, compass and topo map.
2 Choose the perfect boat
If your interests lie in throwing blunts and flat spins on your river runs, then you should shack up with a playful boat. Your coquettish play partner will be shorter, with more aggressive edges to maximize manoeuvrability. On the other hand, if luscious tumbling drops get your heart thumping, then you’re more of a serious river running man or woman. The right accomplice for those longer journeys and steep descents will be more voluminous and curvaceous to give you a fast but forgiving ride. Finally, in case you had doubts, size does matter. Consider length, diameter and surplus… of your legs, hips and budget.
3 Get protected from the sun
Our bodies produce and lose heat constantly. If we were unable to dissipate heat, our body temperatures would rise steadily until we literally cooked ourselves. According to wilderness medical professionals at the National Outdoor Leadership School, radiation from a person’s skin to the environment accounts for 65 per cent of heat loss when the air temperature is lower than the body temperature. Under a hot sun however, our bodies actually gain heat through radiation. Evaporation from sweating and gradual acclimatization—typically taking 10 days to two weeks—to the hot climate become our only methods of staying cool.
Protecting yourself from direct exposure to the sun goes a long way in preventing dangerous overheating and other sun-related ailments. Go for a swim or roll often to cool your core body temperature. Canoe trippers should wear a light-coloured, long-sleeved paddling shirt. Frequently reapply waterproof sunscreen on exposed skin. Don those cool polarized shades to prevent damage to your eyes. Finally, Velcro a geeky visor on your helmet or splurge for a stylin’ design with a built-in peak.
Dress for the coldest temperature, whether it’s water or air. | Photo: Haitham/Unsplash
4 Dress for conditions
There are two truths that we paddlers must learn. The first is to dress for the coldest temperature, whether it’s water or air. The second is that it’s better to be dry. Cold drizzly days, long swims on icy mountain runs and insisting that skin to wind makes you a river hero are all equally effective ways of becoming cold, miserable or worse.
Avoid bargain paddling tops that are not breathable and only half as waterproof as your yellow grade school slicker. Shelling out for a comfortable and rugged drysuit or top made of quality fabric is an investment you’ll never regret. It will extend your paddling season and make every day enjoyable.
Closed-toed shoes rock, open-toed sandals suck. The reason: Subungual hematoma (crush injury) or toenail delamination—need we say more? Water shoes need to provide protection, good traction on wet rocks and be slim and flexible enough that your feet fit comfortably into your kayak. Mesh and sandal-style shoes are quick-drying and sporty, but neoprene booties offer superior insulation and are your best defense against leaches. Above all, whatever your footwear—remember to wear them. Renowned whitewater guide Phil DeRiemer tells his clients the story of a kayaker who hiked barefoot eight miles out of the Grand Canyon of the Stikine after a bad swim washed his boat away with his shoes stowed safely behind the seat—he says it wasn’t him.
6 Four ways to lose body heat
Conduction, convection, radiation and evaporation. It’s not a contest to see who can do all four at once.
5 essential river rescue skills
1 Get your signals straight
Save the elaborate gesticulations for the ballpark. Hand and paddle signals should be simple and unequivocal. Five you definitely need to know:
Stop: Arms outstretched, horizontal to the ground or paddle held horizontally above your head.
Go (safe to proceed): One arm straight up or paddle held vertically from shoulder height. Also used as a question: Is it safe to proceed?
O.K.: Fist tapping or held to the top of your head. Can also be used as a question: Are you okay?
Help: Both arms waving overhead to form an alternating V and X or paddle waved overhead from side to side.
Go here: Pointing with arm or paddle to the spot on the river your buddy should go. Never point to danger!
2 Learn the Hand of God
There are two good options for saving your friend’s butt while allowing him to stay in his boat and avoid the dreaded swim and compulsory round of complimentary beers. The T-rescue—in which the rescue boat approaches the midsection of the upset boat, allowing the capsized paddler to grab the offered bow or stern and hip-flick up—is quick and simple but won’t work if you can’t make a “T” or your friend doesn’t have the awareness to do the rescue. In these cases, a Hand of God (HOG) is your best bet.
Step 1: Pull up parallel to the hapless boat. Reach across the overturned hull with your near hand and grab the edge. Place your other hand on the hull beside you.
Step 2: Simultaneously push down hard on the near side and pull up on the far side to right the boat with the paddler still inside. It’s a miracle.
3 Build a rescue kit
For pinning, entrapment and nearly anything else that can go wrong. Minimum equipment should include: two prusiks, two pulleys, throw rope—minimum 50 feet, two carabiners and two slings or eight-foot lengths of webbing. Use a small stuff sack or wide-mouth bottle to store everything except the rope in a convenient, easy-to-access package. A versatile hauling system that you should learn to construct quickly is a Z-drag, which triples your pulling force by creating a 3:1 mechanical advantage. Here’s how to rig a Z-drag:
Step 1: Construct an anchor by wrapping a piece of webbing or sling around a sturdy tree or rock. Clip a carabiner and pulley through the webbing.
Step 2: Attach a rope to the boat and run the rope through the anchor pulley. Now attach a prusik cord as far back down the rope toward the boat as possible.
Step 3: Clip a second carabiner and pulley through the prusik and run the rope through it and back toward the anchor. Look at your system: the rope should make a Z shape with you pulling on the rope in the same direction as the main line is pulling on the load.
4 Do the live bait rescue
Use this method if the swimmer is injured, panicked or otherwise unlikely to catch a throw bag—like if he is getting worked in a hole. A soon-to-be-wet rescuer is attached via a quick-release belt to a line that is waist-belayed by a happy-to-stay-dry second rescuer. For an effective belay, the dry rescuer should try to sit into the bank or otherwise firmly brace herself in anticipation of the sudden pull of two swimmers. When the swimmer is in range, the tethered rescuer belly flops into the water and grabs the victim from behind by his PFD shoulder straps. By holding the swimmer to his chest in this way, the rescuer protects himself against the potential danger of a panicked victim. The rescue site should be carefully selected so both swimmer and rescuer pendulum safely into a waiting eddy.
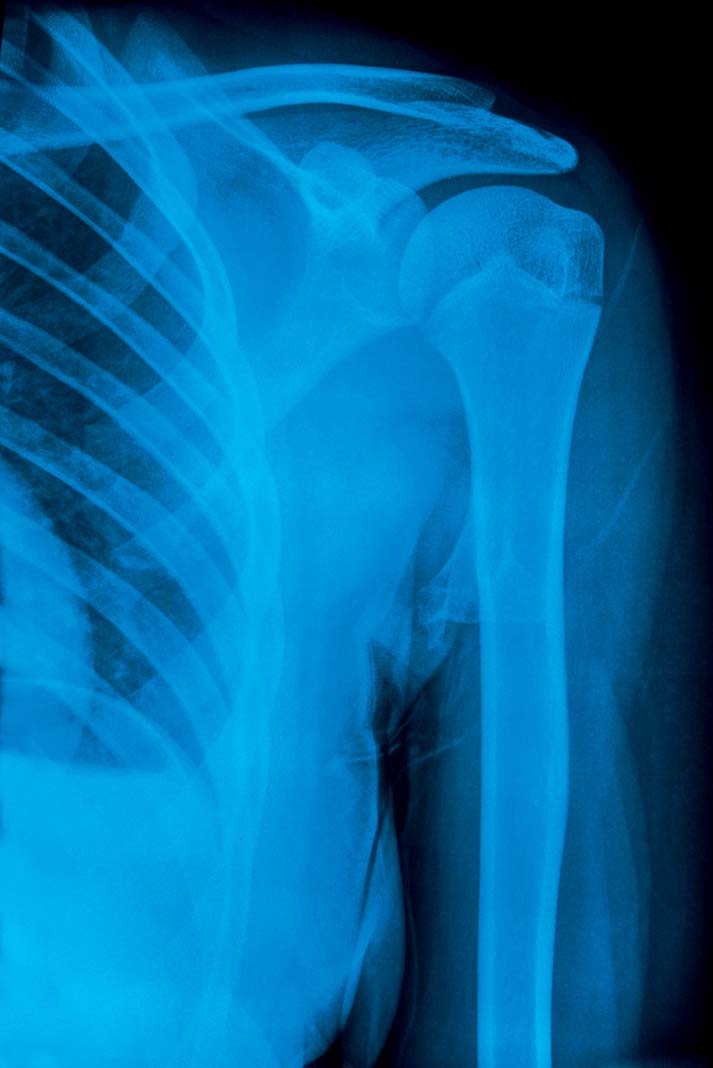
Dislocated shoulder (anterior)
5 Set a dislocated shoulder
Our best advice is to avoid a dislocated shoulder altogether. Mind the paddler’s box—a rectangle formed by your arms, paddle and chest when your hands are kept in front of and parallel to your shoulders. Paddling outside the box is an invitation to shoulder injury. If the worst happens, here’s what to do.
Step 1: Reset the dislocation as soon after the injury as possible, before the muscle spasm becomes too severe. Have the injured person sit in front of a tree. Tie a loop of webbing tautly around his chest and the tree.
Step 2: Kneel on one knee facing the victim and hold the injured arm level in the direction of the dislocation, with the elbow bent at 90 degrees.
Step 3: Slip a second loop of webbing around your hips and the injured arm.
Step 4: Lean backwards while slowly bending the elbow towards the shoulder to increase traction, allowing the muscles to relax and the shoulder to pop into place. This can take less than a minute or upwards of 30.
After a decade of columns in this space dedicated to the history, heritage, esoterica and minutiae of canoeing, written for paddlers and would-be paddlers, it occurred to me that there might be people out there who are non-paddlers. Maybe the spouses or children of readers, who might pick up Canoeroots out of curiosity or from self-preservation having to share living space with a person who goes on and on about all things canoe. For the benefit of these folk, here’s a debunker’s guide to canoeing myths.
Let’s get this one right up front. When it comes to gear—and I’m talking good gear, not office technical wear, and stuff that is sold with main street in mind—canoeists will spare no expense. It’s not so much the availability of funds as it is about deployment of funds that fuels this myth.
Canoeists look at ‘60s blue porcelain bathroom fixtures, shag carpets or comely avocado-colored kitchen appliances and ask, “Why would you want a new one of those when the ones we have are perfectly serviceable?” Same goes for decisions about saving for college tuition and weddings versus setting cash aside for a new canoe or a longer or more exotic canoe trip.
These canoeing myths are categorically untrue—most of the time. | Feature photo: Portij/Unsplash
2 Canoeists all drink as much as Kevin Callan
I know Kevin Callan is prone to claiming that alcohol taken orally is an excellent bug deterrent. He also claims it makes his skin more water repellent. Whatever other merits he and his sidekick, Andy Baxter, award the perfect bush martini, most canoeists don’t drink as much as Kevin. No, no, no. For as far back as when the Hudson Bay Company and North West Company sent voyageurs west with casks of whiskey to trade, we’ve tended to drink more.
3 Canoeists will all, eventually, look like Bill Mason
A former student came up to me one day and said that he’d just had a strange and portentious dream. In his dream he was at a talk I was giving, sitting in the front row. He turned around and everybody in the audience—both men and women—looked just like Bill Mason. The lecture hall was filled with short, white-bearded canoeists wearing red flannel shirts and neck scarves. Scary thought.
This one has some truth. However, the Masonesque characteristic that is echoed by all dyed-in-the-wool paddlers is not so much the soggy sneakers, white beard and plaid shirt. It’s a look in their eyes that says, “I may be bodily indoors but I’m actually running a river in my head.”
4 Canadian canoeists constantly assert their “Canadianness”
That this myth endures is due largely to Pierre Berton or Pierre Elliott Trudeau—neither of whom admitted they said, or did, anything of the kind. For the record, canoeists are not forever asserting their Canadianness in a canoe. We only do so in private, often in the dark under pincushion skies, when the water is calm, rarely at put-ins or on portages, and only when overtaken by the wilderness muse. And—safety paramount if on the water—we always take the precaution of removing the center thwart.
5 Canoeists are always right
Well…anyone who has hung around a canoeist for more than a few minutes will know that no matter what the issue, we all think our solution is the best. This includes such diverse topics as paddling, portaging, how to build a fire, how to make camp kitchen, how to raise a child, how to foster a relationship, how to achieve world peace and nuclear disarmament, and how to simultaneously eat, drive and find the access-point coordinates on a GPS.
[ Browse the widest selection of boats and gear in the Paddling Buyer’s Guide ]
Our answers to these questions are not only objectively right but also, having considered all other options (or the other options we could imagine), simply the best. For better or worse, sadly, this is not a myth. It’s true. Just ask our paddling Prime Minister.
These canoeing myths are categorically untrue—most of the time. | Feature photo: Portij/Unsplash
In a recent expedition, a world-renowned German kayaker, Adrian Mattern, and an expert-level crew headed deep into Kyrgyzstan’s Tian Shan mountains to paddle a little-known (and extremely remote) river called the Sary-Jaz.
The technical, class V river begins at the Engilcheck glacier at the foot of Khan Tengri in far eastern Kyrgyzstan and flows through the Tian Shan mountain range into China. Once inside the deep gorge, there are limited opportunities to hike out.
[ View all Whitewater Creekboats in the Paddling Buyer’s Guide ]
Mattern and his team were able to make it down most of their planned route before they ran into serious trouble; their exit point—a low-volume creek that should have been easy to cross—was in flood.
Check out the short documentary to discover the measures they took to finish the expedition.
O n Friday, July 15th, The Grand Salmon Source to Sea team completed their 1,000-mile paddle journey from the multiple headwaters of the Salmon River to the Pacific Ocean, in solidarity around a call to action about dwindling salmon populations in the Snake River Basin and placing a moratorium on the Stibnite mine proposed in central Idaho.
The team of women paddlers have engaged thousands of people through grassroots advocacy in river communities along the way, in addition to reaching hundreds of thousands via social media channels. The team has encountered obstacles over their two and a half month journey including facing unusually high water this spring and portaging the four Lower Snake River dams in four days. Yet despite these challenges, what they have faced is minimal compared to what these resilient fish endure.
Photo Courtesy of The Grand Salmon
Their story is rooted in adventure and a love of rivers that gives way to shining light on the bigger picture – now is the time to act to prevent the extinction of Pacific salmon species.
“We have been planning this trip for over two years, and I am still a bit shocked that it actually came to fruition, and also can’t believe we are almost done,” said Brooke Hess, a professional kayaker and science journalist on the team. “This has been the coolest, most challenging, and most fulfilling several months of my life so far.”
Libby Tobey, the environmental policy and climate change expert on the paddling team added, “It feels absolutely impossible to be staring at the finish line of this project. Looking back on how many people we’ve been able to engage with about this cause makes me feel unbelievably proud of our team. To speak up and do hard work to protect the rivers we love is every kayaker’s dream, and I’m so excited we’ve been able to do that.”
[ Browse the widest selection of boats and gear in the Paddling Buyer’s Guide ]
The project comes at a timely moment as the summer of 2022 is perhaps the most pivotal window of opportunity in more than a 30-year endeavor to restore salmon populations in what would be the largest river restoration project in American history – the removal of the four Lower Snake River dams.
Photo Courtesy of The Grand Salmon
“It feels totally surreal to be at this point in the journey knowing that we’re going to cross into the Pacific Ocean soon, right about the time that the smolts that we left Idaho with will be reaching the ocean. Honestly, this is the best team I could have imagined doing this trip with, and to have the White House release their statement feels serendipitous and powerful as well. I’m so grateful to everyone who has been with us on this wild journey,” said Hailey Thompson, an artist and fisheries expert on the paddling team.
Idaho Rivers United stands by the best available scientific and other relevant evidence, when fully and objectively evaluated, which shows that breaching the four lower Snake River dams, with adequate spill at the remaining lower Columbia River dams, is the only viable option to both protect and restore salmon and steelhead.
All of this urgency has been said by Northwest tribes from the beginning of time – the four Lower Snake River dams must be removed. As recent resolutions by the Affiliated Tribes of Northwest Indians and National Congress of American Indians make clear: the decimation of salmon runs is a violation of treaties and other commitments made with tribes by the federal government. Preventing extinction is a matter of justice.
[ Plan your next sea kayaking adventure with the Paddling Trip Guide ]
Idaho Rivers United, the lead advocacy organization for the Grand Salmon campaign, strongly urges the report to more prominently highlight necessity and the cost of inaction related to LSRD dam breaching, specifically that impending extinction of wild salmonids leads to the perpetuation of injustice related to tribal sovereignty, economic and cultural hardships for rural towns and Indigenous communities that depend on abundant salmon runs. The continuation of a broken Columbia-Snake hydrosystem exacerbates inequality in the region and will continue to provide diminishing returns to stakeholders.
Photo Courtesy of The Grand Salmon
“Our organization is incredibly proud of the Grand Salmon team and is relentlessly committed to the cause and mission of this remarkable endeavor,” said Tess McEnroe, Communications Associate at Idaho Rivers United. “Salmon restoration and the Snake River restoration campaign has been a priority in our work for three decades. Along with our elected officials, we as citizens have an incredible opportunity to act now. Our nation can lead the largest river restoration and salmon recovery effort in history, while making smart investments in clean energy, infrastructure, and communities.”
[ Plan your next whitewater paddling adventure with the Paddling Trip Guide ]
“The success of the Grand Salmon campaign has shown how effective a source to sea adventure can be as a catalyst for conservation. Connecting people throughout a watershed, bringing communities together to protect and restore an ecosystem, and providing a voice for these rivers has been a profound and inspiring journey for all.” says Danielle Katz co-founder and director of Rivers for Change and lead project coordinator for the campaign. Rivers for Change mission is to connect people to rivers through source to sea adventures, conservation, and education.
“The question of what you want to own is actually the question of how you want to live your life.” ―Marie Kondō.
| Photo: Andrew Strain
My attempts at traveling light, paring everything down to the bare minimum, started and ended with my clothes. My daily uniform amounted to a wetsuit, a quick-dry T-shirt and a Gore-Tex paddling jacket, with a single, lightweight set of dry clothes to wear in camp.
It all fit in a small drybag behind the seat in my cockpit, leaving the spacious waterproof bow and stern hatches free for camping supplies, books and three weeks’ worth of food. Thus began my preparations for an 80-day kayak trip down the West Coast.
Why traveling light holds the key to true happiness
Packing for the first time took three hours. Usually, when packing a kayak, I put everything in various stuff sacks and then stow those in suitable spaces in the boat. But the narrowness of our kayaks on this particular trip and the vast quantity of our larder required an entirely different method.
A big part of why I like paddling so much is the hard limit on what you can carry, which is both physical and mental.
We had virtually every individual item of food unpacked and strewn on the dock. After pushing the narrow items, like bags of tent poles and rolled up sleeping pads into the far reaches of the bow and stern, and then jamming in the larger items like tents and sleeping bags, we resorted to squeezing single cans and bags of food into all the remaining irregular spaces in-between. I had sardines wedged beside my hips.
It reminded me of the long-ago advice of some productivity guru about how fitting important things into your life is like putting rocks in a jar. You have to put the biggest ones in first, then you can put in the pebbles and finally the sand, but if you start with the sand first, you run out of space for the big stuff. Which means you first need to figure out what is most important.
“The question of what you want to own is actually the question of how you want to live your life.” ―Marie Kondo | Feature photo: Andrew Strain
After launching off the dock in Prince Rupert, I remember the joyful realization that everything I needed for the foreseeable future was trimly packed and organized into the slim confines of my kayak’s hull. Inside the shell of my kayak were my legs, followed by my toes, then a bulkhead, some clothes and sleeping gear and a thin boundary of Kevlar between me and the rest of the known and unknown world. The self-contained feeling at the start of a trip always puts a smile on my face.
A big part of why I like paddling so much is the hard limit on what you can carry, which is both physical and mental. At home, the more space we have, the more we hang onto things representing aspirations, like a kind of material to-do list. The photographs we may someday put into albums, the guitar we’ll learn to play when we have time, the books purchased but unread. These things surround and nag us about everything we don’t have time to accomplish.
Everyone I know is engaged on some level with managing either their personal storehouse or downsizing the possessions of older relatives. It looks the same—clearing out cluttered basements and rented storage lockers, sorting China sets, silverware and antique furniture for the thrift store or Craigslist. Our lives are funnels, taking in more than we need, and more than we can care for or properly care about.
Less is more—in life and in your kayak
I think of managing this inventory of goods as a kind of background radiation constantly bombarding and degrading us. It’s no wonder minimalism has caught on. Japanese decluttering guru Marie Kondo recently turned her ruthless war on stuff, made famous in her bestselling book The Life-Changing Magic of Tidying Up, into a Netflix series.
In Free Solo, the recent documentary on free climber Alex Honnold, he turns minimalism into an art form, living in a van to pursue the ultimate in simple pastimes—the climbing of natural rock with little more than a chalk bag, a pair of shoes and fraying pants. The appeal is not so much in living without, but the clarity of mind and purpose suggested by such simplicity.
Surely, it’s no accident sea kayaking flourished in the counterculture 1960s Pacific Northwest as part of a wholesale rejection of western materialism.
Wilderness travel is boot camp for downsizing, a lesson in just how little we truly need. Streamlining also can be a metaphor for the other transformations occurring in the wilderness—casting off of old ideas and routines, coming out the other side with an emptier pack and a brimming spirit. Surely, it’s no accident sea kayaking flourished in the counterculture 1960s Pacific Northwest as part of a wholesale rejection of western materialism.
I turn to the water when I need a respite from the flood of stuff in my life. I’ve bought books about hiking and paddling purely for their packing lists and tidy color-coded diagrams showing where everything should be stowed. Unfortunately, there’s no equivalent list or diagram for everyday life to help me manage the malaise upon arriving home to a cluttered house begging for my divided attention.
[ View all touring kayaks in the Paddling Buyer’s Guide ]
“We all live in a machine designed to get us to neglect what is important in life,” says journalist and author Johann Hari, who writes about society’s epidemics of addiction and depression. “Nobody thinks they’re going to lie on their death bed and think about all the things they bought; they’re going to think about moments of love and connection and meaning in their lives, and yet we’ve created a culture designed to get us to neglect those things.”
Learning to let go of clutter
Wrapped up in our attachment to stuff can be found profound sadness. I just attended a memorial service for my wonderful uncle, whose passing marks the end of a family era. My cousins now have to sell the house he and my aunt lived in for 40 years.
The thought of disposing of most of their possessions magnifies the heartache that he’s not coming back. It’s tempting to hold on. But it helps to remember our lives are not the sum of our things. Even the kayak and the paddle I used on that 80-day trip are long gone. I don’t need them anymore, but the memories are strong.
Wilderness travel is boot camp for downsizing, a lesson in just how little we truly need. | Photo: Joshua Sukoff/Unsplash
In the modern world, I think of the kayak as a kind of prop for the brain the same way those blocks and pillows in yoga class help people who aren’t flexible enough to bend into the pretzel poses. It’s a crucible for simplification, a metaphor for clarity of purpose and forward motion.
[ Plan your next epic kayaking adventure with the Paddling Trip Guide ]
Life keeps renewing and moving. Once afloat in a kayak, you’ve belted yourself in for a ride, during which you will not think about anything else but what’s right here in front of you. I find solace in the thought of getting my kayak finally loaded and setting off, with only the view of the upturned bow and then everything else ahead.
This article was first published in the Spring 2019 issue of Paddling Magazine. Subscribe to Paddling Magazine’s print and digital editions, or browse the archives.
“The question of what you want to own is actually the question of how you want to live your life.” ―Marie Kondo | Feature Photo: Andrew Strain
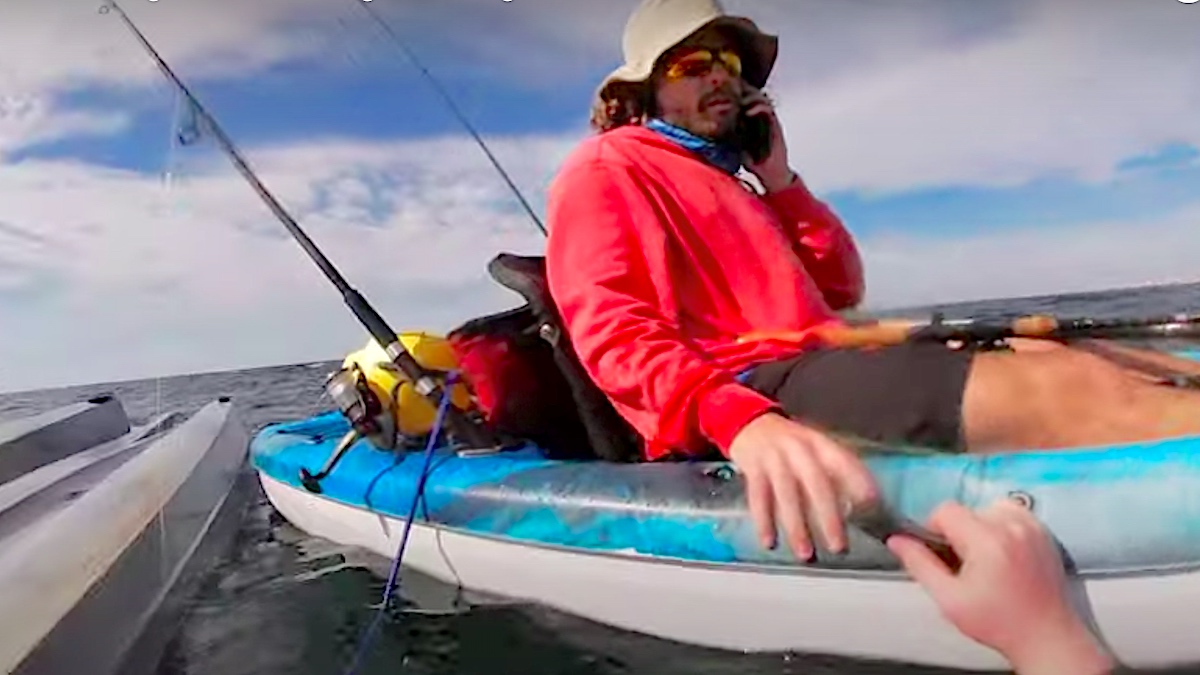
When Christian Nelson’s kayak turned turtle 3 miles offshore, a friend’s cell phone was his only way to call for help. | Photo Courtesy Christian Nelson
Christian Nelson didn’t know the trouble he was in. He was three miles out from Gulf Shores Alabama when the kayak he was trolling from developed a 9-inch crack between the scupper holes. He didn’t notice the damage until the kayak was full of water and on the verge of sinking.
Who do you call when your kayak sinks?
“It feels bottom-heavy,” he told his friend Bryan Llanes. Thirty seconds later he was in the Gulf of Mexico, treading water with a 2/0 circle hook buried in his shin. He reached for the pair of life jackets he kept stowed in the kayak’s center hatch, one for him and one for Bryan. He managed to shimmy into his and get it buckled, but Bryan’s life jacket floated away as Christian struggled to save himself and his gear. Christian kept his video camera rolling throughout the ordeal, and later uploaded a 20-minute edited clip to his YouTube channel, FishinAll50.
When Christian Nelson’s kayak turned turtle 3 miles offshore, a friend’s cell phone was his only way to call for help. | Feature photo: Courtesy Christian Nelson
Christian didn’t know it at the time, but the clock was ticking. In an hour, maybe two, he would become incoherent and eventually lose consciousness. He had to get out of the water, but there was no room on Bryan’s kayak. Christian tried to pull himself onto his half-sunken kayak to get out of the water, but it wouldn’t hold him.
It was a cool day in February, with air temperatures in the 50s and the water not much warmer—hypothermia conditions, especially for a man dressed in jeans and a light jacket. Bryan was even less prepared for cold weather, in only shorts and a hooded sweatshirt. He did, however, have his cell phone and it was picking up a couple bars of service.
Bryan pulled up Google, typed “Coast Guard Gulf Shores” into the search box, and called the first number that popped up. The U.S. Coast Guard rescue coordination center in New Orleans is on standby 24-7 to direct search and rescue operations on the Gulf Coast. But that’s not the Coast Guard office Bryan reached.
This is one of the best reasons not to rely exclusively on a cell phone in a maritime emergency: It’s only as good as the number you call.
People in an emergency who need Coast Guard assistance should broadcast a distress call on VHF marine radio Channel 16, says Paul Barnard, the Recreational Boating Safety Program Manager at U.S. Coast Guard District 8 in New Orleans.
Christian’s chilly close call in the Gulf of Mexico shows why. The Coast Guardsman who took Bryan’s call had to act as a middleman. He asked for the kayakers’ position, a description of their kayaks, and physical condition—then told Bryan to hold the phone as he relayed the information. That took time.
Coast Guard Rescue Coordination Centers and most 911 call centers have equipment that can pinpoint the location of a cell phone, but the office Bryan was talking to didn’t have that capability. He tried to describe their position based on where they launched and landmarks on shore, with Christian’s help. “We launched at the Gulf State Park pavilion,” said Christian, clinging to the side of Bryan’s kayak. “We’re straight out from a blue water tower.”
Finally Bryan opened the fishing app on his phone to find their latitude and longitude. He read the coordinates back to the person on the phone, who asked Bryan to hold the line again as he passed the information to rescue crews. Help was on the way, but not as quickly as it could have been.
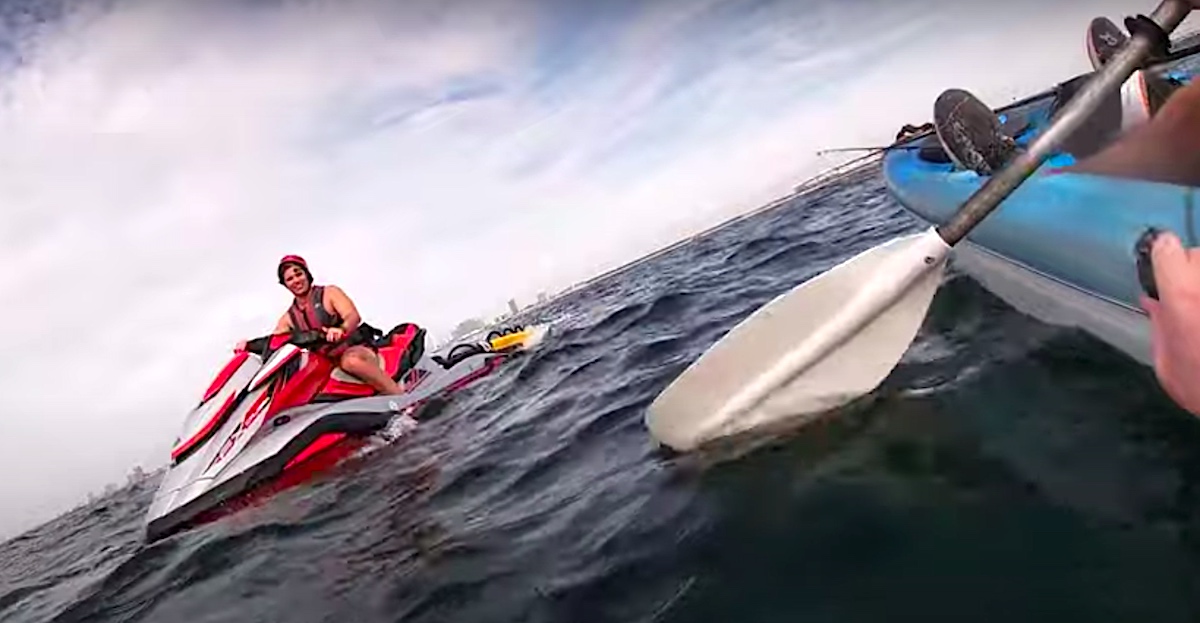
Christian had been in the water for more than an hour when the life guard PWC arrived. | Photo: Courtesy Christian Nelson
If Bryan had broadcast a Mayday on VHF Channel 16, watch standers in the Sector Command Center would have received the call instantly. Nearby boaters likely would have heard it too.
“VHF Channel 16 is your best bet because when that call goes out it reaches a broad audience,” Barnard says. “Everybody that’s on the water and has their radio on is going to receive that call.” In many cases, nearby Good Samaritans are able to respond to a call for assistance before the Coast Guard can get there.
That day in the Gulf, the message took a little longer to get through. When it did, the nearest first responder was a Gulf Beach Fire lifeguard, who answered the call on a personal watercraft. An Alabama Marine Police vessel arrived on the scene soon after, and a Coast Guard helicopter flew overhead. The cavalry had arrived just in time. Christian had been in the water for more than an hour.
Paramedics checked him out on the beach. Though chilled to the bone, he didn’t require hospitalization. The police boat even recovered his kayak, which Christian took back to Bass Pro for a full refund. He thinks he may have stressed the hull by over-tightening the straps when transporting it on his car’s roof rack, or maybe the plastic just wasn’t up to snuff. In either case, he says he should have inspected the kayak before he launched—something he now does every time he leaves shore.
That’s just one of the lessons Christian’s close call drove home. He enumerated some of them in a follow-up video on his YouTube channel: Wear the right apparel for immersion in cold water, don’t skimp on rescue gear like a waterproof VHF radio, Personal Locator Beacon, bilge pump, a sharp rescue knife and, most importantly, a life jacket that you wear. Securing your phone in a waterproof pouch is also a smart move.
Two kayakers going three miles offshore with only one life jacket between them is a recipe for disaster, no matter who you call.
Watch Christian’s original kayak sinking video here:
This article was produced under a grant from the Sport Fish Restoration and Boating Trust Fund, administered by the U.S. Coast Guard.
Learn from our past mistakes and avoid these easy-to-fix family camping missteps. | Feature photo: Andreas Rønningen/Unsplash
Family camping trips are all about making s’mores and singing Neil Diamond’s ultra-classic “Sweet Caroline” around the campfire, right? We certainly hope so. Not everything always goes according to plan though, and even the most experienced campers can make silly mistakes. Whether you’re car camping or taking to the backcountry by foot, canoe or kayak, ensure your time outside is relaxing instead of aggravating. Learn from our past mistakes and avoid these easy-to-fix family camping missteps.
15 Family Camping Mistakes (And How to Avoid Them)
1 Leaving food in your pack
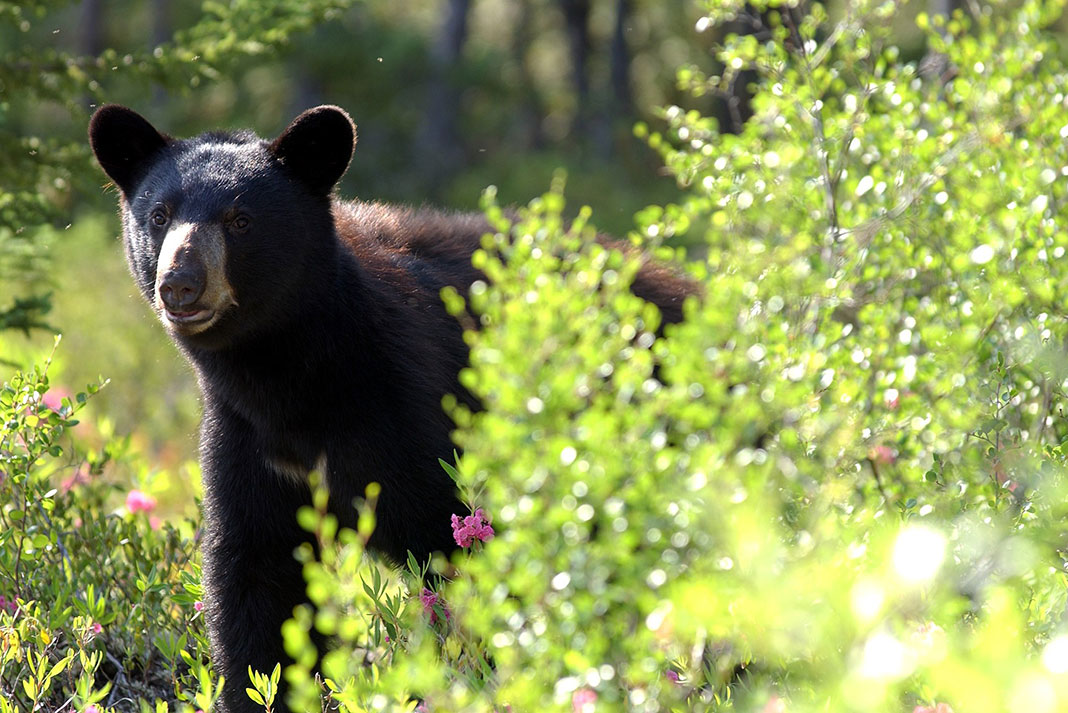
Everyone worries about the 400-pound hungry ursine that might come knocking in the middle of the night, and that’s a legitimate safety concern in bear country. Far more common however, is the chubby-cheeked, 19-gram field mouse that will scurry into camp and use its tiny teeth to chew through your fancy $400 canoe pack, all to get at the leftover nub of a forgotten Clif bar you didn’t really enjoy in the first place. Fortunately, many bear safe practices will help vermin-proof your gear.
Many bear safe practices will also help vermin-proof your gear. | Photo: Peupleloup/Wikimedia Commons
2 Not taking care of your gear post-trip
It sucks when you pull out gear for your next trip and it’s not been repacked properly or pieces are missing. “Have you seen the tent poles?” is not a question you want to ask at midnight when you roll into a sleepy riverside campground. Worse, gear that’s not cared for doesn’t last long. Damp gear rots, loses waterproofing and durability—plus, it smells. Forgetting to clean your water filter pump post-trip is a sure way to take the manufacturer’s claim of 10,000 clean liters pumped and reduce its output to nine measly trips. When you return home, wash and dry the gear that needs it before carefully storing it until next time.
3 Burying bear spray at the bottom of your pack
It can’t help you there, and can potentially be set off accidentally, coating your kitchen kit and other essential items in capsaicin. Bear spray is a great safety tool, but needs to be easily accessible to be useful. Easy-reach side pockets of packs might work well but even better is a purpose-specific holster. Pretend you’re in a spaghetti Western and practice drawing your piece from your chosen location— don’t get stuck asking the bear to stick ‘em up empty-handed.
4 Bringing weird, heavy things
On portage-heavy backcountry canoe trips, the Paddling Mag team has witnessed friends new to interior camping bring: four kinds of beans rehydrating in glass mason jars, five-pound citronella bucket candles to ward off mosquitoes, an exceptionally large portable Coleman gas heater for use inside a flammable nylon tent on a balmy September night, and several other questionable things. Safety concerns aside, huffing needlessly heavy items up and down portage trails is a quick ticket for many to wonder why anyone goes camping at all. Help your new-to-camping friends with a helpful list of essentials pre-trip.
Newbies aren’t the only ones to benefit from list making. “I’m 52. I don’t think I should check a list—I know I have to,” says canoeing guidebook author Kevin Callan. “It started out by forgetting small items, such as toothpaste and after dinner snacks. The moment I started forgetting T.P. and extra rations of whiskey is when I started making a list religiously.” It’s the only way to make sure you don’t leave something important behind.
6 Packing for an expedition on a weekend trip
Stop bringing so much stuff. If you’re packing enough gear to survive an apocalypse, then of course it’s going to seem like a lot of effort to get outside. Once you’ve looked after your needs for shelter, water and food, the rest is gravy. Pay attention to what gear is brought but not used and—unless it’s your rain jacket, first aid kit or another safety essential—leave it behind next time.
Learn from our past mistakes and avoid these easy-to-fix family camping missteps. | Feature photo: Andreas Rønningen/Unsplash
7 Forgetting the guide
Get a bird nerd or tree sleuth into their natural environment and they’re pointing out a spotted wood thrush and explaining that its Australian relative, the bassian, directs a stream of flatulence towards suspected earthworm sites to gas them out and then eat ‘em for dinner. Cool! And gross. Natural interpreters don’t come pocket-sized, but field guides do. Worth the $15 in the park office.
8 Relegating your adventures to long weekends only
The 100-mile, four-hour bumper-to-bumper crawl back to Urbania following a three-day statutory holiday weekend is enough to make anyone say, “We’re never going camping again.” Get out more often by mastering the lost art of the microadventure.
Don’t cross your fingers and gamble on blue skies and balmy temperatures. The one-day temperature forecast is now accurate within two degrees—compared to within six degrees in 1972—according to the National Weather Service. Coming prepared will exponentially increase your enjoyment of any trip.
10 Checking the weather report
In his essay, “The Weatherman Is Not A Moron,” Nate Silver refers to a study of TV meteorologists in Kansas City that found when they said there was a 100-percent chance of rain, it failed to rain at all one-third of the time. Wet bias is well documented and refers to commercial forecasters overestimating the chance of rain. For example, a five-percent chance of rain may be reported to the public as a 20-percent chance. This is said to increase the usefulness of the forecast, but overstating the risk of rain is more likely to keep campers at home. Use weather reports to guide how to pack for a trip—don’t let it be the deciding factor in whether or not to go. Possible exceptions include: hurricanes, monsoons and volcanic lightning.
11 Walking around barefoot
The editorial office—half of them barefoot for the discussion—was divided on this point, but shoes protect your feet from all sorts of sharp and bitey hazards. For backpackers and backcountry campers, it’s better to minimize the risk of injury to your tootsies completely. No shoes, no service? We like to say no shoes, no epidermis. We’re trying to make that a thing.
12 Killing your campfire with too much, too soon
Patience you must have, young padawan. A sixth sense for fire-making develops with the more campfires tended. However, a good rule of thumb is that if you can get your hand within six inches of the fire without feeling extreme (read: painful) heat, it’s still too early to put on anything thicker than your forearm.
Photo: Brooks Rice/Unsplash
13 Improper axe usage
There are only two ways to avoid putting that axe blade in your shin—either good luck or proper form. We prefer relying on the latter. With a sharp blade, take a wide stance and swing the axe on an arc between your legs. Kneeling makes this safer. The aim is to create an arc for the axe blade that avoids every part of you. The longer the axe the safer your kneecaps are.
14 Waiting until your kids are older to start camping
“The best age to start kids camping is now,” says Bruce Kirkby, author, explorer and father of two. Along with his wife, Christine, and two boys, the Kirkbys have climbed mountains, traversed deserts and paddled remote rivers. Our favorite example: When their youngest was just four months old the Kirkbys flew to Georgia, bought a chesnut mare and spent two months traversing the Caucasus Mountains. “For parental sanity, try to avoid bugs, heat and severe cold. Like anything in life, start the way you want to continue. Getting them outside early is setting you up for years of healthy, outdoor family fun,” adds Kirkby.
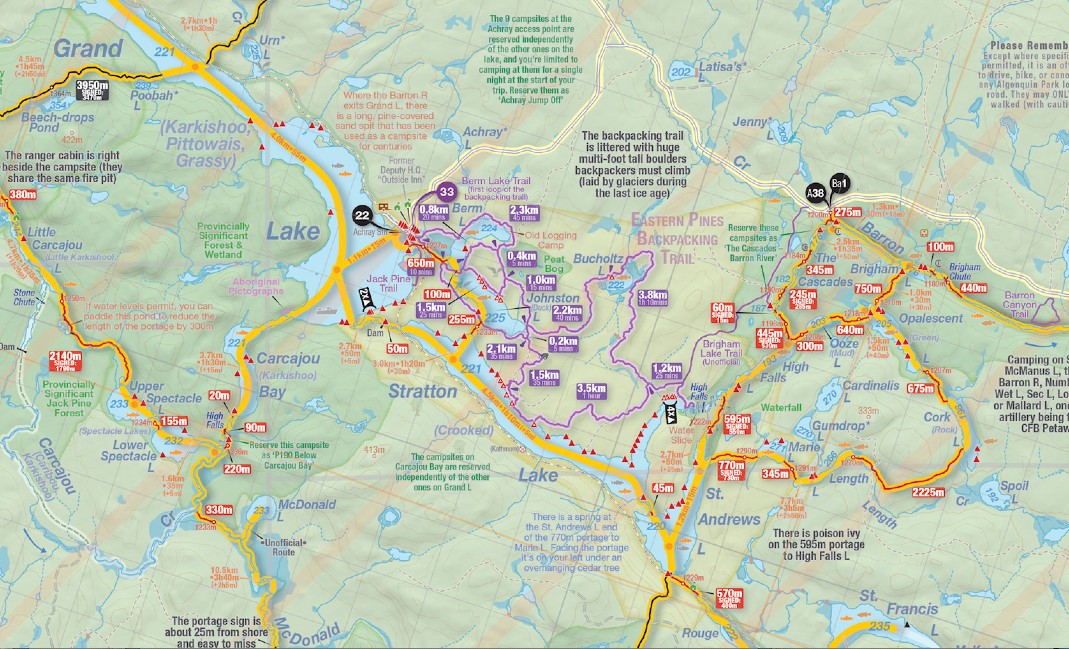
Feel the rush at Algonquin Provincial Park’s High Falls. | Feature photo: Courtesy Destination Ontario
Algonquin’s High Falls is the perfect place to cool off on a hot day. Pack your swimsuit and a picnic lunch for an exciting afternoon of sliding and splashing down this natural rock water slide. The Barron River doglegs over slabs of water-polished granite and through deep, placid pools cradled by sun-warmed stone. Slide, sun, swim and repeat.
The High Falls water slide is located on the eastern edge of Algonquin Park, accessible from Barron Canyon Road and Achray Access Point on Grand Lake. There are a number of ways that hikers, canoeists, kayakers and paddleboarders can reach the slide, including an easy walking trail or a short paddle down Stratton Lake. Interior backpacking and canoeing campsites near the falls invite a longer stay—there’s nothing like a bracing, wake-up swim down Algonquin’s High Falls slide to start your day!
The chute is a popular swimming hole for park users of all ages, but as with any moving water, it should be enjoyed with caution. Supervise children, wear a life jacket while sliding and always scout the slide for hazards before entering the water. Be aware that the top of High Falls itself is hidden just 100 meters downstream. While the falls are beautiful and well-worth hiking down to see, they are not safe for swimming! Watch for poison ivy while hiking, portaging and camping in the High Falls area—this pesky weed is abundant along trails and shorelines and causes an itchy rash.
[This article is part of the Ultimate Algonquin Park Travel Guide. Find all the resources you need to plan an adventure-filled trip to Algonquin Park.]
Algonquin High Falls Trail hike
The most direct way to reach Algonquin’s High Falls is to walk a well-defined trail that travels 4.5 kilometres through mixed forest to the chutes. The pleasant High Falls Trail is the most popular option for day hiking to the falls. To find the trailhead, drive 13 kilometres beyond Algonquin Park’s Sand Lake Gate (where you can purchase permits for day-use or camping). Roughly 250 meters past the Brigham Lake access point, turn left down a short dirt road to the trail parking lot.
For a longer backpacking trip to High Falls, begin at Achray and hike the Eastern Pines Backpacking Trail. The four backcountry campsites tucked on Stratton Lake’s High Falls Bay are the furthest from the trailhead—making for a 20-kilometre loop. To get here, hikers will skirt several small lakes and a peat bog, while scrambling over and around huge boulders deposited by glaciers during the last ice age. From the campsites, it’s a short stroll to the High Falls water slide.
Canoeing to Algonquin’s High Falls
Most paddlers access the High Falls water slide by canoe from Algonquin Park’s Achray launch on Grand Lake. Where the Barron River exits Grand Lake, there is an easy 50-meter portage around a small dam into Stratton Lake. Paddle the length of Stratton Lake and turn left up High Falls Bay to reach the top of the chutes—a distance of 8.5 kilometres (around two hours) from the put-in.
If you are planning an overnight or basecamp canoe trip and wish to camp close to Algonquin’s High Falls, you can choose from interior campsites on Stratton Lake or neighbouring St. Andrews Lake. The six well-spaced campsites on St. Andrews Lake offer a quieter, more remote feeling alternative to the popular sites on Stratton Lake, which can get crowded on busy summer weekends.
Canoeists can also include High Falls on longer canoe trips in this part of the park. The wonderful Barron Canyon canoe route starts from Achray and travels downstream on the Barron River through Stratton, St. Andrews, High Falls and Brigham lakes to the spectacular Barron Canyon. As you paddle into the slow-moving waters of the canyon, sheer cliffs rise 100 meters (330 feet) from the river. Towering white pines on the gorge’s rim appear like toy trees from this vantage point.
[ Plan your next Algonquin paddling trip with the Paddling Trip Guide ]
Return to Achray by backtracking along the same route, or portaging through Opalescent and Ooze lakes to re-join the river at High Falls Lake. Allow at least three days to complete the Barron Canyon canoe route. Five days is even better—basecamp a couple nights on both St. Andrews and Opalescent lakes and day-trip to the water slide and the canyon.
For a shorter one-way canoe trip, contact local outfitters Algonquin Portage or Algonquin Bound to arrange a shuttle.
Hikers enjoy the closest High Falls camping, with four waterfront campsites located a short walk from the water slide. Both the Eastern Pines Backpacking Trail and High Falls Trail access this popular backcountry camping area, so it is recommended that you make campsite reservations well in advance of your trip to avoid disappointment.
Canoe campers will find more than 20 interior campsites on Stratton Lake and St. Andrews Lake—all within an hour’s paddle of the High Falls water slide.
Backcountry camping fees are charged per person: around $12 for each adult, $6 each for those under 18. A maximum of nine campers is allowed per backcountry campsite.
If you are planning to access the falls as a day trip, but looking to stay nearby, Algonquin Park’s Achray Campground offers 45 developed sites for car-campers and RVs, as well as a heated yurt that can accommodate up to six people. This quiet campground also features flush toilets, sandy swimming beaches and direct trailhead access to the Eastern Pines Backpacking Trail.
Campsite reservations can be booked online at www.ontarioparks.com, or by calling 1-888-ONT-PARK (1-888-668-7275).
Source: Jeff’s Map Algonquin
Algonquin High Falls map
For a detailed look at the High Falls area, pick up a copy of the official Algonquin Park Backpacking Trails Map. Published by the Friends of Algonquin Park, the map is available for purchase at the park’s Sand Lake Gate or from their website. A number of excellent Algonquin Park Canoe Routes Maps are available for paddlers exploring the High Falls water slides and beyond. See our top picks at Don’t Get Lost In The Woods: A Guide to Algonquin Park Maps.
Guided trips to High Falls
For a fun, educational, no-hassle exploration of Algonquin Park, consider booking a guided canoe trip with local outfitter Algonquin Bound. Travel with an experienced Algonquin Park guide who will share their knowledge of park history and ecology, animal identification, canoeing and outdoor living skills. Your guide will also plan and prepare delicious camp meals, so you can spend more time relaxing, hiking and enjoying the High Falls water slide.
Custom guided trips from 1 to 5 days are available upon request from Algonquin Bound.
The outfitter also offers fully or partially outfitted self-guided trip packages. These packages include detailed 1-, 2-, 3- and 5-day trip itineraries, backcountry meals, canoe delivery, shuttle service and bus stop pick-up, if needed.
In recent years, swimming and picnicking at the High Falls water slide has exploded in popularity, especially during the heat of summer. Consider visiting the slide mid-week or in the off-season to avoid the crowds.
Travellers planning a trip to Algonquin’s High Falls water slide should also be aware that the park has a number of different cascades named “High Falls” that could be confused with the swimming hole we’ve described here. In fact, there is even another High Falls Trail—located in south Algonquin near the park’s Kingscote Lake and Benoir Lake access points—named for a spectacular falls on the York River. While swimming is popular in the pools at the base and top of this High Falls, the cascade itself is too steep and rugged for safe sliding.
Feel the rush at Algonquin Provincial Park’s High Falls. | Feature photo: Courtesy Destination Ontario
Sleep(n): A time machine to breakfast. | Photo: Kaydi Pyette
A restful night in the backcountry starts with a dependable sleeping pad. Unlike backpackers who rank weight above most else, packability, price and pleasure tend to be more critical metrics for paddlers when choosing a pad. Here are five top inflatable pads that prioritize creature comforts while minimizing bulk, perfect for your next kayak camping adventure.
Ether Light XT Extreme. | Photo courtesy: Sea To Summit
Clever construction for all seasons, Sea To Summit’s Etherlight XT Extreme features an R-value of 6.2 and four inches of opulent comfort. Our tester is the women’s version, built with narrow shoulders and wider hips than the unisex size. This toasty platform minimizes convection heat loss with internal Thermolite insulation and is as about as snug as it gets for cold nights while minimizing bulk. Packed up, the Etherlight XT Extreme has the largest silhouette of the pads we tested here by just a small margin—shaped more like a 1.5-pound loaf of Wonder Bread than a water bottle. Sea To Summit’s innovative stuff sack design doubles as the inflation pump bag. It’s a remarkably efficient bag, getting the Ether Light XT filled with just three bags of air, the fastest inflation of all the designs tested here.
Thick, lightweight and also the most compact of the pads reviewed here. Big Agnes’ Q-Core Insulated SLX inflates to a bump-banishing 3.5 inches and features even chunkier 4.25-inch-thick outer rails to keep you comfortably cradled all night long. The 20-inch width of our tester model is best for side sleepers and lithe paddlers, while larger paddlers and back sleepers will want to opt for the 25-inch-wide option. Open the inflation valve and peek inside; you’ll see a reflective layer, part of the Q-Core’s toasty silver insulation system that gives this pad a cozy R-value of 3.2, welcome on late summer nights around the Paddling Magazine office. We found Big Agnes’ upcycled inflation bag a bit stiff and low volume; it took eight repetitions to inflate the pad using it. We’d leave the inflation bag at home and blow up the pad with some old-fashioned huffing and puffing. Antimicrobial treatment keeps the pad’s interior microorganism-free if you choose this route.
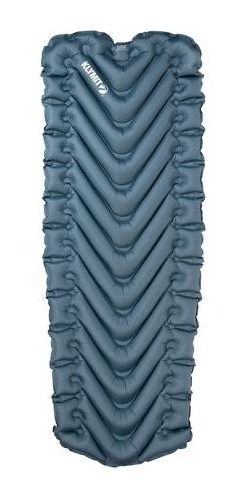
A lightweight, full-size sleeping pad is the height of luxury on trip and Klymit’s Static V Luxe SL summer pad delivers. Named for its V-shaped air chambers, these diagonal baffles create comfortable, 3.5-inch-high pods of heavenly support. Our tester measured in at a spacious 27 inches wide—perfect for bigger paddlers or those camping with a snuggly furry friend. The Static V’s raised side rails make it easy to stay on the pad through the night, even if you toss and turn, and its 30-denier polyester fabric is soft and quiet even if you’re prone to flopping around. A slight taper at the foot of the pad trims its weight down to a respectable 1.3 pounds. Rolls up into a tidy Nalgene-sized sack, especially notable given its broader inflated size. With an R-value of 1.5, the Static V Luxe is best paired with summer adventures.
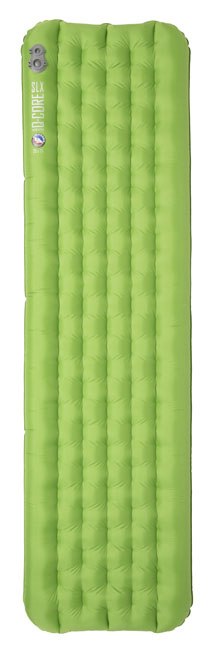
Suited to most year-round exploits, Exped’s Ultra 5R is a lightweight pad that packs down into an impressively small 5- by 9-inch silhouette given its toasty R-value of 4.8. Rated for temps down to -5°F (-20°C), our tester provides far more insulation than most kayakers will ever need—but it does so while tipping the scales at just over a pound in a standard 72- by 20-inch size. If you’re looking for one sleeping pad that can handle most overnight adventures, the Ultra 5R is a strong contender. Exped’s Schnozzel Pumpbag system is an editor favorite. It’s intuitive to use and blows up this voluminous pad in about five bags of air. A small but thoughtful design feature we’re big fans of is the stuff sack’s hidden pocket storing a tiny repair kit, so it doesn’t get accidentally lost or left behind. Another thoughtful feature we love? Exped’s mats are carbon neutral.
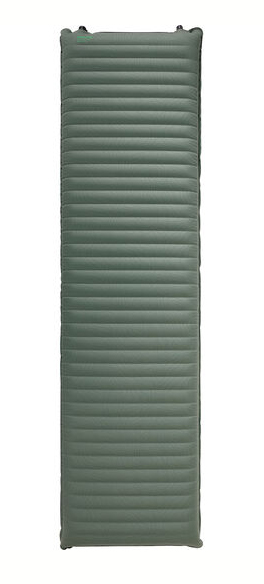
Experts at crafting industry-leading pads, Therm-a-Rest elevates their NeoAir line to new heights with the Topo Luxe. Pairing luxury with hatch-friendly compression, the Topo Luxe offers a lofty four inches of insulated comfort for an R-value of 3.7. The wizards at Therm-a-Rest have made a pad comfortable enough for car camping but designed with backcountry portability in mind. Made without bulky fill materials, our tester model in regular 20- by 72-inch size is just a titch larger than a Nalgene when packed. The topside fabric is soft nylon featuring a cool topo map design—soft and comfortable next to skin. Despite the large volume of the provided inflation sack, it took us about ten repetitions to get the pad to optimal fill, likely due to the cotton sack not being air-tight. Available in several lengths, including a roomier wide option.
This article was first published in Paddling Magazine Issue 64. Subscribe to Paddling Magazine’s print and digital editions here, or download the Paddling Magazine app and browse the digital archives here.
Sleep(n): A time machine to breakfast. | Feature photo: Kaydi Pyette


 This article was produced under a grant from the Sport Fish Restoration and Boating Trust Fund, administered by the U.S. Coast Guard.