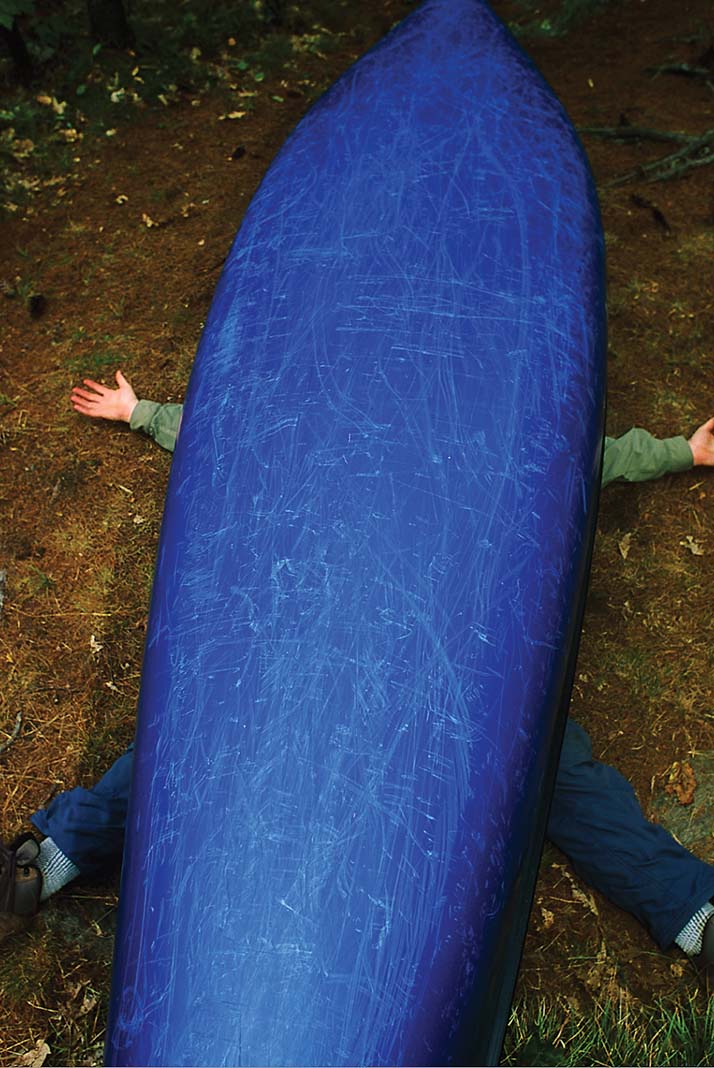
Even legendary canoeist Bill Mason once said, “Anyone who tells you portaging is fun is either a liar or crazy.” | Feature photo: Tony Webster/Flickr
It can hurt to portage a canoe. Whether you are hopping from one lake to another or avoiding a set of nasty rapids, each trail has some potentially painful characteristics: slippery rocks, steep inclines, bug-infested hollows, boot-sucking mud, wrong turns. Even legendary canoeist Bill Mason once said, “Anyone who tells you portaging is fun is either a liar or crazy.”
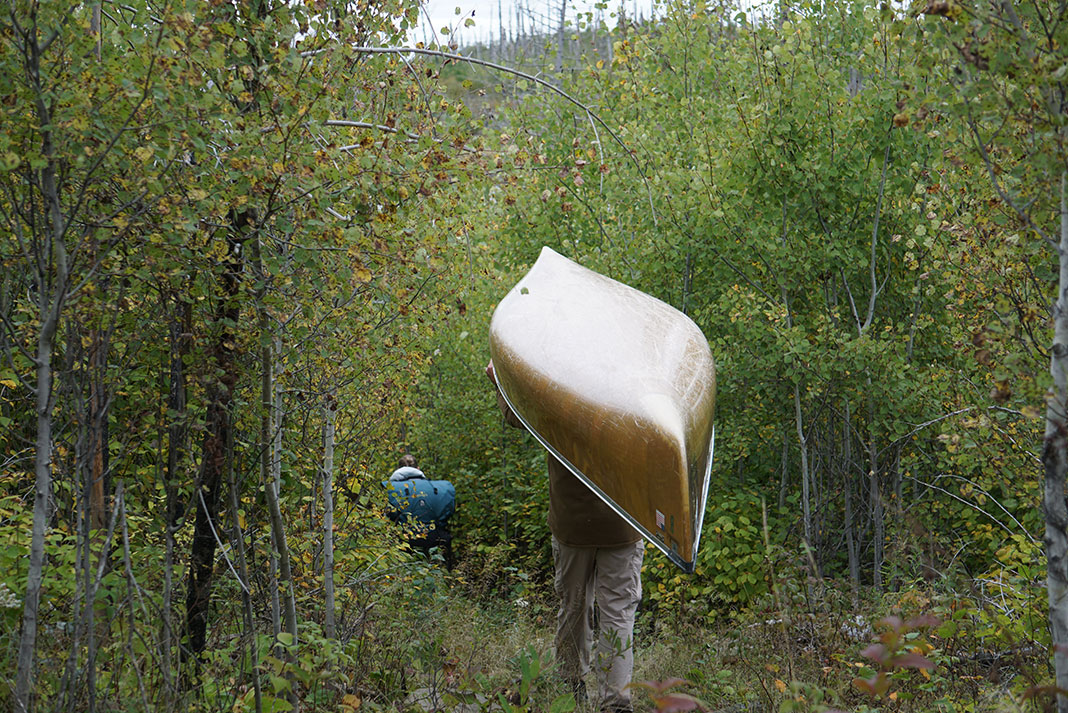
Portaging is canoe tripping’s necessary evil. Often a painful hike through the woods with 500 pounds of gear is the only thing standing between you and absolute solitude. There are ways to ease the pain, however. These portaging tips will lessen your burden considerably.
15 tips to conquer any canoe portage
Came, saw, conquered. | Photo: Kevin Callan
1 Reduce clutter
The only thing worse than having a canoe full of loose stuff is those same items dangling from your packs on a portage. Stuff everything inside a large canoe pack.
2
Lessen the sagging feeling
Choose a pack with a hip belt, chest strap, and a tumpline to lessen the sagging feeling of a heavy pack, especially while going uphill.
3
Test-drive your pack
Practice carrying your load around the block before attempting a real portage. If you are having problems, unpack and jettison nonessentials.
Portaging across twice obviously takes longer, but it’s better to make extra trips than to overdo it. You’ll avoid injuries and also have room to carry an extra flask of wine.
5
For type A’s
If you can’t bring yourself to do two full trips, try a trip and a half. Both canoeists head across the portage, one with packs and the other the canoe. Halfway along, the one carrying the canoe stops and returns for the second pack. The other person continues on to the end, and then returns for the canoe. If only one person is able to carry the canoe, then you can both start off with packs, and one person goes back for the canoe.
6
Hooked on portaging
Strap fishing rods along the inside gunwale and make sure no lures are attached. There’s nothing worse than fishing line tangled up in brush or a fish hook stuck in your gear, or worse, your arm.
Make sure you safely stow your fishing gear before starting the portage. | Photo: Daakrolb/Panoramio
7
Stand up and be counted
Preassign each group member the equipment they are responsible for carrying. This helps organize everything at the take-out and put-in, as well as assigning responsibility—or blame, depending on your group—if there’s something missing at the end of the day.
8
Money buys happiness, just this once
Splurge on either renting or buying a lightweight canoe. It’s worth it, I promise.
[ Paddling Buyer’s Guide: See all lightweight canoes ]
9
Independence is bliss
Learn how to solo carry rather than shoulder the canoe with your partner. It’s actually easier in the long run and fewer arguments will erupt.
10
Portage a half-bubble off level
Replace your cheap, factory-built yoke or thwart with a custom yoke conforming to your own shoulders. Install the yoke yourself, placing it a wee bit back from center to make the canoe slightly tail-heavy.
Carrying the canoe, occasionally drop one arm to your side. Grip the opposite gunwale with the other arm, making sure it’s outstretched and your elbow is straight. Switch often. This technique transfers the weight from one shoulder to the other and gives you a few minutes of pain relief.
Placing a carrying bar or thwart in front of you, just within reach, offers more hand positions and reduces cramping or simply tie a rope between the bow and stern and grasp that to keep the canoe properly balanced.
13
Listen to your inner tortoise
When carrying packs I can generally suffer for at least 40 minutes before I have to stop and rest. But with the canoe I stop every 20 minutes and rest for five minutes before continuing. Also rest at the tops of hills, so you’re on your game during a slippery, rocky descent. Slow and steady wins the race.
14
Dangle a chocolate carrot from the bow
I always make sure to pack a big bag of treats. At the end of each carry we celebrate by gorging ourselves. It’s amazing how the thought of having something sweet at the end may be the only thing pushing you to get the job done.
Find a musical way to pass the time and you may not dread the sight of this sign. | Photo: Joshua Mayer/Flickr
15
Oh, Mickey, you’re so fine
I pass the time on portages by singing to myself. So I make darn sure the last song I heard on the radio before embarking on my trip was a good one, as I know it will be in my head for the entire trip. Try for something classic like Billy Joel’s “Piano Man” or Jimmy Buffet’s “Margaritaville,” and nothing by Wham!
This article originally appeared in Canoeroots and Family Camping, 2004 and in Paddling Magazine Issue 65. Subscribe to Paddling Magazine’s print and digital editions here, or download the Paddling Magazine app and browse the digital archives here.
Even legendary canoeist Bill Mason once said, “Anyone who tells you portaging is fun is either a liar or crazy.” | Feature photo: Tony Webster/Flickr
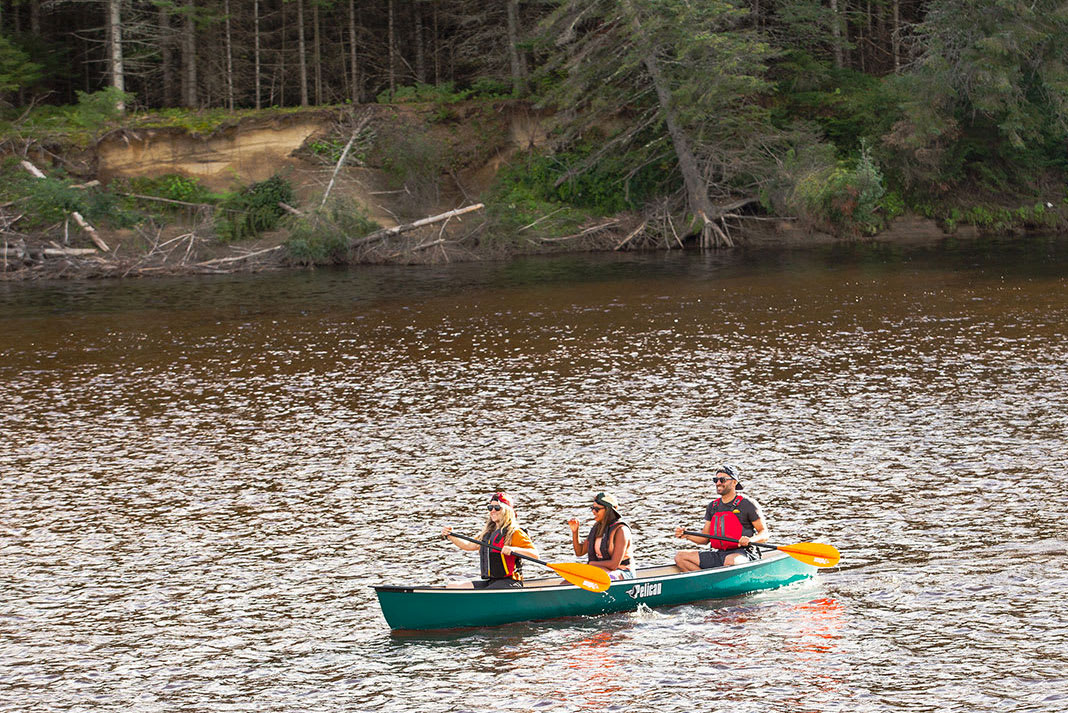
The Pelican International 15.5 canoe is built tough, for many years of recreational paddling on rivers and lakes. It’s constructed of legendary RAM-X plastic, a durable material that’s proven to stand up to the rigors of rocky rivers. The Pelican 15.5 leisure canoe is versatile, with three seats that make it suitable for tandem and solo paddling as well as outings with three paddlers.
This 15.5-foot canoe has plenty of volume for weekend trips and more, with good depth to make it seaworthy in rough conditions and a flat bottom for good initial stability. With a price well under $1,000, our 15.5 Pelican canoe review concludes that this classic canoe remains budget-friendly while offering solid performance and outstanding durability.
Many paddlers note that the Pelican 15.5 has the perfect blend of speed, stability and maneuverability. We would have to agree; it’s our exact definition of an all-around recreational watercraft.
The Pelican International 15.5 canoe handles well on rivers and lakes, with the capacity to handle backcountry canoe camping trips ranging from a weekend to a week in length. The 81-pound weight makes it heavy to carry but lends durability and also allows the 15.5-foot Pelican canoe to feel secure in stronger winds.
Market and demographics
This 15.5-foot Pelican canoe is billed as a river canoe, with good maneuverability to help you steer around obstacles. And when you hit a rock, the patented RAM-X plastic hull is built to withstand years of use (and even abuse). The keel is the centreline of the hull from bow to stern. Pelican has reinforced the keel line of the 15.5 canoe with an aluminum rod to ensure structural integrity and paddling efficiency.
It’s part of what makes the Pelican 15.5 an excellent choice if you’re looking for a cheap canoe that has been built to last and will work well in a variety of applications. You can store it outside (ideally in a shaded location) without any worry of the Pelican 15.5 being damaged by the elements.
The Pelican 15.5 canoe comes equipped with fishing rod holders and three molded seats, making it suitable for anglers, families and solo paddlers. Use it at the cottage or on a day trip at your neighbourhood pond. There is much to be said for such a versatile canoe at this price.
Photo: Courtesy Pelican
Photo: Courtesy Pelican
Comfort
The molded plastic seats of the Pelican 15.5 canoe are highly functional, tough and reasonably comfortable—and they can be modified for longer days on the water (see below). It’s important to note that the Pelican 15.5’s plastic hull is far more comfortable to paddle than comparable aluminum canoes. It offers two main advantages over aluminum: The RAM-X plastic remains cool to the touch in hot weather and provides insulation between paddlers and cold water.
About the Pelican 15.5 canoe
Design
Design features and details
The most notable design features of the Pelican 15.5 canoe are its moderate rocker, flat-bottomed cross-section profile and flared entry lines. Combined, these features produce a canoe that responds well to paddle strokes on twisty and rock-studded rivers, with excellent stability and a dry ride in waves and chop.
A pronounced keel running along the bottom of the canoe allows the Pelican 15.5 to track straight on lakes; it also adds stiffness to the supple RAM-X hull, making it more efficient to paddle.
Material and construction
The Pelican 15.5 canoe is made of RAM-X, a proprietary polyethylene plastic that’s impressively durable. In fact, this heavy-duty canoe tripping material has a long track record of durability, originating with Coleman canoes in the 1980s. Pelican uses an aluminum rod along the keel line to increase stiffness in the hull to make it more efficient to paddle.
Paddle Sober And Smart
Never mix alcohol and paddling. Coast Guard and state BUI (boating under the influence) laws apply to all vessels. This includes canoes, kayaks, SUPs and rafts.
Outfitting and accessories
The Pelican 15.5 is outfitted like a classic canoe, with molded bench seats. Creature comforts include drink and fishing rod holders. Carry handles at either end of the canoe make it easier to haul the 81-pound Pelican 15.5 from a vehicle or boathouse to the water’s edge for launching.
Replacement seats are available from the manufacturer, and though it seems unlikely that these durable, foam-filled molded plastic seats will break, some Pelican 15.5 owners have reported a need for replacement. The process of swapping in a new seat is as easy as removing and re-attaching a few nuts and bolts.
Opportunities for modifications
Adding padding and a backrest to the seat is a great modification that increases the comfort factor of the Pelican 15.5 canoe. These can be as simple as stadium seats, fastened to the molded plastic benches. If you’re an angler, you may wish to install items like a fish-finder and bait wells to your Pelican 15.5. Glued-in knee pads are a simple upgrade that make it more comfortable to safely paddle the Pelican 15.5 in whitewater.
How it compares
The Pelican International 15.5 canoe strikes a nice balance between an expedition-ready tripping canoe and a compact day paddler, with attributes and design features that cater to both niches. The third seat sets it apart from Pelican’s other canoes. This allows you to paddle tandem or solo, or with a passenger in the center.
Photo: Courtesy Pelican
Where to buy the 15.5
You’ll find the Pelican 15.5 canoe for sale at many outlets in Canada and the United States. Searching “Pelican 15.5 canoe Canadian Tire” will reveal availability across Canada. It’s also available at Walmart, Home Hardware and Peavey Mart.
The Pelican 15.5 canoe is marketed as the Pelican 15.5 Dakota in the United States. Look to find deals at box stores like Academy Sports.
Pelican 15.5 pros and cons
Pros
Jack-of-all-trades canoe that meets the demands of a wide variety of users, including river runners, anglers, cottagers, families, day trippers and overnight campers
Handles well on lakes and rivers with up to class II rapids
Outfitting is basic and can be modified to increase comfort
RAM-X hull is ultra tough, and able to withstand impacts and bounce off rocks
Trim your boat’s plastic fat and look sexy for summer. | Feature photo: Scott MacGregor
Synthetic trim may be practical—vinyl is durable and aluminum is lightweight—but in my opinion, nothing matches the warmth of wood. Even on an ultralight Kevlar canoe, the classic look of traditional, natural wooden gunwales are worth the effort.
A wood gunwale replacement takes roughly eight hours and can pare down your canoe’s weight by at least five pounds. Your canoe will never look or feel better than with a fancy new set of wood gunwales. Here’s our approach to installing new wood gunwales on a composite canoe.
Make the inwale and outwale lengths as long as possible ensuring they can be clamped snugly in the curvature at the bow and stern. | Photo: Scott MacGregor
How to Install Wood Gunwales on Your Canoe
Preparation and Materials
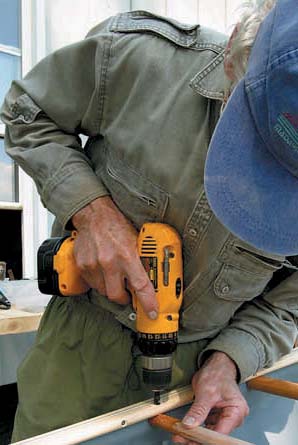
Begin by drilling out the rivets from your ugly vinyl gunwales. Now that you’re totally committed, seek out specialty lumber yards. Look for a knot-free, straight-grained length of ash or cherry, about four inches wide and slightly shorter than the length of your boat.
If you lack your own table saw, planer and router, get on a first-name basis with the guy at your local woodworking shop and have him rip your plank into four equal strips. Gunwales squared to three-quarters of an inch look beefy, ideal for people who think paddling steep drops is a giggle. Five-eighths square looks best and is tough enough for all but the craziest of open boat cowboys.
The strips should be ripped slightly wider (by about one-eighth inch) than these final gunwale dimensions, then planed down to a perfect square in thickness and width, and finally rounded off to a round profile with a router using a three-eighths corner round over bit.
6 Steps to Install Wood Gunwales
1 How Long?
The inwale and outwale can be the same length. Play with the lengths until the inwale and outwale can be clamped together on the boat and still contour tightly to the curve of the hull at the ends. Center the gunwales on the boat using center marks on everything—boat, inwale and outwale. Round over the ends of the gunwale strips using a rasp and then sandpaper.
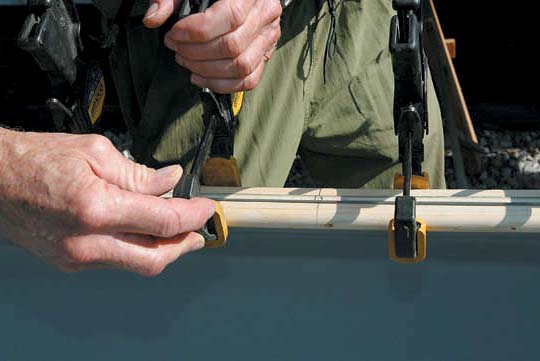
Carefully marking the centre point on everything makes assembly fast and accurate. To “cut your boat down” simply clamp the gunwales lower and then trim the Royalex later. Be careful—the two pieces of wood must be constantly checked for matching heights. | Photo: Scott MacGregor
Every pilot hole has to be countersunk to cradle the screw head but also to drill a hole through the Royalex hull. Carefully align the height of the inwale and outwale and clamp tightly before drilling. | Photo: Scott MacGregor
2 Drill Time
The goal is to beautify, so ensure there are only two screws showing at each end of the outwale. All other screws are installed from the inside of the boat. On your worktable, drill two one-eighth-inch holes, spaced five inches apart, in either end of the two outwales (the strips on the outside of the boat) and then a series of holes five inches apart on the inwales.
At this point, sand the gunwales to an irresistible smoothness. Seal the wood with an oil finish where it fits against the hull.
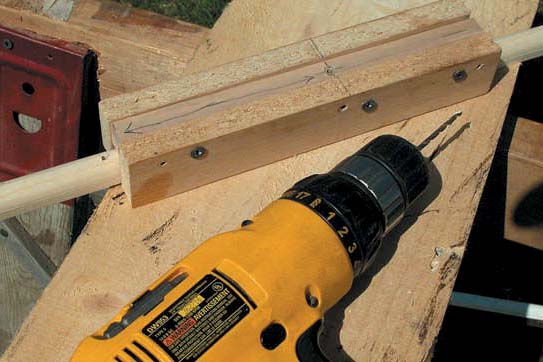
Create a hole-centring jig from scrap material to ensure that the holes are exactly centred in the gunwales. Sandwich a short section of squared gunwale stock (with a pre-drilled absolutely centred hole) between two pieces of wood about one and one-half inches wide. Slide it along the gunwales in the drilling operation. If the hole in your jig is five inches from one end, it eliminates all need for measuring hole spacing. | Photo: Scott MacGregor
Without a clamp on either side of the hole, winding in the screw actually forces the two strips apart. Many clamps make the installation much faster. The final turn of each screw should be done with a hand screwdriver. | Photo: Scott MacGregor
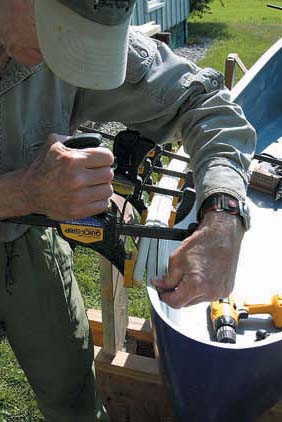
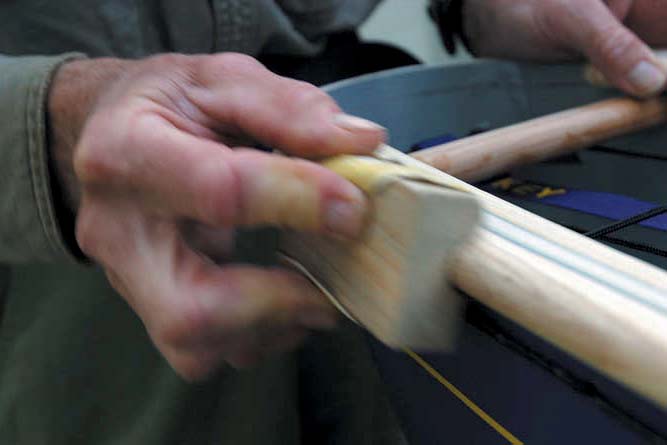
3 Clamps, Please
Clamp the gunwales back on the hull, centering everything again. Leave a bit of the hull protruding up between the strips; we’ll trim or sand this flush later. Now, countersink each predrilled hole, drilling through the hull. The drill bit in the countersink must be smaller than the width of a #6 screw. Screw threads need something to hold onto.
[ Paddling Buyer’s Guide: See all canoes ]
Hot shot tip: If you want to cut your boat down—reducing the depth and sheer—this is when you do it. Simply clamp the gunwales as low as you want the height of your boat. Drill. We’ll trim the excess material away later.
A laminate trimmer with a straight cutter eats
through Royalex effortlessly, taking down the hull to meet your gunwales while elminating any rough
edges. Hold on tight! Beg, borrow, buy or rent a trimmer, otherwise be prepared with lots of time
and sand paper trying to sand Royalex. | Photo: Scott MacGregor
Cut the length of your thwarts to return the
boat to its original factory width or try different
widths to modify the hull shape to your personal
preference. Dip in finishing oil to seal the ends. Locate thwarts carefully ensuring an equal distance from the bow or stern on each side. | Photo: Scott MacGregor
A random orbit sander will take the wood to a
polished marble finish very quickly. Start with 60 grit and work up through 100 to 220 grit paper. | Photo: Scott MacGregor
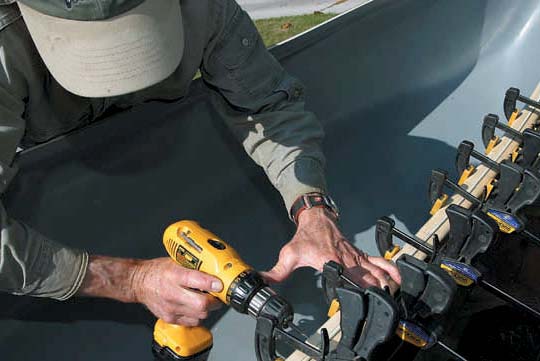
4 Pass the Screws
With a clamp beside every hole, screw the two strips together using one-and-a-quarter-inch #6 stainless steel screws. Do the final tightening by hand.
Some great tools cost nothing. Try making a sanding block for the round edges using high density foam. | Photo: Scott MacGregor
5 Pro Job
A laminate trimmer is used to trim off the rough and irregular edge. A sander does the same job but takes infinitely longer.
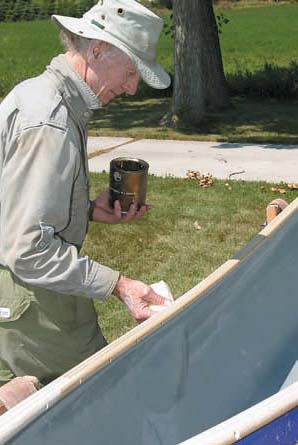
Using an exterior oil finish very sparingly prevents unsightly oil stains. A small piece of soft foam makes an idea applicator. Wipe up any oil on the hull immediately. A few minutes of hand rubbing the oil into the wood gives a hard, durable finish that will last for months of use. | Photo: Scott MacGregor
6 Polish Your Image
After a final sanding of the wood, and re-installing the thwarts, apply Varathane’s Natural Oil Finish. Cut up the old vinyl gunwales and use them as tomato stakes in the garden, the perfect final use for such hateful things.
This article first appeared in the Summer 2004 issue of Rapid Magazine and in Paddling Magazine Issue 65. Subscribe to Paddling Magazine’s print and digital editions here, or download the Paddling Magazine app and browse the digital archives here.
Trim your boat’s plastic fat and look sexy for summer. | Feature photo: Scott MacGregor
You won’t find a better way to introduce youngsters to paddling than with the Lifetime Wave 60 Youth kayak. This lightweight sit-on-top recreational kayak is perfect for paddlers weighing less than 130 pounds. At 6’ long, the Wave 60 Youth is specifically designed to be easy to paddle for kids age 5 and up.
You might be wondering, what exactly is a Wave 60 kayak? A summary of Lifetime Wave Youth kayak reviews would say it is a durable, bargain-priced boat that would be an ideal addition to calm-water paddling outings with an entire family.
The Lifetime Wave 60 Youth kayak features outstanding stability—a critical performance feature for parents concerned about their children’s safety. A flat bottom keeps the kayak from feeling tippy at first float; in fact, the Wave 60 Youth is stable enough to be used as a swim platform.
The stern of the kayak is blunt and low to the water to create a swim-up deck for kids to climb aboard. The Lifetime Wave 60 Youth kayak maximum capacity is 130 pounds, and the manufacturer recommends it for kids aged 5 and up, with adult supervision.
Market and demographics
With a retail price of around $200, the Lifetime Wave 60 Youth kayak is clearly targeted at parents looking for a budget-friendly way to introduce their kids to paddling and watersports. The boat is designed for calm, sheltered water. The open deck makes it safe and easy to enter and exit, however it also exposes the paddler to the elements. The Wave 60 Youth is best suited to warm water environments and sunny days—a feature that makes it perfect for a day at the beach or paddling outings at the cottage.
Comfort
Different Lifetime Wave Youth kayak reviews highlight the boat’s comfortable open deck. Molded-in foot supports make it suitable for a range of paddler sizes (up to 130 pounds), making it a great option for parents looking for a kayak that kids won’t soon grow out of.
About the Lifetime Wave 60 Youth
Design
Design features and details
The most important design feature of the Lifetime Wave 60 Youth kayak is the flat, surfboard-like bottom—meant to enhance stability. The kayak’s modest, 24” width makes it easy to handle, even for smaller and younger paddlers. Stability is further increased by a reverse chine, a feature that essentially adds extra buoyancy at the perimeter of the hull, making it extremely resistant to capsizing.
Meanwhile, twin fins at the stern of the Lifetime 6-foot, solo Wave Youth kayak help it track straight through the water, making it a great boat for young paddlers with limited strength and skills.
Material and construction
The Lifetime Wave 60 Youth kayak is constructed of high-density polyethylene, an ultra durable, molded plastic that promises years of worry-free use. The kayak’s pronounced edges and stern fins add stiffness to the material to make it move through the water more efficiently.
Lifetime managed to keep the Wave 60 Youth under 20 pounds, an impressive feat for such a durable product.
Design trends
The Lifetime Wave 60 Youth kayak welcomes a new demographic to recreational kayaking, the largest category of paddlesports retail sales. This sit-on-top recreational kayak offers a good way to introduce the next generation to the joy and thrill of paddling.
Lifetime Wave 60 Youth outfitting and accessories
The Lifetime Wave Youth kayak seat is simply a molded component of the plastic hull. This barebones seating arrangement isn’t particularly comfortable for long periods of time, even for kids. On the plus side, there are no moving parts to break and limited padding to shred or abrade. And it’s easy to add a thin closed-cell foam seat cushion (such as a gardening kneeling pad) to improve comfort.
The Lifetime Wave Youth kayak backrest is equally basic, with a lip behind the seat to secure the paddler in the boat. It appears rudimentary but given the target demographics, the kayak seat is kid-ready and plenty serviceable—as long as paddlers don’t plan on spending many hours sitting in the boat.
Twin scupper holes drain water that accumulates on the kayak deck, making it dry and comfortable to paddle. Parents of new paddlers will love the fact that a kayak paddle is included with the boat.
Wear A Life Jacket
Everyone, even strong swimmers, needs to wear a life jacket at all times when on the water. It is extremely difficult to put a life jacket on once you fall into the water. Even a light wind can blow any paddlecraft away from you, faster than you can swim.
Always wear a USCG-approved Level 70 or Type III life jacket designed for paddling.
How it compares
The Lifetime Wave 60 Youth kayak isn’t the only kid-friendly kayak on the market. Here’s how this durable parent-approved kayak compares to similar models.
Lifetime Wave Youth vs Dash
The Lifetime Dash is a 6.5-foot sit-on-top kayak with a maximum capacity of 150 pounds, making it suitable for larger kids and small adults. The longer length gives the Dash more speed and a bit less maneuverability, best suited for older children and pre-teens.
Just like the Lifetime Wave 60 Youth kayak, the Lifetime Dash features several molded footrests to accommodate paddlers of various sizes. You may still find Lifetime Dash kayaks on the used market.
Lifetime Wave Youth vs Pelican Solo
The Pelican Solo is a somewhat more barebones kids’ kayak than the Lifetime Wave 60 Youth kayak, with a maximum capacity of 100 pounds. It also measures six feet long and includes a swim up stern deck. The twin-tunnel hull mimics a catamaran for great stability. The Pelican Solo comes at a cheaper price and also includes a paddle, making it a good choice for parents with a tighter budget.
Where to buy
The Lifetime Wave Youth kayak is readily available. Searching Lifetime Wave youth kayak Walmart will help you identify big box retailers in your area. It’s also available online through the manufacturer.
Pros and cons
Pros
Offers a safe way for kids to develop coordination and motor skills in a kayak
Glides through the water and tracks straight
Clever hull design
Features a low stern deck that turns the kayak into a fun swim raft
Readily available online and through retailers like Walmart
Most of us can agree that finding an unwelcome critter in the bow of your boat is bad news. When said guest is of the aggressive, fast-moving variety–things can get pretty uncomfortable.
Elite kayaker Erin Savage had been hiking laps of the Green River in Asheville, North Carolina in preparation for the annual extreme kayak race when she spotted the limbless reptile in her kayak.
The snake in question was a brown river snake. “They aren’t venomous, but they are kind of aggressive,” said Savage.
Savage was able to give the snake some distance as it explored the inner walls of her kayak and eventually left of its own accord. Catch the video here.
Whether you are new to paddling and curious, or experienced and ready to get just the right deal, there’s a lot to be said for buying a used kayak. Purchasing a used Craigslist kayak is a great way to get started with paddling, especially if you want a low-cost trial period to make sure you like kayaking before making a larger investment in a new boat. Searching Craigslist for kayaks for sale is also a great option for experienced paddlers who want to try out a new style of paddling or type of boat for cheap.
However, it’s important to be a smart buyer when you’re considering kayaks for sale on Craigslist. While you may find many good deals, you’ll find an equal number of kayaks that aren’t worth buying. Just because you aren’t paying for a new kayak doesn’t mean you shouldn’t approach the search as a well-informed consumer; someone who is ready to analyze what is for sale.
We’ve outlined the common mistakes to avoid when buying a used kayak on Craigslist.
9 mistakes to avoid when buying a kayak on Craigslist
1 Buying the wrong kayak for the job
Kayaks fall into a variety of styles depending on their primary intended use. Each category has its own performance characteristics. Buying the wrong style of kayak for your desired paddling experience will certainly spoil your time on the water. The best Craigslist kayak shopper is an informed one. Our comprehensive Paddling Buyer’s Guide is a great place to start your research.
Wear A Life Jacket
Everyone, even strong swimmers, needs to wear a life jacket at all times when on the water. It is extremely difficult to put a life jacket on once you fall into the water. Even a light wind can blow any paddlecraft away from you, faster than you can swim.
Always wear a USCG-approved Level 70 or Type III life jacket designed for paddling.
Recreational kayaks are short (less than 12 feet long), wide, stable and great for beginners, casual paddlers, children and those nervous about being on the water. While many have a sit-inside cockpit with a seat, backrest and foot supports, some recreational kayaks (known as sit-on-tops) have more basic open cockpits, which are great in hot weather.
Sit-on-tops are also the norm for fishing kayaks, a sub-genre of recreational kayaks that is distinguished by standard angler-specific accessories like rod holders and tackle storage areas.
Recreational kayaks are by far the most popular type of kayak on the market. They’re great for flatwater paddling and short trips in benign conditions, such as those found on small lakes, quiet rivers and sheltered coves. Don’t expect to enjoy impressive glide, speed or paddling efficiency from these boats.
Recreational kayaks are safe to use on calm, protected water but they can be dangerous in exposed, open-water conditions because they lack safety features like floatation, bulkheads and deck lines.
Popular manufacturers of used recreational kayaks on Craigslist include Pelican, Sun Dolphin, Old Town, Ocean Kayak and more.
Touring kayaks are longer (14 to 18 feet), narrower and have more storage than recreational kayaks. They are designed for longer trips and come equipped with storage and hatches with lids that can be removed.
Most touring kayaks are sit-inside designs. They are designed to move straight and efficiently in the water and some will have a skeg or a rudder for directional control. Typical brands of used kayaks on Craigslist include Wilderness Systems and Current Designs.
Whitewater kayaks are very short (6 to 8 feet) and have pronounced rocker, meaning that they’re shaped like a banana with upturned ends to maximize maneuverability in currents. Consequently, they are slow and inefficient to paddle on flatwater. Popular brands on Craigslist include Jackson Kayak and Wavesport.
Knowing the characteristics of these broad categories of kayaks—and which one best aligns with your objectives—is the first step toward making an informed decision.
Along with choosing the right kayak for your desired pursuit, it’s essential to purchase a used kayak that matches the environment you’ll be paddling. Recreational kayaks are by far the most common type of kayak for sale on Craigslist. They’re great for sheltered conditions, but they’re dangerous for use on open water.
If you want to paddle in open water, cold water or any environment with the potential for wind and waves, it’s critical that you choose a kayak that’s meant to be seaworthy in more advanced conditions. For example, most recreational kayaks lack bulkheads (walls in the kayak interior that create watertight chambers for floatation). As a result, when a cheap recreational kayak floods with water, it’s likely to sink.
In contrast, touring kayaks are designed to float even when swamped to facilitate open-water rescues (an important skill you will want to learn in a kayaking course).
Carry A Waterproof VHF Radio, Use Your Phone Only As A Backup
A handheld VHF marine band radio allows you to communicate with the Coast Guard and other boat traffic. Use Channel 16 only for hailing and emergencies. The radio should be waterproof, because it is virtually certain to get wet.
A cell phone, even if in a waterproof case or sealable bag, might not work, so don’t rely on it as the primary means of emergency communication.
3 Not giving a kayak the once-over
Regardless of the material the Craigslist kayak is made of, you should give it a detailed inspection. Examine the deck and hull for damage including deep gouges more than 3 mm or 1/8th of an inch deep; obvious abrasion, especially if the worn areas are a different color from the rest of the kayak; and deformities, which will make the kayak paddle less efficiently.
Recreational kayaks and some touring models are often made of durable plastic that’s meant to withstand plenty of abuse; some damage is fine, so long as the shape of the kayak remains intact. Cracks in a composite, namely fiberglass or Kevlar, kayak often reveal that the kayak is old or received rough treatment.
The best way to check the integrity of outfitting components—including seat, backrest, thigh pads and foot supports—is to take a seat in the cockpit and make sure the outfitting works properly. For example, if the kayak has ratchet straps, crank and loosen them. Next, use a flashlight to take a look inside the kayak. Take hatches on and off and see if they seal.
Flip over the kayak and see if there is any warping in the hull; any waves or lumps in the bottom of the kayak will impact paddling efficiency and may be the sign of an old, worn kayak. Bulkheads are critical in ensuring a kayak remains watertight when the cockpit is flooded; make sure they’re sound and well-sealed in the hull.
There is a difference between a well-used boat, and an abused boat. Sometimes these differences can be hard to spot. Broken items are a giveaway that a kayak didn’t receive proper treatment.
4 Buying a sun-damaged kayak
Color is more than just an aesthetic concern when buying a used kayak on Craigslist. Faded color on the hull or deck is a good indicator that the kayak was stored outside for extended periods of time. Short-term outdoor storage is fine, but, over the long haul, UV radiation will compromise the strength of fiberglass kayaks and make the hull of a plastic kayak softer and less efficient to paddle. It’s also a hint that the kayak could have been abused in other ways, too.
5 Not trying the kayak before you buy
The only way to fully assess the comfort and performance of a kayak is to try it before committing to a purchase. Arrange a meeting place with the seller that allows you to take a few moments on the water. Bring your usual paddle and dress in what you plan to wear while paddling. With a sit-inside kayak, be sure to assess how easy the boat is to enter and exit.
6 Missing out on usual damage
The moving parts on a kayak suffer a lot of wear and tear, so it’s worth inspecting things like the rudder or skeg, which are features on touring kayaks that offer directional control; adjustable foot supports, which can become jammed and broken by sand and grit; and fasteners to attach hatch covers. All these items can be replaced at a reasonable cost and with modest DIY skills, but they may offer a discerning buyer the opportunity to haggle on price.
Other things to watch out for are sun-damaged hatch covers, which may feel dry or brittle, and missing parts like scupper plugs, which are one-way valves that allow water to drain off the deck of sit-on-top kayaks.
7 Not buying the right gear to go with your kayak
The mistake of buying your kayak on Craigslist but not looking into what else you need to be safe on the water could have grave consequences. Safety on the water starts with a properly-fitted, Coast Guard-approved personal floatation device (PFD). A paddling PFD offers both floatation and enough mobility to move your arms and rotate your torso to paddle efficiently. If you’re offered a PFD as part of a used kayak sale make sure it’s in good shape, fits properly and is Coast Guard-approved for the location you’ll be paddling.
Sit-inside kayaks of the recreational, touring and whitewater variety are meant to be used with a sprayskirt, which seals the paddler in the kayak and keeps spray out. It’s recommended that you take a paddling course before using a sprayskirt to learn the proper technique for exiting the kayak should you capsize.
Another key factor in paddling safely is dressing appropriately for the water temperature, which may involve investing in gear like a wetsuit or drysuit if you paddle in cold water conditions. A bilge pump is another important safety accessory for sit-inside kayaks, allowing you to empty water from the cockpit. Similarly, a 15-meter (50-foot) buoyant heaving line may be invaluable during a rescue.
Dress For Immersion, Not Air Temperature
Your body loses heat much faster when immersed in cold water than it does when dry.
Avoid cotton clothing like t-shirts and jeans; they retain water and accelerate cooling when wet. Synthetic fabrics, or wool, are generally a better choice. If the water is very cold (60° fahrenheit or less), you should wear a wetsuit or drysuit.
In general—that is, before Covid-19 put a premium on outdoor equipment—the typical starting point for a used Craigslist kayak in moderate condition was about half its retail price. All that’s changed in the wake of boat shortages brought on by the pandemic, but you can use it as a starting point in haggling for a price.
9 Rushing a decision
Possibly the biggest mistake when shopping for a used kayak on Craigslist is to rush into buying something that isn’t right for you. As with any purchase, only act on something that feels right. There are plenty of used kayaks on Craigslist, with new ones being posted all the time; take your time, do your due diligence and, with patience, you will find the right boat for you.
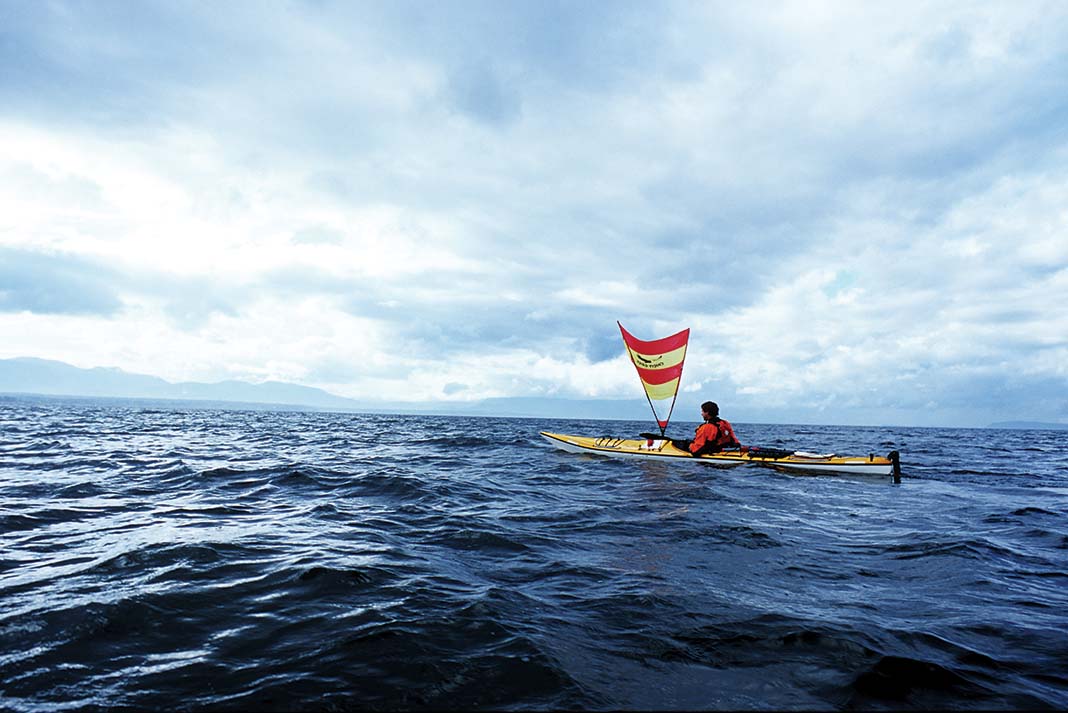
Add a sail and your kayak is pretty much a superyacht now. | Feature photo: Dave Aharoniano: Dave Aharonian
Kayak sails can help you travel faster while expending less energy. But for paddlers or pedalers, relying on the breeze for a boost opens up a whole new world of rigging possibilities. Want to harness the power of the wind? Here’s what you need to know about the three main types of kayak sail.
How to Choose the Right Kayak Sail
Downwind Sails
The simplest and most common type of kayak sailing rig is a V-shaped downwind sail that attaches to a mount on the kayak deck in front of the paddler. A downwind sail is so named because it works like a spinnaker to let you run with the wind.
Downwind rigs are not generally effective for points of sail many degrees off of directly downwind, but they have the advantage of being lightweight and easy to use. Some operate with one or two control lines, while freestanding rigs let you paddle and sail at the same time.
Advantages: Hands-free operation, temporary and permanent base-mount options, easy to set up or take down on the water.
Add a sail and your kayak is pretty much a superyacht now. | Feature photo: Dave Aharonian
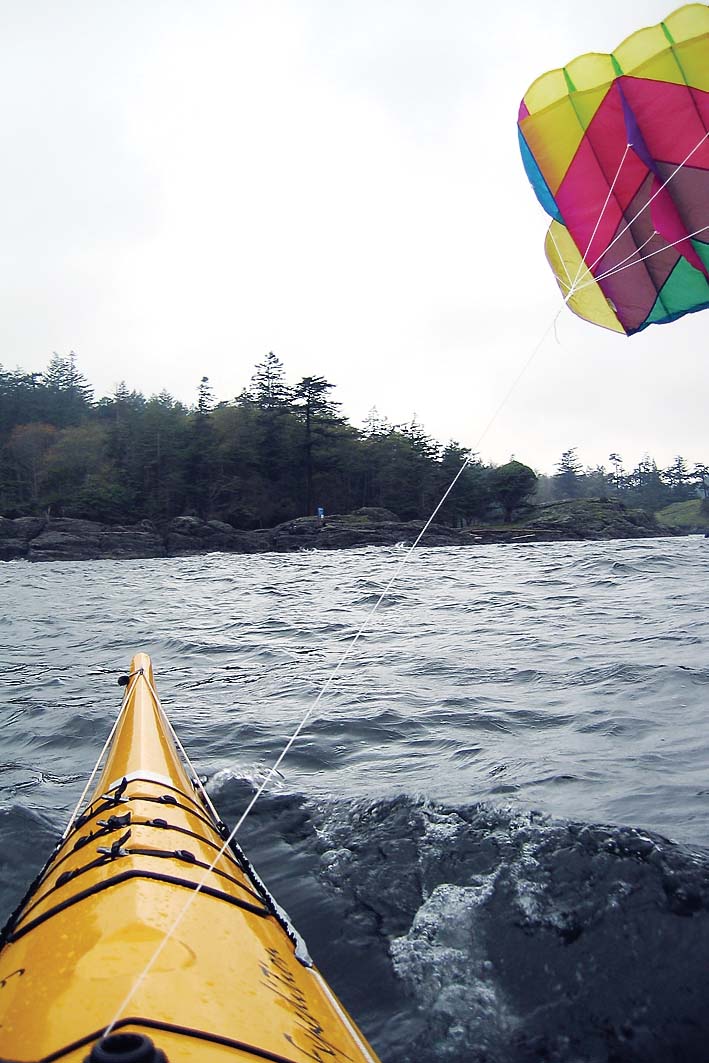
Parafoils
Parafoils are the lightest, simplest and cheapest way to start sailing downwind. A parafoil is a square kite constructed like a parachute. Instead of a rigid frame, sewn cells inflate with air to give the kite its shape. The light nylon foil folds up easily into a small bag the size of a rain jacket that you can stow behind your seat or in a day hatch until the winds pick up.
Parafoils catch a lot of wind and fly lower in the sky than most types of kites, giving them effective forward pulling power. If the winds are strong enough, try adding a heavier line or a weighted tail to fly it even lower. Serious parafoilers may want to modify their bow deck with a system for hands-free flying, including a means of winding in the kite quickly, and a way to thread the string toward the bow to keep it out of the way of the paddle.
Standard size for kayak sailing are 7.5 to 15 square feet. Can be difficult to retrieve quickly on the water.
Advantages: Easily rigged for hands-free operation, lightweight, compact and inexpensive, colorful and fun to fly.
Parafoils catch a lot of wind and fly lower in the sky than most types of kites, giving them effective forward pulling power. | Photo: Adventure Kayak archive
An upwind sail converts your kayak into a real sailboat. | Photo: Adventure Kayak archive
Upwind Sails
An upwind sail rig, while considerably more complex and expensive than a downwind sail or a kite, converts a kayak into a real sailboat that can operate at all points of sail. You can sail a run, broad reach, beam reach, close reach, or close-hauled beat into the wind. Many systems add stability by converting kayaks into catamaran or trimaran rigs with outriggers.
Advantages: Added stability of a leeboard and inflatable outriggers, packs up to stow in hatches or on deck, full upwind capability up to 45 degrees off of upwind, and lighter than a sailboat, faster than a kayak.
7 Tips for Beginning Kayak Sailors
1 If you don’t want to lose it, leash it
You’ll need to be able to drop your paddle to work the sail, and if it’s really cookin’ it will take a long time to turn around and retrieve a lost blade.
2Live by the blade
When you’re playing around with leashes, strings, sheets and such, carry a knife, lest you find yourself upside down in the drink with a kite string wrapped around your neck.
Reeling 500 feet of string out of the depths is embarrassing when you’re trying to impress your friends with your new sailing toys. Always hang onto the line. Connecting the line to the boat or paddle is asking for trouble. Imagine bailing out and watching your equipment sail away without you.
4Bigger is better
Depending on what type of sailor you are, high winds may be too scary to sail in, or low winds could be boring unless you’ve got a lot of sail acreage. Order up that 16-square-foot parafoil and dare to live dangerously.
5Wear gloves
Fingers get chilled when the wind is blowing and gloves protect your hands when you’re handling narrow kite lines and other rigging.
In a ruddered kayak you can steer with your feet while your hands are working the sail. It’s possible to sail a non-ruddered kayak downwind and use a paddle to steer, but this is less efficient and makes it more difficult to sail across the wind.
7Let ‘em laugh
Your friends will guffaw while you’re fiddling with your sail. Kayakers are a stubborn lot and your buddies don’t want you going faster than them. Pay them no heed, Icarus. They won’t be laughing when you pass them effortlessly, riding on the breath of the wind gods.
This article originally appeared in Paddling Magazine Issue 65. Subscribe to Paddling Magazine’s print and digital editions here, or download the Paddling Magazine app and browse the digital archives here.
Add a sail and your kayak is pretty much a superyacht now. | Feature photo: Dave Aharonian
Founded in 1971, Eddyline was one of the first commercial kayak builders in North America, first with whitewater boats and then with high-volume sea kayaks for West Coast adventures. Today, you’ll find Eddylines all around the continent. With their candy colors and glossy finishes, Eddyline kayaks are hard to miss. They are still made in the U.S. at Eddyline’s production facility in Burlington, Washington.
Today, Eddyline has adapted their expertise in building whitewater and sea kayaks to expand their lineup to include recreational, sit-on-top and fishing kayaks as well. The common feature across all these categories is that every one of Eddyline’s lightweight, nimble kayaks is made from thermoformed plastic.
If you are looking for a high-end kayak that is easy to carry and responsive on the water, consider an Eddyline. New paddlers will appreciate the intuitive handling of the boats, while experienced kayakers will recognize the carefully crafted designs.
Eddyline’s range of kayaks include models suitable for everything from day trips on calm waters to weeklong expeditions on exposed coastlines. Traditionally, recreational and sit-on-top kayaks are made with the least expensive materials available, often resulting in a heavier, but durable kayak with bare-bones outfitting.
Thermoforming allows kayaks to be made that retain the durability, but shave off the weight. Lighter kayaks are easier to carry and load onto a vehicle/trailer. Eddyline also takes elements from their more advanced touring boats, like bulkheads, and incorporates them into their entry-level models.
In this guide, we provide an overview of Eddyline’s lineup, along with some buying advice and links to more reviews and information on specific kayaks.
Choosing to buy used means you can get a quality kayak for less. The challenging part is knowing where to look, what to look for, and what is a fair price.
Where to look
Eddyline kayaks are sold across North America, so there’s a good chance one will turn up in your area. If you are specifically looking for an Eddyline kayak, Craigslist, Facebook Marketplace or Kijiji search terms can help filter other kayaks you aren’t interested in. Consider setting up an email alert to be notified when one is posted.
Visit a nearby Eddyline dealer and see if they have any demo kayaks or floor models for sale. If paddling events like symposiums are being held, dealers will bring boats for test-paddling. These boats are often for sale, and you may be able to get some reductions off the sticker price while being able to not only try the kayak, but also talk to an expert.
What to look for
When viewing a used kayak, give it a thorough inspection, paying special attention to the condition of the deck (top) and hull (bottom). Eddyline kayaks are finished with a UV- and abrasion-resistant coating that will protect the boat from most impacts. Minor scratches are okay, but major drops or abuse can result in cracking. In this case, repairs may need to be done.
Photo: Courtesy Eddyline Kayaks
Eddyline sells a Carbonlite repair kit that can be used for all of their thermoform kayaks, and the repair process is relatively simple. If the kayak has a skeg or rudder, check that it deploys smoothly. Also check the function and condition of all outfitting, such as the seat, back rest and foot braces or pedals. If any replacement parts are needed, they can be ordered through Eddyline’s website.
How the kayak was stored is a good indicator of the condition it may be in. If the boat was kept in a garage, it will have less UV and moisture damage than one that was left sitting on a lawn. Some prolonged UV damage can be seen—look for fading or discoloration. If you can’t see any, it doesn’t hurt to ask the owner how they’ve stored the kayak.
Excessive UV damage may mean the kayak hull needs to be refinished. This is a bigger job, but one that a professional can do. Moisture damage is often indicated by mildew inside the kayak, stick your head inside the cockpit and hatches and shine a light to check.
What’s a fair price?
It’s difficult to gauge a fair price for used kayaks, especially as supply has not quite caught up with the increased demand for paddling gear that’s happening now. This may drive the prices of used kayaks higher than expected. Still, don’t forget that you get what you pay for. If a deal seems too good to be true, it likely is.
Kayaks hold their value well, especially if they have been cared for. That being said, a used Eddyline listed at its original sticker price is too expensive. A five-year-old kayak will lose about half of its original value, putting a fair price at 50% of the MSRP, but will not lose much more if it is in good condition.
For more tips on what to look for when selecting a used kayak, read our article How To Buy A Used Kayak.
Photo: Courtesy Eddyline Kayaks
Eddyline Kayaks buying advice
Eddyline focuses on making light kayaks that are easy to maneuver and transport. Most of the boats they make are 14 feet or less. Eddyline divides their kayak catalog into four categories: Sit-on-top, Fishing, Recreational and Touring.
Sit-on-top
Sit-on-top kayaks include the Eddyline Caribbean in 12- and 14-foot lengths. Although the 12-foot kayak can accommodate a wide range of users, the 14-foot kayak adds speed and load capacity. The Caribbean 14 accommodates up to 325 lbs of weight compared to the Caribbean 12’s capacity of 275 lbs. There is also an option for the “FS” version, which comes with a deluxe frame seat (FS). The seat is removable and doubles as a beach chair.
Sit-on-tops are best suited to warm environments and are perfect for beginner kayakers who plan to explore calm, sheltered waters. With no cockpit to lower into, they are easy to enter and exit and feel less confining than a sit-inside kayak. While Eddyline sit-on-tops are very stable and easy to use, they offer less protection from the elements (sun, rain, cold) than a sit-inside design.
Photo: Courtesy Eddyline Kayaks
Fishing
Fishing kayaks from Eddyline are modified versions of the Caribbean sit-on-top models with tweaks for anglers. These include integrated rod holders and grip pads in the footwells. Sit-on-top kayaks are a favorite for anglers, as they are stable, easy to enter and responsive to paddle. Having an open deck is also great for accessing and storing gear like tackle boxes and fishing crates.
Eddyline’s fishing kayaks stand apart with their lightweight construction; as well as looking great with their glossy finish, these boats are easy to transport and carry solo.
Recreational
Eddyline offers six recreational kayaks in their catalog. Recreational kayaks bridge the performance of a touring kayak with the stability and responsiveness of a sit-on-top. Eddyline’s recreational kayaks are “sit-in” style, which gives additional control as the paddler’s legs engage with the kayak. Their recreational lineup ranges from 10- to 14-foot lengths.
The longer kayaks are geared towards paddlers who want to cover more distance on the water on day outings. This lineup includes best-sellers like the Skylark, which is an ideal boat for newer kayakers who want something they can turn easily when exploring calm waters.
All of Eddyline’s recreational kayaks are equipped with the storage and safety features of their larger touring kayaks, including hatches and watertight bulkheads.
Touring
Touring kayaks are the longest kayaks made by Eddyline. They are designed for adventurous paddlers who want to paddle in advanced conditions or take multi-day trips. They are at home in exposed coastal environments or choppy conditions. These kayaks are longer and narrower than the other Eddyline boats, making them more efficient to paddle. All of these touring kayaks feature a snug cockpit for additional boat control, and a comfortable seating system for long days in the saddle.
The touring category includes three iterations of the Sitka day-tourer for all different sizes of paddlers (XT, LT, ST); the flagship Fathom, Eddyline’s longest solo kayak, designed for extended wilderness trips; and the tandem Whisper, for paddling pairs who want to get out for day-long or multi-day trips.
All of Eddyline’s single person touring kayaks use a skeg for controlling the kayak as opposed to a rudder. The skeg is a retractable fin that drops into the water under the stern (back) of the kayak, helping it to stay on course (called “tracking”) when there is wind and waves pushing the kayak otherwise.
A rudder aids with both tracking and steering—a necessity on long tandem kayaks like the Whisper—but Eddyline solo kayaks turn easily enough that rudders aren’t needed.
Just like any kayak you are considering, it is crucial to “try before you buy.” Head to your nearest Eddyline dealer and chat with one of the staff there—they know boats. Describe your paddling goals, and take the kayak out for a spin to make sure it fits and performs as expected.
Still wondering if Eddyline kayaks are right for you? Here are answers to some of the most common online questions about Eddyline kayaks.
Are Eddyline kayaks good?
Eddyline kayaks are a good choice for anyone who is looking for an attractive and lightweight sit-on-top, fishing, touring or recreational kayak at a fair price. Depending on your paddling style, Eddyline offers kayaks for sheltered waters, day touring, fishing and longer paddles on more exposed waters. They come in a range of sizes and colors to suit everyone. The best way to know if an Eddyline kayak is a good fit for you is to try it out.
What are Eddyline kayaks made of?
Eddyline kayaks are made of their proprietary “Carbonlite” material, developed from ABS plastic. Carbonlite sheets are heated and vacuum-formed into the kayak mold. An outer layer of abrasion- and UV-resistant acrylic material is applied to the hull. The result is a kayak that is more impact-proof than premium fiberglass kayaks, but lighter than the rotomolded plastic models that are common amongst recreational and fishing kayaks.
Where are Eddyline kayaks manufactured?
Eddyline kayaks are made in Burlington, Washington.
Eddyline kayak durability
Eddyline kayaks are very durable due to the thermoforming process and impact-resistant materials used in the construction. Eddyline’s proprietary “Carbonlite” ABS material is applied in two layers for added strength, and then coated with an acrylic exterior to protect from abrasions and UV damage.
Nothing is indestructible, however, and it is possible to damage an Eddyline kayak in extreme circumstances. Thermoform plastic is more susceptible to cracking and shattering than rotomolded polyethylene, especially in very cold temperatures. Damage is most likely to result from a direct impact, such as a fall from a roof rack onto a sharp rock. If the hull does have a crack in it, the material can be repaired relatively easily by applying epoxy and a woven patch.
Eddyline kayak prices
Eddyline kayak prices range between $1,200 and $3,250 depending on the make and model of the kayak. Compared to other kayak brands, Eddylines land in the mid-range. They are more expensive than entry-level polyethylene kayaks, but cost less than space-age, ultralight composite kayaks.
Eddyline kayak dealers
Wondering where to buy Eddyline kayaks? Use the dealer locator tool to find one near you. At outdoor chains like REI, Eddyline kayaks and accessories may be available, although they are not listed on the site. Check your local store or inquire about special ordering a kayak. This is essentially placing an order through REI to have a kayak shipped.
How to store Eddyline kayaks
Storing Eddyline kayaks properly is key to ensuring they have a long life. Although the hull is UV-resistant, it is best to keep your kayak out of direct sunlight, ideally in a garage. If you need to store it outside, place the kayak under an awning to minimize sun damage.
Keep the kayak off the ground to prevent moisture damage and reduce the chances of critters making it their home. Make sure that the contact points of the rack do not warp the kayak. It’s ideal to place these near the bulkheads, using webbing or wide straps to minimize pressure points.
After paddling, rinse the kayak with freshwater to clear any sand, debris or salt, especially around the skeg and inside the cockpit. Make sure the kayak is completely dry before storing it.
Kayakers can opt for either a roof rack or trailer when getting their boat to the put-in, and there are benefits to both, depending on the vehicle you drive. Smaller boats may fit into the bed of a pickup truck, but it isn’t ideal for anything longer than 10 feet.
Transporting your Eddyline kayak can be stressful. Serious damage can occur if the kayak is not secured properly. You’ll want four points of contact connecting the boat to the vehicle. Attach lines from your vehicle to the bow and stern for added safety and peace of mind.
A common mistake when securing the kayak is over-tightening the straps. This puts undue pressure on the kayak and can lead to cracks in the hull or deck. Avoid ratchet straps, and instead use cam straps to safely secure the kayak to your roof rack.
What is the lightest Eddyline kayak?
The lightest Eddyline kayak is the Sky 10 recreational kayak, weighing 32 lbs / 14.5 kg. All of Eddyline’s kayaks are built with lightweight materials and will be some of the lightest boats when compared to similar models from other brands.
Photos: Courtesy Eddyline Kayaks
Compare Eddyline kayaks
Eddyline vs Delta kayaks
Like Eddyline, Delta kayaks are made exclusively from thermoformed plastic. Where Eddyline kayaks are manufactured in Burlington, Washington, Delta builds their boats near Vancouver, British Columbia. Delta focuses more on touring kayaks, although they also make quality recreational kayaks. Both companies are excellent options for lightweight day touring kayaks. Go with Eddyline if you are looking for a sit-on-top or fishing-specific kayak.
Hurricane vs Eddyline
Hurricane kayaks are also high-quality thermoformed kayaks. They feature a more extensive line of sit-on-top kayaks than Eddyline. Look to Hurricane kayaks if you are set on a sit-on-top; Eddyline kayaks are designed more for touring, as evidenced by comfort-focused outfitting and skegs for superior tracking.
Eddyline vs Wilderness Systems
Wilderness Systems is another popular kayak company, making a variety of boats for recreational, fishing and touring paddling. Wilderness Systems makes kayaks that can be paddled, pedaled or motor-powered. The main difference between Eddyline and Wilderness Systems kayaks is the construction.
Wilderness Systems’ kayaks are made from rotomolded polyethylene plastic as opposed to Eddyline’s thermoform construction. Rotomolded kayaks cost less but are heavier than thermoformed kayaks.
Eddyline vs Current Designs
Current Designs makes their kayaks with a deliberate focus toward longer boats and touring. They offer kayaks longer than 15 feet for expedition travel, ocean play and day touring. Current Designs makes rotomolded plastic kayaks as well as ultralight Aramid composite boats. Eddyline’s kayaks land in between these materials for durability, price and weight.
Eddyline also focuses more on shorter recreational, fishing and day touring kayaks. Go for an Eddyline if you are looking for a good value, lightweight, mid-range kayak and aren’t planning on extended paddling trips or heading out into big swells.
Eddyline vs Dagger
Dagger kayaks are found anywhere there is whitewater to be run. They take this sleek whitewater design and apply it to their line of sporty recreational and day touring models. All of Dagger’s kayaks are made from durable rotomolded plastic. Eddyline kayaks are more expensive, but lighter and available in more color and design options.
Choose Dagger if you are considering multi-water paddling that includes swiftly moving rivers or rapids, or if you want an extremely durable kayak that can handle repeated impacts with rocks. If you are a beginner or experienced paddler looking for a lightweight recreational or touring kayak, Eddyline is the better fit.
Eddyline vs Perception
Perception makes rotomolded plastic fishing, recreational and sit-on-top kayaks at an entry-level price point. Perception is part of the Confluence Outdoor family, the same group that owns Dagger and Wilderness Systems. For a dependable, no-frills kayak, Perception has a variety of good options.
By comparison, Eddyline’s kayaks have more premium features and their thermoform construction shaves weight. As a result, expect to pay more for an Eddyline kayak.
Photo: Courtesy Eddyline Kayaks
Eddyline kayak reviews
Paddling Magazine is your best online resource for Eddyline kayak reviews. Remember, the first step in choosing a kayak is considering the type of paddling you aspire to do. Reading expert reviews will allow you to evaluate how each kayak handles and how it performs for the intended paddler and conditions.
Get away from the crowd with this one-of-a-kind flats fishing secret weapon. | Feature photo: Roberto Westbrook
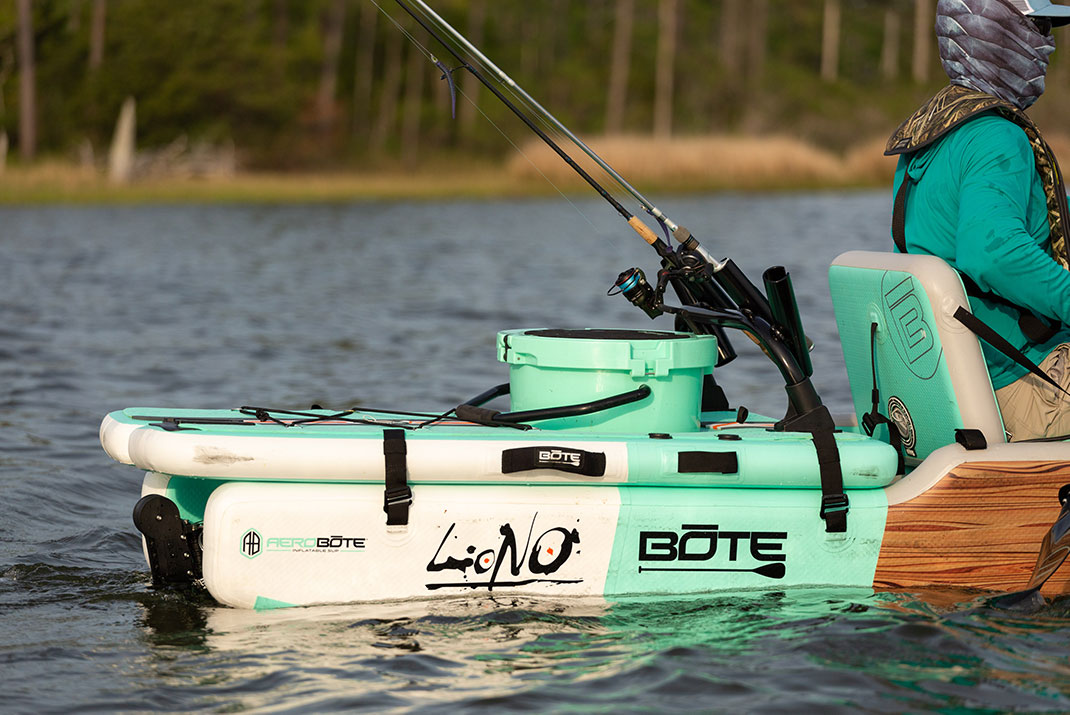
Like a scourge of locusts or a blood red sea, it seems like new anglers have taken over every fishing hole. Oh well, I can’t fight them, so I decided to find a new place to fish. That means finding a launch other anglers can’t reach. To pull off the plan, I needed a kayak that can go places other kayaks can’t go. Enter the BOTE LONO Aero Apex, a kayak like no other.
Sure, there are plenty of capable inflatable kayaks, even pedal-powered blow-up boats. But I needed a full-function fishing kayak with pedal drive I can drag 100 yards through woods to reach virgin water. The LONO Aero offers a full-size, full-feature fishing kayak with a pedal system. Using the LONO Aero Apex, I can go where no kayak can go and still have a capable fishing platform when I get there.
Here’s how it works: I start by searching a satellite image for prime fishing grounds out of reach of boaters and kayakers. Then, I look for a place to park my car within dragging distance of the honey hole. Once I have a few leads, I spend a windy day exploring each spot. When I find a suitable off-grid launch, I return in season loaded for bear.
Places where I would need a heavy-duty, balloon-wheel cart to muscle a rotomolded kayak to the water, an inflatable will bang and bully through any terrain.
Normally, to reap the advantages of an inflatable, I would give up the performance of a pedal boat and the rigging on a full-feature kayak. If I want to explore Shangri-La, I expect to sacrifice performance and range. With the BOTE LONO Apex, I get the advantages of an inflatable and the performance of a hard-bodied kayak in one boat.
In the Early Summer issue of Kayak Angler, I reviewed the paddle version of the BOTE LONO. I wrote “Calling the LONO a kayak doesn’t do it justice.” Adding a pedal drive further makes the point.
A well-earned reputation for innovation
The LONO isn’t BOTE’s first foray into an out-of-the-box design. The company’s history is full of genre-breaking and industry-leading ideas. From the high-sided Rackham to the first inflatable micro skiff, the folks at BOTE see a problem without seeing obstacles to a solution. The LONO is their solution to the biggest problems with inflatable kayaks: performance and rigging.
Start with the LONO’s unique design. The LONO comes in two pieces. The main hull is constructed of three high-pressure chambers, a floor and two gunwales. When I’m hitting a hidden spot that is hard to reach and super shallow, I can fish the LONO like a 50-pound standup paddleboard with almost zero draft.
The inflatable stern deck turns BOTE’s Aero into an inflatable kayak with gear storage and a standing platform. | Photo: Roberto Westbrook
Adding the inflatable deck to the stern turns the LONO SUP into a kayak. I can sit or stand on the stern deck and store tackle and gear below. The inflatable deck also offers more options for rigging with rod holders, Power-Pole Micro and other accessories.
The design allows the LONO Aero Apex to go from formidable inflatable standup to equally capable inflatable kayak. Now, BOTE has added a pedal drive to give the LONO greater range and open more possibilities.
Adding pedals to an inflatable boat
To pull off the conversion, BOTE keeps it simple. A small port in the deck holds the propeller drive. To install the drive, drop it through the hole and secure it with three knobs. Going into shallow water mode takes several seconds to lift the lower unit out of the port.
The LONO Apex includes an inflatable bench seat that can be moved forward and back to adjust pedal distance. The seat is comfortable and functional as a solid pedaling platform for short distances.
It only took a few minutes to rig the rudder and steering controller. From deflated to inflated pedal kayak, I spent about a half hour setting up the LONO. With three large, high pressure chambers, the seat and rear deck to inflate, I highly recommend a power air pump.
A flared bow and reinforced keel keep the inflatable on course even in choppy seas. | Photo: Roberto Westbrook
Since the LONO Aero requires some effort to inflate, I assemble the boat at home and truck it to the fishing spot. At only 93 pounds with the drive, I can roll it on a light cart or drag the boat to the water through almost any terrain. Some people worry an inflatable will spring a leak, but the heavy-duty vinyl is almost puncture proof and, if it does spring a leak, it’s easy to patch. When I’m beating the LONO around, I don’t worry about breaking it.
On the water with the LONO Aero Apex
But does the LONO Aero Apex keep its promise on the water? Is it an inflatable that performs like a hard body? Well…almost.
Okay, so you’re not going to replace a Hobie Mirage Pro Angler or Old Town Sportsman PDL with the LONO Aero Apex. On the other hand, you’re not going to fit the PA or PDL in your broom closet. While the LONO may not perform like a full-size kayak, it handles a hell of a lot better than the average inflatable.
First, the 12.5-foot-long, 35.5-inch-wide kayak is as stable as any full-size boat. The flat, open deck provides plenty of room for standup fishing. I like the LONO rigged with Rocket Rack rod holder and Kula cooler for tackle and gear. I keep rigging to a minimum. However, the boat can be set up with rod holders, accessories and even electronics.
Without the stern deck, the inflatable paddleboard performs almost as well as a hardboard. The boat has a unique flared bow and a stiff ridge in the hull creates a keel. A couple fins in the stern improve tracking. The high sides catch the wind, but they also offer more room for gear and keep my catch from flopping overboard.
Add the deck section to the stern and I get a convenient seat or standing platform. The boat’s design and elevated seat make it more comfortable and improve performance, but the LONO Aero isn’t as efficient as a hardbody boat. The AeroBote drop stitch construction keeps the inflatable chambers rigid so the boat doesn’t bend under pressure.
Get away from the crowd with this one-of-a-kind flats fishing secret weapon. | Feature photo: Roberto Westbrook
With the pedals, the LONO Aero turns into a formidable fishing kayak. Pedal power cancels the negatives of paddling an inflatable, and the lower unit and propeller improve tracking and speed. The pedals work efficiently to turn the propeller and push the inflatable like any other pedal kayak. While the Apex pedal system isn’t on par with higher-priced pedal kayaks, it will go toe-to-toe with many budget hard plastic pedal boats.
The rudder control is responsive and easy to index, so I can feel the angle the rudder is pointing. Of course, the high-sided, low-draft inflatable is subject to wind and current, but the pedal drive and large rudder help keep the boat on course. Turning the rudder hard to the side, I couldn’t get the boat to do donuts, but it did turn well enough to go where I pointed the bow. The shallow draft and light weight make the LONO Aero a champ scooting across skinny water.
Fish outside the box with LONO Aero Apex
To be honest, the LONO Aero Apex probably wouldn’t work if it wasn’t for BOTE’s dedication to quality. The drop stitch chambers, heavy-duty vinyl and high-quality components make it possible to put a pedal unit in an inflatable. The LONO’s design combined with BOTE’s pedigree as skinny-water, flats-fishing enthusiasts is behind the boat’s out of the box design that keeps its promises. If you’re looking to find new places to fish other anglers can’t reach, the BOTE LONO Aero Apex can take you there.
This article was first published in Kayak Angler Issue 45. Subscribe to Kayak Angler and get the magazine delivered to your front door. Download the Kayak Angler Magazine+ app to seamlessly glide between the digital archives, the latest articles and videos.
Get away from the crowd with this one-of-a-kind flats fishing secret weapon. | Feature photo: Roberto Westbrook
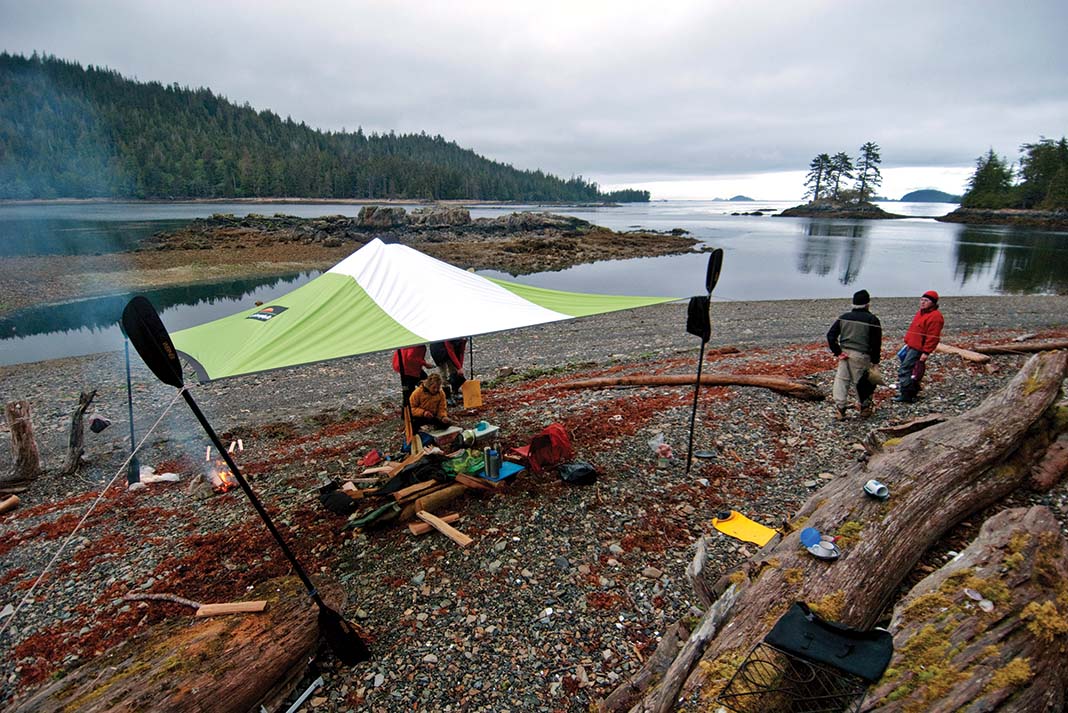
“We all need a little shelter/Just a little helper to get us by...” —Cinderella | Feature photo: Dave Quinn
You’re a paddling Jedi who can keep it hull-down in any sea conditions, roll a loaded double and cook a mean backcountry soufflé. But can you set up a tarp? Follow these tips to stay out of the elements and setup a tarp shelter on your next kayak or canoe camping trip.
Whether you’re stuck in a 10-straight-day reminder of why it’s called the “rainforest” or blessed with blistering sun in Patagonia or Baja, solid tarp skills are the sine qua non of campcraft lore that separate the backcountry pros from the schmoes.
To salvage an otherwise drowning or overcooked experience, try this advanced tarp setup, known as the Big Top. With a little practice, you can create a spacious shelter for any situation.
“We all need a little shelter/Just a little helper to get us by…” —Cinderella | Feature photo: Dave Quinn
4 Easy Steps for Tarp Shelter Setup
1 Tie Tarp to Poles
Attach tarp corner lines to either paddles or cut driftwood poles just above head height, using a clove hitch.
2 Secure the Corners
Tautly secure all four corners at a 45-degree angle from the tarp edge and a 45-degree angle to the ground.
3 Prop Up the Big Top
Elevate the center with either a driftwood pole, raft oar or two paddles duct-taped together (experiment with lengths, depending on tarp size). Tie the top of the pole to the tarp center to keep it from falling in wind gusts.
4 Watch Out for Extreme Weather
Extreme conditions may require extra anchor ropes along the tarp sides. Anchors can be driftwood, boulders, boats, trees or simply a deadman anchor—a stick or log buried in the beach perpendicular to the rope, with the rope tied to the center.
[ Browse the widest selection of boats and gear in the Paddling Buyer’s Guide ]
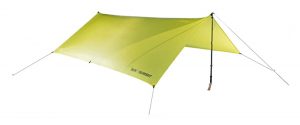
Perfect for minimalist camping trips, this ultralight tarp shelter comes with eight super-strong tie-out points and attached cord adjusters. Weighing less than a pound, this versatile tarp can be setup with trekking poles or attached to nearby trees. Also attaches to Sea to Summit’s Escapist Bug Tent.
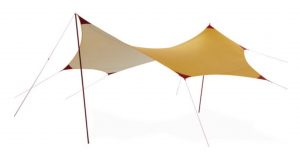
The modern, lightweight MSR Sun Shield 200 would be equally at home on the set of Battlestar Galactica as the wildest, wettest corners of Earth. Sold with poles, the funky design provides 200 square feet of shelter while weighing only six pounds. Now with updated UPF of 50+ for sun protection. Perfect for expeditions where weight is as important as comfort.
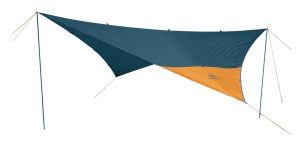
Carried in a convenient roll-top bag, this simple tarp shelter from Kelty includes attached corner guyline with storage pocket and multiple reinforced tie-out points for secure setup. Weighs less than three pounds and provides 144 square feet of shelter. Poles sold separately.
This article originally appeared in Adventure Kayak, Spring 2010 as well as in Paddling Magazine Issue 65. Subscribe to Paddling Magazine’s print and digital editions here, or download the Paddling Magazine app and browse the digital archives here.
“We all need a little shelter/Just a little helper to get us by…” —Cinderella | Feature photo: Dave Quinn


 This article was first published in Kayak Angler Issue 45.