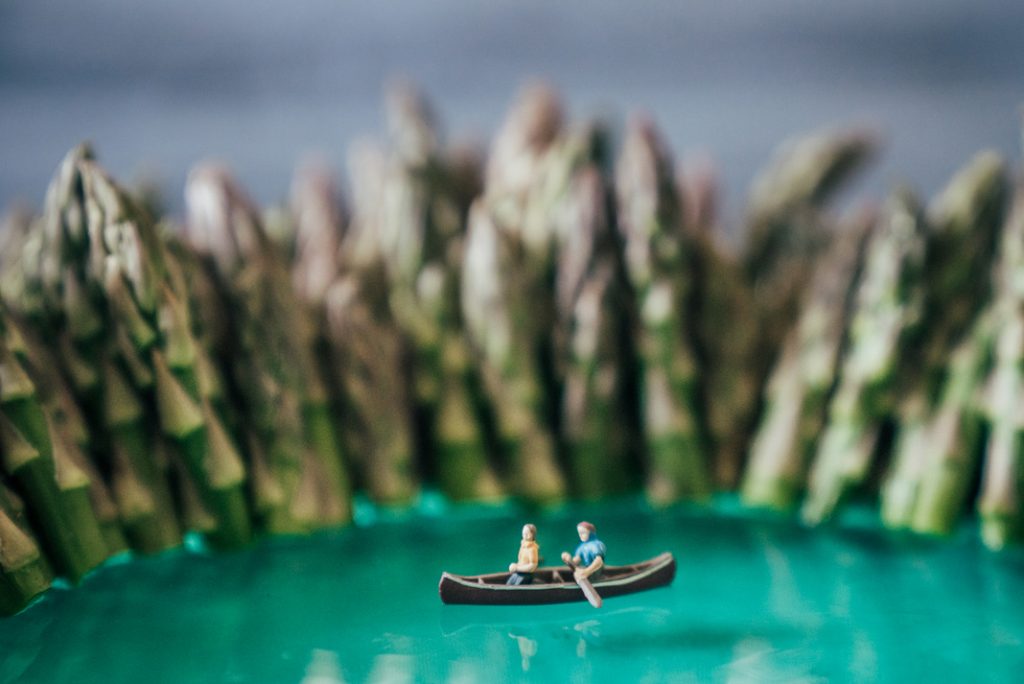
“And on your RIGHT, you’ll see the rare shoots of the asparagus forest.” | Photo: Erin Sullivan
Well before California’s stay-at-home order came into effect on March 19, 2020, Los Angeles photographer Erin Sullivan had a plan in place. She had been following the spread of COVID-19 in Italy and wasn’t under any illusions; it was only a matter of time until life as she knew it ground to a halt.
“I asked myself, ‘If and when we go into a quarantine situation, how can I stay creative and connected to the outdoors?’” she recalls.
Sullivan, who is best known for her travel photography (@ErinOutdoors), knew her world was about to get smaller—literally.
Launched during the first days of the COVID-19 quarantine, #OurGreatIndoors is a macro photography series, where Sullivan uses train figurines and household objects to replicate the natural world. Accompanying behind-the-scenes images reveal the magic is actually in the mundane: A crumpled paper bag forms the walls of a slot canyon. Hikers wander through snowy forests of rosemary trees. A couple embraces in front of a paper cut-out sunset. And, in the most polarizing image, bathers recline in onion hot springs; just like the real thing, the smell takes some getting used to.
“And on your RIGHT, you’ll see the rare shoots of the asparagus forest.” | Photo: Erin Sullivan
Sullivan’s goal is to create believable outdoor scenes—the type that would make you do a double-take when you scroll past them (as I did when mid-lockdown I saw her image of two tourists inside a glow worm cave; it turned out to be tinfoil, rain jackets and a hunk of rose quartz).
“It’s not that I’m trying to imitate a real place. It’s more of a feeling that I’m trying to emulate,” she explains.
In the case of the canoeists on the gelatin lake, she wanted to capture the feeling of paddling on a mountain lake in the summertime, complete with an aerial “drone” shot. But unlike natural environments, Sullivan’s at-home set-ups are entirely within her control, meaning there are more details to consider. Each idea is sketched out first before props are sourced and painstakingly arranged. Then, she spends about an hour shooting each scene. And yes, she eats the edible accessories when done.
“Being intentional is something I’m always thinking about when I’m shooting, but this project has made me even more deliberate and interested in details, like the shadows and textures of a scene,” she says.
Within six weeks of its launch, the series had nearly doubled her Instagram following and landed her sponsored posts with Honda and protein bar brand Gomacro at a time when her other work was on hold.
But even for someone who was managing to make lemonade, the rollercoaster of COVID-19 was taking its toll. When I speak with Sullivan in early May, she admits she’s having a “blah” day, the weight of lockdown fatigue heavy in her voice.
“A lot of us are going through job uncertainty or can’t travel, or can’t get outside and do the things we love that make us feel alive,” she says. “I think that’s why this series resonated with people—it gives some joy, lightness, and a moment of being transported.”
It’s also why she encouraged her followers to take up the project’s mantle, writing on her page: “We cannot hold onto our ideas so tightly that we suffocate them…like love, celebration and laughter, creativity can shine when it is shared.”
At the time of writing, more than 1,500 images had been uploaded to Instagram with the #OurGreatIndoors hashtag; a feed of LEGO figurines and plastic animals climbing grapefruit mountains and chopping down pretzel stick trees. Sullivan’s latest project may be miniature in its scale, but its reach is anything but.
“This series has made a home for itself in my body of work,” she says. “I feel thankful; I would never have created this had I not been forced to stay inside.”
This article was first published in Paddling Magazine Issue 62. Subscribe to Paddling Magazine’s print and digital editions here , or browse the archives here.
“And on your RIGHT, you’ll see the rare shoots of the asparagus forest.” | Photo: Erin Sullivan
After decades of work, American Whitewater has succeeded in opening limited access for paddlers in Yosemite National Park. Yosemite hosts a number of rivers, ranging from class I floats to multi-day class V+ epics, including the Merced River. Despite millions of visitors a year, paddling the Merced had been off-limits—until now.
[ Plan your next whitewater adventure with the Paddling Trip Guide ]
Setting out for the Merced River
On June 1st, I set out on an expedition with South African professional paddler Steve Fisher to document the first descent of this long-forbidden route. Fisher hopes that this legal first descent will encourage authorities to open up other rivers in the national parks where paddling is not permitted. His kayaking partner was Pat Keller, a southeastern expedition paddler and waterfall guru. My role was to photograph the expedition.
Over hill, over dale
We approached the Merced River from Tuolomne Pass, hiking our gear 17 miles through alpine meadows, past icy cold lakes, and into the headwaters of the river. At the end of the first day, after hiking with a 90-pound loaded kayak over a 10,000-foot pass, Keller was still keen to explore.
[ Paddling Buyer’s Guide: See all kayaks ]
We scrambled up to a rocky point overlooking the Merced Valley, staring in awe at the massive snow-covered peaks surrounding us. In the distance, I could just make out the trail the crew would be hiking the following day to access the river. I knew I needed a shot of that from this vantage point. The next day I was up early and waiting in the same spot to snap this photo of Fisher and Keller with my Nikon D610 and 70-200mm F2.8 lens.
FORBIDDEN FRUIT | PHOTO BY SCOTT MARTIN
Fisher’s first descent begins
The following morning, Fisher and Keller began their descent, beginning 15 miles of whitewater from the Lyell Fork to just above Nevada Falls. The Merced River would reveal itself to be a gem, with crystal clear water, massive slides, a handful of stout boulder gardens and astonishing scenery. “It’s one of the most amazing trips I’ve ever had the pleasure to go on,” Keller later said.
Fisher and Keller completed the epic first descent over five days. Because of the efforts of American Whitewater, kayaking sections of the Merced River is now legal in Yosemite National Park.
Check out Episodes 1 to 6 of “Beyond Adventure: The Lost Valley of the Merced” on Outside Television’s Youtube channel.
This article originally appeared in the 2016 Paddling Buyer’s Guide issue.
Subscribe to Paddling Magazine and get 25 years of digital magazine archives including our legacy titles: Rapid, Adventure Kayak and Canoeroots.
The Bliss-Stick RAD (Radically Aerial Device) is a revolutionary freestyle weapon offering performance and comfort. Designed for huge air, the RAD is also a fantastic conventional cartwheeler and an extremely capable river runner.
[ Paddling Buyer’s Guide: See all freestyle kayaks ]
First run with the Bliss-Stick RAD
Get in the lotus position
The Bliss-Stick RAD 185 is without question the fattest boats we’ve ever tested (fat like Albert, not phat like the spoiler on your Honda Civic). The knee box area is super deep and wide, providing massive amounts of lotus position space.
The seat raises your knees into an aggressively strong position in the thigh braces. Advanced paddlers suggest lifting the seat to help overcome the depth of the cockpit. The RAD is virtually unflippable paddling downriver.
[ Plan your next adventure with the Paddling Trip Guide ]
Pro perspective
“Dude, this thing rocks a wave.” In addition to startling speed, the Bliss-Stick RAD has about 1,020 square inches of planing surface, 20 percent more than the next largest, the Pyranha S6F and the Liquidlogic Big Wheel.
Speaking of aerial moves, we should mention that at the recent Pre-Worlds in Australia, the RAD paddlers were exploding from the hole with the biggest loops. Packed with loop volume in the bow opposite a slicier stern (relatively speaking), the RAD is super unbalanced, knocking some ends.
If you seek to get more than variety points for cartwheels, getting forward seemed to help, as would a little down-home bow crushing. Half the battle to winning competitions is staying in the hole—with the RAD’s volume you’ll be happily tumbling upstream.
Pros: Loops you silly. Spacious cockpit. Mammoth planing surface.
Cons: Rapping knuckles and elbows on the cockpit. Unbalanced cartwheels.
This article was first published in the Summer 2004 issue of Rapid Magazine. Subscribe to Paddling Magazine’s print and digital editions, or browse the archives.
Standup paddleboards may not be the obvious backcountry craft for paddlers who typically use them for lake paddling, sup yoga or surfing ocean swell. Taking your paddleboard on a SUP camping trip can be a great way to travel lakes and scenic stretches of river you might never consider running in a raft or kayak.
Planning your SUP camping trip
Somewhere between bringing the kitchen sink on a traditional raft trip, and sawing off the handle of your toothbrush for a minimalist kayak expedition, lies the art of self-SUPport. Here’s how to plan and pack for your first backcountry board trip.
Location, location, location
A 20- to 30-mile stretch of easy flowing river with class I to II swifts, is ideal for an overnight or weekend trip. A SUP travels faster than a raft, but slower than a kayak, so plan your mileage accordingly.
Assess your speed by loading up your board with overnight equipment and taking it for a test spin at a lake or local river before committing to a multi-day SUP camping trip.
The perfect paddleboard
Choose a large board so you have room to store your gear. Paddleboards built for fishing are great overnight options since they tend to be spacious and stable in moving water.
A board with multiple tie-down points is critical for strapping all your gear down tight. I use extra cam straps to fit around bulky dry bags, instead of just relying on the short straps that came with my board.
The essentials, and then some
If you have basic backpacking gear, you’re almost ready to go. Depending on the season, you should take a light sleeping bag, a small sleeping pad, and a lightweight three-season tent. I stow all of this on the bow of the SUP along with my clothes and hiking shoes in a secured dry bag.
I strap a smaller dry bag to the stern with a small backpacking stove, a pot and other cooking accessories, along with the majority of my food. A lightweight grill and collapsible fire pan gets tied underneath this stern bag. My favorite luxury item for a SUP camping trip is a small, portable cooler filled with steaks, beer and more. Find one that fits your board and has the capacity to carry enough provisions for your trip. A strapped-down cooler also doubles as a seat when you need a break from standing.
Comfy shoes are essential for long periods of standing, and PFDs with generous pockets will allow you to keep snacks and a GPS handy. I always wear a helmet in rapids but bring a big straw sun hat for the flat stretches in between.
NEW HORIZONS. | PHOTO: PETER HOLCOMBE
Strike a balance
Before launching, take time to strap everything down and balance out the board. Strive for equal weigh distribution from front to back and side to side. As days go by, you’ll need to adjust where you pack things as the weight of food bags decreases.
Once I ironed out a packing system, it only took me 10 minutes to load and unload each time.
Writer and photographer Peter Holcombe is a contributor to Rapid magazine.
MUSTANG SURVIVAL CHOOSES DOWN RIVER EQUIPMENT AS OFFICIAL DISTRIBUTOR OF MTI PROFESSIONAL RAFTING PFDS
Mustang Survival, the North American water-life brand that provides trust and confidence for the most demanding marine environments, is pleased to announce that it has signed Down River Equipment (DRE) as the official distributor of MTI Rafting to Commercial Outfitters in the United States.
Down River Equipment, based in Wheat Ridge, CO, have been manufacturing and supplying river equipment since 1985. They specialize in the custom fabrication, distribution, and retail of equipment for all types of river adventures. MTI raft vests and commercial jackets will now join the group of brands under the DRE distribution umbrella.
“I’m really excited to be able to offer MTI rafting vests to the outfitters we work with. I think that the future looks very good for MTI now that they are part of the Wing and Mustang Survival family.” – Phil Walczynski, President/GM/Co-Owner
“With universal, sized and youth option, along with great colors, fit and durability, we are looking forward to introducing the MTI commercial jackets to our outfitters. “ – Zack Svoboda, Co-Owner
Considered the best in the industry, Down River Equipment is known for their quality crafted frames that are all made in Colorado. They also manufacture dry boxes, tables, pumps and a other cargo gear at their CO facility. In addition, they are the distributor of choice for Hyside, AIRE, Rocky Mountain Rafts, Sawyer, Carlisle, Advanced Composite, and Engel.
MTI is proud to join the team.
About Mustang Survival
Founded in 1967 in Vancouver’s Gastown by Irv Davies, the inventor of the world’s first Floater™ Coat, Mustang Survival has over 50 years’ experience providing confidence to work, play and protect on the water.
Purposefully designed and obsessively engineered by a team of highly skilled and innovative problem solvers, Mustang Survival PFDs, dry suits, flotation coats and water-life apparel support real-world superheroes live life beyond land.
From professional mariners, Special Operations Forces, Air forces, Navy Seals and NASA astronauts to recreational offshore and inland marine adventurers, Mustang Survival gear is the trusted sidekick to chase the feeling of freedom that comes from being on the water.
Kayakers at sunset in New York Harbor. | Feature Photo: Vor/Shutterstock
New York City is an extraordinary place to paddle. The Hudson waterfront on the west side of Manhattan boasts unparalleled views of the Statue of Liberty and the world’s most famous skyline. Like any busy urban waterway, paddling the Hudson is not without its challenges, as illustrated by a scary kayak accident in 2016 involving a ferry.
Ferries crisscross New York’s Hudson River day and night, and all manner of craft ply the waterfront, from barges and cruise liners to pleasure boats under power and sail. Add rebounding boat wakes and powerful tidal currents to that mix, and it’s remarkable that kayakers in New York have been involved in only one serious collision with a commercial vessel in recent years. But it was a memorable one.
During an August rush hour in 2016, the NY Waterway ferry Jersey City collided with a group of 10 paddlers, knocking several from their kayaks and injuring three people, including veteran Manhattan Kayak Company (MKC) guide Jay Cartagena and an 18-year-old man who suffered deep lacerations to his left arm.
The kayak accident occurred just before 6 p.m. near the West Midtown Ferry Terminal at Pier 79, and video of the ensuing rescue aired on local news channels. In a news conference that evening, the commander of the New York Police Department’s Harbor Unit announced that the young man’s arm had been “partially severed.” That detail led all the news coverage, and though the injuries were not as severe as initially described, the accident illustrated the hazards of paddling in busy commercial waterways.
What led to the kayak accident?
A Coast Guard investigation focused on two primary causes: a lack of communication between the kayak and ferry companies, and sun glare that prevented the ferry captain from seeing the group of eight kayaks in his path. Due to the intense glare, the ferry captain relied on his radar to make sure there was no traffic in his path. Kayaks, of course, do not appear on radar.
Big, Beautiful and Busy: Ferries and other vessels coming to and from Lower Manhattan crisscross New York Harbor. | Photo: Keith Sherwood/Shutterstock
Rather than slowing or posting a lookout, however, the captain accelerated into the glare. Within a minute of leaving the dock he was making 22 knots and heading straight for the kayakers. The guide, Cartagena, shouted and waved his paddle. It was no use. At that time of day, in those conditions, he and the other kayakers were all but invisible to the ferry operator.
[ Paddling Buyer’s Guide: See all rescue kits ]
Cartagena watched in disbelief as the ferry collided with a double kayak carrying two experienced paddlers, including the man whose left arm was badly lacerated. Then the ferry struck him as well. “I think part of the reason why I got hit was because I couldn’t get myself out of the way because I was just so much in shock about what just had happened,” Cartagena later told investigators with the Coast Guard and National Transportation Safety Board. He suffered a dislocated shoulder, broken rib and punctured lung, as well as lacerations on his hand and neck. His first thought was getting back into his boat to assist the others. Cartagena and MKC owner Eric Stiller did not reply to requests for comment, and NYC ferries declined to comment on the incident, which was the subject of a lawsuit.
A well-coordinated rescue unfolds
The clients were using sit-on-top kayaks—five singles and two doubles—but Cartagena was paddling a 14-foot sit-inside. The impact blew off the rear hatch cover and left the boat completely swamped. Then, as he tried to pull himself aboard, Cartagena realized his shoulder was dislocated. Floating in the Hudson, the ACA-certified guide did his best to make a head count and organize the paddlers as the ferry rendered assistance.
Deckhands lowered a rope ladder over the side, while the ferry captain contacted the Coast Guard and 911. Another employee simultaneously contacted the NYPD Harbor Patrol by cell phone. The emergency response was swift and well coordinated. A news helicopter filmed the scene of the kayak accident.
The most seriously injured kayaker, the young man with the lacerated arm, was reportedly slipping in and out of consciousness. Another kayaker used his shirt to fashion a makeshift tourniquet. The boaters helped the young man onto a kayak, and he was transferred to the NYPD patrol boat and rushed to the hospital.
Visibility is everything when paddling busy urban waterways. Here a NY Waterways ferry moves through fog. | Photo: Songquan Deng/Shutterstock
Cartagena told investigators he never thought such an accident would happen, especially since he felt the kayak company and ferry operators had established a good working relationship. At the time of the accident, MKC had been based for three years at Pier 84, just five blocks north of the ferry terminal. Cartagena estimated that he had led at least 200 kayak and standup paddleboarding tours from the location, at least half of which crossed in front of the Midtown Ferry Terminal.
How to do better in the future?
Yet in all that time working in close proximity, the two companies had never organized a formal line of communication. (MKC and NY Waterways did work together to produce a safety video in 2011.) Moreover, while every ferry captain knows that kayaks are common in the area, MKC’s kayak tours don’t operate on a regular route or schedule. Due to the Hudson’s powerful tidal currents, every outing has to be timed with the tides, and even the choice of whether to go north or south from the boathouse at Pier 84 can be a game-time decision.
As a result, there was no formal mechanism in place to alert ferry operators that kayaks were in the area. Cartagena didn’t announce on VHF Channel 13 that his group of kayaks was crossing in front of the ferry terminal. In fact, he didn’t have a VHF radio or air horn with him at the time of the accident. That, combined with the blinding glare and the ferry captain’s failure to post a lookout and proceed at a prudent speed for the conditions, was a recipe for disaster.
The aftermath of the 2016 kayak accident brought plenty of finger-pointing and a lawsuit that was settled out of court. It also prompted some soul-searching within the vibrant New York City kayaking community. The paddling scene in New York is centered around a dozen nonprofit clubs like the Downtown Boathouse on the Lower West Side and the Brooklyn Bridge Park Boathouse in Brooklyn. After the accident, all the clubs and commercial outfitters including MKC came together to review best practices for paddling New York’s wild and wonderful waterways.
About 100,000 New Yorkers paddle the city’s waterways each year, many through free community programs like the Downtown Boathouse at West 26th Street. Most stay in protected waters well clear of commercial traffic. | Photo: Shutterstock
Preventing Kayak Accidents: Lessons learned
1) Avoid the chokepoints
The key to accident avoidance, says Downtown Boathouse President Graeme Birchall, is just that—avoidance. While the waters around New York are some of the busiest in America, Birchall contends that kayaking in the city is still safer than riding a bicycle on Sixth Avenue. “The harbor is bigger than Manhattan, and it’s much more open, with much better visibility,” says Birchall, whose nonprofit has organized nearly half a million free kayak outings in the last two decades without a major incident. The problem is chokepoints such as ferry terminals, where paddlers come into contact with heavy marine traffic.
The first lesson if you’re paddling in New York City or any other crowded waterway, is to avoid those chokepoints. Paddlers at the Downtown Boathouse rarely leave the embayment at West 26th street, an area about half a mile square with no regular commercial traffic, Birchall says. To use the cycling analogy, these quiet corners of the Hudson are like side streets, and the shipping channels are like highways.
[ Plan your next rescue training with the Paddling Trip Guide ]
Nobody wants to cross the interstate on a bicycle. So stay well clear of the shipping channels. If you must cross them, do so at a 90-degree angle when there’s a clear break in traffic, and—this is important—when you can be confident that other vessels can see you clearly and from sufficient distance.
The Midtown Ferry Terminal at West 39th Street. As many as 36 ferries come and go from this terminal during a typical weekday rush hour. | Photo: Jim Henderson/Wikimedia Commons
2) Make yourself visible—and then assume you’re not
The ferry operator didn’t see the kayakers until seconds before the collision, even though they were in brightly-colored kayaks on a clear sunny day. From the perspective of the ferry captain looking west toward the late-afternoon sun, the kayaks appeared as tiny silhouettes against the bright glare. This is one of the most important lessons from the kayak accident: Just because you can see other boats doesn’t mean they can see you.
Just as motorcyclists need to be hyper-aware of other motorists’ blind spots, kayakers, canoeists and standup paddleboarders should pay special attention to how they appear to other boaters. Factors like sun, fog, and even wave action can make kayaks harder to see. The best strategy is to wear bright colors and do everything you can to make yourself visible, and then paddle as if you’re not.
3) Make your intentions clear
In the safety video that MKC and the ferry company worked together on, NY Waterways ferry captain Richard Thornton makes a point of saying how helpful a simple wave from a kayaker can be. “If they can make some sort of visual signal like a hand-wave, it’s greatly appreciated on our part,” he says. Eye contact, or a paddle held aloft to indicate you’re waiting for the other vessel to pass, can help avoid confusion on the water.
4) Go with a pro
In New York City, even experienced kayakers should consider paddling with local clubs or outfitters. The city sees about 100,000 kayak outings a year, the vast majority of which are organized through a dozen community boathouses and licensed outfitters. Paddling in a group led by experienced paddlers who know the chokepoints and traffic patterns is the best way to safely enjoy urban waterways such as Chicago, San Diego and of course the Big Apple. And unlike so many things in New York, club paddling is neither exclusive nor expensive. Many local clubs welcome visiting paddlers for free.
5) Avoid rush hour traffic
Paddlers also should pay close attention to the time of day, Birchall says. In New York, ferry traffic is much heavier during the morning and evening rush hours, which frequently coincide with low-angle sun that compromises visibility. All of these factors came into play in the August 2016 ferry collision.
6) Carry a VHF radio
Commercial vessels regularly announce their movements on VHF Channel 13, and monitor this “traffic channel” at all times. In New York City, many kayak tour guides and recreational paddlers carry handheld VHF radios and announce themselves when crossing in front of ferry terminals and other high-traffic areas. Think of it as a more polite version of the Big Apple crosswalk mantra, “Hey, I’m walkin’ here!” made famous by Dustin Hoffman’s character in Midnight Cowboy.
This last lesson was a key finding of the Coast Guard’s investigation of the 2016 kayak accident. The report concluded that the ferry captain was travelling at an unsafe speed for the conditions and failed to post a proper lookout. But investigators also noted that a radio call from the kayak guide before the group passed the ferry terminal might have caused the captain to proceed more cautiously.
Immediately after the accident, MKC owner Eric Stiller told investigators the company bought three more handheld VHF radios and guides began using them on all outings. The first time he led a group out of the embayment after the incident, Stiller made a call on Channel 13 to alert commercial traffic. “I immediately got two responses from two ferries,” he said. “They copied us right away.”
Kayakers at sunset in New York Harbor. | Feature Photo: Vor/Shutterstock
Every spring brings new expeditions of paddlers who set out to seek adventure by crossing vast distances. As impressive as they are, these trips can be unrelatable for many canoeists. Ryan Morin is nearing the end of a more relatable quest inspired by the accessible beauty of Algonquin backcountry canoeing. This might be the year he finishes canoeing on each of Algonquin Provincial Park’s 630 portage-accessible lakes.
[ Plan your next Algonquin Park adventure with the Paddling Trip Guide ]
How many lakes in Algonquin Park?
Algonquin Provincial Park, located in south-central Ontario, is larger than the state of Delaware. Nearly half of its roughly 1,300 lakes can be reached by paddle and portage from one of the park’s 29 road access points.
The number itself is hard to fathom, but most of the 455-odd lakes visited by Morin so far have been bagged during the type of weekend outings not too different from those taken by your typical, well-adjusted canoeist with a job.
Bitten by the exploration bug
Morin didn’t start down this tallying trail deliberately. “Visiting all these lakes was something I wanted to do, well before I ever thought of putting a name to it,” says the 30-year-old ecologist.
Ryan Morin is a weekend warrior of Algonquin backcountry canoeing.
He grew up 250 kilometers south of the park, in suburban Toronto, and didn’t visit Algonquin until he was 20 years old. “I was shocked,” he says. “I couldn’t believe there was country like this so close to home. I said to myself, ‘I have to work here.’”
Morin got a job at an outfitting company in the park and started exploring. He uses the website Algonquin 875 to document his progress.
“The culture at the Portage Store was competitively adventurous,” he remembers. “We were always asking each other, ‘Who can go farther on two days off?’”
“I found the place so fascinating. It was pure passion for me. I wanted to see the next lake, and then the next lake.” Morin’s friends suggested that he would run out of lakes to explore. Now in his seventh season of Algonquin backcountry canoeing, he is a few months away from proving them right.
I couldn’t believe there was country like this so close to home.
I said to myself, ‘I have to work here.’
X marks the spot
At his home in Dorset, a 20-minute drive from the park’s southwest boundary, Morin has a tattered map. It’s the same kind used by most of the hundreds of thousands of canoeists who visit Algonquin each year. But this one has small black X marks on most of the lakes marked with portages.
Blue icons mark the portage-accessible lakes Ryan Morin has visited, while red icons mark those he has yet to explore. | Google Map: Ryan Morin, Algonquin 875
Morin admits he doesn’t know the exact number of X marks he has tallied. It’s not an object of obsession for him. “Maybe one day I’ll get it framed so I can look at it from my rocking chair,” he says.
Morin’s method of backcountry canoeing
There is nothing extraordinary about his method. He does long days, sometimes up to 50 kilometers, but generally short trips. And he isn’t obsessive about weight. “My pack is on the heavy side,” he says. “I like to bring good food.”
[ Paddling Buyer’s Guide: See all lakewater & touring canoes ]
Yet, Morin admits to a shift in thinking from those days of exploring simply for exploring’s sake—and, more importantly, going Algonquin backcountry canoeing just to fish for trout. “Sometimes now before I go out, I ask myself, ‘Why am I doing this?’ I know a great spot nearby, where I could be alone with lots of fish, instead of driving for two hours to a bog just to cross it off.”
“But I go,” he says. “And every Sunday I come back and have learned or discovered something new.”
Canoeing in Algonquin is simply Devine
One of the stand-out places is Devine Lake, six portages down the Tiny Tim River. Morin says it used to be called Camp Lake, because there’s an island on it almost hollowed out, so the middle seems to be lower than lake level. He says the rumor is that poachers used to hide their camps in there, where no one could see them.
The night Morin spent on Devine Lake was less nefarious, but did involve “a couple of great friends, quite a few drinks, a fire and a burnt pair of expensive hiking pants.” Now that’s an expedition most canoeists can relate to.
At 453 meters of elevation, Morin says Devine is one of the higher lakes in Algonquin, but does receive water from Saw Whet Lake, another kilometer upstream along an impassable creek. There is no portage into Saw Whet, so it doesn’t count toward his goal. Nonetheless, Morin often finds himself in supposedly inaccessible lakes during his Algonquin backcountry canoeing trips, “Just to see what they are like.” He estimates he’s been to about 30 or 40, but he isn’t counting—yet.
This article was first published in Issue 53 of Paddling Magazine. Subscribe to Paddling Magazine’s print and digital editions, or browse the archives.
There’s traditionally been a divide between the recreational kayaks that drive the growth of our sport and the high-end models for enthusiasts. Now one of the biggest recreational kayak makers, Pelican International, is leaping across the rec/touring chasm with the Elite Series Pelican Strait 120 kayak.
Pelican Strait 120 XE Specs
Length: 12’
Width: 25.5”
Depth: 14”
Weight: 48 lbs
Cockpit: 34.5” × 18”
MSRP:$900 USD / $1,000 CAD
[ Paddling Buyer’s Guide: See all Pelican kayaks ]
The Strait 120 is Elite
From the world’s largest thermoforming machine in the suburbs of Montreal, Pelican is producing the mischievously named “Elite Series,” a line of affordable kayaks with premium touring features like adjustable foot pegs, bow and stern bulkheads, waterproof hatches, deck bungees and rudders.
Exceptionally light and strong
Don’t underestimate four decades of plastic kayak moulding know-how. I can’t think of another manufacturer that’s been in the biz since 1968 and it shows. Pelican kayaks are made of a unique triple-layer thermomolded plastic that the company says is 30 per cent stiffer than conventional rotomolded poly and also lighter and strong enough to be driven over by a truck (and bounce back). We were surprised to find it feels as rigid as composite, albeit with a much rougher finish than other thermoform kayaks or gel coat.
The Strait 120 has a very comfortable, ergonomic padded seat, padded thigh braces and plenty of cockpit room for paddlers of all sizes.
Short boat, responsive ride
All the kayaks in the Strait series, which includes 12- and 14-footers with and without rudders, have very attractive lines. The aggressively tapered bow and semi-hard chine give an edge-able, surf-worthy appearance. Stability on the shallow-V hull is moderate, nudging the paddler to try edging. It tracks very straight for such a short boat and also turns quickly, as you’d expect.
The Pelican Strait 120 is a premium short‑tripper
In some regards the Strait’s sea kayak features are misleading; we don’t recommend a 12-foot kayak to anyone who wants to cover water. In waves the short deck and low bow make for a wet ride and a strong paddler quickly maxes out the hull’s cruising speed. For true light touring, consider the Strait 140.
[ Plan your next trip with the Paddling Trip Guide ]
For short paddles and small bodies of water where speed is not an issue, however, the Pelican Strait 120 kayak is a well-designed starter boat that offers a wonderfully rigid plastic and many premium features at a reasonable price.
This article was first published in the Spring 2010 issue of Adventure Kayak Magazine. Subscribe to Paddling Magazine’s print and digital editions, or browse the archives.
A solo canoeist finishes off a forward C stroke. | Feature Photo: Gary & Joanie McGuffin
The canoe C stroke is a good start-up stroke for soloists to get their craft moving forward in a straight line. It’s so-named because it’s a combination stoke in which a bow draw, forward stroke and J stroke come together so the path the canoe paddle travels resembles the letter C.
The bow draw and J stroke portions of the stroke keep the canoe from veering to the offside in response to the turning force of the forward stroke. Even after the canoe is moving forward the C stroke can be useful when you want to forcefully turn the canoe in an onside direction.
Steps to complete the canoe C stroke
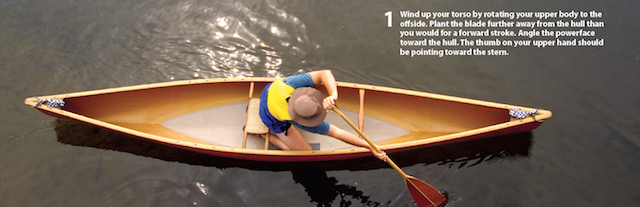
1. Start your stroke
Wind up your torso by rotating your upper body to the offside. Plant the blade further away from the hull than you would for a forward stroke. Angle the power face toward the hull. The thumb on your upper hand should be pointing toward the stern.
Step 1: Start your stroke. | Photo: Gary & Joanie McGuffin
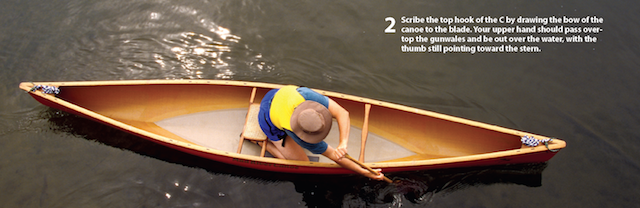
2. Top of the C
Scribe the top hook of the C by drawing the bow of the canoe to the blade. Your upper hand should pass over-top the gunwales and be out over the water, with the thumb still pointing toward the stern.
Step 2: Trace the top of the C. | Photo: Gary & Joanie McGuffin
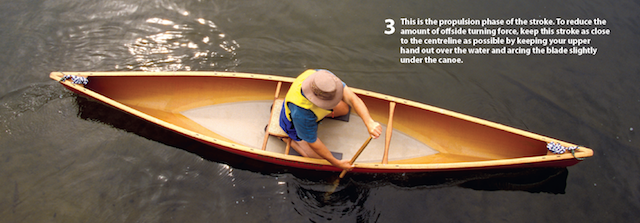
3. Forward stroke
This is the propulsion phase of the stroke. To reduce the amount of offside turning force, keep this stroke as close to the center line as possible by keeping your upper hand out over the water and arching the blade slightly under the canoe.
Step 3: Take your forward stroke. | Photo: Gary & Joanie McGuffin
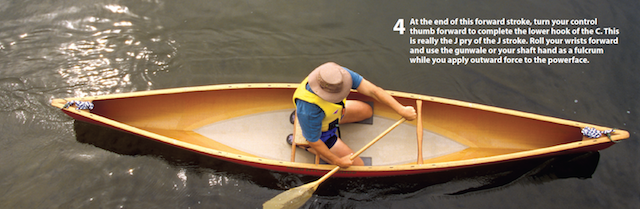
4. Bottom of the C
At the end of the forward stroke, turn your control thumb forward to complete the lower hook of the C. This is really the J pry of the J stroke. Roll your wrists forward and use the gunwale or your shaft hand as the fulcrum while you apply outward force to the power face.
Step 4: Trace the bottom of the C. | Photo: Gary & Joanie McGuffin
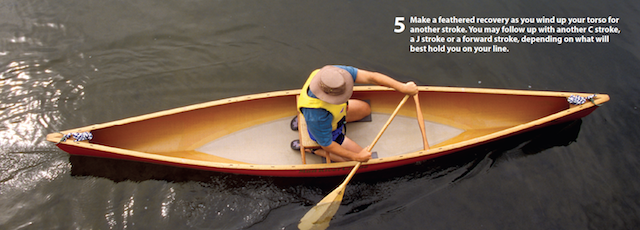
5. Back to the start
Make a feathered recovery as you wind up your torso for another stroke. You may follow up with another C stroke, a J stroke or a forward stroke, depending on what will best hold you on your line.
Step 5: Back to the start. | Photo: Gary & Joanie McGuffin
[ Plan your next canoe adventure with the Paddling Trip Guide ]
This article was first published in the Spring 2006 issue of Canoeroots Magazine. Subscribe to Paddling Magazine’s print and digital editions, or browse the archives.
A solo canoeist finishes off a forward C stroke. | Feature Photo: Gary & Joanie McGuffin
As early spring starts, melting snow and icy bays turn liquid and there’s a good reason the world’s best paddlers keep a close eye on the Ottawa Valley. The migration begins as the swelling Ottawa River bursts above its banks. You too can try kayaking the Ottawa River starting in the town of Beachburg, just a two-hour drive northwest of Canada’s capital city.
World-class kayaking in the Ottawa Valley
Surrounded by sprawling farmland and forest, the Ottawa River boasts some of the biggest whitewater east of the Rocky Mountains—in flood, it rivals some of the biggest-water rivers in the world.
With waves known to showcase the full range of freestyle moves, the Ottawa River is a playboater’s paradise and has nurtured local paddlers like Ben Marr, Nick Troutman and Kalob Grady into world-class big wave kayak competitors.
Depending on water levels, you could play for hours at any of the Ottawa’s well-known waves: Garburator, Buseater, Babyface, Corner Wave and more. Ask a local what’s in.
For the day
A run of the Ottawa’s Main or Middle Channel offers class II to V whitewater. Whitewater Ontario provides detailed access and rapid descriptions.
Expedition
The nearby Madawaska, Petawawa, Mattawa and Dumoine Rivers are popular destinations for multi-day whitewater trips.
[ Plan your next Ottawa Valley adventure with the Paddling Trip Guide ]
Travel
Fly to the international airport in either Ottawa or Toronto and rent a car—it’s a two-hour drive from Ottawa and five hours from Toronto. Bus routes are available to the nearby town of Cobden where you can catch a taxi to your destination.
Camp
Rafting companies dot the banks of the Ottawa River, offering accommodations from cook-over-a-fire camping to comfortable cabins with gourmet meals. Explore your options:
Don’t miss the Whitewater Brewing Company, a brewpub just steps from the banks of the Ottawa. With names like “Class V IPA,” and “Whistling Paddler,” it’s no surprise these drinks are brewed by former river guides.
While you’re there
From family-friendly entertainment to definitely-not-family-friendly nightlife, the local rafting companies host a plethora of events throughout the May to September paddling season, along with activities like disc golf, bungee jumping, SUP, live music and more.
This article first appeared in the Early Summer 2015 issue of Rapid Magazine.
Subscribe to Paddling Magazine and get 25 years of digital magazine archives including our legacy titles: Rapid, Adventure Kayak and Canoeroots.


 This article originally appeared in the 2016 Paddling Buyer’s Guide issue.


 This article first appeared in the Early Summer 2015 issue of Rapid Magazine.


