Landscape Photography
Last year, nature photographer and outdoor enthusiast, Gary Fiedler paddled for 221 days solo through the Boundary Waters Canoe Area to experience the entire open water season. He and wife, Dawn LaPointe, own nature photography business, Radiant Spirit Gallery (radiantspiritgallery.com). Here are his top tips for capturing the perfect landscape photo on your next trip.
Composition
A great landscape photograph can cause the viewer to pause and be drawn into the scene, recalling a memory, stirring an emotion or even inspiring an adventure. Composition is the single most important element of a landscape photo. A well-composed photograph allows the viewer to quickly identify the subject, mood and story the photographer captured, and makes the image more memorable. Include only those items that contribute to the scene or story you want to convey. Our eyes naturally go to the brightest, sharpest and most colorful part of the image. When possible, give your focal point those attributes.
Sharply focused
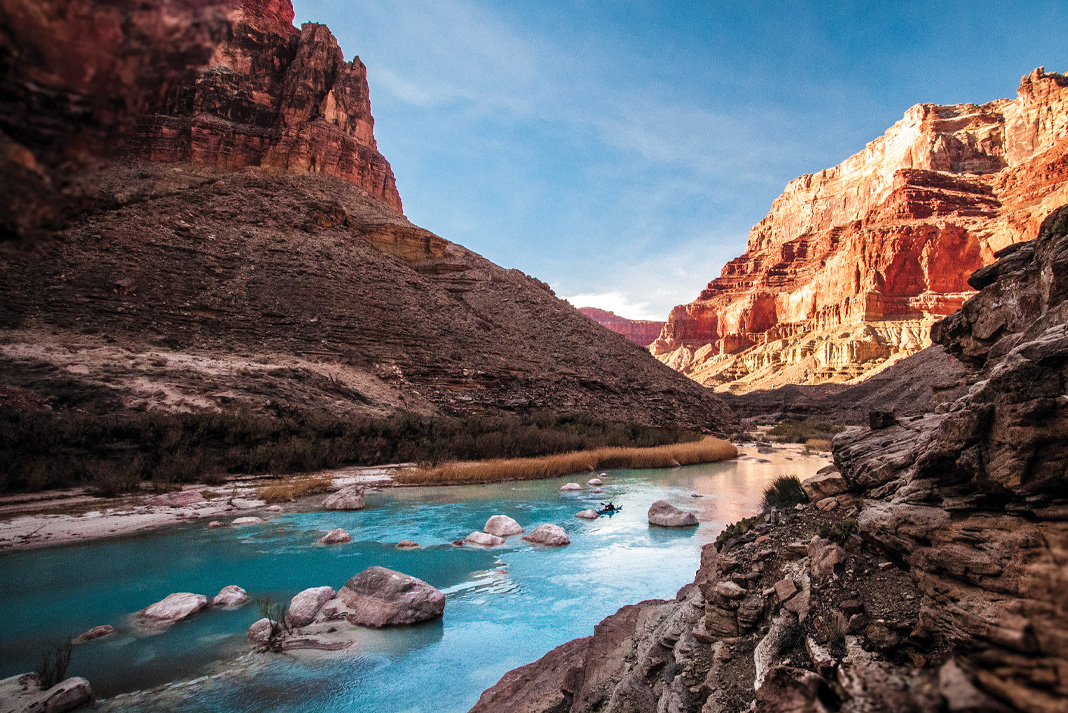
Sharply focused images can be a challenge to capture in low light or from a moving boat. Use a tripod if practical. Adjust your camera settings: Use image stabilization and aim for a minimum shutter speed of 1/125. Shoot several frames in rapid succession to improve your odds of capturing a sharp photograph.
DEPTH OF FIELD FOR LANDSCAPE IMAGES. | Photo: Gary Fiedler
Off-center
Avoid placing your subject in the center of the frame. If you place it off-center, your images will be more interesting. This rule is not definitive, however. Some perfect landscape reflections look best with the horizon or waterline placed precisely across the middle, emphasizing the symmetry. If your landscape composition includes a moving subject like a canoe, place more space ahead of it rather than behind, to avoid a confining feeling.
Change your perspective
Think outside the box and change the camera position. Get low to the ground or try a higher vantage point. Take a vertical composition. Shoot at different times of the day in interesting light.
Circular polarizer
If you bring only one filter, choose a high quality circular polarizer. It will allow you to manage reflections and suppress glare on water, foliage and rocks. It also softens a photo captured on a harsh, sunny day, making it look more pleasing.
Familiarize yourself
Familiarize yourself with your camera’s basic functions. A digital camera is an excellent learning tool because you can take as many shots as you desire using different camera settings and different perspectives. Be creative, experiment and shoot a lot.
LANDSCAPE PHOTOGRAPHY
WORDS and PHOTOS by MIKE MONAGHAN
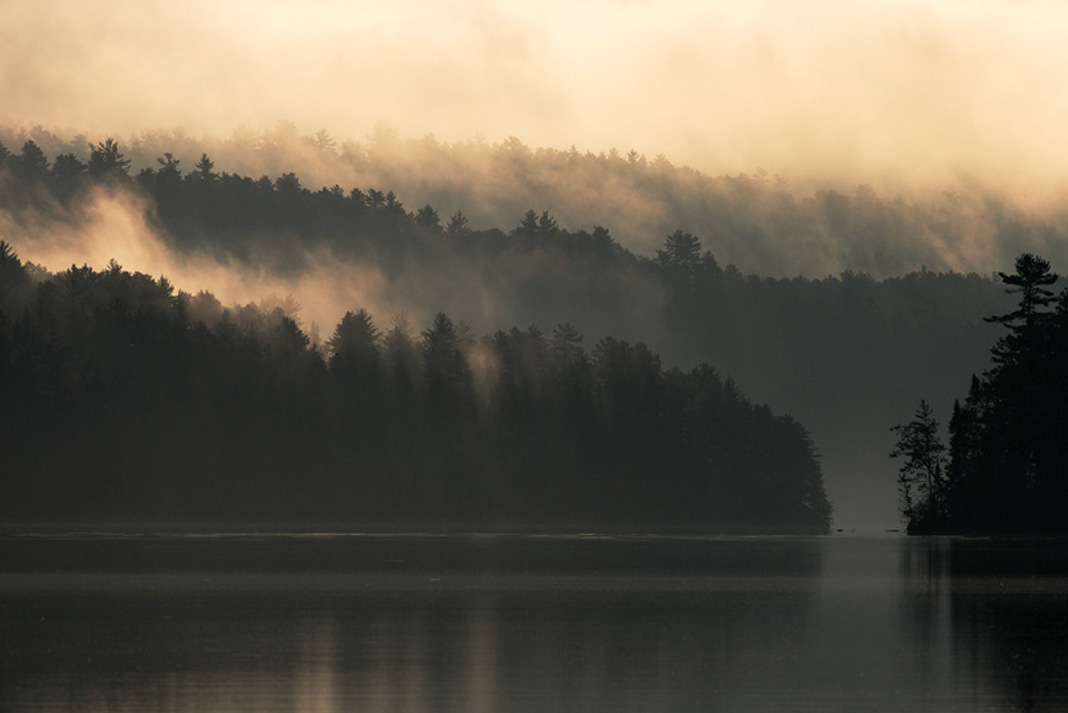
SILHOUETTES
Silhouettes are very effective, yet often overlooked. To create an inky black silhouette with a rich background, expose for the background. In this case, I took an exposure meter reading off of a mid-grey tone in the clouds. This is the time to utilize your camera’s spot meter setting, as dynamic metering, which averages the entire scene, will include the dark foreground in its calculation resulting in a muddy silhouette and blown-out sky. A long lens is the tool of choice when photographing silhouettes, as it allows you to simplify your image by highlighting a specific feature and eliminating distracting elements.
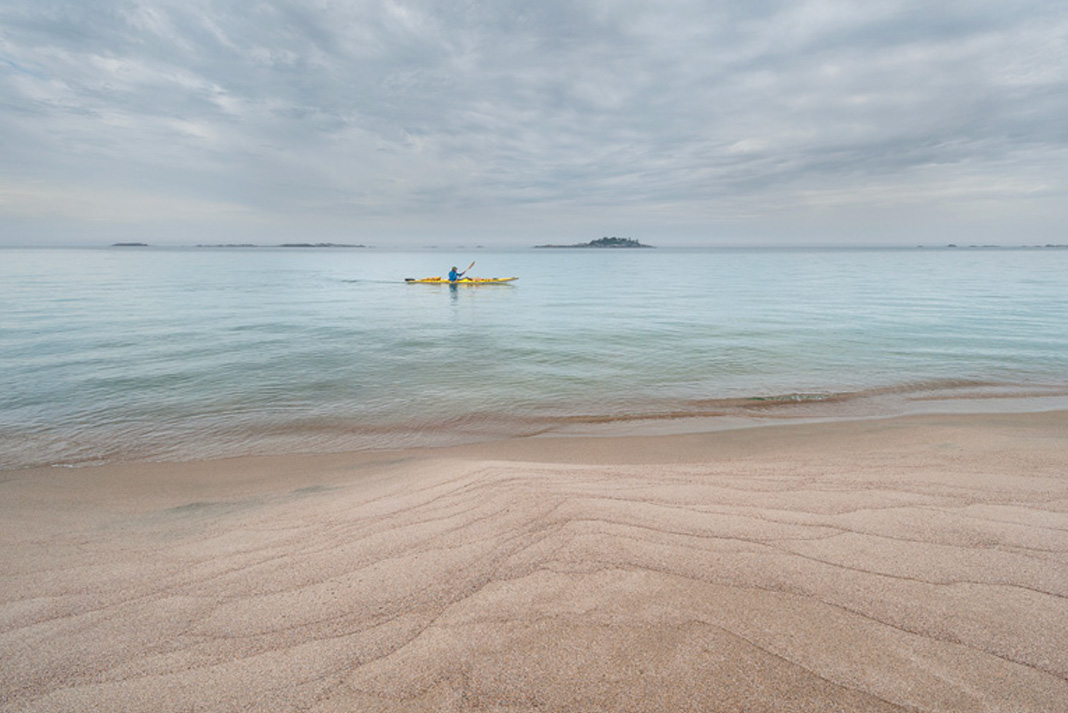
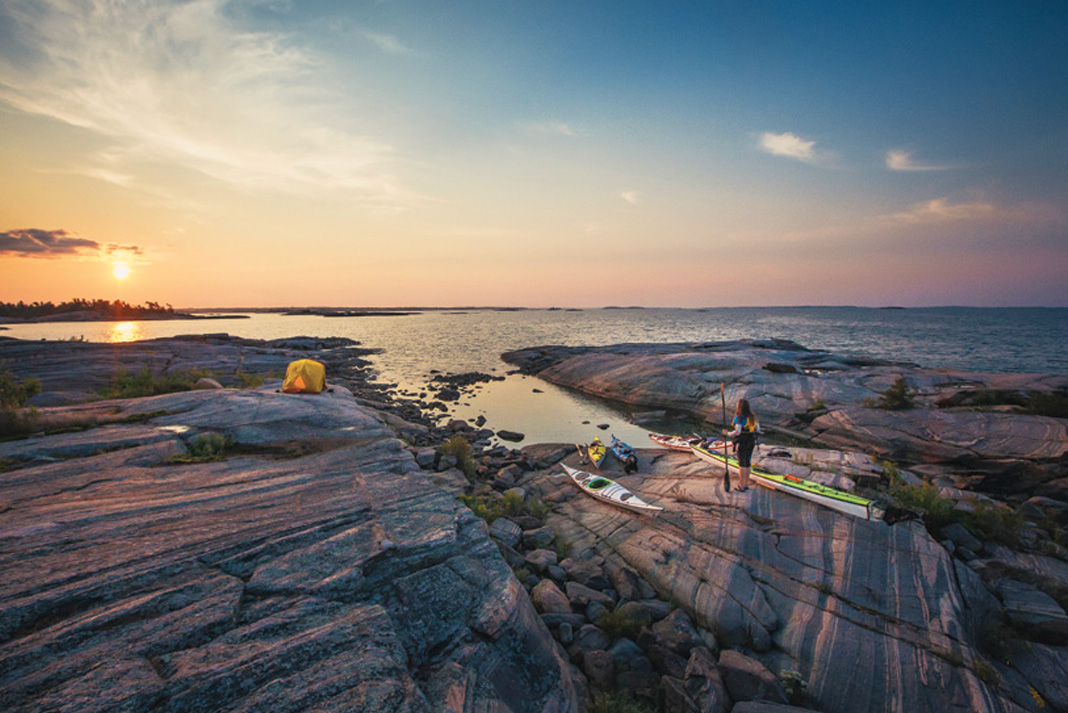
RULE OF THIRDS
For powerful images that hold the viewer’s attention, avoid placing your subject or the horizon at the center of the frame. Instead, think of the composition as a grid divided into thirds both horizontally and vertically, and place the subject or elements of interest along these lines or at their intersections. In this case, the waterline and horizon conform to this principle. Bonus tip: watch where you step. To maintain a pristine look, I was careful to avoid walking on this section of beach when I landed.

GET THE PERFECT EXPOSURE
While our eyes are capable of perceiving a significant range of bright and dark—or dynamic range—a camera’s dynamic range is relatively limited. In order to balance an exposure with a wide dynamic range, graduated neutral density filters can be used. In this example, the top half of the filter, being neutral grey, darkens the sky while the lower half of the filter tapers to clear, allowing the foreground to become balanced with the brighter part of the image. Graduated filters are available in a variety of shades, from light to very dark. Using the same technique as the Silhouette image, I took separate meter readings for the sky and sand. I then exposed for the foreground while selecting the appropriate grad filter to effectively “hold back” the brightness in the sky.

SHOOT THE MOON
Including the moon in an evening scene can add drama, and in this case provide balance to a composition. In low-light conditions requiring a longer exposure, the moon, being much brighter than the landscape, will typically be rendered as a bright glowing disc. To maintain definition in the moon and reveal some of its characteristic surface detail, two separate exposures are required. In this case, I first exposed for and captured the landscape using a graduated filter. I then exposed for and photographed the moon, which was slightly out of the frame. This kind of image can be captured as a double exposure on the same frame, or can be a composite of two separate images using the image overlay feature found in many DSLRs.
Wildlife Photography
Peter Mather is a professional photographer, fellow of the prestigious International League of Conservation Photography and co-author of guidebook, Paddling in the Yukon. “The three P’s of wildlife photography are passion, patience and persistence,” he says. “These traits are more important than your camera equipment, post-processing capability and even location.” Check out his advice for capturing the local wildlife on your next trip.
Patience
Wildlife photography requires an immense amount of patience. Whether you’re shooting squirrels, moose or wolves, the more patience you have the better the images you’ll capture. I’ve spent hours patiently waiting for animals to get comfortable with me, while I slowly inched closer. Eventually, an animal lets me into its personal space and I’m able to capture an intimate image of a unique animal.
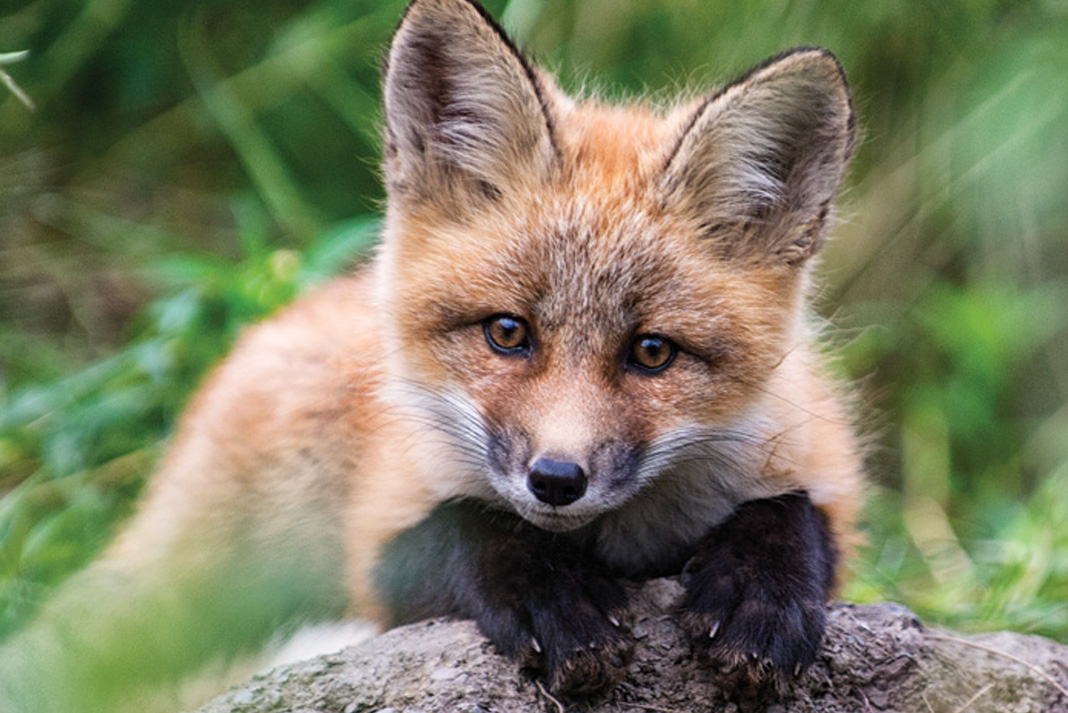
Persistence
The only guarantee you have when pursuing wildlife is failure. Your camera will fail you, you will get hundreds of blurry pictures, and you will not have your camera ready when a wolverine walks through your camp. (Unfortunately, that actually happened to me.) But don’t give up. Persistence is eventually rewarded. Days after the wolverine incident I came across a fox den and I snapped a great image of a fox kit.
Passion
There’s only one thing that will get you out of bed at 5 a.m. in the pouring rain, while your mates are warmly cuddled in their sleeping bags. Passion to capture and share wildlife stories is what will set a successful wildlife photographer apart from the rest.
Keep Your Camera Handy
What makes the difference between good and great photos? Keep your camera handy. Your camera is a tool; it will get used and abused. If you’re going to spend $1,000 on a camera system, don’t bury it in a waterproof pack for the entire trip. If that’s the case, there’s no point in having an expensive camera at all. When I first started photographing my paddling trips, I hid my camera gear in a Pelican case under my spray deck, and I tied it down with a dozen ropes. Not surprisingly, I didn’t get many good shots. Now, my camera with a 70-200mm lens sits on top of my spray deck. The camera only goes in a small dry bag when I run class II rapids or higher.
Use a Wireless Remote
For animals that are too skittish or dangerous to get close to, I covertly set up my camera in a promising feeding area and hide a safe distance away, triggering the exposure with a wireless remote when the time is right. Wireless remotes are cheap and open up new opportunities for any wildlife photographer.
WILDLIFE PHOTOGRAPHY
WORDS and PHOTOS by PETER MATHER
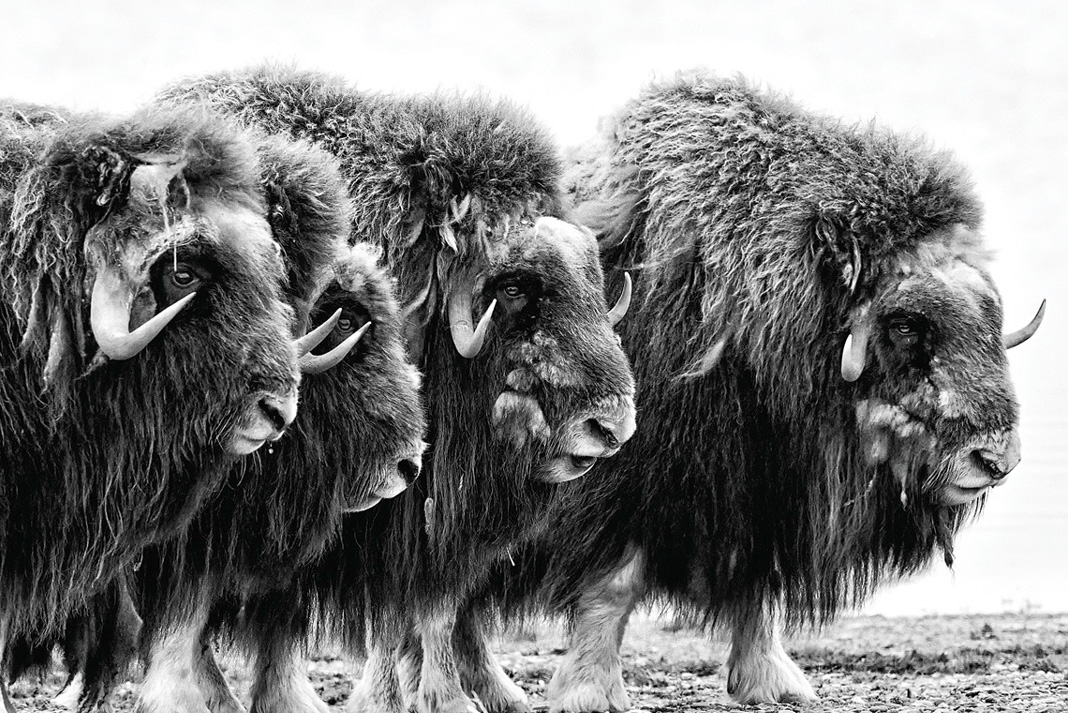
CAPTURING BEHAVIOR
Photography is really about telling stories, and the best wildlife stories involve unique behavior. When photographing wildlife, be patient and wait for that magic moment.
We spotted these musk oxen on a small spit of gravel along the coast. As soon as they saw us, the six adults formed a defensive ring with their four young calves firmly barricaded behind them. I tried shooting from a number of angles, but I like this image the best. The layering of the animals, and the way the eye of the second musk ox is framed by the horns of the first, evokes the impenetrability and fortitude of their protective behavior.
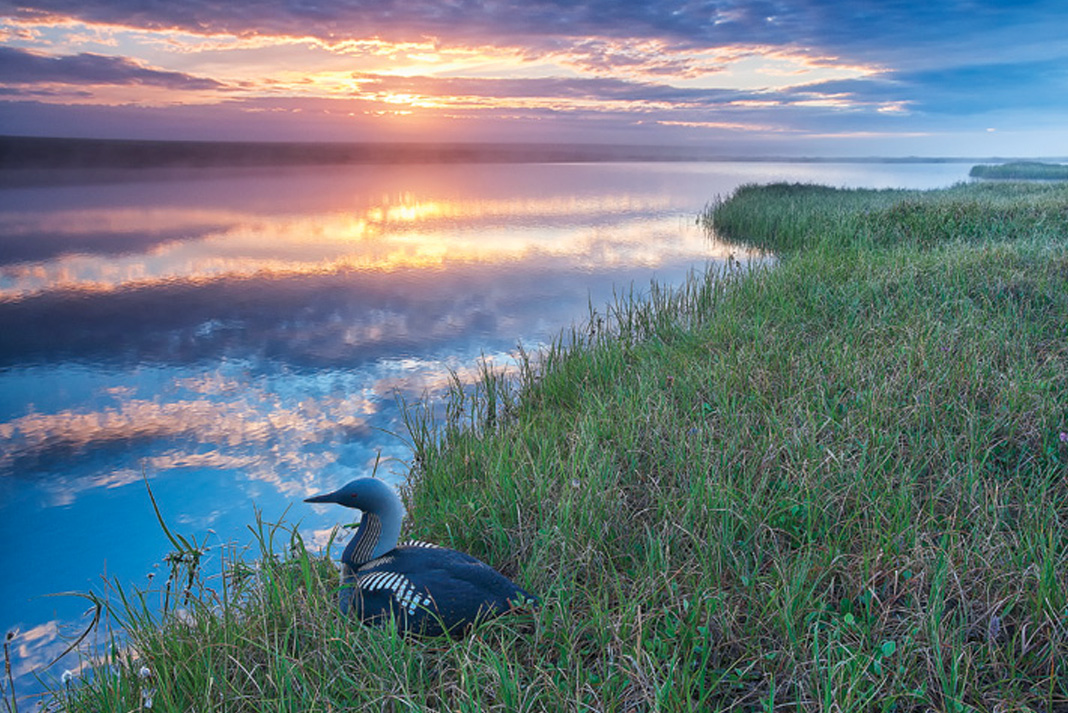
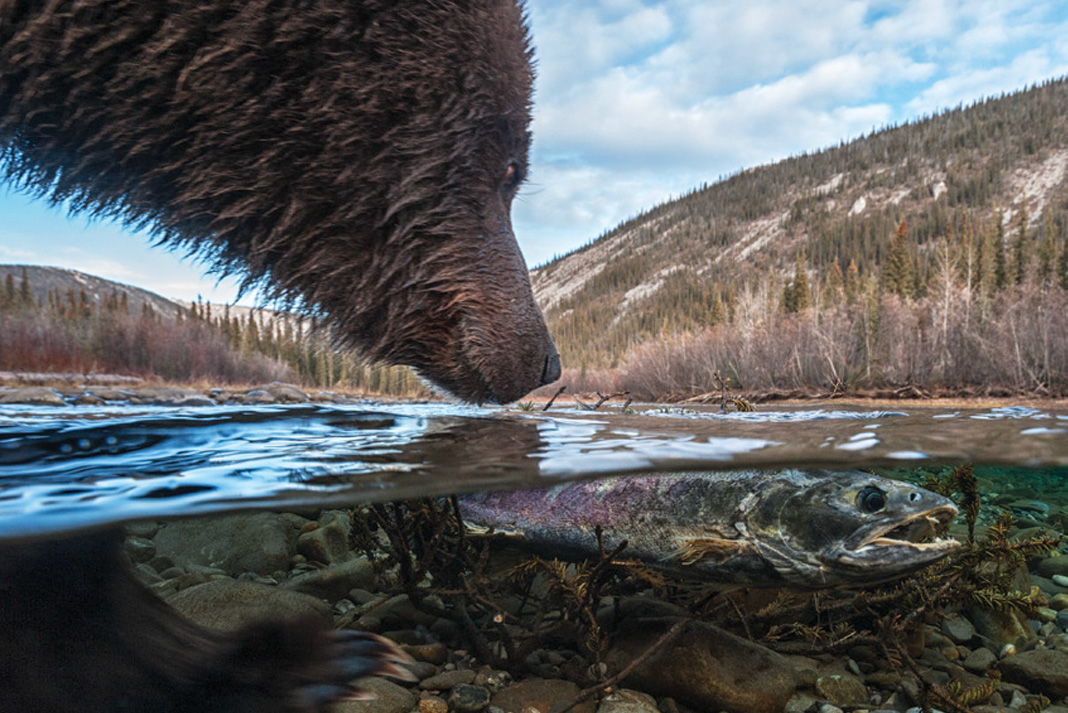
GETTING CLOSE
Robert Capa, the great early 20th-century wartime photographer, once said, “If your photos aren’t good enough, then you’re not close enough.” To get this image of a Pacific loon on her nest required persistence and passion. The nest was on a small pond surrounded by a giant field of tussocks and grass. I made the loon aware of my approach and, every five minutes, I’d get up and move a few feet closer until I was within 10 feet, and able to capture a very intimate portrait.
Try these three methods to get closer to wildlife. But, remember, back off if the animal appears stressed.
Blinds | Set up a man-made or natural blind in a safe area that your subject visits often, and simply wait.
Camouflage | Blend into the environment, avoid any unnatural odors and sneak up on your subject using the natural cover available. Approach from downwind and give the animal a clear escape route.
Zigzag Approach | Make the animal aware of your presence and approach slowly and obliquely in a disinterested manner.
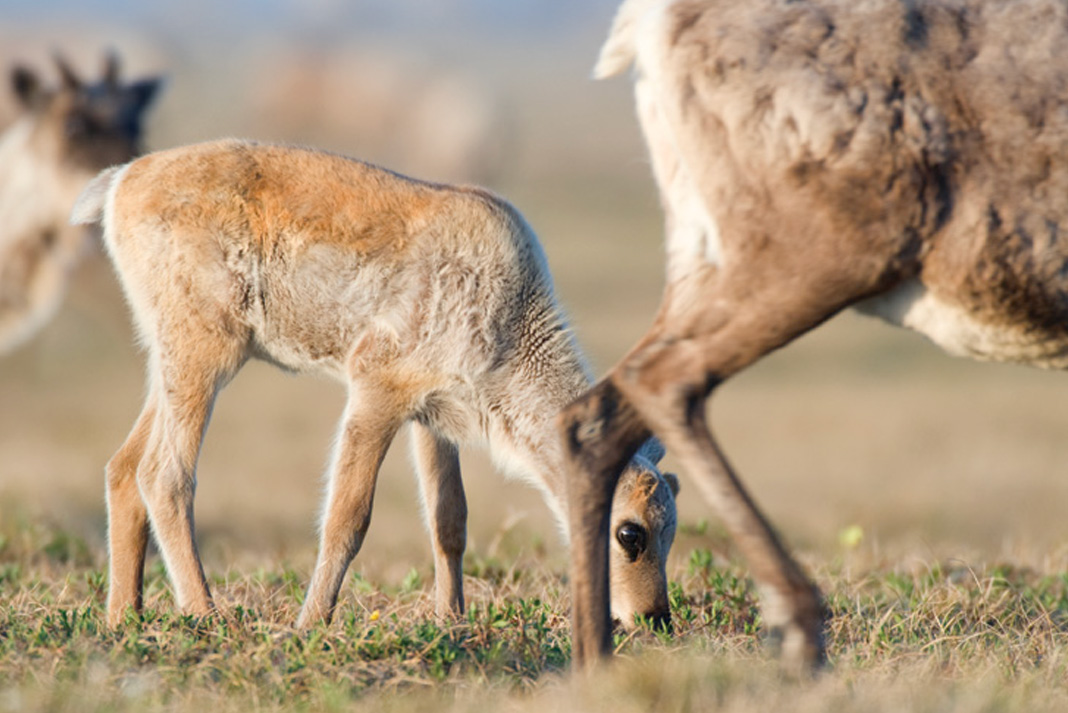
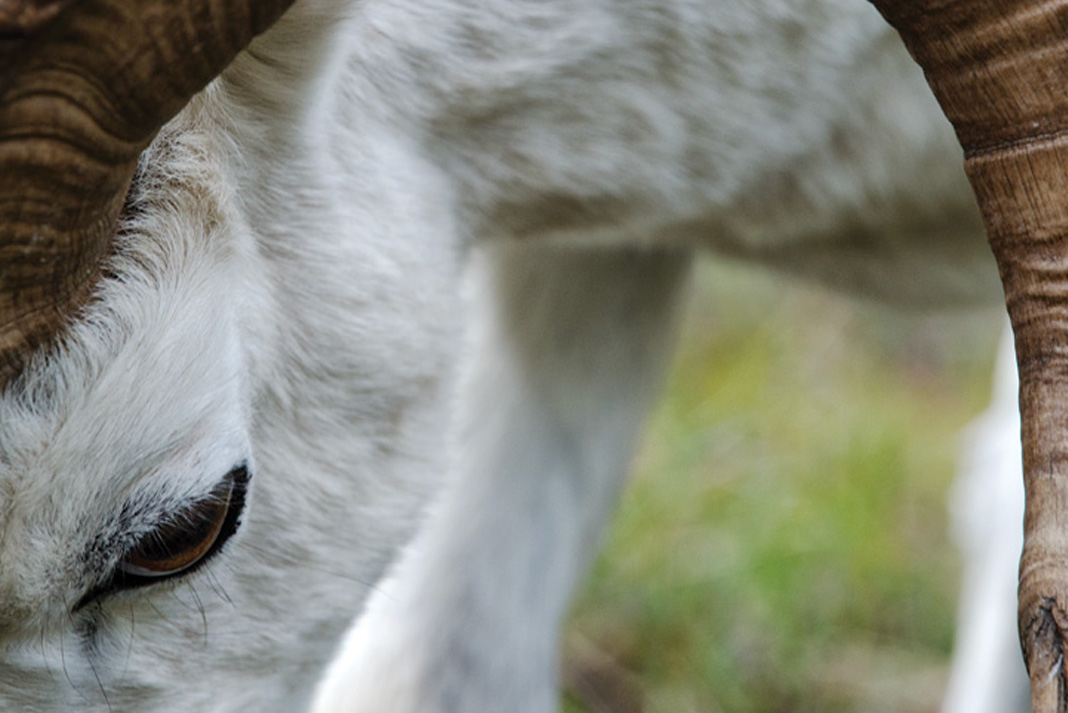
COMPOSITION
When shooting wildlife with a telephoto lens (above 300 mm), choose a small depth of field—F/5.6 or lower—to keep the subject in sharp focus while blurring the background.
This will allow the subject to pop out, giving it a three dimensional effect. Minimize distracting elements by adjusting your position to ensure that the background is of pure color and little texture. Shooting at the bird or animal’s eye level creates an intimate feel and often simplifies the background. Getting low also creates a sense of harmony and balance between the wildlife and the viewer.
EQUIPMENT SELECTION
Dealing with photography equipment on a kayak trip requires balancing two contradic and you want to keep it dry. While paddling, I keep a camera with a telephoto lens wrapped in a towel and double dry bagged between my legs. Whenever I need it, I can free it in less than 10 seconds.
A range of lenses ensures variety in your photography: A macro lens for close-ups, a wide angle zoom lens (12-24 mm) for landscapes, a mid range zoom (70-200 mm) for people and patterns, and a long telephoto (500 or 700 mm) for frame-filling wildlife images like this portrait of a Pacific loon. On a month-long trip, spare batteries, a solar charger and a portable hard drive in a Pelican case are must-haves.
Trip Photography
Part-time professional photographer Mike Monaghan has been solo tripping for 20 years. “What makes a great post-trip slideshow is a diverse portfolio of images that capture the essence of your adventure.”. He lets us know what to look for when capturing photos of your trip.
The human element
The human element is an essential part of trip photography, but that doesn’t mean a smartphone selfie. Including people in your photos serves a purpose by providing context or a sense of scale, and depicting some aspect of the trip experience. As a dedicated solo tripper, I spend hours each trip setting up shots and maneuvering into place, while using the timed interval shooting setting on my camera. Capturing a paddler in a sweeping landscape engages the imagination of the viewer, allowing the viewer to project himself into the scene.
Bright colors pop
Use Bright colors pop when set in a natural landscape. There’s a reason why Bill Mason always paddled a red canoe when making his films—the bright colors draw the eye, becoming a focal point in an image. For the same reason, a piece of bright gear in the corner of an image, unnoticed at the time, can later be very distracting in your photo.
Pay attention to detail
While I am a self-professed wide-angle junkie, a great trip portfolio moves back and forth through a variety of perspectives. Pay attention to detail. Tighter shots made with a telephoto lens can capture textures or a fleeting moment or expression, while a macro image of delicate forest flora fills out the details of your experience.
Less is more
As a rule of thumb, less is more. Simpler compositions are usually more effective. Before you hit the shutter button, get in the habit of zooming in or moving a little closer to cut out clutter or extraneous details like a hanging branch. A photograph should speak for itself and tell its own story. By isolating the subject and scrutinizing the background for distracting elements, an image will have more impact.
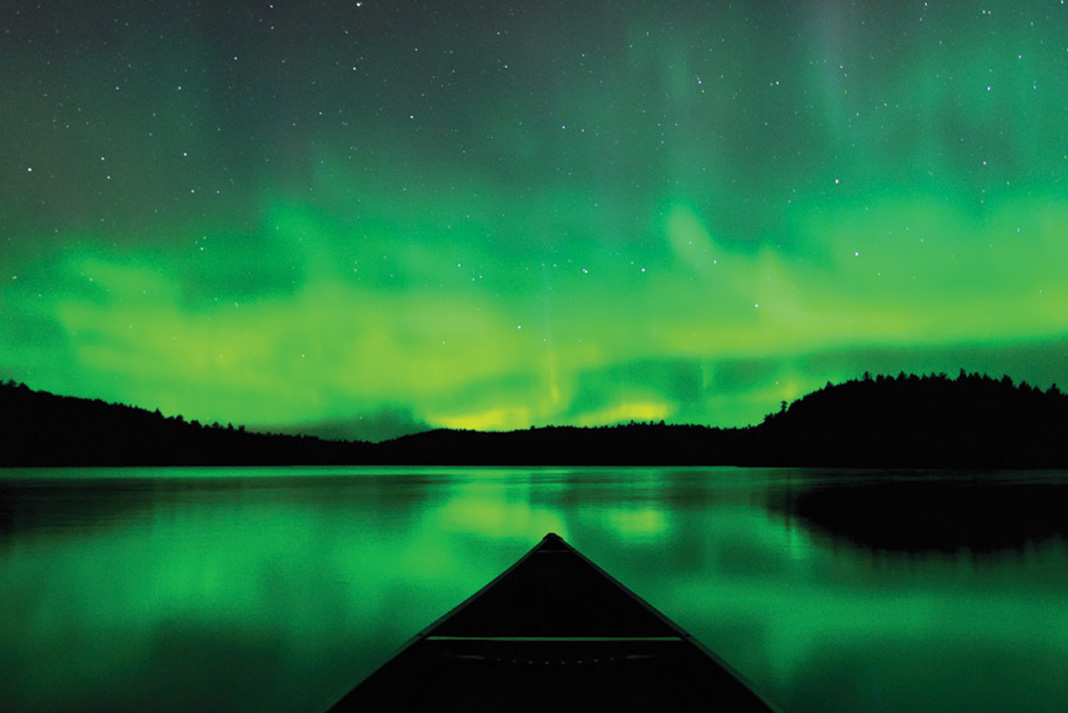
USE A TRIPOD, INCREASE YOUR CAMERA’S ISO AND EXPOSE FOR 20 TO 30 SECONDS FOR
NIGHT PHOTOS. | Photo: Mike Monaghan
Night shots
Take night shots add a compelling twist to any gallery and remind us of fond memories around the campfire. Paired with a sturdy tripod, today’s DSLRs are capable of capturing surprisingly good images at night. For this type of photography, increase your camera’s ISO setting, take advantage of the manual exposure mode and be sure to have your lens set to its maximum aperture. Shots of the night sky are also a compelling addition to your portfolio. Exposures of 20 to 30 seconds will expose the sky without capturing star trails. Experiment with using your headlight to light up your tent or a tree on the shoreline.
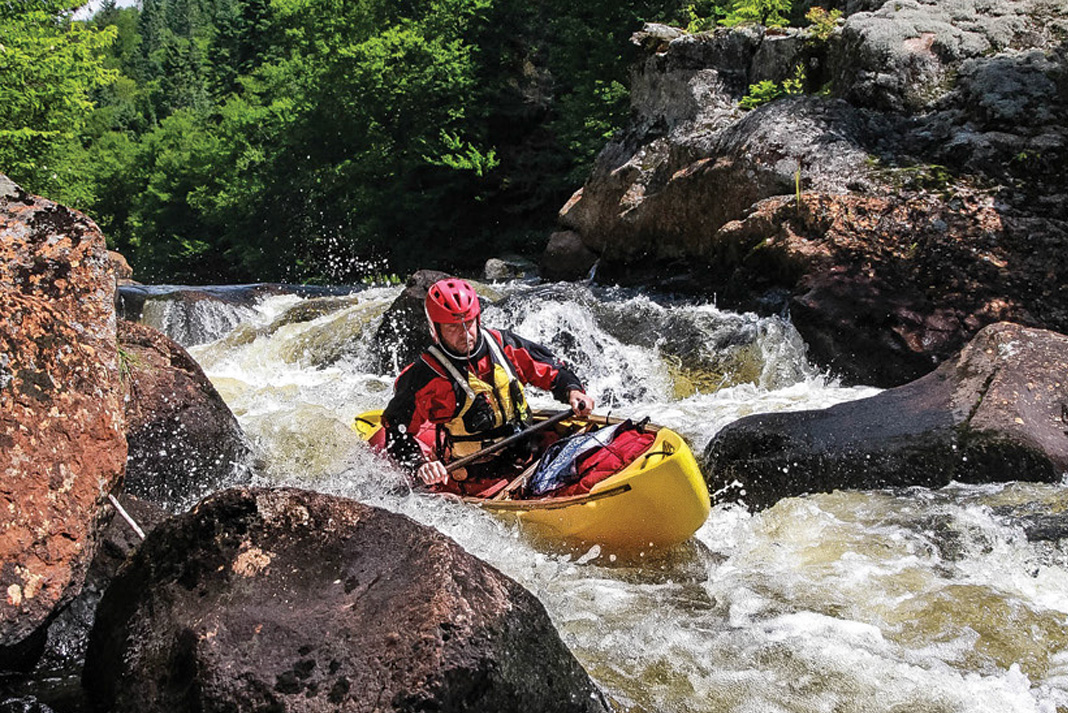
Whitewater Action Photography
Pascal Girard is an internationally published whitewater photographer who has called the river his second home for more than 22 years. “I switched to open boating from kayaking 12 years ago,” he says. “Open boaters don’t paddle down a river, they waltz in and out of eddies.” Get to know his best tips for capturing the action on the water.
Use a Waterproof Camera
When running rivers, you want to ensure your camera is waterproof, yet accessible so as not to miss any photo opportunities. A Pelican case slid between saddle and airbag, secured by two carabiners, ensures my camera is within arm’s reach but protected from splashes and fastened for any upsets.
Compensate
Sunny days create a bright glare on the water and can easily confuse your camera’s light meter—you could end up with a shot of an underexposed canoeist or blown-out whitewater. To compensate you may need to adjust your aperture up or down a half to one full stop in bright conditions. Learning manual exposure is critical; when it comes to shooting on the river, your camera’s automatic mode is a guess and will often disappoint you.
Anticipate the best moment
The river is a dynamic environment. The more familiar you are with river morphology the better you’ll be able to predict where the paddler will be and anticipate the best moment for action in a scene. Look for special features that will enhance the emotion of your photo: a big wave, a drop or a rock. Next, set up your exposure and shutter speed in advance. Do a practice run by pretending you are following a ghost paddler and sweep your lens along the chosen line, taking a few shots and then reviewing to check the exposure. To freeze the action and water droplets, use a fast shutter speed—a bare minimum of 1/500. To achieve more water blur in an action scene, use a shutter speed of around 1/250 and experiment.
Do not be afraid to break the rule
You’ve probably heard this rule: keep the sun behind you. Do not be afraid to break the rule now and then. Sideways light can reveal great contrast and shadows, while shooting into the sun can create dramatic silhouettes. To capture the expression of a paddler, be aware of the position of the sun and that a helmet will often create a shadow on the face.
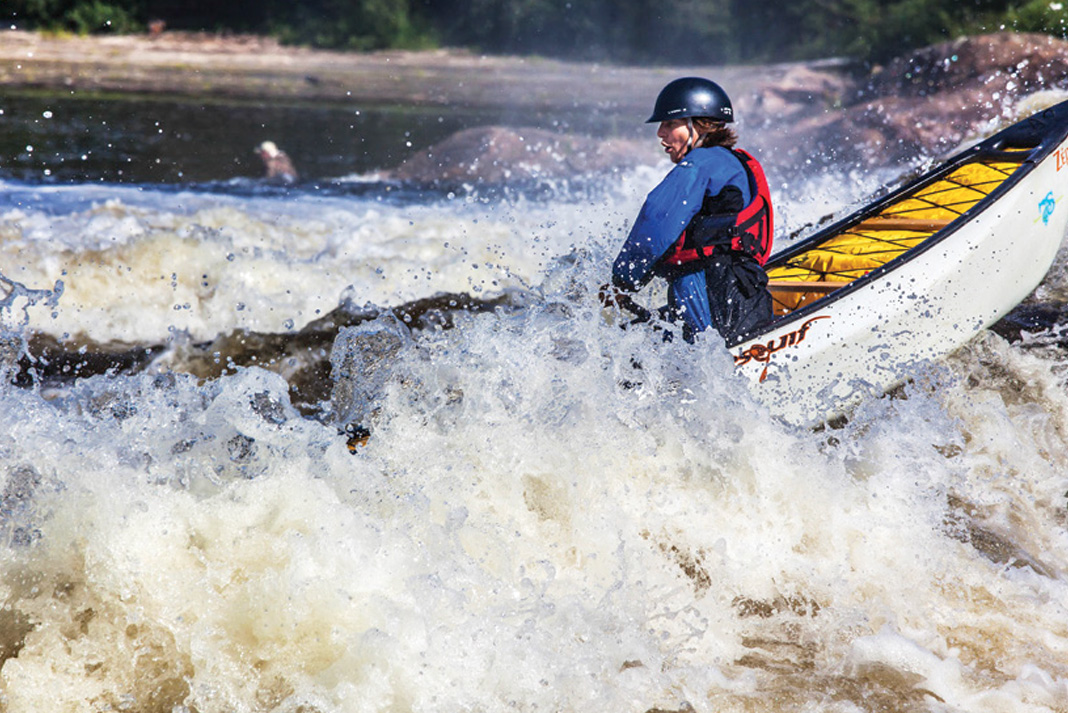
Improbable places
We see most of our world from a standing point of view. Give your action photographs a different angle and shoot from improbable places. Get as low as you can: I often lie down on the riverbank or get right into the water. If you attempt this, be ready to have your gear splashed or worse, and bring a lens cleaning kit. To get higher, climb a rock, a tree or a friend to get above the action.
PHOTOGRAPHING PEOPLE
An internationally published photographer who calls Minnesota home, Layne Kennedy’s images are featured in magazines worldwide on subjects as varied as pink dolphins in the Amazon River to traveling with Inuit hunters by dogsled. To get the most out of photos you take of your fellow trip-goers, check out her best advice.
Don’t forget to take photographs of people
The most valuable lesson I learned while covering wilderness assignments is to make photographs of people. It’s easy to be distracted by the beauty of paddling a foggy lake at sunrise, but your audience wants to see people in those photographs. It puts them on the trip with you and holds their interest.
Subject to be most prominent
When I photograph people in the wilderness, I want to create a sense of place while still focusing on the person. To do this, a 80-200mm lens is useful for closing in tight on a subject and eliminating distractions in the background. Combined with a wide open aperature, it allows the subject to be most prominent.
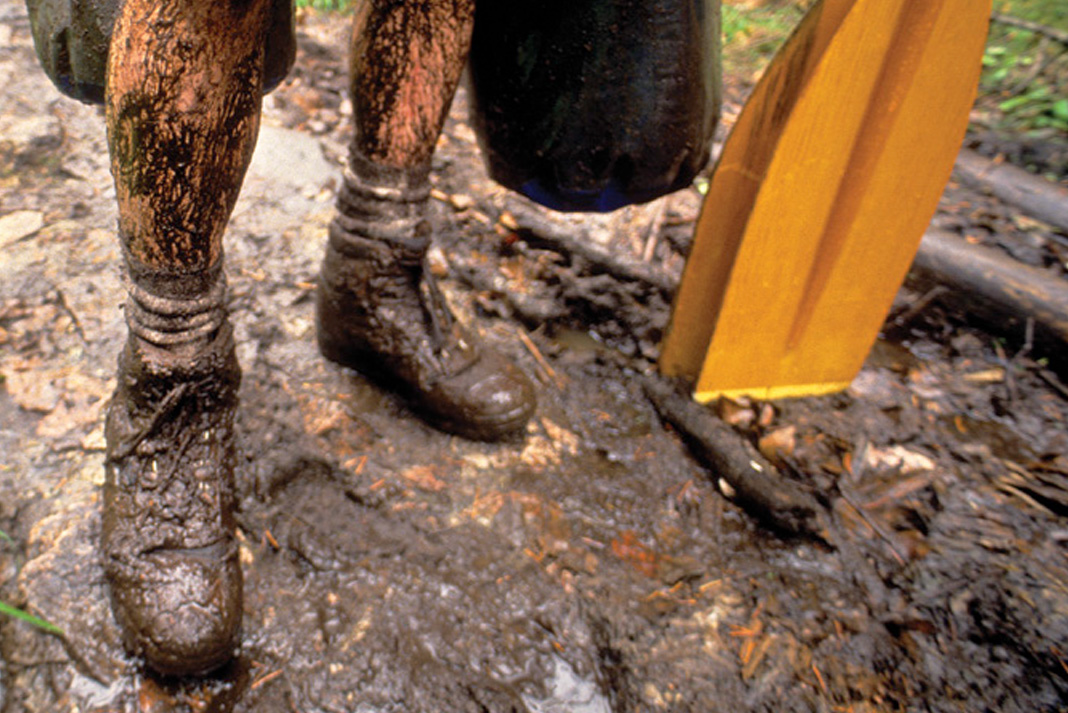
Photograph emotions
Let your emotions set off an alarm in your head to alert you to grab your camera. For example, if you are on a portage and your paddling partner gets covered in mud and you laugh, this is a sign that the moment would make a great photo. The same rationale applies to taking out your camera during the smiles of a campfire sing-along or the struggle of foul weather. Photograph the joy as well as difficulties on your trip to get unique shots and more fully capture the experience.

CANDID PORTRAITS
“Intuition.” Goh Iromoto admits the secret to authentic photographs of people is easier named than mastered. “I didn’t have it when I started,” he says. “I’d have the camera over my shoulder, see something, have that moment of hesitation and miss the shot.” His advice: shoot more. “If you always have your camera and you’re always ready to shoot, you start to gain that intuition,” Iromoto continues. “Be observant and quiet—watch other people when their concentration is elsewhere, and you’ll capture those candid moments.”
In this image, the paddler is busy attaching her spray deck, preoccupied with the logistics of the upcoming trip. Iromoto composed the photo to lead the viewer’s eyes to her pensive expression and capture that moment of departure. “Composition has a lot to do with lines,” he explains. “The line of the dock from the camera to the distant island is a pathway for the eyes to follow. I started shooting from standing height, but the image looked flat. By lying down on the dock, I created a sense of depth and distance.” If you’re struggling to find an interesting composition, Iromoto says, “just crouch or lie down and you’ll get a whole different world of images.”
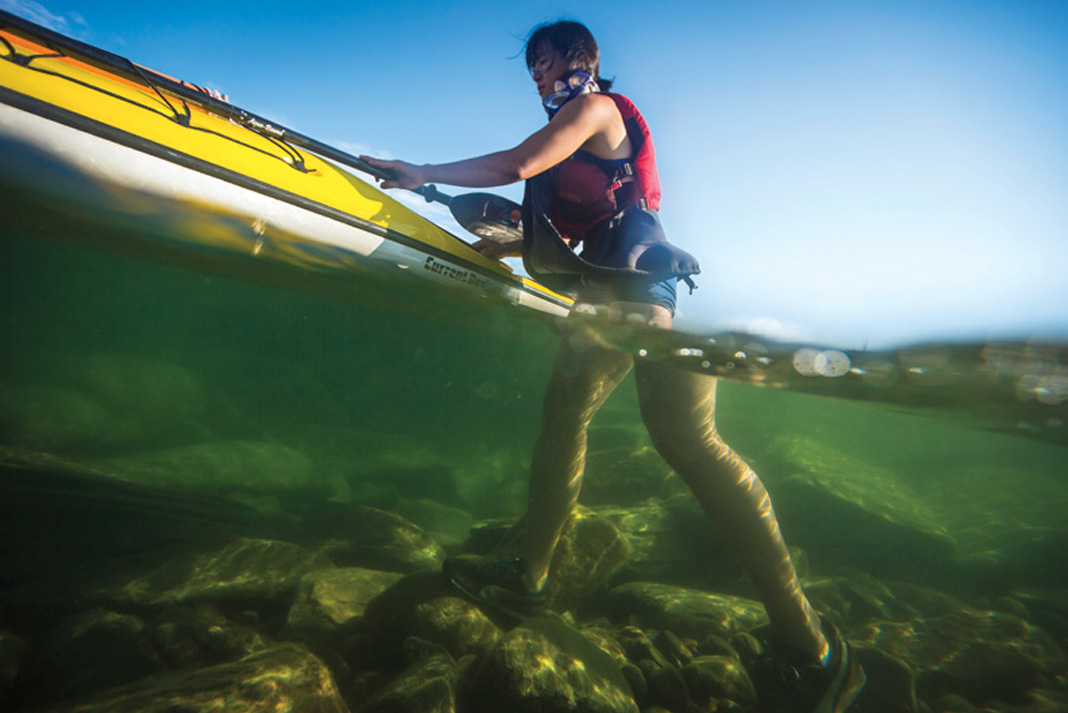
SHOOTING SPLITS
You don’t need a $10,000 housing to get underwater images like this one, says Iromoto. For paddling photography, lighter is better. He uses a waterproof camera dry bag made by EWA-Marine to protect his Canon 5D Mark III. “It weighs just 400 grams compared to the 30-pound camera system I use for commercial underwater photography,” he says. “It’s so handy, I often leave it on when I’m kayaking. I’ve even jumped off a cliff with it, shooting as I fell into the water.”
Split images trick the camera’s autofocus into focusing on the waterline, rather than the scene beyond, warns Iromoto. Before dunking the camera, focus on your subject, set the camera to aperture-priority mode and use a wide aperture like F/2.8 or F/3.5. Then it’s just a matter of making sure the lens is half in, half out of the water. “Use your intuition and watch the subject,” rather than keeping your eye glued to the viewfinder, suggests Iromoto. Shooting with an ultra-wide angle lens and getting to know how it “sees” also help. “Knowing my lens means I know instinctively what will be in the frame,” he adds, “then I can just enjoy the scene.”
LINES AND LIGHTING
When shooting outdoor action and portraits, says Iromoto, “Ninety-five percent of the time I put the sun behind or to the side of the subject.” Back- and side lighting make for more interesting and appealing images than flat overhead or harsh frontal light. Except for cloudy days, which give a softer overall look, Iromoto avoids shooting at mid-day.
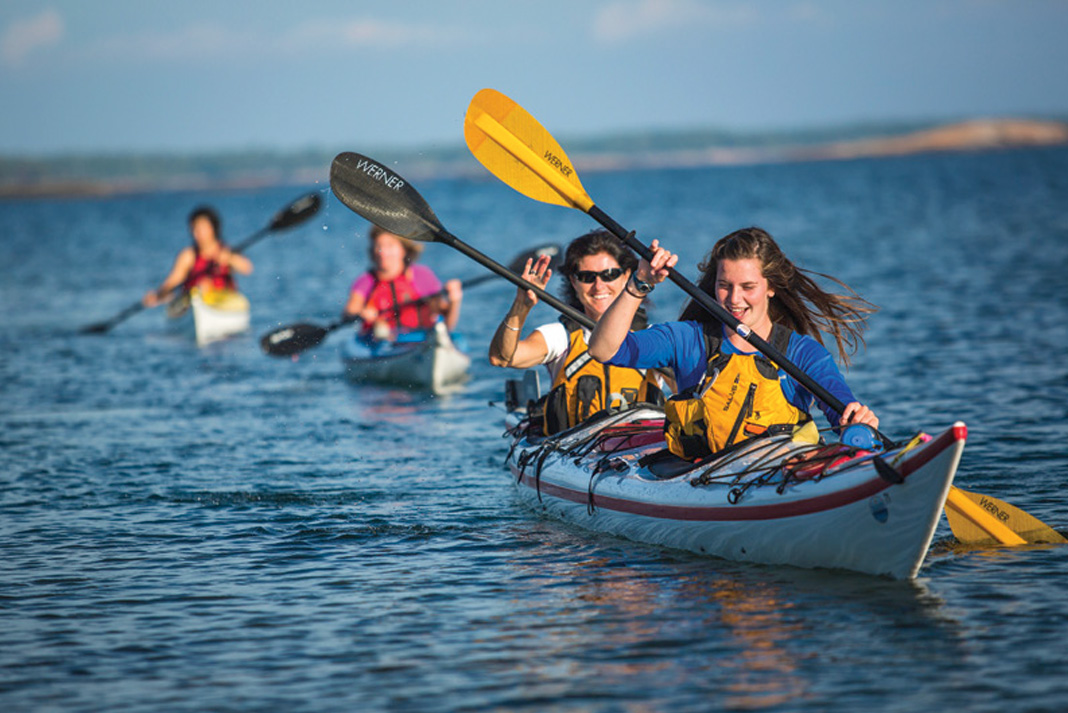
To make this side-lit portrait, Iromoto waited for a moment when the three kayaks formed a line leading into the frame. “There are actually two lines at work here: the diagonal from the tandem’s bow to the last kayak, and what’s called a ‘Dutch angle’—a tilted horizon that forms a sideways V with the paddlers’ line.” Wait, say again? While a flat horizon is more traditional, tilting the horizon can make action photos more dynamic and eye-popping. “On a classic scenic wide angle (like The Trip, next page) that tilted horizon would drive me nuts,” says Iromoto, “but in an action shot like photo #4 (next page, top) the image would lose its power without the tilt.”
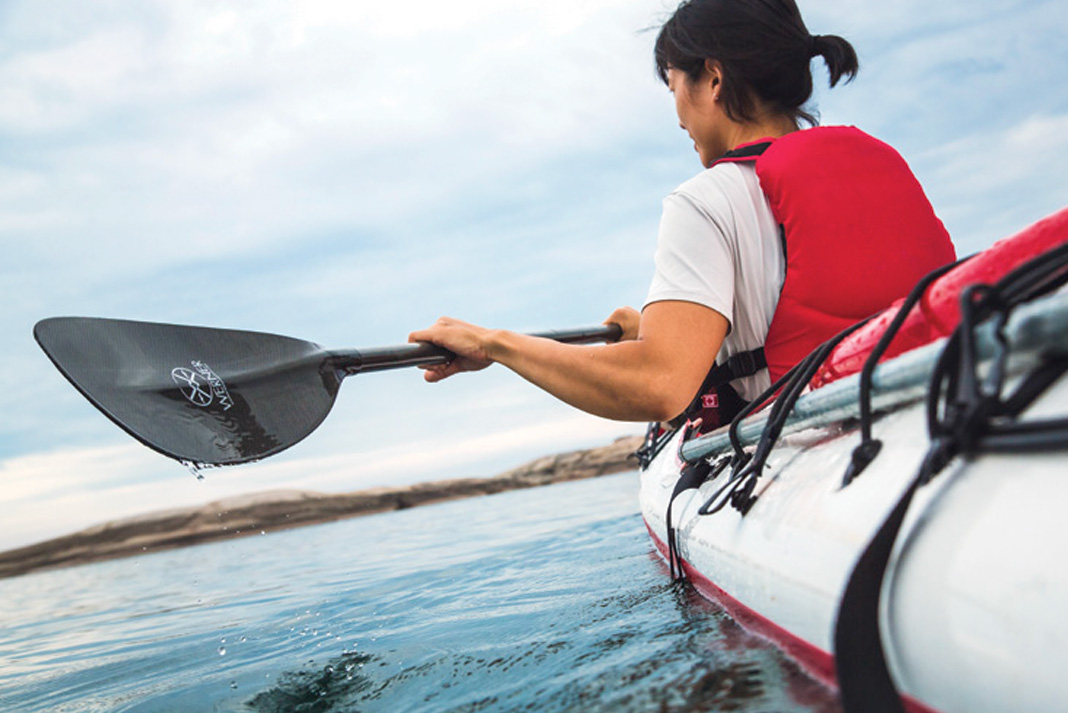
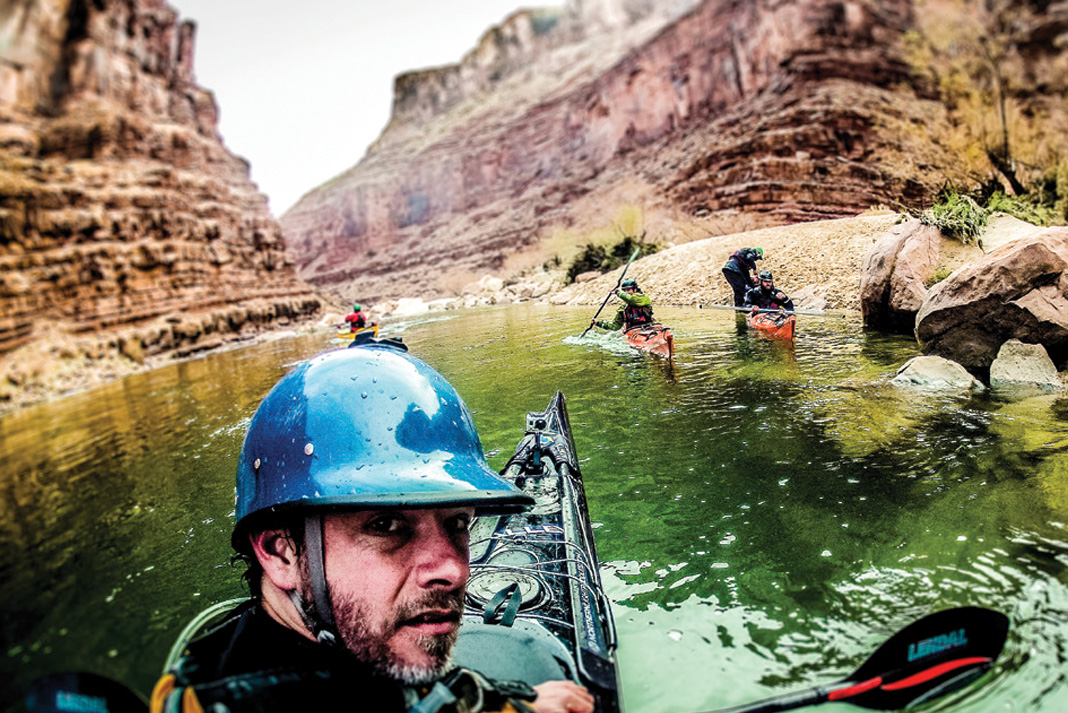
FIND UNIQUE PERSPECTIVES
“Look for angles that haven’t been done,” says Iromoto. “If you’re doing something that feels really awkward or difficult, it’s probably a unique perspective.” For this image, Iromoto sat in the back of a tandem kayak and held the camera just above the water at the side of the boat. For image #3 (previous page), he paddled ahead of the group and then twisted in his seat to shoot over his shoulder. “If you’re sitting and shooting comfortably in your kayak, you’re going to get the same images as everyone else,” he says. Finding a unique angle isn’t just a gimmick. “A new perspective can be refreshing, inspiring and invigorating. It can spark something in people to go outside and explore and seek out their own adventures.”
Be a storyteller
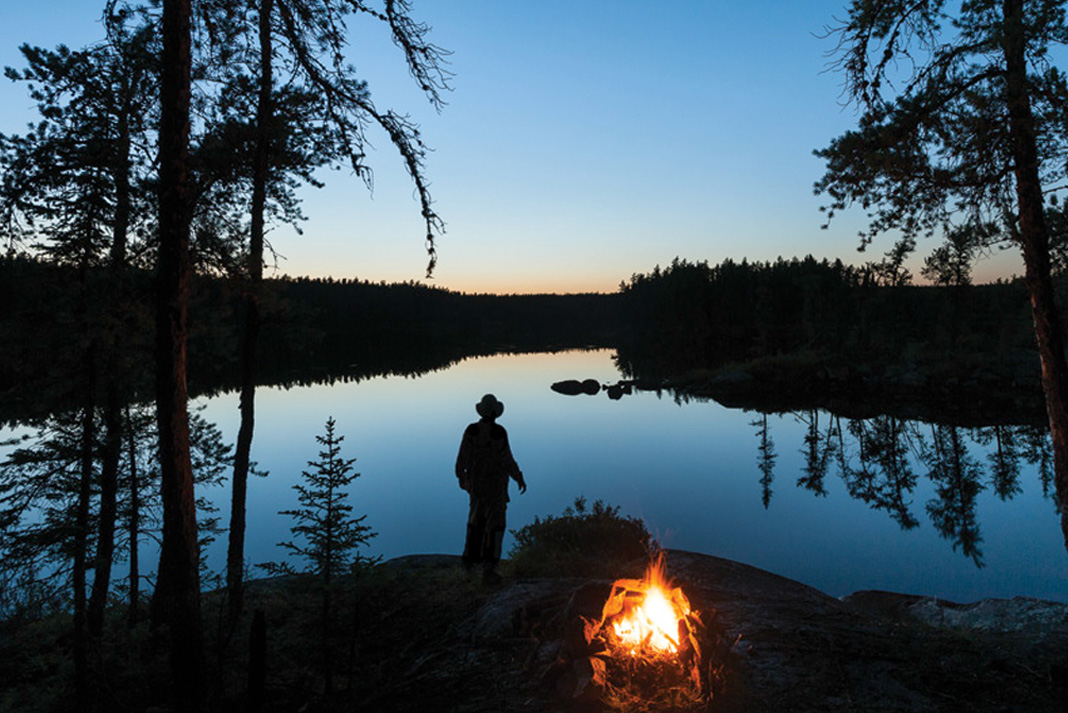
Be a storyteller. I was determined not to take the same old reeling-in-a-fish-at-camp shot. I noticed the sparkling water on the lake and knew a silhouette would separate the fisherman from the background. I waited for the right moment, when I could see part of the rod over his shoulder. The eye always goes to either the sharpest or brightest spot first in a photograph. In this case, it’s the bend in the rod. The bend adds tension and defines his purpose. Instantly, you know he has a fish on.
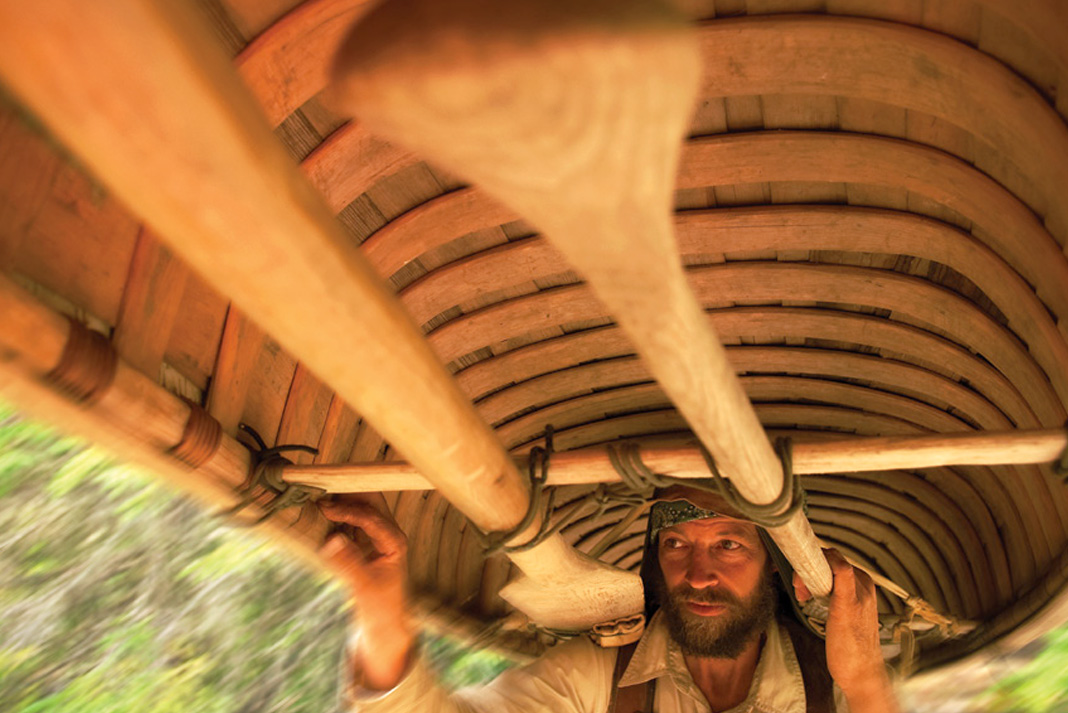
Ask yourself, “What am I trying to say?”
Ask yourself, “What am I trying to say?” before aiming your lens. When I followed adventurer Erik Simula on a major expedition, I wanted to make an image that showed what it might feel like to be under his birch bark canoe while portaging. To do that, the photograph would require movement so that the viewer could feel like they were traveling with him. Once I knew what I was trying to say visually, creating the photo became a simple matter of problem solving.
EXPEDITION PHOTOGRAPHY
PHOTOS by ERIK BOOMER | WORDS by VIRGINIA MARSHALL
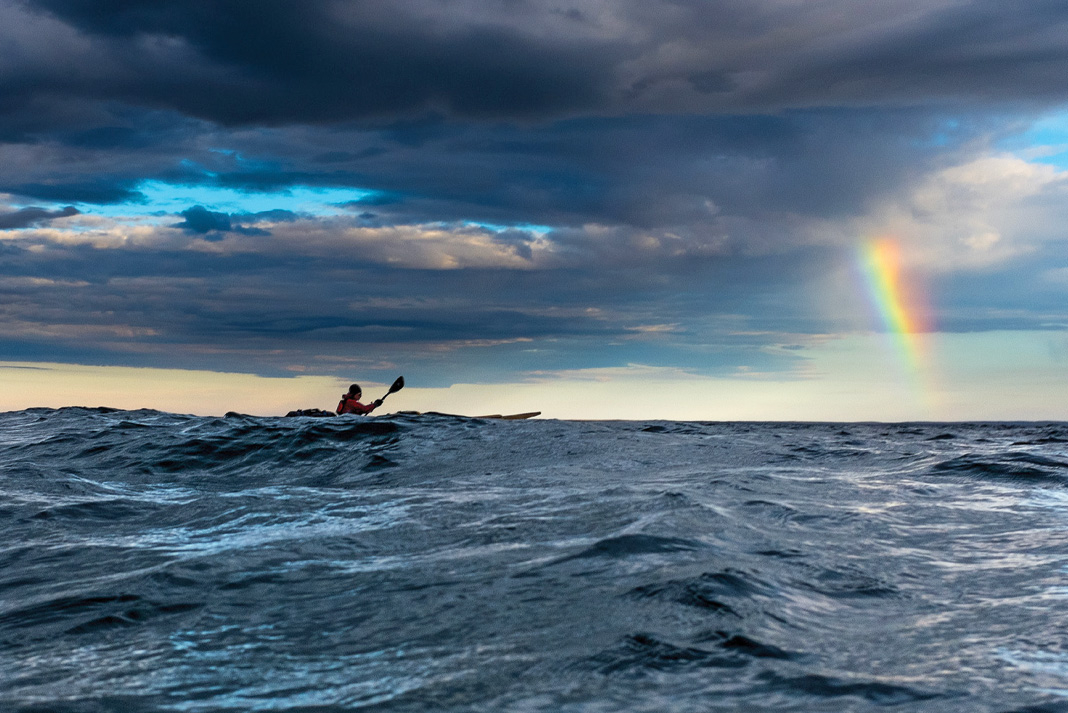
LEARN THE LANGUAGE
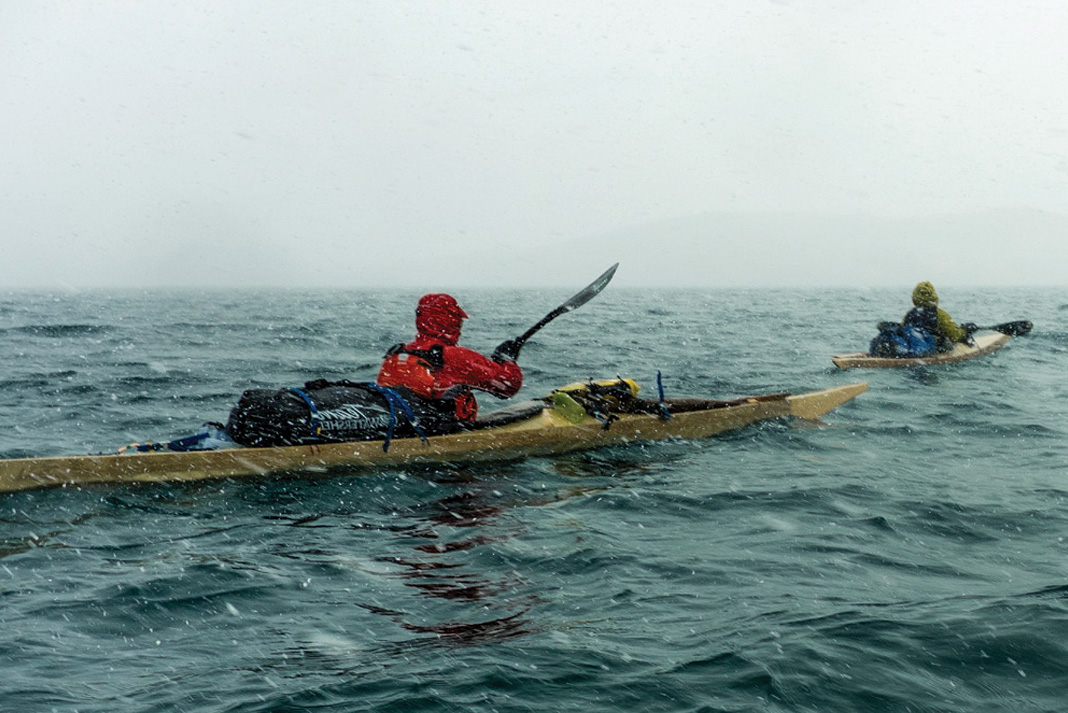
The language of photography, that is. Photographs can be either evocative or narrative, and the best documentary shooters capture elements of both. Evocative images create an emotional response in the viewer—in this image, the tension and challenge of paddling in wind and waves contrasts with the relief of a lifting storm—while narrative pictures depict the subject in a more literal way. “On an expedition, I set out to capture images that will tell a story visually—showing the challenges and also the beauty of the landscape that I am traveling through,” says Arctic adventurer Sarah McNair-Landry. Baffin expedition partner and professional photographer Erik Boomer agrees. Before your trip, he suggests, “Take the time to write out a photo plan.” Capturing those critical moments, says McNair-Landry, is all about keeping your camera handy. “When it’s cold and you’re tired, it pays off. My favorite shots have been during those tough times or stormy conditions.”
COPE WITH THE ENVIRONMENT
How do expedition paddlers keep camera equipment working while shooting in freezing, wet, salty conditions for weeks at a stretch? “The two biggest difficulties are keeping the cameras safe from the water, and keeping the batteries charged in the cold,” says McNair-Landry. The team stored their camera equipment in Watershed dry bags, which they clipped to the kayaks’ decks or stashed in their cockpits for easy access. A veteran of expeditions in frigid environments, McNair-Landry says the secret to extending battery life is ensuring the batteries are warm before use. In cold weather, store spare batteries in a pocket next to your base layer so your body heat keeps them warm. On a long trip, purchasing a compact solar charger may make more sense than buying more batteries. “Since we were traveling for two months, we used solar panels to charge not only our cameras, but also our other electronics,” she says.
CONNECT WITH OTHER CULTURES
Learn as much as you can about local culture and customs before you leave and when you arrive. McNair-Landry and her teammates spent four weeks in Nunavut building their own traditional skin-on-frame kayaks to use on the expedition. As their crafts took shape in the woodshop of the local high school, the paddlers also worked with schoolchildren and teachers to build scale kayak models, sharing their learning and discovery with the community. “It’s important to know your subject,” says Boomer, “I try to spend time with people, really get to know them and at some point, if I am lucky, I earn their trust to set up a good photo.” McNair-Landry agrees, “Be courteous—some people don’t like their picture taken, and that needs to be respected.” Get permission first, says
Boomer, except “when something wild or crazy happens right in front of you—shoot away, then ask for permission later.”
SIMPLIFY YOUR KIT
On a difficult expedition, keep your photography kit as simple as possible. “I only had a fixed lens 35 mm for the whole 65 days,” says Boomer. “Technically the small Fujifilm X100S is a point-and-shoot, but the quality is top notch.” For panoramic landscape images, Boomer got creative in the editing room by stitching photos together. “I was really happy to not bring any other lenses and find a way to make that one work.”
OUTSMART YOUR POINT-AND-SHOOT
My friend and expert paddler Paul Kuthe has a t-shirt that reads, “It’s not the boat.” It’s not the camera, either. On my walls are poster-sized images made with cheap waterproof cameras, not digital SLRs with giant lenses and sensors the size of hatch covers. Skilled shooters can make excellent images with small point-and-shoot cameras. – BY NEIL SCHULMAN
Know How the Meter Works
Camera meters are programmed to make the image 18 percent grey, the tonality of a piece of outfitting foam. It will turn white snow grey. Want a black, inky silhouette? The meter will turn that grey, too. Since not everything in the world is grey, you need to take control.
Compensate
On my cameras, the exposure compensation button is worn from use. It overrides the camera’s meter in fine increments (1/3 of an f-stop). Know where this button is. You can also lock the exposure by holding the shutter button partway and recomposing.
Expose for the Highlights, Process for the Shadows
Cameras have less dynamic range than your eye. Dark shadows are often acceptable. Blown highlights aren’t.
Get Modal
Your camera’s modes (action, portrait, landscape, etc.) use different combinations of shutter speed, depth of field and color balance. Learn what they do so you can assert creative control.
Maximize Speed
Some shutter lag is inevitable. To minimize it, shut off the auto-review and flash and set the camera to burst mode. Use a memory card with a fast write speed.
Move
The best feature of these small cameras is their rugged portability. Use it. Change perspectives, get in the water, climb cliffs and get the best angle.
Point-and-Shoot is an Attitude
Point-and-shoot is more of a mindset about making quick snapshots than it is a type of camera. Take your time. Think. What really matters in photography is vision, light, composition and meaning, not the device. Nobody asked Melville what kind of pen he used to write Moby-Dick.
GET THE MOST FROM YOUR GOPRO
WORDS and PHOTOS by JAIME SHARP
SEE IN POV
The Point Of View (POV) camera fad has swallowed our recreation world whole, and with it comes a flood of marginal DIY action videos and photos. What makes POV cams so much fun—and potentially so powerful— is that you can mount them in the craziest places and get mind-blowing compositions. You just need to know what works.
Learn what field of view your GoPro or similar POV captures, so you can visualize before you shoot. Take lots of photos and you’ll start to get a feel for how wide the shot will be, and how the perspective pushes objects away and flattens height. Add-on LCD screens are great for must-get angles, but they use up a lot more juice.
MOUNTING MATTERS
My go-to mounts for diversity and changing up angles on the fly are suction arms. I use RAM mounts, one with a short hand-sized arm and another with a two-foot pole. Both arms can be quickly repositioned, used handheld or strapped to objects for more non-traditional uses. Photos and video captured from a high or low perspective are far more impressive than the head-shoulder-cockpit shots we’ve all seen a zillion times. However you mount it, don’t forget to tether your POV to something bombproof. I have lost three GoPro set-ups to waterfalls, waves and roads.
WATER AND LIGHT
Don’t let moisture ruin your shoot. Rain-X is priceless for keeping the camera lens free of water droplets. To prevent fogging inside the housing when you are shooting in cold water or on sunny days, slip silicone desiccant tabs inside the housing to absorb moisture.
POV cameras’ light metering systems are irregular and notoriously finicky. GoPro images often look bland despite good composition and angle—highlights are blown out, shadows are too dark, blacks are dull and colors are erratic. The final key to making your GoPro images really pop is post processing with photo editing software like Adobe Lightroom.

TRIP PHOTOGRAPHY
WORDS and PHOTOS by FREYA FENNWOOD
GOLDEN HOUR
Make the effort to get out and paddle at sunrise or sunset, the “golden hours” for photography. For a silhouette like this one, point your camera into the sun and ask a friend to paddle out and do a few laps in front of you. To get this shot, I was up to my armpits in
the water, holding my camera in a waterproof housing just above the surface. I put the sun behind and just at the edge of the paddler, and used a small aperture (high f-stop, like F/22), to create a dazzling little sun star. Try getting out of your comfort zone: get high, get low, get in the water. Your sunset shot will be a stunner and not just the same snapshot you have taken over and over again.
MEMORABLE MOMENTS
It’s often the photographs you weren’t planning on that are the most memorable. Take this spontaneous group shot of an impromptu tailgate gathering as we waited for the ferry. The image captures the carefree spirit of a bachelorette trip with friends. This is the true measure of a successful trip picture—whether it embodies the feeling of a particular moment.
TRY SOMETHING DIFFERENT
Create fun and unique trip images after dark with a technique called light painting. For this shot, I put my camera on a tripod and used a remote release to hold the shutter open (you can also use your camera’s bulb setting). Then I used a flashlight to trace the outline of the kayak and my friend holding the paddle, pointing the flashlight directly at the camera so just the lines of light appeared. I also painted light on the bags and used an off-camera flash inside the tent (you can get similar results painting a bright flashlight on the inside walls).
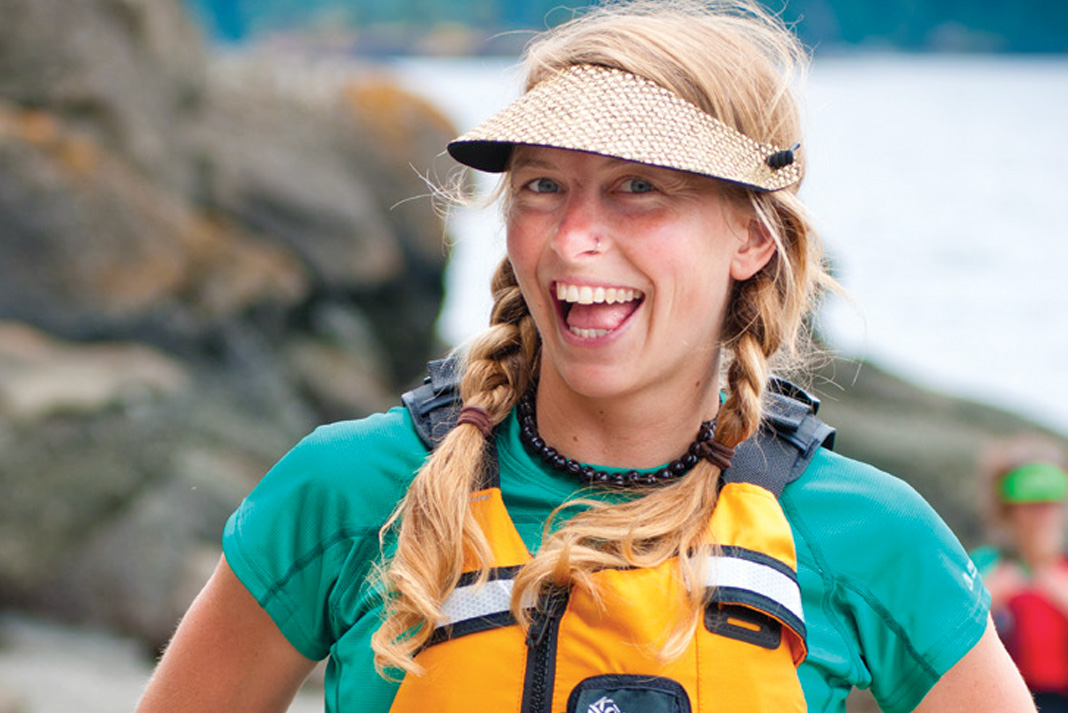
PORTRAITS WITH PERSONALITY
Photography is about being constantly observant and ready for that decisive moment at all times. Have your camera ready and out a lot to get people used to it, and you’ll capture authentic moments. Great trip portraits are all about seeing a natural smile and pressing the shutter at the right time. For flattering portraits your friends will thank you for, shoot a little zoomed in. A lens with a focal length from 50 to 200 mm will render naturally proportioned features and a pleasingly out-of-focus background.
Longtime National Geographic photographer Jim Richardson once said, “If you want to be a better photographer, stand in front of more interesting stuff.” Sea kayaking is certainly interesting, but subject matter alone won’t get you a great photograph. Learn how to use light and lensing, and wait for that moment that captures the essence of your trip to make an everyday paddle look like the adventure of a lifetime.
TAKE BETTER SHOTS SOLO
BY GARY LUHM
Paddling solo has its challenges, so much so that photography often ranks last in our preparation. Don’t make the camera an afterthought. At trip’s end you’ll be bursting with stories that will come alive when accompanied by great photos.
Plan
Make a shot list. Consider the images you want and the gear you’ll need to get them. A wide-angle zoom is indispensable while solo; wide is your story-telling lens. A longer focal length, like 75-300 mm, will isolate sea birds or mammals in their environment. Pack a tripod. If space is an issue, at least carry a tabletop tripod or Joby Gorillapod.
You’re the Boss
Paddling solo means you have control of your time, so you can photograph in the sweet light of dawn and dusk, no excuses. Rise early, shoot the magic hour and afterward do breakfast and break camp. In the evening, eat first, secure the camp and then venture out with your camera.
Put Yourself in the Picture
We love people pictures. People add scale and interest, and images with people tell the most compelling stories. Compose shots ashore on a tripod, set your camera’s 10-second time delay and sprint into position. Even better, use a remote release or set your camera’s interval mode to take a burst of pictures, so you’ll have many to choose from.
Shoot Action
Don’t just pose for the camera. Get shots of yourself hauling the kayak, pitching the tent, boiling water for hot chocolate or building a campfire. If something unexpected or memorable happens, do an on-the-spot reenactment if it’s feasible.
POV Pleasers
For selfies on the water, a bow or stern mounted POV is far more interesting than the view from a helmet mount. I like the GoPro Hero3, which has a built-in interval mode and wireless controller mounted on a wrist strap, so you can quickly change from video to stills.
 This article contains content that first appeared in the Early Summer 2015 issue of Canoeroots and Family Camping magazine and in the Early Summer 2014 issue of Adventure Kayak Magazine. Subscribe to Paddling Magazine and get 25 years of digital magazine archives including our legacy titles: Rapid, Adventure Kayak and Canoeroots.


