Many rely on satellite-assisted, turn-by-turn GPS navigation for everything from driving in the city to day hiking unfamiliar trail networks, but electronic navigation is no substitute for traditional map and compass skills. Electronics can fail, but whichever compass you choose to buy—from the fanciest to the most basic—won’t require lithium batteries or a reliable satellite connection to guide the way.
There’s no more visceral reminder of why paddlers need to master these skills than stroking for 20 eerie minutes into a foggy whiteout with the wind in your ears and the hairs standing up on the back of your neck. At its most basic, navigation is about getting from A to B. But being a skilled navigator is much more—it is an empowering way of better understanding our planet and safely exploring our place within it.
Identify the tools of navigation
Fortunately for backcountry travellers, the tools of navigation are simple, minimal and easy to carry:
- Topographic map or nautical chart for your area of travel
- Orienteering compass
- Watch
- Length of string
- Pencil
- Marine deck compass is optional but highly recommended
Read maps and charts
Maps and charts are the single most useful source of navigation information for paddlers. Map-reading, the art of correlating what you see on paper to what you see around you, is the foundation of sound route finding. Maps can provide clues to potential hazards and direct us to campsites, water sources and scenic areas.
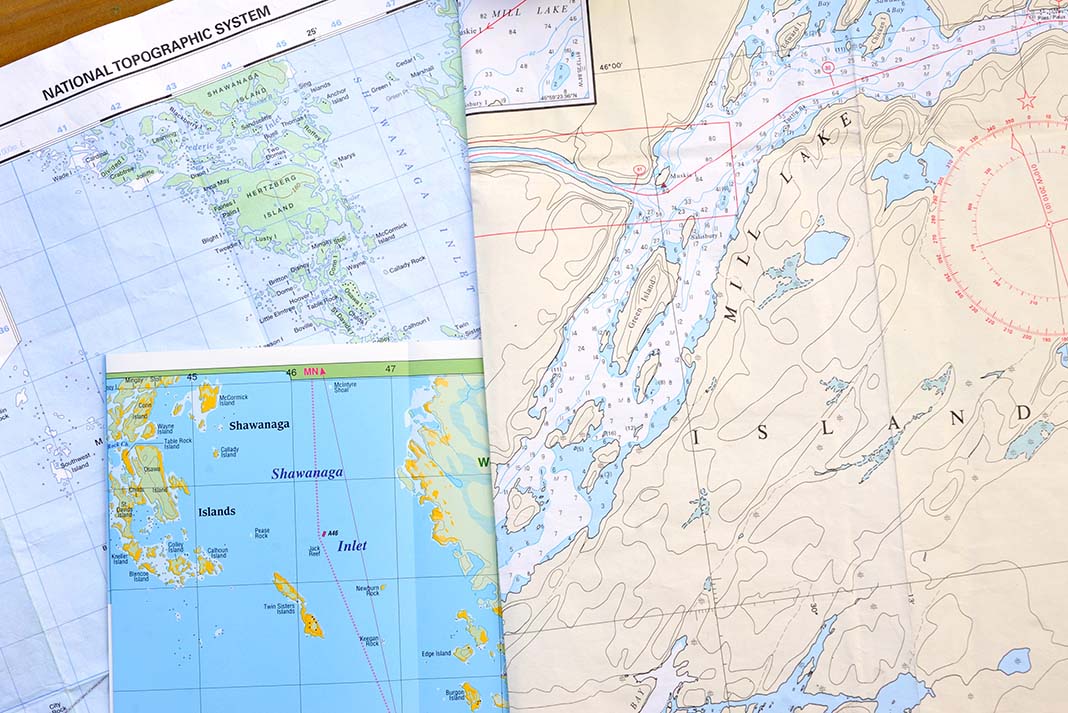
Depending on where you paddle, you may rely on topographic maps, marine charts or a combination of both. While maps emphasize land features—such as elevation and relief (using contour lines), roads and trails—marine charts focus on maritime features like water depths, tidal current speed and direction, buoys and other aids to navigation.
Paddlers are unique in that we spend time in both environments. In coastal areas with prominent features and frequent boat traffic, marine charts are indispensable. On freshwater and in areas with indistinct coastlines or infrequent boat traffic, maps are more commonly used. Topographic maps are particularly invaluable for locating potential landing sites and identifying coastal features like cliffs, headlands or inflowing rivers.
Compass basics
Whether you’re tackling open water crossings, weaving among island mazes or hunting for an elusive campsite in the fog, a compass is invaluable. Use a compass to orient yourself within the landscape, define a line from A to B, and pinpoint your position by establishing bearings to known landmarks.
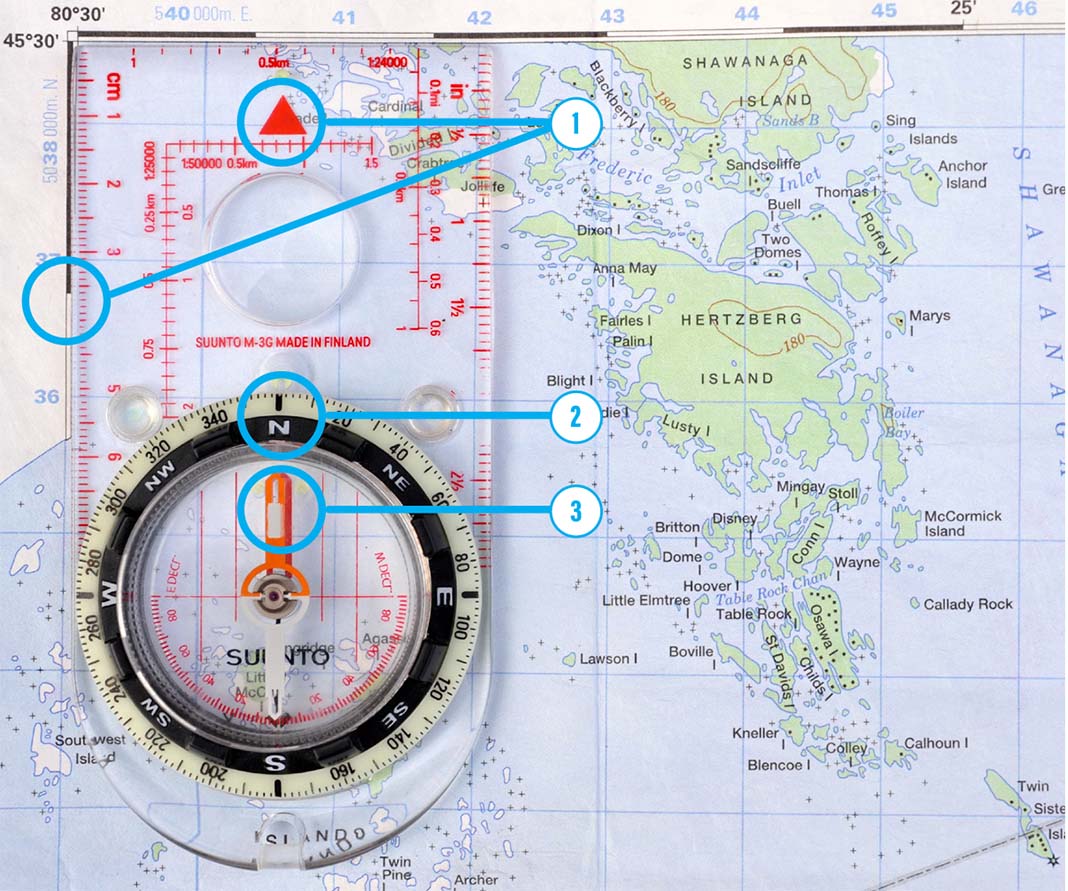
Identify the parts of a compass
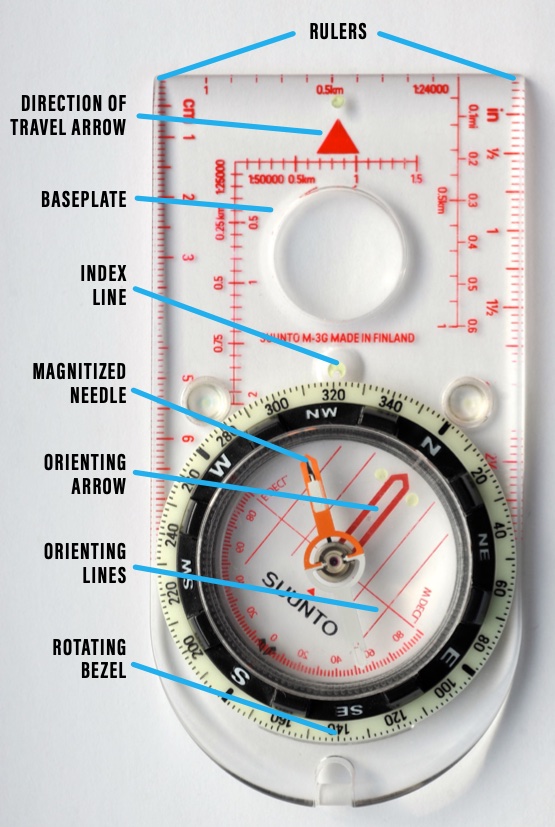
Baseplate
Transparent, so you can see your map through it, with at least one straight edge for taking bearings and transferring them to your map.
Rulers
Use with your map’s scale to measure distances.
Direction-of-travel arrow
Shows you which direction to point the compass when you’re taking or following a bearing.
Rotating bezel
This outer ring surrounding the needle housing is printed with direction indicators (N, S, E, W) and 0° to 360° markings.
Index line
Located at the top of the bezel, this is your “read bearing here” mark.
Magnetized needle
The red end (white on some compasses) of the needle always points to magnetic north.
Orienting arrow
Used to orient the bezel with magnetic north, it has an outline shaped precisely to fit the magnetized end of the needle.
Orienting lines
Parallel lines rotating with the bezel; correctly aligning these with the north-south grid lines on a map aligns your orienting arrow with north.
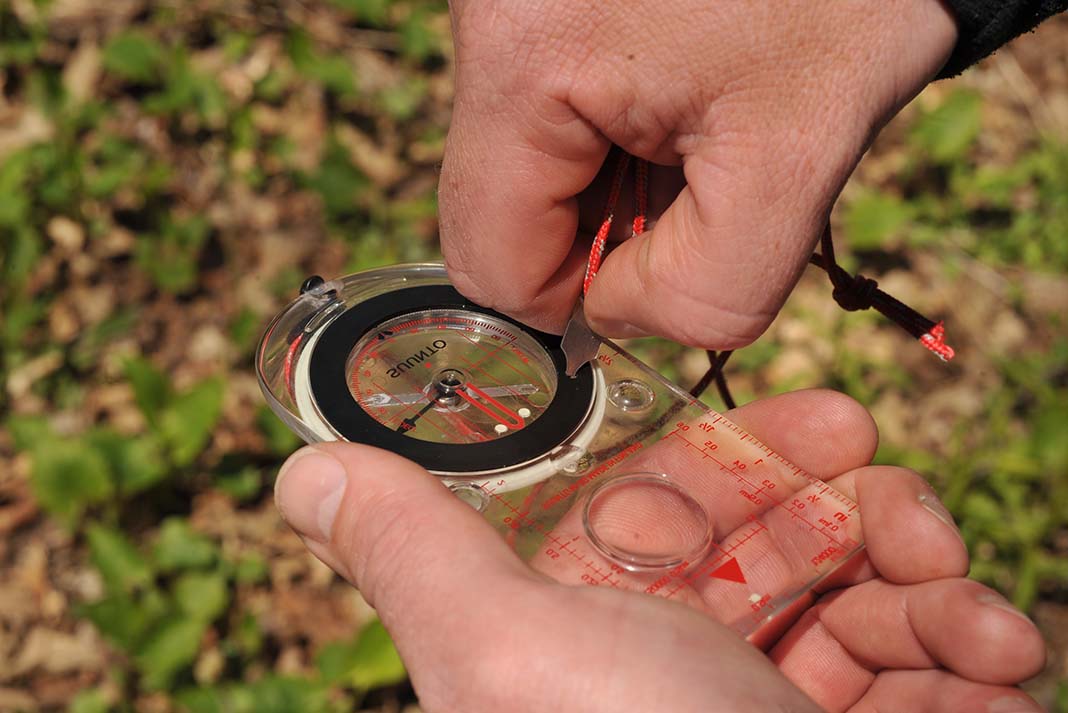
Most handheld orienteering compasses also include a lanyard for hanging the compass around your neck, but kayakers will find this string is most useful for measuring distances on your map, or girthing to your decklines or PFD to prevent accidental drops overboard. If your compass isn’t advertised as floating, it will sink!
Adjust for declination
Finding north on a map is a no-brainer—it’s at the top. But while maps and charts are oriented to the geographic North Pole (or “true north”), your compass needle points to a different location: magnetic north. The difference between the two is called declination (or variation) and results from the ever-shifting nature of the Earth’s magnetic field.
This magnetism originates deep within the planet’s mineral-rich core and the circulation of this fluid core means our magnetic poles are in constant motion. In fact, magnetic north has been drifting from the Canadian Arctic toward Siberia for over a century, and is currently migrating at a rate of about 40 miles per year. Today, true north and magnetic north sit about 250 miles apart.
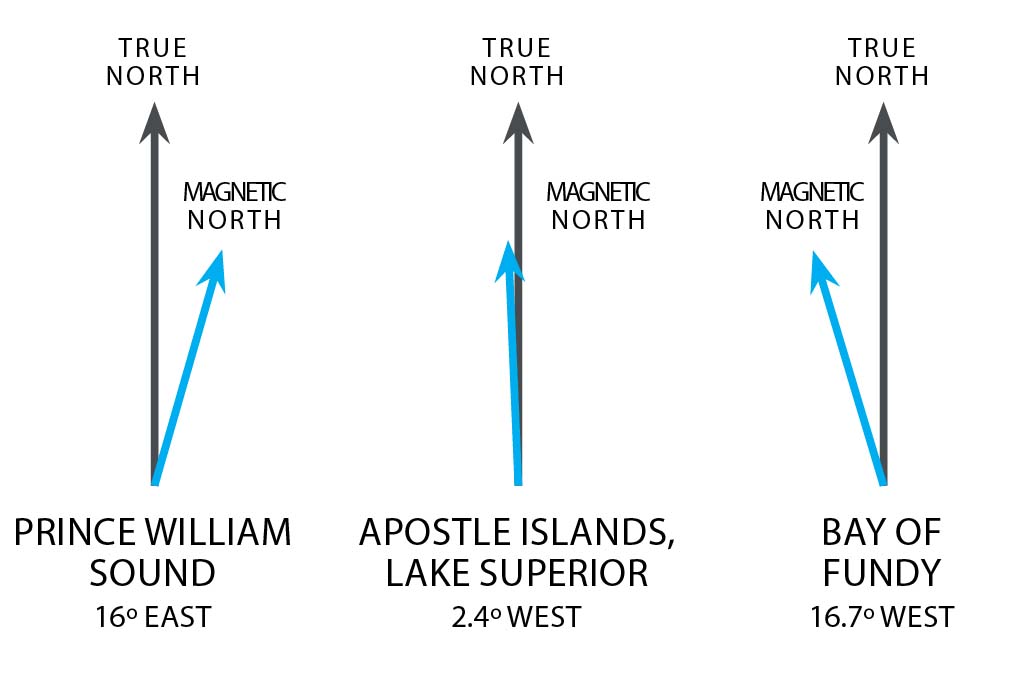
The fixed position of the geographic North Pole simplifies cartographers’ jobs, but it means compass users have to do a bit of math to ensure our map and compass are speaking the same language. In Canada and the continental U.S., declination can vary from nearly 20° east on parts of the West Coast, to nearly 20° west on areas of the East Coast. Compensating for this declination is key to taking accurate bearings. A 15° error, for example, on a mile-long crossing puts you a quarter-mile away from your target.
Check your chart or map for the declination value for your trip area. It will be listed in the map margin, or indicated within your chart’s compass rose. Since magnetic north is always on the move, declination also changes over time. If you are using an older map or chart, you’ll need to update the declination using the listed rate of change or, better yet, consult an online magnetic declination calculator or the National Oceanic and Atmospheric Administration’s (NOAA) current world magnetic model.
In eastern Canada and eastern United States, ADD declination when moving from a map bearing to a field (magnetic) bearing, and SUBTRACT declination to translate your compass bearing to your map. West of the Great Lakes and Mississippi River, do the opposite.
A bit of preplanning goes a long way here. Before your trip, update your maps with this year’s current declination. Make sure any bearings you plot on your map are adjusted for declination and marked with an ‘M’ for magnetic, so they’re compass-ready. Many orienteering compasses also have an adjustment screw on the back of the baseplate, which allows you to set-and-forget the declination right in your compass. If you paddle in the same area most of the time, set your compass to the local declination and you won’t have to do any more math.
Orient your map
Before you begin taking and following bearings, your first step should be orienting your map so it aligns with the actual landscape around you. Once you’ve set declination, map orientation is easy:
1
Lay map on a flat surface
Start by laying out your map on a flat surface. Place your compass on the map with the direction-of-travel arrow pointing toward the top of the map and one straight edge of the compass at the edge of the map.
2
Rotate the bezel
Rotate the bezel so N (north) lines up with the direction-of-travel arrow.
3
Spin the map
Carefully spin the map (don’t touch the compass) while watching the magnetic needle. Continue turning the map until the red end of the magnetic needle is within the outline of the orienting arrow.
Ta-da! Your map is now oriented correctly to the real world. Take a moment to become familiar with how recognizable landmarks like islands, headlands and hills are represented on the map. How many can you now identify through just a basic sense of direction?
Refer to your map often as you paddle, because staying found is far easier than finding yourself after you are lost.
How to take a bearing
If thinking about bearings and degrees brings on high school trigonometry flashbacks and exam sweats, don’t panic. A bearing is just a different, more precise way to describe a direction. On a compass, north is equivalent to 0° or 360°, east is 90°, south is 180° and west is 270°. A compass bearing is simply the angle—measured clockwise—between north (0°) and your direction of travel.
One important caveat to keep in mind when you are learning how to use a compass: Bearings are always relative to a specific location. In order for a bearing to be useful you must know where you are taking the bearing from, or what you are taking the bearing on. If you are truly lost, and have no way to orient yourself, a compass is of little use.
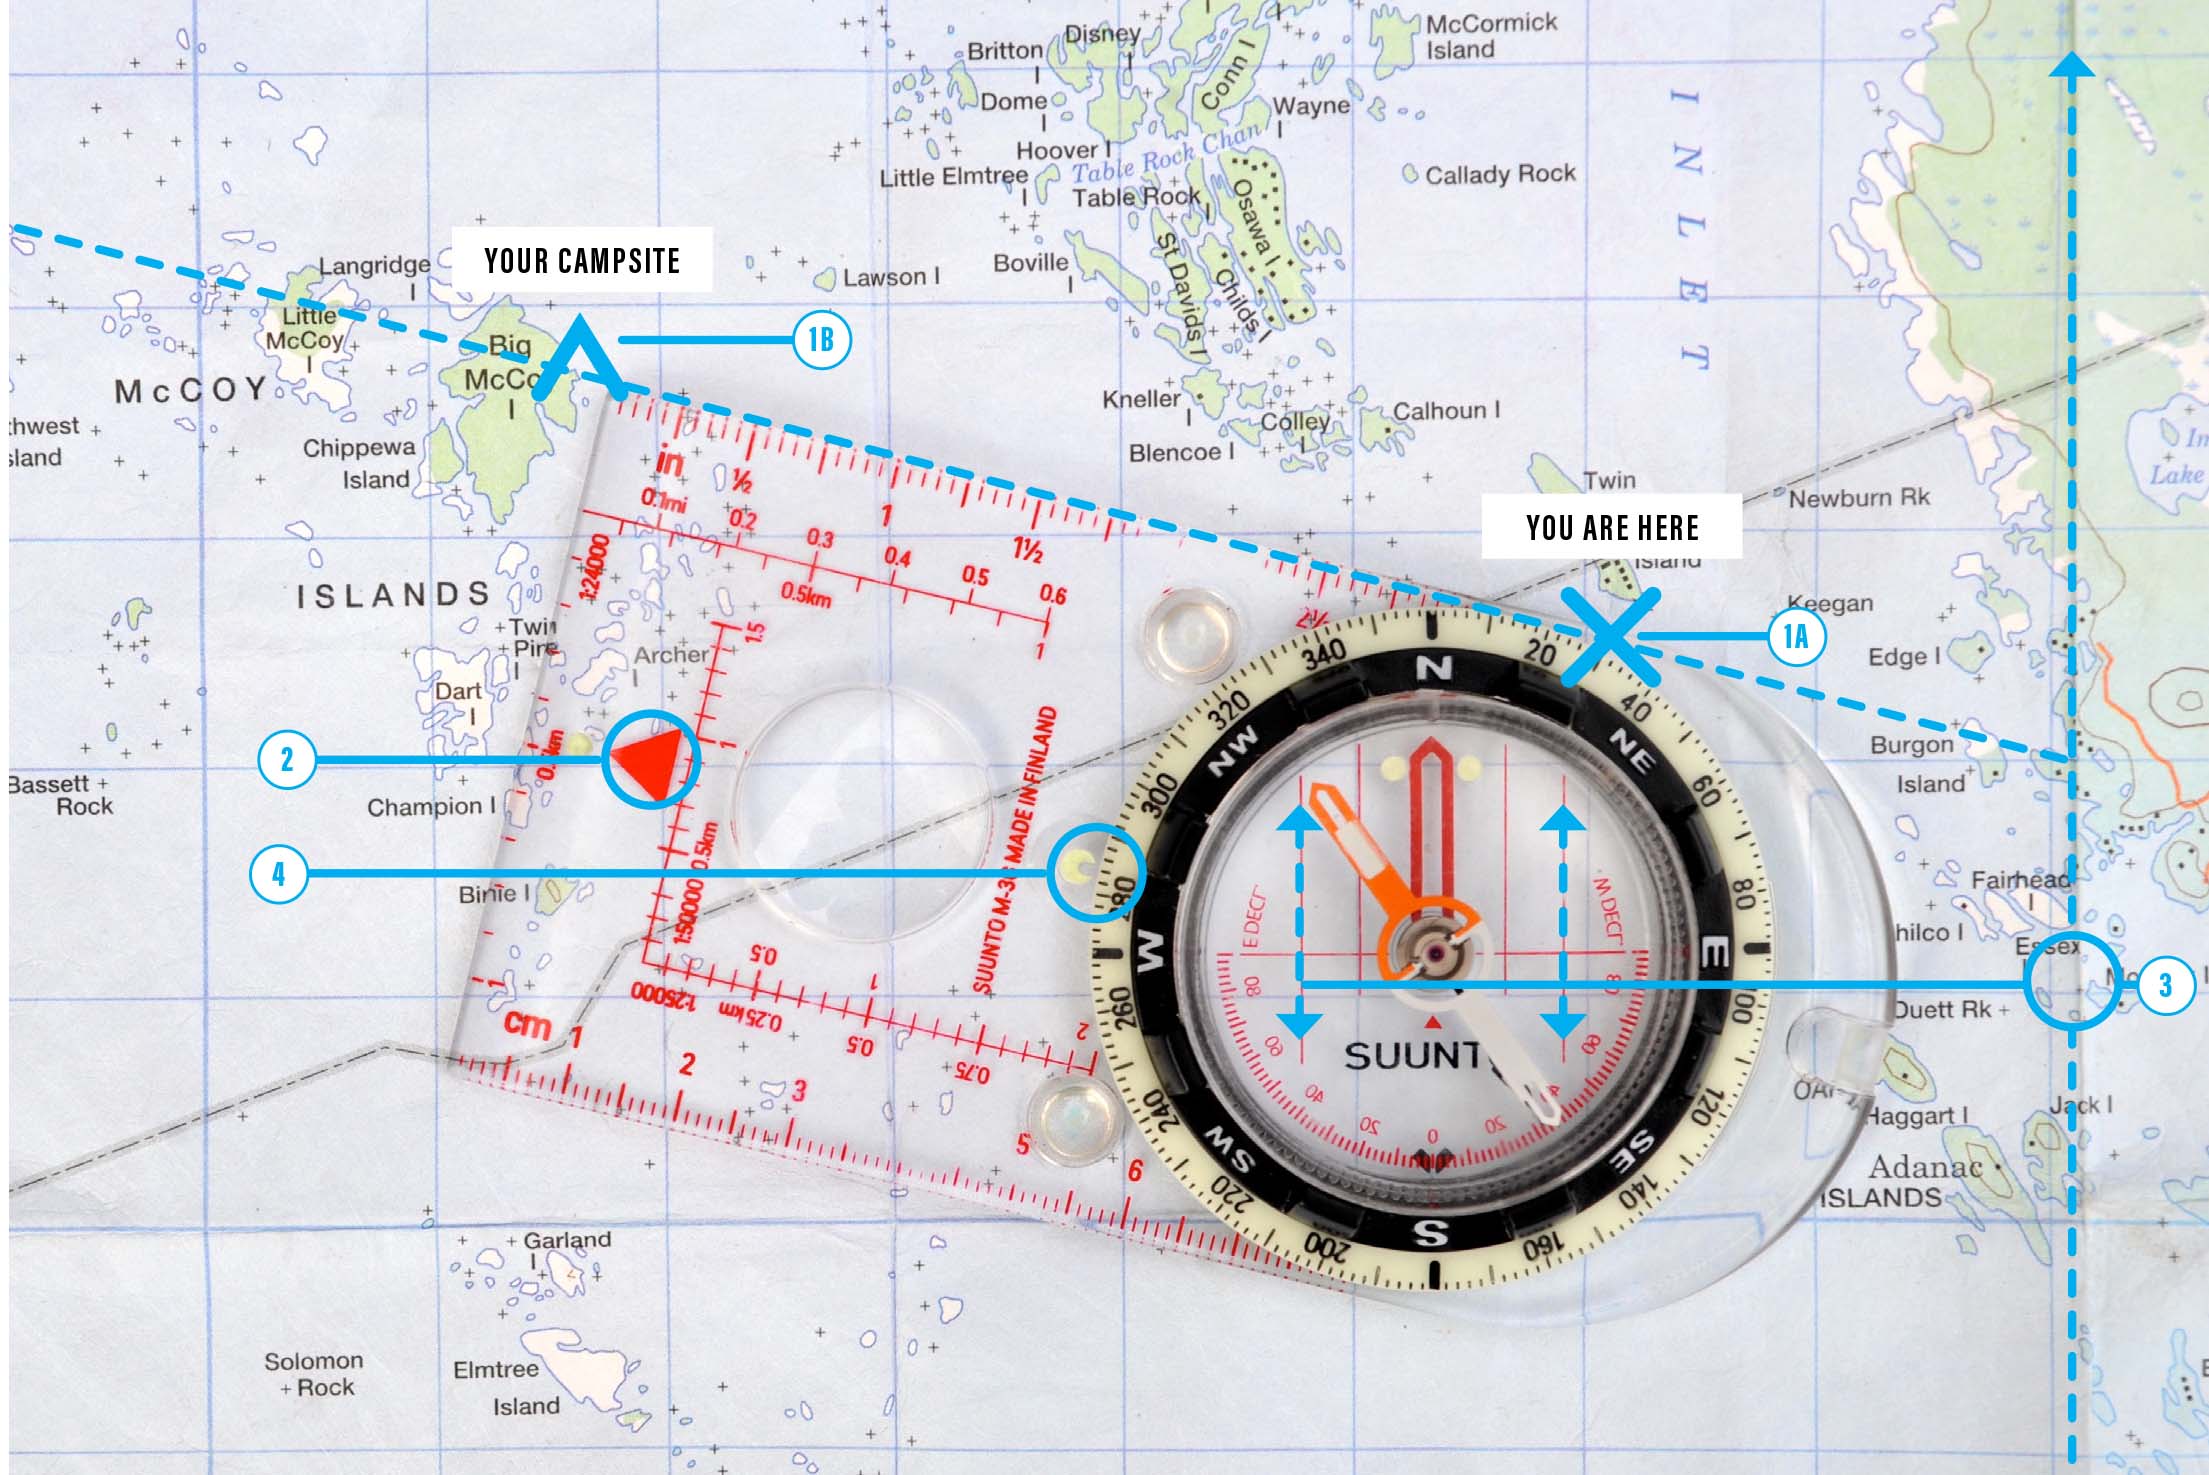
How to take a bearing from a map
Taking a bearing from your map is a useful way to confirm your heading in navigationally challenging landscapes—for example, when a labyrinth of islands obscures your destination. You can also plot the bearings for all large, obvious crossings along your route beforehand, to simplify compass work while afloat.
- On your map or chart, align the straight edge of your compass baseplate between where you are (1a) and where you want to go (1b). If you are plotting the bearing ahead of time, choose well-defined start and finish points, like islands or points of land. If your compass edge isn’t long enough, extend it with a sheet of paper and a pencil line.
- Make sure the direction-of-travel arrow is pointing toward your destination (in other words, your compass isn’t upside down).
- Firmly holding the baseplate to the map, rotate the bezel until the orienting lines on the compass are parallel to the north-south grid lines on your map (longitude lines if you’re using a chart). For this process, just ignore the magnetic needle. Make sure the N (north) marker on the bezel is pointing toward the top of your map (not south).
- Look at the index line to read the bearing at the top of the compass bezel.
- Now you can use your compass to follow that bearing to your destination. Don’t forget to add or subtract declination, if needed, to get your magnetic bearing.
How to follow a heading from a compass bearing
As you paddle along, the direction your bow is pointing is called your heading. On calm water, your bearing and heading should be the same angle. Of course, paddlers often have the added challenge of compensating for sideways drift due to wind, waves or current.
To follow a heading using an orienteering compass
- Check the bearing is correctly dialed in at the index line on the compass.
- Place the compass on a flat surface near the middle of the boat where you can see it, with the direction-of-travel arrow pointing away from you and the edge of the baseplate parallel to the keel line. The deck of your sprayskirt works well for this.
- Without touching the compass, turn your boat until the red end of the magnetic needle is inside the outline of the orienting arrow. Your bow is now pointing toward the bearing you took from your map.
- Paddle forward, monitoring your compass and adjusting your heading to keep the magnetic needle inside the orienting arrow.
How to take a bearing in the field
If you know where you are and want to identify an unknown landmark that you can see, you can take a magnetic bearing in the field and plot it on your map.
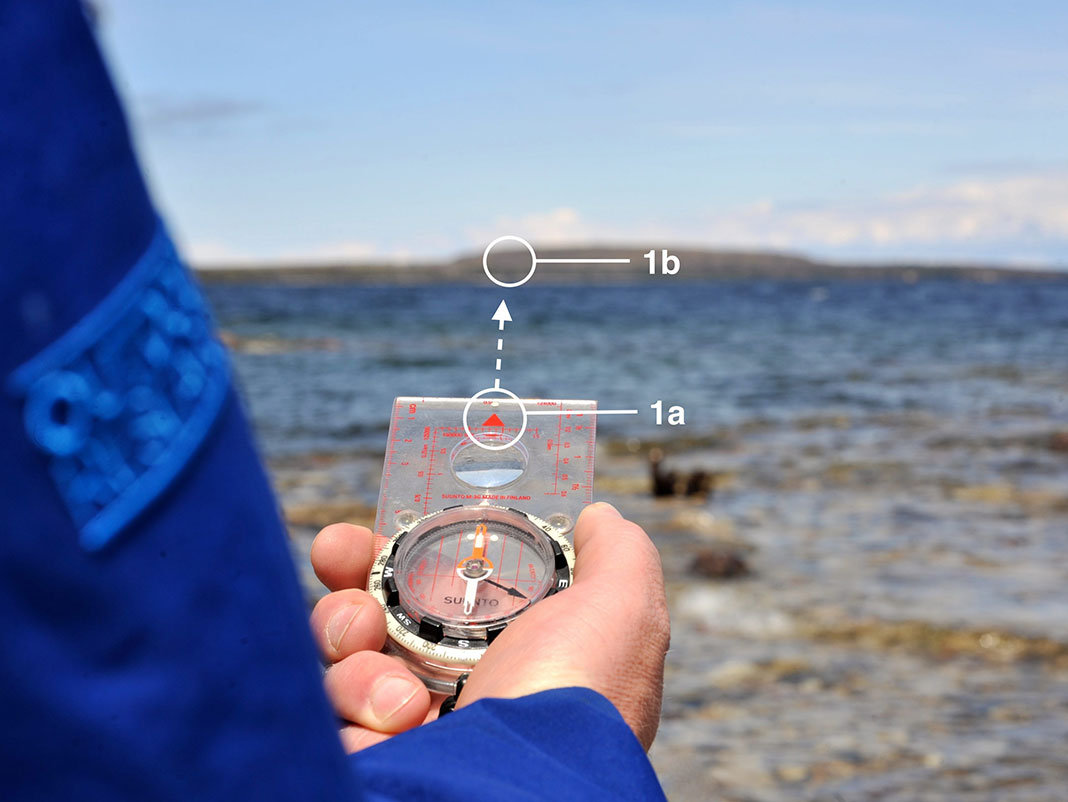
- Hold your compass flat with the direction-of-travel arrow (1a) pointing away from you and directly at the landmark (1b).
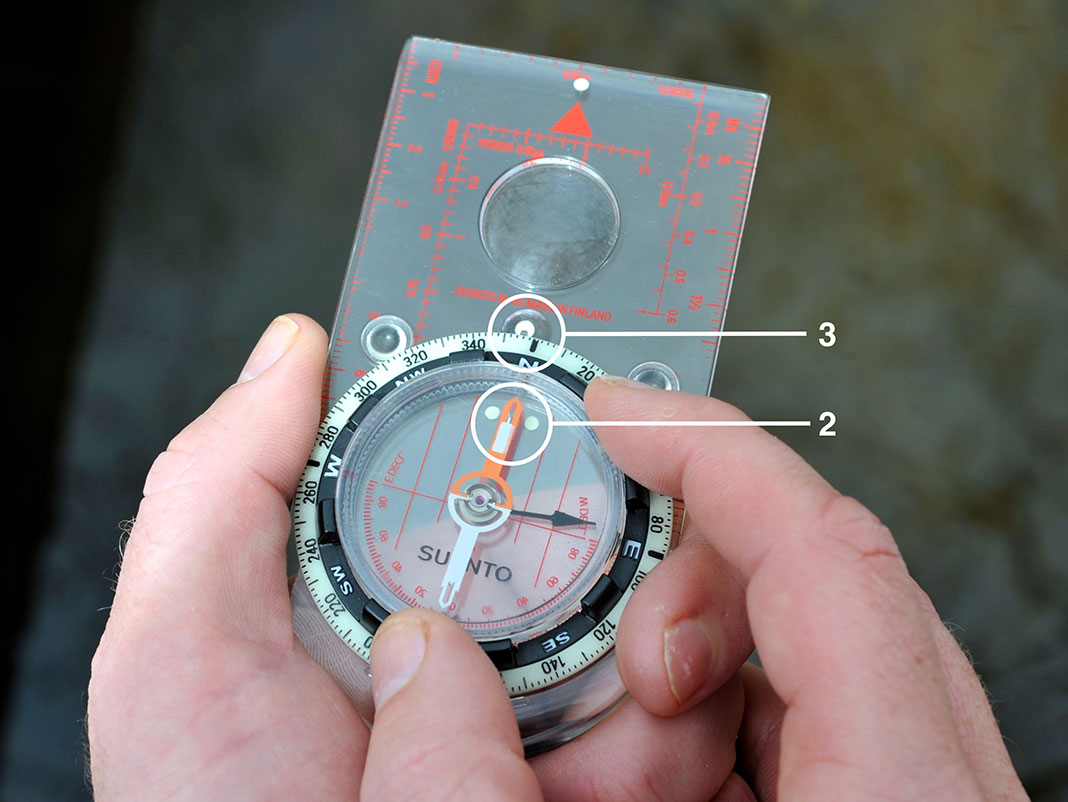
- Rotate the bezel until the red end of the magnetic needle is inside the orienting arrow.
- Look at the index line to read the magnetic bearing you’ve just captured.
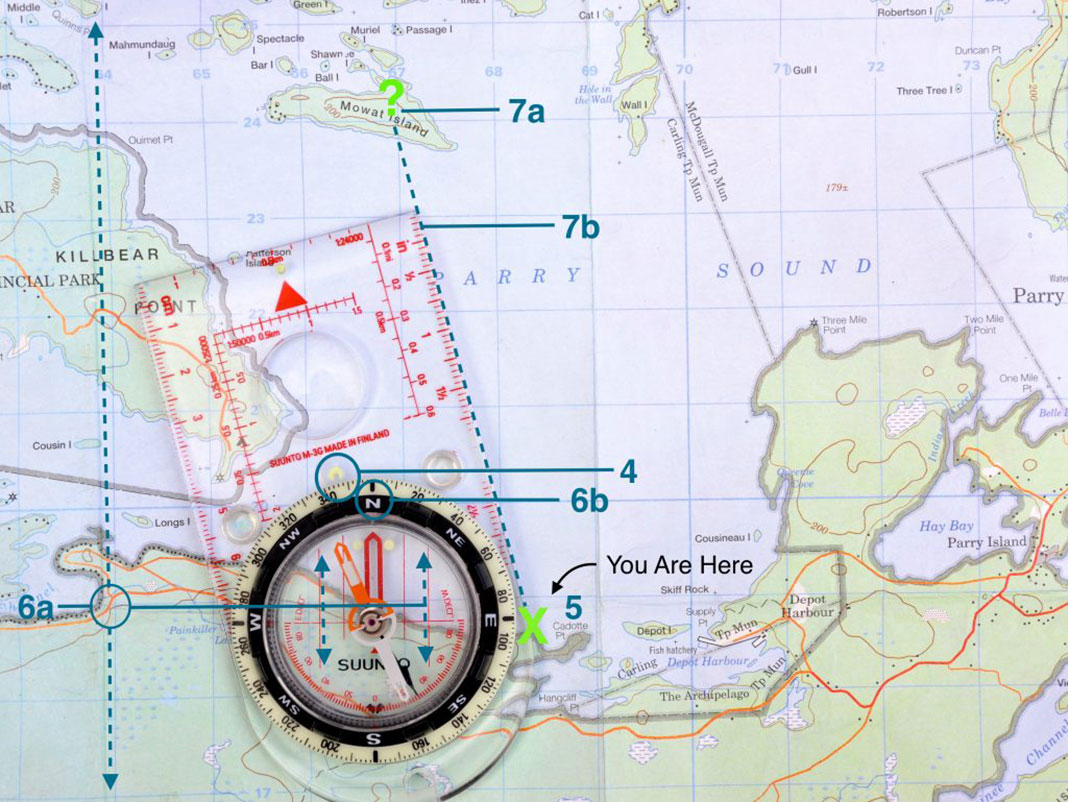
- Subtract declination if you are east of Lake Superior, or add it if you are west, to convert the magnetic bearing to a true (map) bearing. Dial the adjusted bearing in at the index line on your compass bezel.
- Now you can transfer that bearing to your map to identify your mystery landmark. Lay the compass on your map with the bottom outside edge of the baseplate anchored to your location.
- Pivot the entire compass baseplate around the anchor point until the orienting lines are parallel with the north-south grid lines on your map (6a), and the north marker on the bezel is pointing toward the top of your map (6b).
- Your unknown landmark (7a) lies somewhere along the line established by the edge of the compass baseplate (7b). If you extend the line, you should be able to figure out what it is—perhaps a distant lighthouse tower, or maybe just a mirage.
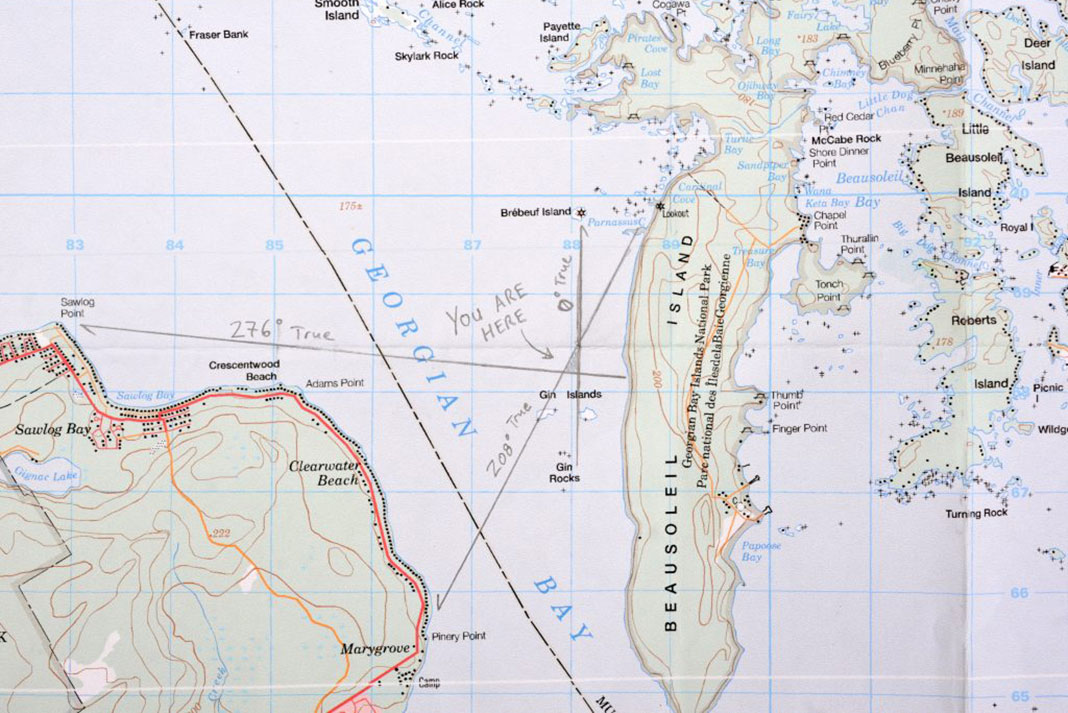
Where am I? How to triangulate position
If you don’t know exactly where you are, but can identify two or more landmarks, you can use multiple bearings to find precisely where you are on the map. Two landmarks will give you what’s called a bisect—while three intersecting bearings provide a triangulation.
- Take a bearing to a known landmark.
- Add or subtract the declination to convert the magnetic bearing to a true (map) bearing. Dial this number in at the index line on your compass bezel.
- Place the compass on your map with the top corner of the baseplate anchored to the known landmark.
- Pivot the whole compass around the anchor point until the orienting lines are parallel with the grid lines on your map and the north marker on the bezel is pointing to north on your map.
- Draw a pencil line along the straight edge of the compass baseplate. Repeat these steps with a second and third landmark. For the most precise fix, try to select landmarks that are at least 60° apart, and avoid those that are close to 180° apart. Landmarks can be anything recognizable: look for prominent summits, river mouths, valleys, bays, beaches, islands or human-constructed features like communication towers, lighthouses, marine lights, buoys, buildings, etc.
- If the three lines you draw meet at a single point, this is your precise location. Most of the time, however, the lines will form a small triangle—your location is somewhere in this area. Re-check your work if your triangle is very large; you likely have at least one significant error.
6 tips for using a compass while paddling
Navigating with a compass adds a measure of security, especially when paddling unfamiliar waters or in low visibility. As with any developing skill, be sure to practice on calm, easy days with good visibility before relying on your compass in more challenging conditions.

1 Round to the nearest 5°
On the water, it’s virtually impossible to gauge angles of less than 5°. Adjust map bearings to the nearest 5° so they’re easier to remember and more realistic to follow while paddling.
2 Write it down
Note the bearing in your logbook, on your map, or on a dive slate so you don’t forget it.
3 Get a back bearing
The back bearing is useful to know if you plan to return along the same route, or in case you need to turn back in poor visibility. You can read your back bearing off the bezel at the bottom of your orienteering compass (opposite the index line), or calculate it by adding or subtracting 180° to your bearing. For example, if your bearing is 240°, the back bearing is 240° – 180° = 60°.
4 The deviation is in the details
The magnetic needle on your compass is affected by anything in its vicinity that carries a magnetic field. This means a can of beans or a camp stove packed in your front hatch—or even your electronic wristwatch—can mess with your compass bearing. If you’re not sure whether an object is magnetic, move it toward your compass to see if the needle makes an obvious shift.
5 Compass uncertainty
Without a visual target, compass uncertainty and paddling go together like fish and chips. The farther we travel along a course, the greater the uncertainty becomes. Keep crossings as short as possible, and divide long journeys into shorter legs.
6 Using backstops
If possible, choose bearings that allow you to take advantage of natural backstops, such as obvious landmarks, so you don’t go too far beyond your target by mistake. You can also use time backstops. For example, if the paddle to your lunch site should take two hours at your average paddling speed, and you leave at 10 a.m., then your time backstop might be 12:15 p.m. If you pass this time backstop, you have either miscalculated the required crossing time, underestimated the distance or veered off your heading.
Types of kayak compass
Paddlers use two types of compasses: a handheld orienteering compass, and a deck-mounted marine compass. While an orienteering compass is essential for map work, nothing beats the ease of use of a marine compass for following a heading. We recommend using both when navigating.
Orienteering compass
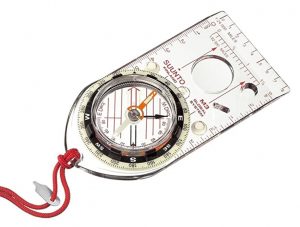
Use an orienteering compass for all map-and-compass work, such as plotting bearings or using triangulation to fix your position.
Pros: Compact; can be adjusted for declination; includes a ruler and straight edge for measuring distance and taking bearings from a map.
Cons: Must be held level to ensure an accurate reading; not easy to sight bearing while paddling.
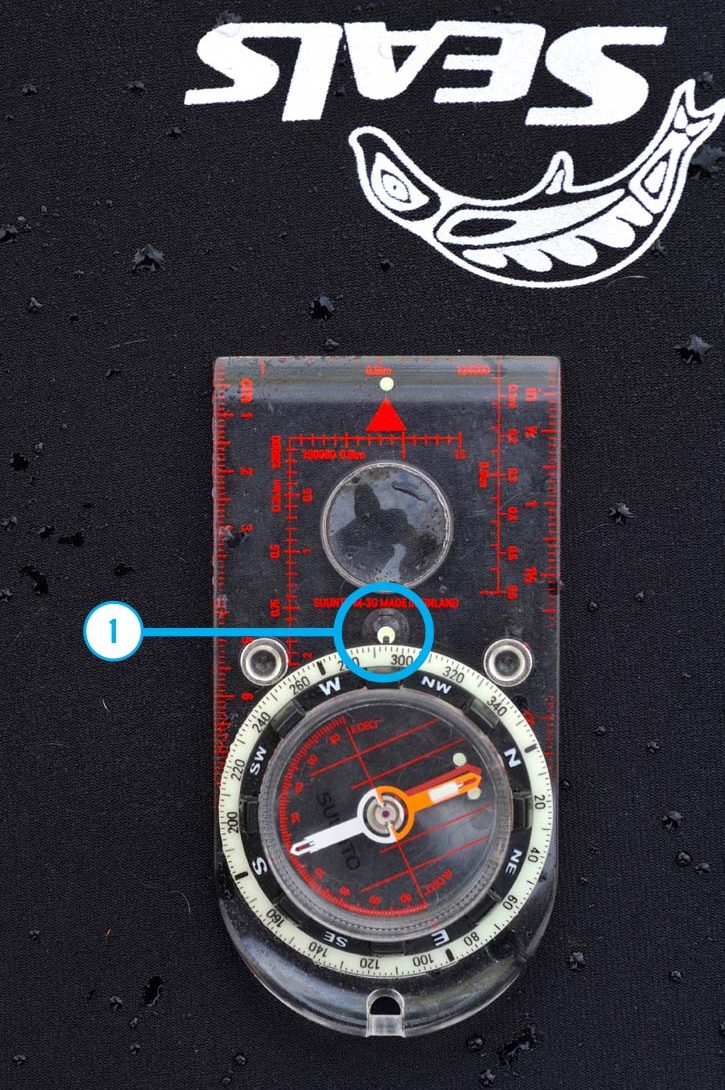
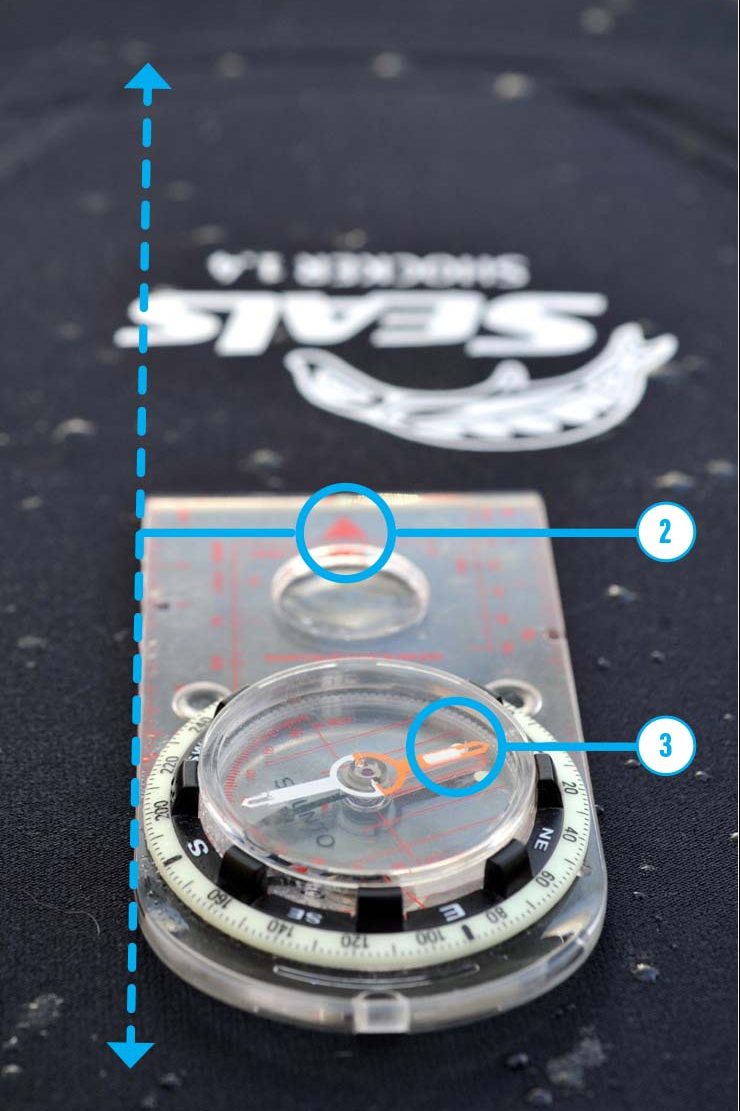
Choose a quality orienteering compass like the Suunto M-3G for the best precision and features, including a screw to set declination and an elongated baseplate for easier map work. The sturdy, flat profile slips unobtrusively into your map case, pocket or under your decklines.
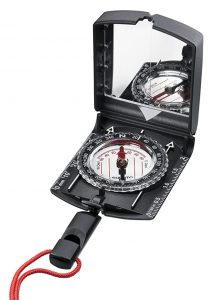
Another reliable option for paddlers is the Suunto MCB, which features a floating housing and folding sighting mirror that doubles as an emergency signaling device.
Marine compass
Use a marine compass for following a magnetic heading.
Pros: Intuitive, easy to sight bearing on large numbers; hands-free; set forward on the kayak to minimize seasickness; accurate in bumpy conditions or when kayak is edged.
Cons: Indicates only magnetic direction; cannot be adjusted for declination or used to take map bearings.
The Silva 70P is designed for use with kayaks that have a molded-in compass recess on the deck. It mounts permanently with four simple screws for a secure fit. Because the compass dome sits nearly flush with your kayak deck, this style is also durable and protected from most impacts.

If your kayak doesn’t have a compass recess, a removable deck compass such as the Silva 58 Kayak Compass is designed to clip into your decklines. Some paddlers prefer this style because it can be mounted closer to the cockpit for easier sighting, and removed to avoid damage during transport.
How to use a marine compass
Using a marine compass is dead-easy: point your bow at the object you want the bearing of, and read the magnetic bearing at the “lubber line”—the line marked on the side of the compass dome, facing the paddler.
More navigation methods for paddlers
If you think of navigation as the act of following a line between two points, there are a number of different types of lines that we can follow. Line-of-sight is the easiest and most obvious. A compass bearing is another type of line, as are shorelines and other natural “handrails.” Ranges offer yet another line to get from A to B.
Piloting
When it comes to actual navigation, we spend the vast majority of our time using the simple method of piloting. This is the process of keeping track of where you are by relating features on your map or chart to real world observations. One very easy way to do this is to follow a natural handrail—paddling a coastal corridor, for example. As you journey along, keep track of any shore or water-based features and checkpoints—such as prominent headlands, islands, inflowing rivers or buoys—marked on your map. These give you periodic “fixes” along the line of your handrail.
Aiming off
When visibility is poor or sideways drift is a concern, experienced navigators “aim off.” This is the practice of deliberately planning a course to either side of a shore-based target, to account for factors like wind, current, drift or compass uncertainty. Imagine, for example, you can’t see the campsite you are crossing to. If you aim intentionally to the right of the campsite, you will know to turn left when you reach the shoreline. This is particularly useful in featureless terrain and on long crossings.
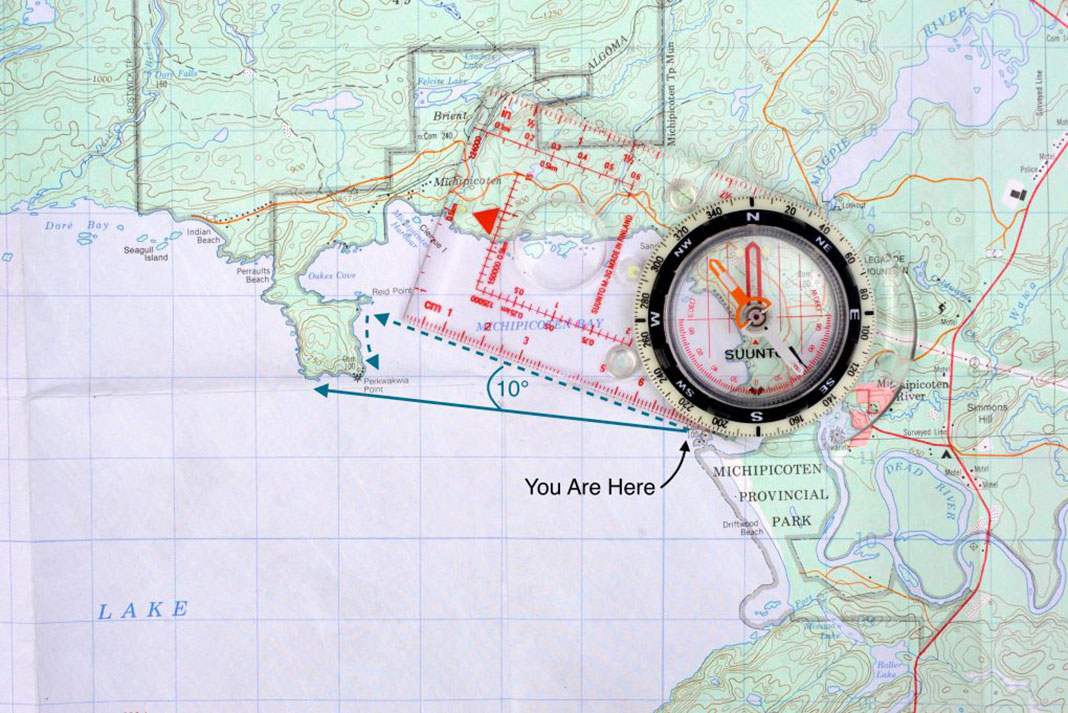
Similarly, aim upwind or up-current to compensate for drift. As a general rule, adjust your course by 15° for a 15-knot crosswind or 15° for every 1 knot of current speed when paddling across the current. Don’t have a compass? Hold your hand at arm’s length from your face and make a fist—index knuckle to pinky knuckle is about 10°; make a shaka (spread your thumb and pinky) to measure 20°.
Ranges
Ranges are another useful tool for navigating in wind and current, especially when crossing smaller channels. Look for two objects ahead that line up along your direction of travel—these could be a prominent tree or rock on the shore lining up under a notch in a hill. If wind or current pushes you off this line, adjust your course accordingly so the objects remain aligned.
Dead Reckoning
Dead reckoning navigation is based on yet another type of line: a timeline. It is useful for predicting how long a trip will take or estimating current position when traveling out of sight of land, along a non-descript coastline or in foggy conditions—basically whenever piloting isn’t practical. Dead reckoning uses a simple formula: D = S x T (Distance = Speed x Time). In order to make accurate predictions, you’ll need a way of measuring all three variables. Distance can be measured on your map using a string or your compass ruler and the map scale. Wear a watch and always note your start time and any significant breaks. Finally, track your speed in a variety of conditions to get a reliable sense of how fast you paddle in calm water, headwinds and tailwinds.
Practice how to use a compass
Reading about navigation techniques and how to use a compass is a great first step to point you in the right direction. Now get out on the water or in your local green space with a map in one hand and a compass in the other. Practice these skills often and you might be surprised by what you find—but not where you find yourself.
This article originally appeared in Paddling Magazine Issue 65. Subscribe to Paddling Magazine’s print and digital editions here, or download the Paddling Magazine app and browse the digital archives here.
Practice these skills often and you might be surprised by what you find—but not where you find yourself. | Feature photo: Andrew Strain


