"What do you want to do next Wednesday?" | Photo: Thomas Heaton
An adventurous life doesn’t have to be the domain of eccentric millionaires and dirtbag vagabonds. Even with a 9-to-5 job, you too could be setting off on a new adventure every week—the trick is to think smaller, shorter and closer to home. Think microadventure.
Microadventures fit into the oft-neglected 5 to 9, according to British explorer, Alastair Humphreys, who coined the term. A spontaneous weeknight paddle with friends. A moonlight hike along a favorite trail. Cycling your 10-mile commute instead of driving. Heading downriver for one night with the smallest pack you can manage.
“What do you want to do next Wednesday?” | Feature photo: Thomas Heaton
“Microadventures are a way to refresh the soul from the routine of the real world,” says Humphreys. Known for his larger-than-life exploits—cycling 40,000 miles around the world, rowing across the Atlantic and paddling remote rivers, just to name a few—Humphreys has championed sticking closer to home over the last five years. “Adventure is a state of mind—you don’t need to go far to find it,” he says.
While mortgages, car payments, kids, pets and a multitude of other responsibilities can make it hard to commit to a multi-week journey-of-a-lifetime each summer, almost anyone can fit in a microadventure. Why? Because they’re cheap, simple, short and on your doorstep. Don’t relegate outdoor adventure to a handful of three-day weekends a year—go micro, go more often and be happier for it.
[ Looking for some trip suggestions? Find more adventures in the Paddling Trip Guide ]
1 Make no excuses
Adopt this mantra: Any adventure is better than no adventure. If, like many North Americans, you receive just two precious weeks of vacation, plus nine stat holidays a year, that still leaves you with 123 unscheduled days. Obligations will quickly eat into that time, but the key is to, “Work around the things that are non-negotiable,” advises Humphreys. “Lack of time, or money or equipment or specialty skills are all things you can either bemoan or make the best of.”
2 Get yourself going
Once you’ve kicked your excuses to the curb, “Make a cup of tea, open a map, and find green space near you,” advises Humphreys. Start small and achievable. Commit to paddling the nearest bit of water you can find after work, or climb a hilltop with a view of the sunset and sleep under the stars.
Recruit a friend if you’re likely to procrastinate or waffle at the last moment. “First overcome the inertia of routine,” says Humphreys, then get more ambitious.
Inertia is the enemy. Keep it short, simple, local and cheap to go more often. | Photo: Ashley Voykin
3 Fear the gear
Less gear equals less prep and cleanup, making it easier to get up and go. A sleeping bag, tarp, water bottle and snacks may be all you need for a single night out. A night of minimalism can be a way to experiment with creating a cozy ultralight kit, or learn an entirely new skill, like MacGyvering a cook stove from a beer can.
Being a parent isn’t an excuse. “The problem is not kids, it’s adults,” says Humphreys. “Kids love adventure, like nights out and sleeping wild.” Children often surprise adults with their resiliency, and their enthusiasm, spontaneity and curiosity make them perfect explorers. It’s adults that often need to relearn these qualities.
5 Write it all down
If you’re bored at home, make a plan for your summer adventures today. Pencil in proposed dates of weekend getaways, overnights and evening paddles. “Real life often gets in the way and good intentions fade—writing down your plan and committing to it makes it more likely to happen, even if you have to reschedule,” says Humphreys.
6 Repeat regularly
When the University of Illinois discovered last year that spending time in nature boosts the human immune system, it became only the most recent institute among dozens to prove that time outside really does make people happier and healthier. Humphreys challenges his readers to get out on 12 microadventures a year at minimum—one a month.
Still need a shove out the door? Find more ideas and tips at alastairhumphreys.com. Discover what others are doing and where they’re going by searching #microadventure on social media.
This article originally appeared in Early Summer 2016 issue of Canoeroots & Family Camping and in Paddling Magazine Issue 65. Subscribe to Paddling Magazine’s print and digital editions here, or download the Paddling Magazine app and browse the digital archives here.
“What do you want to do next Wednesday?” | Feature photo: Thomas Heaton
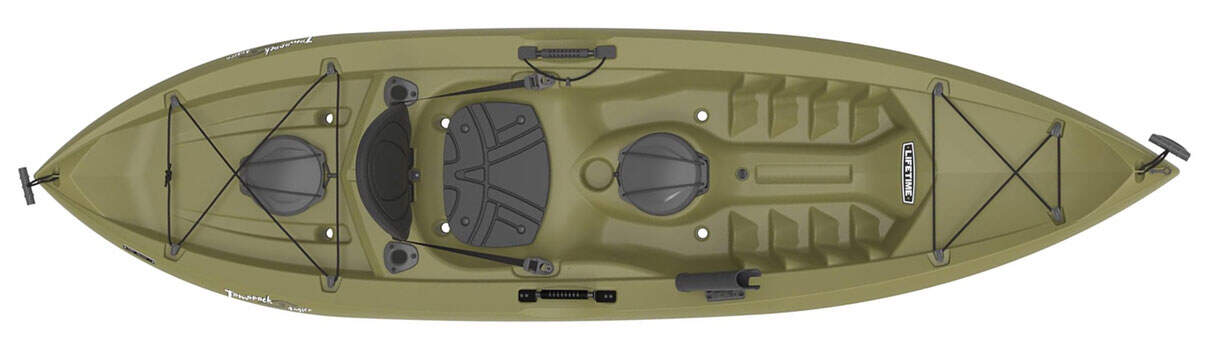
Intex knows inflatables. The company produces many different types of air-filled products: pools, pool toys, mattresses, and a wide assortment of other inflatable equipment to enjoy and stow away. Intex inflatable kayaks fit nicely into this theme; they get you out on the water at a low price, and are portable and packable when not in use.
Intex kayaks are affordable inflatable kayaks for the casual paddler. These low-cost kayak packages come with nearly everything needed to get on the water: pump, paddles and the boat itself. All you need is a Personal Flotation Device (PFD) and the required safety gear, and you’re ready to go. They’re also widely available from big box department stores, outdoor stores or online.
Available as solo or tandem boats, Intex inflatables are best used as casual recreational kayaks. These are not heavy-duty, expedition-ready touring kayaks, but rather are best suited to an afternoon at the beach, cottage or campground, and short paddles on sheltered lakes, bays and slow-moving rivers.
Intex inflatable kayaks are stable, and with their open decks, are comfortable and easy to enter and exit—making them ideal for beginner paddlers. Intex kayaks’ inflatable design adds to the comfort of the kayak; it’s like sitting on an air mattress. They can also be quickly deflated to make storing and transporting easier.
Intex kayaks are ideal for paddlers or families who want a low-cost option to spend some time on the water. While they are not as durable as high-end inflatable kayaks, they still hold air for casual paddlers on a budget. For aspiring recreational kayak owners, Intex inflatables offer comparable price and performance to an entry-level rigid kayak, but with the added benefit of effortless storage and portability.
Overall, these kayaks are a great choice for occasional paddlers who are tight on space and want a kayak they can stuff in a closet or storage shed.
If you’re buying a used Intex kayak, carefully weigh the potential benefits and drawbacks. Choosing to buy used can save you some money, but consider that since these budget-priced inflatable kayaks aren’t exactly known for durability, your purchase may not last as long as you’d hoped.
Cost savings are the main reason to buy used, or if you feel that you’re among the most casual of casual kayakers. Intex inflatables are perfect for a float around a calm lake, and if you only hope to take the boat out a few times a season, why not get the cheapest one you can?
All Intex kayaks are inflatable, so it is imperative that you ensure the kayak actually inflates and holds air before you purchase it. Start by examining the overall condition of the Intex kayak. Open up the package and inflate it. In the process, listen for air leaks in the valves and tubes and watch for any stains and mold, which may reveal the kayak was stored wet.
Is there any fading in the Intex kayak’s deck (top) or hull (bottom)? Fading reveals UV damage, which will compromise durability. Make sure there are no missing parts; check for seat(s) and seat back(s), deck rigging such as grab lines, skeg (a removable fin that slides into the hull) and pump.
If you discover the kayak has an air leak, it may not be a deal-breaker. If the leak is a simple pinhole, you can repair the hole using the patch kit provided, or any PVC patch kit. Leaks along the seams of the kayak or at the valves will be more difficult to resolve; pass on any leaking used kayak that you’re not confident about repairing.
For more tips on what to look for when selecting a used kayak, read our article How To Buy A Used Kayak.
Intex kayak buying advice
Intex kayaks are available across North America at box stores and online outlets. These inexpensive inflatable kayaks are a good choice if you’re low on storage space and looking for a casual kayak for recreational paddling on calm, sheltered water without breaking the bank. Intex kayaks are available for a range of needs, including recreational paddling and fishing, single and tandem, for paddlers of all sizes.
There are three main models of Intex kayaks, with two models available as a solo or tandem kayak. Each design is slightly different to match different activities. The Explorer and Challenger models are found within Intex’s budget-minded “Sport” series, while the higher-priced Excursion falls within the brand’s more feature-rich “Professional” series.
Here’s a rundown of all the models to help you identify the best match for your paddling style and ambitions.
Explorer
The Explorer K2 kayak is the least expensive two-person kayak from Intex. Available as a tandem model (that can also be paddled solo), the kayak kit comes with a pump and paddles, so in theory you can buy a personal flotation device (PFD) and safety kit (containing Coast Guard-approved equipment), walk out of the store and get on the water.
Still, it’s important to remember that Intex’s background is making pool toys and air mattresses. Their inflatable kayaks are built in the same vein, especially the cheaper Explorer. This kayak is perfect for an hour of gentle fun on a sheltered bay or lazy river, but it is not one you want to rely on in any sort of rough waters.
Paddle Sober And Smart
Never mix alcohol and paddling. Coast Guard and state BUI (boating under the influence) laws apply to all vessels. This includes canoes, kayaks, SUPs and rafts.
Challenger
The Challenger K1 and K2 kayaks are comparable in performance and price to the Explorer, with slightly more covered decks. The Challenger K1 is a single-person, lightweight inflatable kayak, while the main difference between the Challenger K2 and the Explorer K2 is that the Challenger features less rocker (or lift in the bow and stern) and is a foot longer, making it slightly quicker and roomier for two adult paddlers. The Challenger K2 can also be paddled solo by a larger paddler.
Excursion
Intex’s Excursion Pro K1 and K2 kayaks are the best built kayaks produced by the company. These single and tandem kayaks are made from better quality PVC materials than the Explorer or Challenger series kayaks. More robust materials allow for a higher air pressure, which keeps the kayak shape stiffer, increasing speed and performance.
With angler-specific features like rod holders and gear mounts, the Excursion Pros are also suited to casual kayak fishing. All this does add a bit of weight, but at 37 and 46 pounds for the K1 and K2, respectively, these kayaks are not ridiculous to carry either. Transporting the kayak is also easier with the included carry bag—something other Intex kayaks do not come with.
At double the price of the Explorer and Challenger series kayaks, the Excursion Pro kayaks offer an attractive middle ground in terms of performance, price and durability between those budget boats and higher-end inflatable kayaks made by Advanced Elements or Sea Eagle.
Use this as a start, and remember that online research will only get you so far. The best advice we can offer is to always test paddle before buying any boat. Of course, that’s a challenge at most of the big box and online outlets where Intex kayaks are sold. Try to borrow an Intex kayak from a friend for a test paddle in real-world conditions. The more time you can spend on the water in a similar style of kayak, the better the purchasing decision you will make.
Wear A Life Jacket
Everyone, even strong swimmers, needs to wear a life jacket at all times when on the water. It is extremely difficult to put a life jacket on once you fall into the water. Even a light wind can blow any paddlecraft away from you, faster than you can swim.
Always wear a USCG-approved Level 70 or Type III life jacket designed for paddling.
Here are answers to some of the most common online questions about Intex kayaks.
Intex kayak warranty
Intex kayaks come with a 90-day limited warranty. Submitting warranty claims requires Proof of Purchase (your receipt) and should be done through Intex, rather than the place you bought the kayak from.
Cheapest Intex kayak
The cheapest Intex kayak is the Challenger K1 Kayak. This kayak retails for around $170 US. It’s a 9-foot solo inflatable, made with vinyl. The package includes aluminum paddle, pump and a removable skeg (fin that attaches to the hull) to assist with directional control.
Where to buy Intex kayak
Intex kayaks are available in-store and online at many big-box retailers like Walmart, Cabela’s, Bass Pro and Canadian Tire, as well as from Amazon. The inexpensive Explorer kayaks are the most widely available, but many stores can also order in other Intex kayaks.
Intex comparison
Intex vs Sevylor inflatable kayak
Both Intex and Sevylor produce similar discount-priced inflatable kayaks for casual paddlers. The two brands cater to similar demographics: namely, beginners looking for a cheap kayak that they can store in a closet and transport in their trunk, without the need of investing in a pricey roof rack.
On the whole, Sevylor has a broader range of inflatable kayaks than Intex—especially if you’re looking for a unique two- or three-person kayak. However, Sevylor’s North American sales are limited—Amazon is your best bet, but be aware that online returns or support may be more difficult. If you want a greater selection of inflatable kayaks, you will benefit from Intex’s broader network of North American distributors.
Both brands offer similar performance characteristics and both are meant for use in sheltered, calm water and on gentle rivers with class II whitewater or less.
Sea Eagle vs Intex kayak
Sea Eagle produces some of the highest quality inflatable kayaks on the market. They utilize drop-stitching to keep the walls rigid, and use robust PVC to resist abrasion and impact. These upper-tier kayaks cost much more than Intex boats, but their lifetime is significantly longer.
Intex’s “Pro” series Excursion models are comparable to Sea Eagle’s Sport Kayak series. The SE330 and SE370 are only slightly more expensive than Intex kayaks, but magnitudes better. If you feel like spending the extra hundred dollars, opt for a Sea Eagle and get a boat that will actually paddle like a kayak.
Carry A Whistle (And A Light For Night Use)
Every paddler should have a whistle attached to his/her life jacket.
Carry a light at night. Consider carrying a distress signal device.
Intex kayak reviews
Turn to our expert reviews of Intex’s line up of kayaks to help select the right model for you. We discuss design features, accessories, performance, comfort and more so you can get a sense of what to expect—even more important if you’ll be unable to paddle the boat before purchasing.
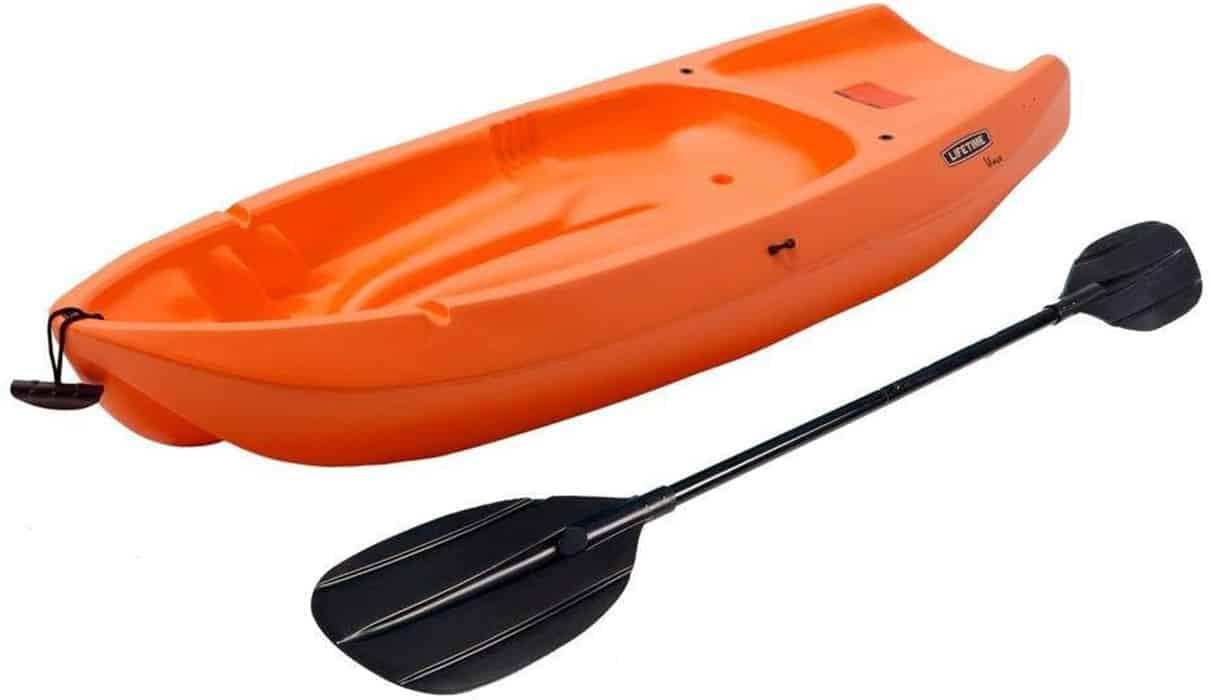
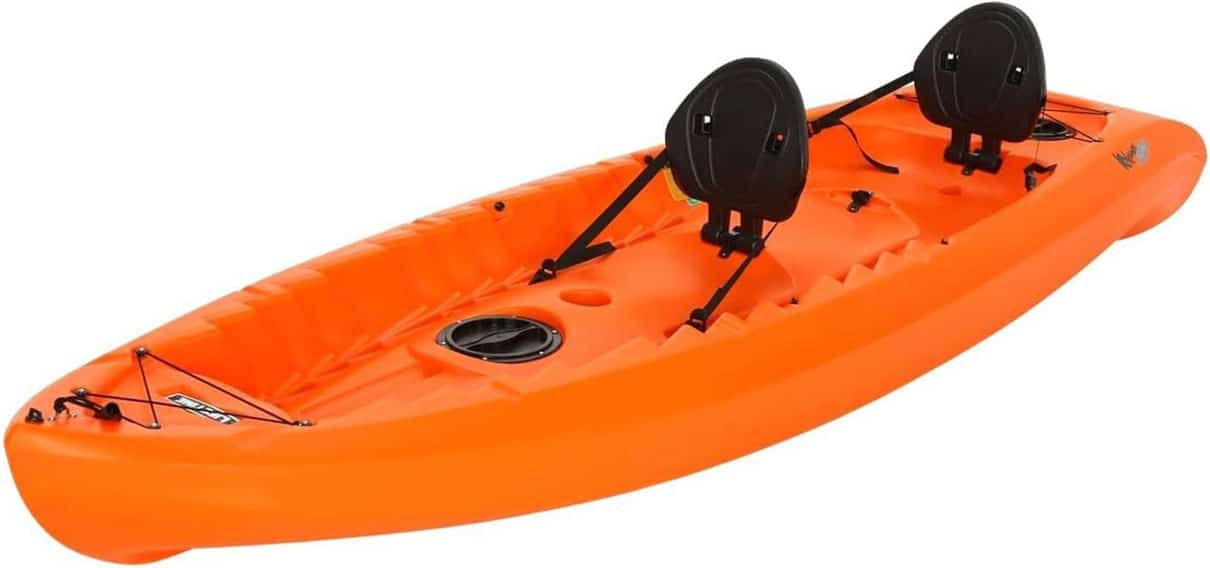
Founded in 2002, Emotion is known for making budget-friendly recreational sit-inside and sit-on-top kayaks. In 2011, the Emotion Kayaks brand was purchased by Lifetime products, creators of basketball nets, sheds and other outdoor equipment. The merger combined Emotion’s knowledge of kayak design with Lifetime’s robust plastic manufacturing processes to improve their kayaks.
Today, Emotion kayaks are made under the Lifetime label. Many Emotion classics continue to be available under the Lifetime label—for example, the Emotion Stealth Anger Pro is now rebranded as the Lifetime Angler Pro. With Lifetime products, you’re still getting the best Emotion kayak shapes and designs, just under a new name.
Emotion (and Lifetime) kayaks target beginner paddlers who do not want to spend a ton of money on their first kayak or paddlers who want a bare-bones boat that can get them out on calm, sheltered water. They are classified as recreational kayaks. “Rec boats,” as they’re sometimes called, are characterized for their wide, flat bottoms and relatively short lengths, often 12 feet or less.
Most people will quickly grasp the basics of paddling in a recreational kayak, whereas longer, narrower sea kayaks can feel unstable or difficult to control for someone new to the sport. Recreational kayaks’ short length also means they are easy to carry, store and transport.
If this is what you’re looking for, or you want to learn more, read on for advice on buying new and used Emotion kayaks.
You’re likely to find more used Emotion kayaks than new ones, as many models are now made under the Lifetime brand. Choosing to buy a used kayak is an excellent way to save money, but you’ll want to check the boat over carefully before committing to a purchase. This is especially true with Emotion kayaks, as some replacement parts may not be available.
Emotion kayaks are made from rotomolded plastic, which is incredibly resilient and durable. Check the hull (bottom) and deck (top) of the kayak for scrapes and cuts. Scratches that don’t pierce the hull are generally superficial. If you’re handy, deeper gouges can be mended by using a polyethylene repair kit.
Wear A Life Jacket
Everyone, even strong swimmers, needs to wear a life jacket at all times when on the water. It is extremely difficult to put a life jacket on once you fall into the water. Even a light wind can blow any paddlecraft away from you, faster than you can swim.
Always wear a USCG-approved Level 70 or Type III life jacket designed for paddling.
The most common damage you’ll find with rotomolded kayaks is that their shape warps. Known as “oil-canning”, the most likely spot for this warping to happen is on the hull below the cockpit (seating area). Warping is most often the cause of UV damage from improper storage (long-term exposure to direct sunlight) or improper transport (over tightening tie-downs). Sometimes oil-canning can be mitigated by warming the kayak and reshaping it, but it will affect the boat’s performance if it is too warped.
The buckles, straps and seating of budget Emotion recreational kayaks are often the first things to fail. Many of these parts are plastic and can be replaced with hardware store equipment, or by contacting Lifetime for substitute parts.
The only way to fully appreciate the comfort and performance of a kayak is to try it before committing to a purchase. Arrange a meeting place with the seller that allows you to take a few moments on the water. Bring your usual paddle and dress in what you plan to wear while paddling. With a sit-inside kayak, be sure to assess how easy the boat is to enter and exit.
For more tips on what to look for when selecting a used kayak, read our article How To Buy A Used Kayak.
Emotion Kayak buying advice
Emotion kayaks are budget-friendly for people who want to get into kayaking without the significant investment that comes with high-end gear. These boats are intended for casual use on sheltered water, like at the cottage, campground or local wetland. Their basic design means that there are fewer moving parts to break.
It’s important to note that these kayaks are not suitable for open water or rough conditions. Without a watertight bulkhead (interior wall that creates separate flotation chambers within the hull), Emotion recreational kayaks will sink if the cockpit fills with water. If you are looking to explore further or paddle in rougher waters, look toward a touring kayak. But for general use on gentle waters, Emotion kayaks are available for a range of needs for paddlers of all sizes.
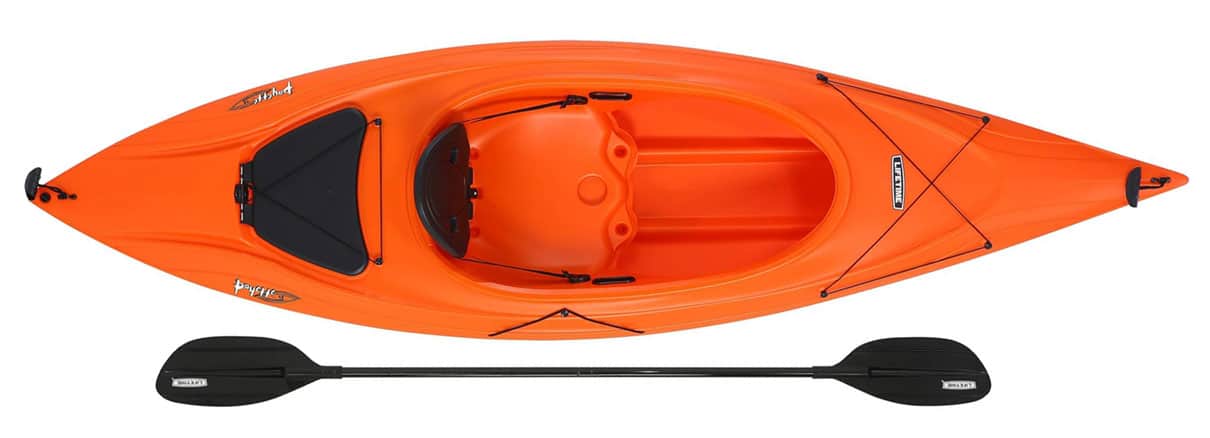
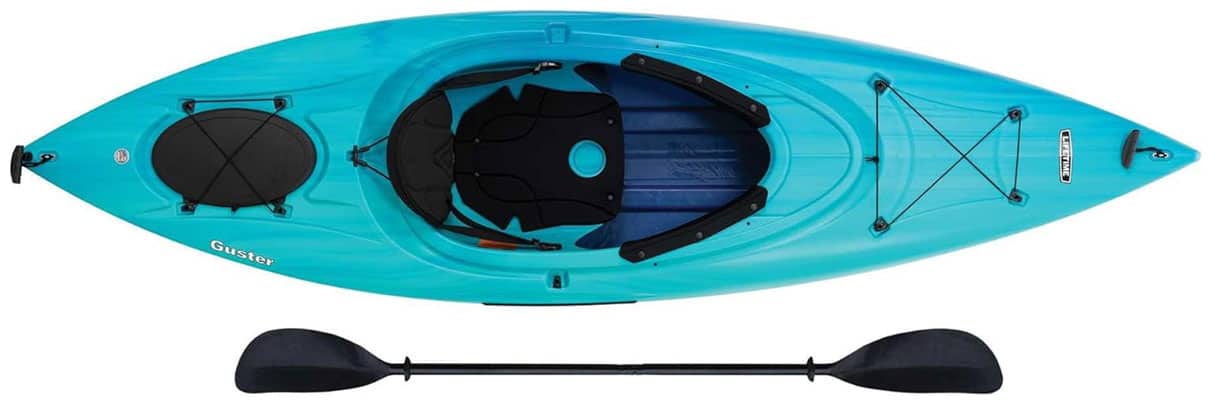
The initial choice for a recreational kayak buyer is deciding between a sit-inside or sit-on-top. Sit-inside kayaks are a good stepping stone for paddlers who wish to advance their skills or progress toward a longer touring kayak. As their name implies, the paddler sits inside the cockpit, with their legs covered by the deck. Some sit-inside recreational kayaks can also be equipped with a nylon sprayskirt that forms a seal around the paddler and shelters the cockpit from splashing waves, precipitation and wind.
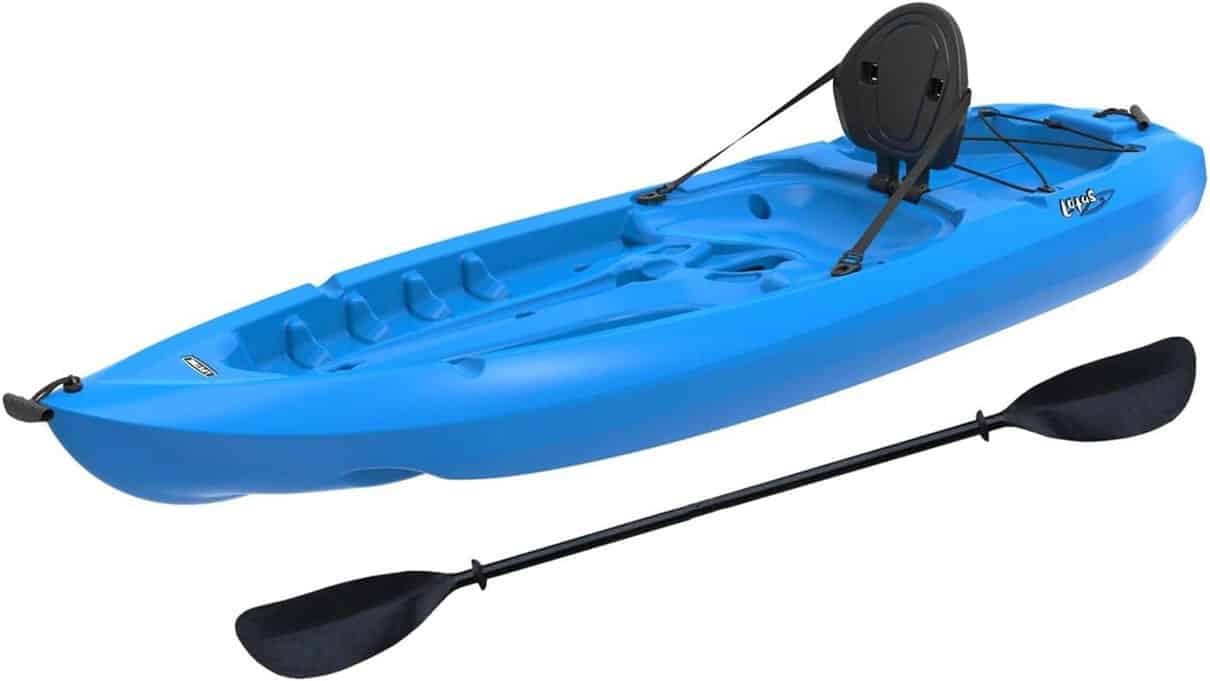
With their open decks and wide, stable designs, sit-on-tops are even more beginner-friendly. Getting on and off requires less technique than entering or exiting a sit-inside kayak. Larger paddlers may feel more comfortable and less confined by the open deck layout. Many fishing kayaks are also sit-on-tops, as it is easier to access gear, cast and land fish.
With a bit of luck, you might track down an Emotion kayak online that suits your needs, but you likely won’t find it in any stores nearby. Instead, check for Lifetime kayaks—the model you are looking for may be available under the new parent company name. The general design of Emotion kayaks is not particularly ground-breaking or exclusive to the company. If you are looking for a cheap, stable kayak with no frills, Emotion, Lifetime, Perception and Sun Dolphin are all fairly equivalent options.
The best advice we can offer is to always test paddle before buying any boat. Of course, that’s a challenge at most of the big box outlets where many recreational kayaks are sold. Try to borrow an Emotion kayak from a friend for a test paddle in real-world conditions. The more time you can spend on the water in a similar style of kayak, the better the purchasing decision you will make.
Paddle Sober And Smart
Never mix alcohol and paddling. Coast Guard and state BUI (boating under the influence) laws apply to all vessels. This includes canoes, kayaks, SUPs and rafts.
Here are answers to some of the most common online questions about Emotion kayaks.
Are Emotion kayaks good?
Emotion kayaks are good entry-level recreational kayaks. You get a craft that is intuitive to use, stable and durable for a reasonable price.
What happened to Emotion kayaks?
In 2011, Emotion was purchased by Lifetime products. This began a gradual shift towards rebranding Emotion kayaks under the Lifetime label. Emotion’s design team went to work for Lifetime, so newer Lifetime kayaks still have Emotion’s fingerprints on them.
Emotion kayak models
The Emotion Tide 103 kayak is still made, while other popular models like the Stealth Angler Pro have adopted the Lifetime label.
Where are Emotion kayaks made?
Emotion kayaks are made in the Lifetime factory, located in Utah.
Emotion kayak price
Emotion kayaks are priced in the low-to-mid range. Used Emotion kayaks should be priced no higher than $400. New Emotion kayaks, like the Emotion Tide 103, are slightly more expensive than basic Lifetime models but still on the lower end of the rec kayak spectrum.
Emotion kayak weight limit
Emotion kayak’s weight limit varies depending on the model, but recreational kayaks tend to have generous weight capacities. Most Emotion kayaks will have a maximum capacity of 250 pounds, except the youth kayaks, which are 130 pounds.
How much does an Emotion kayak weigh?
The weight of an Emotion kayak depends on its length, with most Emotion kayaks weighing around 40–50 pounds. Emotion kayaks are made from rotomolded polyethylene plastic, which is one of the heavier kayak materials. If you’re looking for a lighter kayak of the same size, consider a kayak made from thermoformed plastic or fiberglass (although these materials will cost significantly more than an Emotion kayak).
Emotion kayak warranty
New Emotion kayaks come with a one-year limited warranty under Lifetime.
Emotion kayak comparison
Pelican vs Emotion kayak
Pelican is a behemoth in the kayak world, producing dozens of different models. The kayaks Pelican makes range from rotomolded ones similar in price and target demographic to Emotion kayaks, to more expensive lightweight recreational kayaks. Emotion/Lifetime sticks to rotomolded budget kayaks. If you are looking for a simple, cheap kayak for short outings, Emotion is a fine choice (if you can find one).
However, you’ll find a far greater selection of new Pelican kayaks available today; this widespread availability makes them a better choice for many beginner paddlers. Also, many Pelican kayaks are made of super durable RAM-X plastic, which is worth the nominal extra expense for those looking to store their kayak outdoors and exposed to the elements.
Education: Get Some!
Take a paddling safety course from the American Canoe Association (ACA), your local paddling shop or outfitter, or other reputable source.
Take a boating safety course from the U.S. Coast Guard Auxiliary, U.S. Power Squadrons® or your own state’s boating agency.
Take on-the-water skills training.
Lifetime vs Emotion kayak
New Lifetime and Emotion kayaks are essentially the same boats—with a few caveats. The Emotion Tide 103 is slightly more expensive than similarly-sized Lifetime models, mainly because of the “skeg wheel” addition. This feature has two purposes: helping with tracking and making transport more accessible.
The skeg is a fin that extends below the back (stern) of the kayak to prevent the kayak from turning side-to-side with each paddle stroke. On the Emotion Tide 103 kayak, the skeg is also a wheel. It rolls on smooth surfaces for easy transport with just one person across parking lots or down boat ramps.
The Ocean Kayak Malibu Two tandem sit-on-top recreational kayak is an excellent choice for couples, families and pet owners looking to double their pleasure on the water. This review highlights the key features of this wildly popular tandem kayak.
Take a look at the Ocean Kayak Malibu Two if you’re in the market for a versatile sit-on-top kayak for recreation and fishing that can be used by one or two paddlers and performs well in a variety of conditions.
At 12 feet, the Ocean Kayak Malibu Two sit-on-top is longer than a typical recreational kayak but somewhat shorter than the average tandem. Length equals speed and tracking, and the Malibu Two clips along and holds its course—especially with two adult paddlers. Just bear in mind the kayak’s maximum capacity is 362 pounds, including paddler weight and any cargo brought on board. Yet the length is also reasonable for car-topping and carrying from the parking lot to the water’s edge.
The hull boasts Ocean Kayak’s trademark stability; with a broad, 34-inch beam the Malibu Two provides a large, comfortable platform for paddlers. It’s no surprise the Malibu Two is a popular kayak for one adult and a child or a pet, given its comfort and reassuring performance.
Check out the Ocean Kayak Malibu Two XL sit-on-top recreational kayak if you need more capacity for larger paddlers.
Market and demographics
The Ocean Kayak Malibu Two is a recreational kayak best suited for calm, sheltered waterways and mild surf. As an open-deck sit-on-top kayak it’s especially well suited to warm water environments where enclosed, sit-inside kayaks may feel hot and restrictive.
Like many other tandem kayaks, Ocean Kayak Malibu Two is extremely stable: Parents love the Malibu Two as a safe way to introduce youngsters to kayaking; it’s also a perfect kayak to get out on the water with your canine companion.
Photos: Courtesy Ocean Kayak
Ocean Kayak Malibu Two fishing is an added bonus. The large hull provides plenty of space for a single angler to pack all the gear to seek out trophy fish. The specialized Ocean Kayak Malibu Two XL Angler provides even more space and stability, as well as angler-specific accessories like rod- and paddle holders. The Malibu Two is a great way to introduce youngsters to kayak fishing.
Comfort
Ocean Kayak invented the sit-on-top style and pairs a smart hull design with top notch outfitting, including supportive seats that can be removed and adjusted for solo and tandem paddling. Bear in mind there’s limited space for two larger adult paddlers; the Malibu Two is best suited for couples and for a parent to paddle with a child.
The third paddling position in the center of the kayak means the Ocean Kayak Malibu Two comfortably accommodates a single paddler with plenty of space to spare.
About the Ocean Kayak Malibu Two
Design
Design features and details
The Malibu Two boasts Ocean Kayak’s trademark Tri Form hull, which combines solid performance with stability. As its name implies, the Tri Form hull features three distinct hull “chambers” (almost like a trimaran) which make the kayak less tippy and keep it tracking straight while paddling.
A closer look at the 12-foot hull shows asymmetrical rocker; that is, there’s more upturn at the bow than at the stern to offer a blend of maneuverability and tracking in flatwater conditions, making the kayak easier to paddle and a more enjoyable experience for novices.
Above the waterline, the Ocean Kayak Malibu Two tandem kayak affords seven different seating arrangements by adding, removing and adjusting the placement of seats (all performed easily with no tools), depending on paddler weight and expectations. Unlike many other tandem sit-on-tops, the Malibu Two can be configured for a solo paddler to sit in the center of the kayak, offering better control and performance. What’s more, the bow seat can be pivoted to face the stern—a great arrangement if you’re paddling with a child.
Material and construction
The Ocean Kayak Malibu Two is constructed from single-layer polyethylene, a plastic that’s virtually indestructible in normal use. The slippery material slides over obstructions and cuts through the water. Combined with the Tri Form hull design, it’s also stiff and efficient for paddling. The tradeoff for ultimate durability is weight, and the Malibu Two is somewhat heavy at 63 pounds.
Design trends
Ocean Kayak is noted in the paddlesports industry as an innovator, particularly for inventing the sit-on-top style of recreational kayak. Until this point, most kayaks were of the sit-inside variety (with a confining deck and cockpit); removing the deck made for an ideal kayak for warm weather and hot environments, as well as easier entry and exit for paddlers of all sizes.
Photo: Courtesy Ocean Kayak
The Malibu Two fits the typical Ocean Kayak mold, offering remarkable versatility. As a fishing kayak the Malibu Two fills a rare niche as a tandem angler, making it especially perfect for introducing children to kayak fishing.
Ocean Kayak Malibu Two outfitting and accessories
The Ocean Kayak Malibu Two tandem kayak comes ready to paddle with comfortable folding seats with adjustable back support and molded in foot braces (supports inset into the kayak deck that provide a solid platform for your feet while paddling) to fit a wide range of paddlers.
For dry storage go for the optional Gaspachi hatches; this Ocean Kayak Malibu Two hatch kit provides waterproof protection and easy access to your lunch, sunscreen, camera and other paddling essentials in the bow, center and stern of the kayak, making this a popular Malibu Two package for day trippers.
Ocean Kayak Malibu Two replacement parts include scupper plugs. If you want to retrofit a motor you’ll have to order your own small marine engine and get creative, looking to YouTube for clues on how to install a trolling motor on a Malibu Two.
Malibu Two modifications
The easiest Ocean Kayak Malibu Two modifications are built in: The seats can be arranged in seven different ways, depending on paddlers’ weight, objectives and comfort. An Ocean Kayak Malibu Two hatch kit is available to allow owners to retrofit up to three push-on, eight-inch hatches on their kayak.
Some Ocean Kayak Malibu Two owners choose to expand the standard bow, center and stern cargo straps with additional straps or bungees. There are plenty of potential modifications for anglers, including rod holders and bungees to carry tackle boxes and trays—available as after-market upgrades from other manufacturers.
Warranty
The hull and deck of the Ocean Kayak Malibu Two sit-on-top kayak is covered by the manufacturer’s limited lifetime warranty, which covers defects in workmanship and materials.
Portability
At 63 pounds the Ocean Kayak Malibu Two is somewhat heavy, but it’s reasonable enough for a two-person carry over short distances using the handles at the bow and stern. Molded in side handles add another option for short carries.
You have several options for an Ocean Kayak Malibu Two roof rack. The kayak is well within the weight capacities of most factory-installed vehicle roof racks, or aftermarket roof racks. Adding foam kayak cradles or pool noodles to the metal roof rack bars is your cheapest solution for safe car-topping.
Pickup truck drivers may have room to transport the Ocean Kayak Malibu Two kayak in the truck bed, depending on the vehicle model.
How it compares
The Ocean Kayak Malibu Two is a versatile sit-on-top recreational kayak that fills many needs. Let’s see how it compares to other kayaks in its class.
Ocean Kayak Malibu Two vs XL
At 13’4” the Ocean Kayak Malibu Two XL is simply a longer version of the 12-foot Malibu Two. More length equals more capacity (430 pounds versus 362 pounds) and a bit more speed. What’s more, the Malibu Two XL has a larger opening for the optional center hatch, making it easier to pack with essentials for a day trip.
Otherwise, the Ocean Kayak Malibu Two and Malibu Two XL have the same functionality, with many options for paddling tandem, solo, with a child or a pet—and many paddling positions. Given its larger dimensions, the Malibu Two XL is also somewhat heavier at 70 pounds.
Perception Rambler 13.5 vs Ocean Kayak Malibu Two XL
Looking for a bit more carrying capacity for a drier ride in waves and space for packing for a kayak day trip? The Perception Rambler 13.5 tandem sit-on-top kayak (at 13’6”) is even larger than the Ocean Kayak Malibu Two XL, with a practical storage well in the stern for gear.
The Perception Rambler 13.5 can be paddled in many of the same configurations as the Ocean Kayak Malibu Two, and comes with a molded center seat for kids or pets. The Rambler 13.5, however, is eight pounds heavier than the Malibu Two XL, making it more cumbersome to carry by hand and load on a vehicle roof rack.
Photo: Courtesy Ocean Kayak
Where to buy the Malibu Two
The Ocean Kayak Malibu Two and Malibu Two XL are both readily available from Ocean Kayak retailers across North America. Buying a new Malibu Two from a kayak retailer will give you access to all the Ocean Kayak accessories at the point of sale.
Looking to save some money? Search Ocean Kayak Malibu Two Craigslist to find a used one. With solid construction the Malibu Two is built to last, so buying used is a great way to find a good deal on a solid recreational kayak.
Pros and cons
Pros
Supreme versatility is this sit-on-top kayak’s greatest strength: tandem or solo, kayak fishing or paddling in easy waves
Fantastic for getting kids on the water or sharing the adventure with your pet
Cons
Generalist kayak design means it does not excel in any particular area of use, especially when paddled solo. Look at a solo-specific kayak if your main objective is to paddle alone.
Larger, and therefore heavier, than more compact sit-on-top rec kayaks.
Practice these skills often and you might be surprised by what you find—but not where you find yourself. | Photo: Andrew Strain
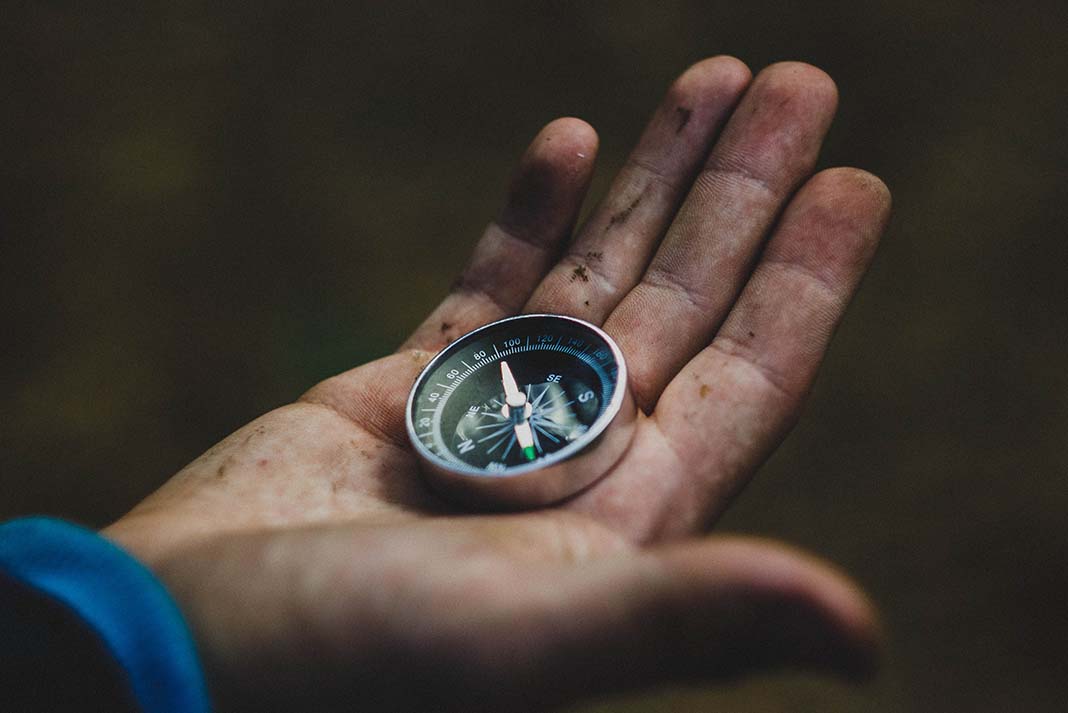
Many rely on satellite-assisted, turn-by-turn GPS navigation for everything from driving in the city to day hiking unfamiliar trail networks, but electronic navigation is no substitute for traditional map and compass skills. Electronics can fail, but whichever compass you choose to buy—from the fanciest to the most basic—won’t require lithium batteries or a reliable satellite connection to guide the way.
There’s no more visceral reminder of why paddlers need to master these skills than stroking for 20 eerie minutes into a foggy whiteout with the wind in your ears and the hairs standing up on the back of your neck. At its most basic, navigation is about getting from A to B. But being a skilled navigator is much more—it is an empowering way of better understanding our planet and safely exploring our place within it.
Identify the tools of navigation
Fortunately for backcountry travellers, the tools of navigation are simple, minimal and easy to carry:
Topographic map or nautical chart for your area of travel
Orienteering compass
Watch
Length of string
Pencil
Marine deck compass is optional but highly recommended
Read maps and charts
Maps and charts are the single most useful source of navigation information for paddlers. Map-reading, the art of correlating what you see on paper to what you see around you, is the foundation of sound route finding. Maps can provide clues to potential hazards and direct us to campsites, water sources and scenic areas.
Depending on where you paddle, you’ll need some combination of maps and charts to navigate successfully. | Photo: Virginia Marshall
Depending on where you paddle, you may rely on topographic maps, marine charts or a combination of both. While maps emphasize land features—such as elevation and relief (using contour lines), roads and trails—marine charts focus on maritime features like water depths, tidal current speed and direction, buoys and other aids to navigation.
Paddlers are unique in that we spend time in both environments. In coastal areas with prominent features and frequent boat traffic, marine charts are indispensable. On freshwater and in areas with indistinct coastlines or infrequent boat traffic, maps are more commonly used. Topographic maps are particularly invaluable for locating potential landing sites and identifying coastal features like cliffs, headlands or inflowing rivers.
Compass basics
Whether you’re tackling open water crossings, weaving among island mazes or hunting for an elusive campsite in the fog, a compass is invaluable. Use a compass to orient yourself within the landscape, define a line from A to B, and pinpoint your position by establishing bearings to known landmarks.
Identify the parts of a compass
Baseplate
Transparent, so you can see your map through it, with at least one straight edge for taking bearings and transferring them to your map.
Rulers
Use with your map’s scale to measure distances.
Direction-of-travel arrow
Shows you which direction to point the compass when you’re taking or following a bearing.
Rotating bezel
This outer ring surrounding the needle housing is printed with direction indicators (N, S, E, W) and 0° to 360° markings.
Index line
Located at the top of the bezel, this is your “read bearing here” mark.
Magnetized needle
The red end (white on some compasses) of the needle always points to magnetic north.
Orienting arrow
Used to orient the bezel with magnetic north, it has an outline shaped precisely to fit the magnetized end of the needle.
Orienting lines
Parallel lines rotating with the bezel; correctly aligning these with the north-south grid lines on a map aligns your orienting arrow with north.
Most handheld orienteering compasses also include a lanyard for hanging the compass around your neck, but kayakers will find this string is most useful for measuring distances on your map, or girthing to your decklines or PFD to prevent accidental drops overboard. If your compass isn’t advertised as floating, it will sink!
Adjust for declination
Finding north on a map is a no-brainer—it’s at the top. But while maps and charts are oriented to the geographic North Pole (or “true north”), your compass needle points to a different location: magnetic north. The difference between the two is called declination (or variation) and results from the ever-shifting nature of the Earth’s magnetic field.
Set the declination for your trip area in your orienteering compass, and you won’t have to think about it again. | Photo: Virginia Marshall
This magnetism originates deep within the planet’s mineral-rich core and the circulation of this fluid core means our magnetic poles are in constant motion. In fact, magnetic north has been drifting from the Canadian Arctic toward Siberia for over a century, and is currently migrating at a rate of about 40 miles per year. Today, true north and magnetic north sit about 250 miles apart.
The fixed position of the geographic North Pole simplifies cartographers’ jobs, but it means compass users have to do a bit of math to ensure our map and compass are speaking the same language. In Canada and the continental U.S., declination can vary from nearly 20° east on parts of the West Coast, to nearly 20° west on areas of the East Coast. Compensating for this declination is key to taking accurate bearings. A 15° error, for example, on a mile-long crossing puts you a quarter-mile away from your target.
Check your chart or map for the declination value for your trip area. It will be listed in the map margin, or indicated within your chart’s compass rose. Since magnetic north is always on the move, declination also changes over time. If you are using an older map or chart, you’ll need to update the declination using the listed rate of change or, better yet, consult an online magnetic declination calculator or the National Oceanic and Atmospheric Administration’s (NOAA) current world magnetic model.
In eastern Canada and eastern United States, ADD declination when moving from a map bearing to a field (magnetic) bearing, and SUBTRACT declination to translate your compass bearing to your map. West of the Great Lakes and Mississippi River, do the opposite.
A bit of preplanning goes a long way here. Before your trip, update your maps with this year’s current declination. Make sure any bearings you plot on your map are adjusted for declination and marked with an ‘M’ for magnetic, so they’re compass-ready. Many orienteering compasses also have an adjustment screw on the back of the baseplate, which allows you to set-and-forget the declination right in your compass. If you paddle in the same area most of the time, set your compass to the local declination and you won’t have to do any more math.
Before you begin taking and following bearings, your first step should be orienting your map so it aligns with the actual landscape around you. Once you’ve set declination, map orientation is easy:
Before you begin taking and following bearings, your first step should be orienting your map. | Photo: Virginia Marshall
1
Lay map on a flat surface
Start by laying out your map on a flat surface. Place your compass on the map with the direction-of-travel arrow pointing toward the top of the map and one straight edge of the compass at the edge of the map.
2
Rotate the bezel
Rotate the bezel so N (north) lines up with the direction-of-travel arrow.
3
Spin the map
Carefully spin the map (don’t touch the compass) while watching the magnetic needle. Continue turning the map until the red end of the magnetic needle is within the outline of the orienting arrow.
Ta-da! Your map is now oriented correctly to the real world. Take a moment to become familiar with how recognizable landmarks like islands, headlands and hills are represented on the map. How many can you now identify through just a basic sense of direction?
Refer to your map often as you paddle, because staying found is far easier than finding yourself after you are lost.
If thinking about bearings and degrees brings on high school trigonometry flashbacks and exam sweats, don’t panic. A bearing is just a different, more precise way to describe a direction. On a compass, north is equivalent to 0° or 360°, east is 90°, south is 180° and west is 270°. A compass bearing is simply the angle—measured clockwise—between north (0°) and your direction of travel.
Don’t panic! A bearing is just a different, more precise way to describe a direction. | Photo: Virginia Marshall
One important caveat to keep in mind when you are learning how to use a compass: Bearings are always relative to a specific location. In order for a bearing to be useful you must know where you are taking the bearing from, or what you are taking the bearing on. If you are truly lost, and have no way to orient yourself, a compass is of little use.
How to take a bearing from a map
Taking a bearing from your map is a useful way to confirm your heading in navigationally challenging landscapes—for example, when a labyrinth of islands obscures your destination. You can also plot the bearings for all large, obvious crossings along your route beforehand, to simplify compass work while afloat.
On your map or chart, align the straight edge of your compass baseplate between where you are (1a) and where you want to go (1b). If you are plotting the bearing ahead of time, choose well-defined start and finish points, like islands or points of land. If your compass edge isn’t long enough, extend it with a sheet of paper and a pencil line.
Make sure the direction-of-travel arrow is pointing toward your destination (in other words, your compass isn’t upside down).
Firmly holding the baseplate to the map, rotate the bezel until the orienting lines on the compass are parallel to the north-south grid lines on your map (longitude lines if you’re using a chart). For this process, just ignore the magnetic needle. Make sure the N (north) marker on the bezel is pointing toward the top of your map (not south).
Look at the index line to read the bearing at the top of the compass bezel.
Now you can use your compass to follow that bearing to your destination. Don’t forget to add or subtract declination, if needed, to get your magnetic bearing.
How to follow a heading from a compass bearing
As you paddle along, the direction your bow is pointing is called your heading. On calm water, your bearing and heading should be the same angle. Of course, paddlers often have the added challenge of compensating for sideways drift due to wind, waves or current.
Double-check your bearing. | Photo: Virginia Marshall
Place the compass on your boat and turn your boat until the needle lines up with the orienting arrow. | Photo: Virginia Marshall
To follow a heading using an orienteering compass
Check the bearing is correctly dialed in at the index line on the compass.
Place the compass on a flat surface near the middle of the boat where you can see it, with the direction-of-travel arrow pointing away from you and the edge of the baseplate parallel to the keel line. The deck of your sprayskirt works well for this.
Without touching the compass, turn your boat until the red end of the magnetic needle is inside the outline of the orienting arrow. Your bow is now pointing toward the bearing you took from your map.
Paddle forward, monitoring your compass and adjusting your heading to keep the magnetic needle inside the orienting arrow.
If you know where you are and want to identify an unknown landmark that you can see, you can take a magnetic bearing in the field and plot it on your map.
Find the direction of travel. | Photo: Virginia Marshall
Rotate the bezel and read your bearing. | Photo: Virginia Marshall
Transfer the bearing to your map to identify your mystery landmark. | Photo: Virginia Marshall
Hold your compass flat with the direction-of-travel arrow (1a) pointing away from you and directly at the landmark (1b).
Rotate the bezel until the red end of the magnetic needle is inside the orienting arrow.
Look at the index line to read the magnetic bearing you’ve just captured.
Subtract declination if you are east of Lake Superior, or add it if you are west, to convert the magnetic bearing to a true (map) bearing. Dial the adjusted bearing in at the index line on your compass bezel.
Now you can transfer that bearing to your map to identify your mystery landmark. Lay the compass on your map with the bottom outside edge of the baseplate anchored to your location.
Pivot the entire compass baseplate around the anchor point until the orienting lines are parallel with the north-south grid lines on your map (6a), and the north marker on the bezel is pointing toward the top of your map (6b).
Your unknown landmark (7a) lies somewhere along the line established by the edge of the compass baseplate (7b). If you extend the line, you should be able to figure out what it is—perhaps a distant lighthouse tower, or maybe just a mirage.
Where am I? How to triangulate position
If you don’t know exactly where you are, but can identify two or more landmarks, you can use multiple bearings to find precisely where you are on the map. Two landmarks will give you what’s called a bisect—while three intersecting bearings provide a triangulation.
Three intersecting bearings provide a triangulation, allowing you to determine your location on a map. | Photo: Virginia Marshall
Take a bearing to a known landmark.
Add or subtract the declination to convert the magnetic bearing to a true (map) bearing. Dial this number in at the index line on your compass bezel.
Place the compass on your map with the top corner of the baseplate anchored to the known landmark.
Pivot the whole compass around the anchor point until the orienting lines are parallel with the grid lines on your map and the north marker on the bezel is pointing to north on your map.
Draw a pencil line along the straight edge of the compass baseplate. Repeat these steps with a second and third landmark. For the most precise fix, try to select landmarks that are at least 60° apart, and avoid those that are close to 180° apart. Landmarks can be anything recognizable: look for prominent summits, river mouths, valleys, bays, beaches, islands or human-constructed features like communication towers, lighthouses, marine lights, buoys, buildings, etc.
If the three lines you draw meet at a single point, this is your precise location. Most of the time, however, the lines will form a small triangle—your location is somewhere in this area. Re-check your work if your triangle is very large; you likely have at least one significant error.
Navigating with a compass adds a measure of security, especially when paddling unfamiliar waters or in low visibility. As with any developing skill, be sure to practice on calm, easy days with good visibility before relying on your compass in more challenging conditions.
Navigating with a compass adds a measure of security, especially when paddling unfamiliar waters or in low visibility. | Photo: Andrew Strain
1 Round to the nearest 5°
On the water, it’s virtually impossible to gauge angles of less than 5°. Adjust map bearings to the nearest 5° so they’re easier to remember and more realistic to follow while paddling.
2 Write it down
Note the bearing in your logbook, on your map, or on a dive slate so you don’t forget it.
3 Get a back bearing
The back bearing is useful to know if you plan to return along the same route, or in case you need to turn back in poor visibility. You can read your back bearing off the bezel at the bottom of your orienteering compass (opposite the index line), or calculate it by adding or subtracting 180° to your bearing. For example, if your bearing is 240°, the back bearing is 240° – 180° = 60°.
4 The deviation is in the details
The magnetic needle on your compass is affected by anything in its vicinity that carries a magnetic field. This means a can of beans or a camp stove packed in your front hatch—or even your electronic wristwatch—can mess with your compass bearing. If you’re not sure whether an object is magnetic, move it toward your compass to see if the needle makes an obvious shift.
5 Compass uncertainty
Without a visual target, compass uncertainty and paddling go together like fish and chips. The farther we travel along a course, the greater the uncertainty becomes. Keep crossings as short as possible, and divide long journeys into shorter legs.
6 Using backstops
If possible, choose bearings that allow you to take advantage of natural backstops, such as obvious landmarks, so you don’t go too far beyond your target by mistake. You can also use time backstops. For example, if the paddle to your lunch site should take two hours at your average paddling speed, and you leave at 10 a.m., then your time backstop might be 12:15 p.m. If you pass this time backstop, you have either miscalculated the required crossing time, underestimated the distance or veered off your heading.
Paddlers use two types of compasses: a handheld orienteering compass, and a deck-mounted marine compass. While an orienteering compass is essential for map work, nothing beats the ease of use of a marine compass for following a heading. We recommend using both when navigating.
Orienteering compass
Suunto M-3G compass.
Use an orienteering compass for all map-and-compass work, such as plotting bearings or using triangulation to fix your position.
Pros: Compact; can be adjusted for declination; includes a ruler and straight edge for measuring distance and taking bearings from a map.
Suunto MCB compass.
Cons: Must be held level to ensure an accurate reading; not easy to sight bearing while paddling.
Choose a quality orienteering compass like the Suunto M-3G for the best precision and features, including a screw to set declination and an elongated baseplate for easier map work. The sturdy, flat profile slips unobtrusively into your map case, pocket or under your decklines.
Another reliable option for paddlers is the Suunto MCB, which features a floating housing and folding sighting mirror that doubles as an emergency signaling device.
Marine compass
Use a marine compass for following a magnetic heading.
Pros: Intuitive, easy to sight bearing on large numbers; hands-free; set forward on the kayak to minimize seasickness; accurate in bumpy conditions or when kayak is edged.
Cons: Indicates only magnetic direction; cannot be adjusted for declination or used to take map bearings.
The Silva 70P is designed for use with kayaks that have a molded-in compass recess on the deck. It mounts permanently with four simple screws for a secure fit. Because the compass dome sits nearly flush with your kayak deck, this style is also durable and protected from most impacts.
Silva 58 Kayak Compass.
If your kayak doesn’t have a compass recess, a removable deck compass such as the Silva 58 Kayak Compass is designed to clip into your decklines. Some paddlers prefer this style because it can be mounted closer to the cockpit for easier sighting, and removed to avoid damage during transport.
How to use a marine compass
Using a marine compass is dead-easy: point your bow at the object you want the bearing of, and read the magnetic bearing at the “lubber line”—the line marked on the side of the compass dome, facing the paddler.
More navigation methods for paddlers
If you think of navigation as the act of following a line between two points, there are a number of different types of lines that we can follow. Line-of-sight is the easiest and most obvious. A compass bearing is another type of line, as are shorelines and other natural “handrails.” Ranges offer yet another line to get from A to B.
Piloting
When it comes to actual navigation, we spend the vast majority of our time using the simple method of piloting. This is the process of keeping track of where you are by relating features on your map or chart to real world observations. One very easy way to do this is to follow a natural handrail—paddling a coastal corridor, for example. As you journey along, keep track of any shore or water-based features and checkpoints—such as prominent headlands, islands, inflowing rivers or buoys—marked on your map. These give you periodic “fixes” along the line of your handrail.
Aiming off
When visibility is poor or sideways drift is a concern, experienced navigators “aim off.” This is the practice of deliberately planning a course to either side of a shore-based target, to account for factors like wind, current, drift or compass uncertainty. Imagine, for example, you can’t see the campsite you are crossing to. If you aim intentionally to the right of the campsite, you will know to turn left when you reach the shoreline. This is particularly useful in featureless terrain and on long crossings.
There are a number of different types of lines that we can follow to navigate with a compass. | Photo: Virginia Marshall
Similarly, aim upwind or up-current to compensate for drift. As a general rule, adjust your course by 15° for a 15-knot crosswind or 15° for every 1 knot of current speed when paddling across the current. Don’t have a compass? Hold your hand at arm’s length from your face and make a fist—index knuckle to pinky knuckle is about 10°; make a shaka (spread your thumb and pinky) to measure 20°.
Ranges
Ranges are another useful tool for navigating in wind and current, especially when crossing smaller channels. Look for two objects ahead that line up along your direction of travel—these could be a prominent tree or rock on the shore lining up under a notch in a hill. If wind or current pushes you off this line, adjust your course accordingly so the objects remain aligned.
Dead Reckoning
Dead reckoning navigation is based on yet another type of line: a timeline. It is useful for predicting how long a trip will take or estimating current position when traveling out of sight of land, along a non-descript coastline or in foggy conditions—basically whenever piloting isn’t practical. Dead reckoning uses a simple formula: D = S x T (Distance = Speed x Time). In order to make accurate predictions, you’ll need a way of measuring all three variables. Distance can be measured on your map using a string or your compass ruler and the map scale. Wear a watch and always note your start time and any significant breaks. Finally, track your speed in a variety of conditions to get a reliable sense of how fast you paddle in calm water, headwinds and tailwinds.
Reading about navigation techniques and how to use a compass is a great first step to point you in the right direction. Now get out on the water or in your local green space with a map in one hand and a compass in the other. Practice these skills often and you might be surprised by what you find—but not where you find yourself.
This article originally appeared in Paddling Magazine Issue 65. Subscribe to Paddling Magazine’s print and digital editions here, or download the Paddling Magazine app and browse the digital archives here.
Practice these skills often and you might be surprised by what you find—but not where you find yourself. | Feature photo: Andrew Strain
The Vibe Cubera 120 Hybrid paddles like a kayak, fishes like a SUP. | Feature photo: Roberto Westbrook
There is a secret fishing hole 100 yards from the small parking lot for my community library. The launch requires carting my kayak across the library lawn, so needless to say I don’t like to hang around too long. Commando fishing requires quick action, so the local library is a perfect location to test Vibe’s redesigned and renamed Cubera 120 Hybrid.
The launch is through a row of thick hedges and across 20 yards of marsh grass then dropping down a muddy bank pocked with clusters of oysters. Not surprising, I get some weird looks from the library patrons. Especially after I return from a trip, popping through the hedges, covered in mud and saltwater, grunting and wheezing as I drag my kayak across the grass, with a stringer full of speckled trout, striped bass and redfish on deck.
The Cubera 120 Hybrid is a hybrid standup paddleboard and kayak. It fits in the same category as the Kaku Wahoo or new Hobie Lynx. The wide, flat deck and shallow draft make these hybrids a standup paddleboard. A frame seat makes them a kayak. The idea is to capture the best of both worlds and overcome the disadvantages of each platform.
A standup paddleboard is simple to transport, store and carry. On the other hand, a kayak is stable, easier to operate and carries more gear.
The trick with a hybrid is to harness the power of both a SUP and kayak. To this end, the Cubera is a success. Shaped like a paddleboard and rigged like a kayak, I load the boat with gear, rods and paddle.
I can slide the Cubera fully rigged into the back of my pickup truck and I’m ready to go when I get to the launch. Instead of using a cart to move my kayak to the water, I just drag the Cubera a short distance across the grass.
Once on the water, I can sit and paddle to the fishing grounds with a kayak paddle. Then, switch to a SUP paddle or push pole to stand and fish. The kayak and SUP hybrid is perfect for quick trips on sheltered waters where standup fishing is on the menu.
Reintroducing a Maverick
Vibe’s new Cubera is a redesign of their original Maverick hybrid with more fishing features and a new seat option. I reviewed the Maverick in the Spring 2018 issue of Kayak Angler where I said, “The Maverick combines features of a rotomolded kayak and foam-filled hard board to create a new type of hybrid anglers will feel comfortable using and abusing.”
The same is true with the Cubera. To build the Maverick, Vibe developed technology to fill a plastic shell with foam. The plastic is thinner than their rotomolded kayaks to save weight, while the foam makes the board stiff and unsinkable.
Unlike most foam-filled hard boards with epoxy and fiberglass skin, the Cubera’s plastic flesh will not bruise or bleed. The rotomolded plastic makes the Cubera almost indestructible.
Room to party out back. | Photo: Roberto Westbrook
The foam core also makes the Cubera stiff and strong. With a 475-pound capacity, the Vibe can carry up to 100 pounds more stuff than some competitors. The advantage is a larger angler will feel more comfortable standing and fishing on the Cubera. With limited deck space and no internal storage, a 300-pound angler could carry 100 pounds of gear. But where would it all fit on a SUP?
The foam also makes the Vibe heavier than other SUPs. At 72 pounds without the seat, the Vibe is as heavy as a traditional kayak. It is considerably heavier than other standup paddleboard hybrids. Carrying the Cubera under one arm like a SUP is a stretch. With the 33.5-inch beam, I had to stretch my arm to reach the recessed grab handle in the deck.
SUP shape, compact kayak weight
The Cubera is more kayak than standup paddleboard. Beside the standup paddleboard shape with low gunnels, shallow draft and flat deck, the hybrid is as heavy and wide as a small kayak.
Still, the Cubera’s low profile make it easier to drag or cart. The bow slides across the soft ground and the Cubera has reinforced and replaceable plates on the stern. Dragging from the bow is tough because the molded fins dig into the ground like a land anchor. It’s easier to pull the Cubera around by the stern handle.
The SUP shape is more convenient to store and transport. The Cubera slides into a pickup truck bed and fits perfectly on a cartop roof rack. I prop the board against the side of my garage and cover it with a tarp, but it would be possible to lift the Cubera to the garage roof rafters.
Another advantage of the SUP hybrid is stability. The Cubera may be as heavy as a small kayak, but it is lighter than a typical standup kayak. The Cubera is 10 pounds lighter than Vibe’s Shearwater flagship standup boat. On the other hand, the Cubera is slightly heavier than their Yellowfin 120. But I dare you to try and stand in the performance-oriented Yellowfin.
Fishing rod, paddle and go. | Photo: Roberto Westbrook
Best seat on a paddleboard. | Photo: Roberto Westbrook
So, with the Cubera, I get standup stability with the weight of a compact kayak. On the kayak side of the story, the Cubera may be heavier than a traditional standup paddleboard, but the extra weight gives the hybrid capacity to carry a full arsenal of gear and a full-feature frame seat.
Pedal straight through the chop
The Cubera’s hull is a modified version of their tunnel design with shallow keel and channels to improve performance. A hint of flare in the bow and tumblehome in the stern keeps the hybrid paddling straight. The Cubera also has three small, molded finlets to further improve tracking.
A low gunnel cuts below the wind but it does expose gear and tackle to waves and spray. While the Cubera doesn’t handle as well as a performance kayak, it has some advantages over a standup kayak.
The day I met Kayak Angler photographer Roberto Westbrook to shoot photos of the Vibe, the wind was blowing 20 knots out of the south. Although we launched in a secluded harbor, I had no worries pointing the Cubera into the wind.
The board splashed through the short-period wind chop, and I appreciated the low profile design and high capacity for keeping the bow out of the water and the boat paddling straight. Facing these conditions in a traditional standup boat would have been drier, but a lot more difficult to paddle.
Another advantage from the kayak side of the family is the Cubera’s rigging potential. While the incredible capacity tempts me to pack everything and the kitchen sink, the SUP side of the tree encourages me to keep rigging to a minimum.
I attached a Stealth QR-1 X elevated rod holder to a gear track on the gunnel. The QR-1 X is perfect for a SUP because the locking cam keeps my rod secure on a SUP where there is more potential for the rod to go overboard.
For gear and rod storage, I secured Railblaza’s Kayak Crate with the bungees and clips in the stern. In less than a minute, the Cubera is ready to fish.
Stand tall or sit in comfort
A kayak is easier to paddle than a SUP. Standing and paddling on a board takes balance and a lot of energy. Sitting with a double blade paddle is easier to propel the boat and keep it straight.
To turn the hybrid into a mini kayak, the Cubera uses their new Summit seat. This is the same seat as the Shearwater. With four positions, the seat can be raised, lowered, reclined and turned into a standing platform.
The Vibe Cubera 120 Hybrid paddles like a kayak, fishes like a SUP. | Feature photo: Roberto Westbrook
Fold the seat back forward and add the poling platform and brave anglers get an extra few inches of elevation. The higher I stand in the kayak, the more I can see through the water. Since the Cubera is intended for standup sight fishing, being able to see the fish farther from the kayak gives an advantage to the angler.
The Summit seat is the most advanced seat on a hybrid SUP and kayak. It’s also the heaviest. The adjustable positions and quick-dry mesh covering make it one of the most comfortable options. In the low position, the seat makes for efficient paddling. In the high position, I could sneak along a mud flat looking for signs of fish. Then, I can stand on the deck or climb onto the poling platform to hunt down my prey.
Catch the Cubera 120 Hybrid
While the Vibe Cubera 120 Hybrid doesn’t have the range of a traditional kayak, and it is heavier than a hard-shell standup paddleboard, the advantages of stability, portability and fishability make the Cubera the best of both worlds.
This article was first published in Kayak Angler Issue 46. Subscribe to Kayak Angler and get the magazine delivered to your front door. Download the Kayak Angler Magazine+ app to seamlessly glide between the digital archives, the latest articles and videos.
The Vibe Cubera 120 Hybrid paddles like a kayak, fishes like a SUP. | Feature photo: Roberto Westbrook
Anyone who’s been on an overnight paddling trip knows that it pays to plan ahead. But some things are easier to anticipate than others, especially when it comes to wildlife, wild weather and the people you might meet along the way. To help you prepare for anything, we’ve gathered expert tips from paddlers who have been there before—and survived to tell about it.
Kathleen Gallagher is probably the unluckiest first-time skinny dipper. The canoe trip virgin followed Wild Women trip mates into inviting Murray Lake, but the inaugural dip didn’t go as planned. “I felt a flapping between my thighs” as the snapping turtle clamped down, recalls Gallagher. Although Gallagher’s injuries were easily remedied with a happy face Band-Aid, keep these tips in mind when baring your bottom.
1. Choose a secluded lake
Skinny dipping is illegal in some parts of North America. Beth Mairs, founder of Wild Women Expeditions, asks us to, “Think practical. It’s ridiculous to wear a wet bathing suit or drag it around throughout a canoe trip.”
2. Be safe
Pick a clean location and watch out for glass, garbage, clams and snapping turtles. The last thing you want is to ride in an ambulance naked.
3. Enjoy
Nothing is more wonderful than the feeling of lakewater on your skin.
Forest fires spread quickly—up to eight kilometres per hour—much faster than we can run or paddle. The smell of smoke, a light dusting of ash on canoes or tents and unusual behaviour from birds and mammals are usually the first signs of an encroaching fire.
Follow these steps to survive a forest fire. | Photo: Hap Wilson
The SAS Survival Guide recommends staying calm, upwind of the fire (if possible) and moving to the closest body of water such as a lake or river. If you become trapped in the fire, do the following:
Keep your clothes on, as they protect you from the intense heat of a fire. Cover any exposed skin.
Semi-immerse yourself in the water. Care should be taken to avoid hypothermia.
Cup your hands around your nose and mouth or breath through a bandana.
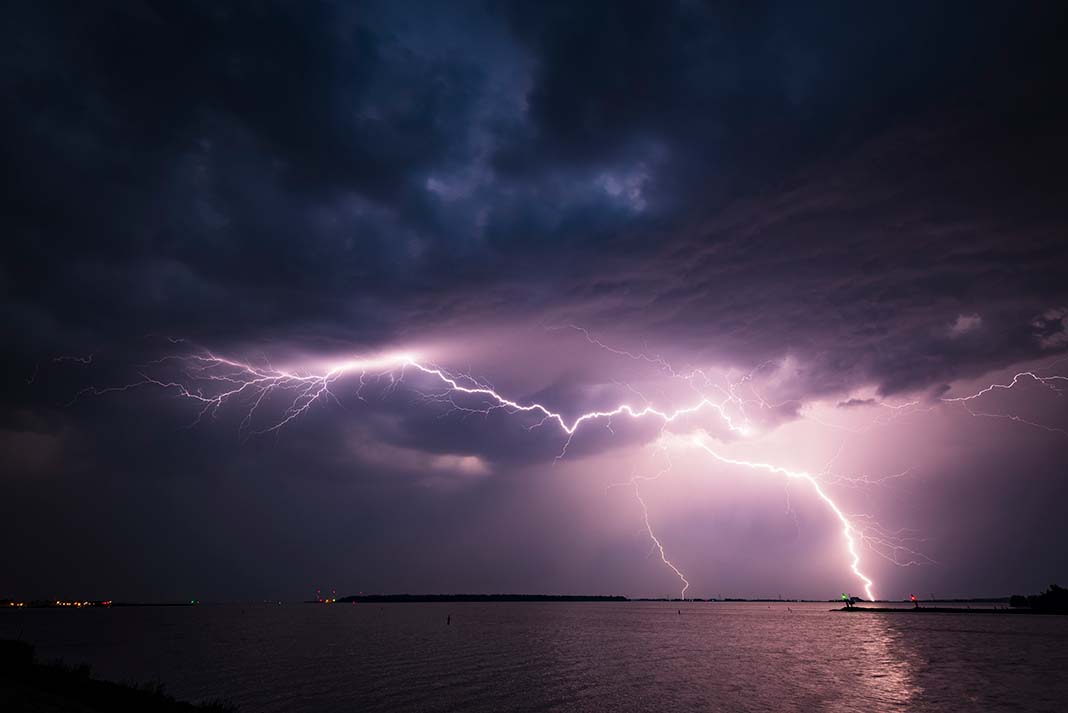
Lightning strikes down more people than tornadoes, snowstorms and hurricanes and remains a top offender in storm-related deaths.
With lightning, it’s one strike and you’re out. | Photo: iStock
According to Environment Canada, nine to 10 people are killed and 92 to 164 are severely injured in Canada each year. And if you’re a guy, the stats don’t point in your favour. NASA says you’re four times more likely to be struck. So here’s how to avoid this 27,760°C bolt.
Head to shore as soon as you see a flash of lightning or hear a rumble of thunder.
Avoid being the tallest thing around. Stay away from tall trees, hilltops, cliffs, open water and caves. Find a level spot of terrain.
Adopt the lightning ready position. Crouch down with your feet close together, preferably on a Therm-a-Rest insulated sleeping pad or PFD, to wait out the storm.
Remove any jewellery and stay away from metal objects—this is not the time to be fiddling with aluminum tent poles.
If you’re in a group, spread out—it’s your best chance of survival.
4 The first scratch
The chalk-like squeal of Kevlar grinding over granite isn’t pretty, especially when you notice the trail of red gelcoat left behind. Before playing the blame game or signing divorce papers, understand this law of attraction: shiny, new, expensive canoes are magnetically attracted to rocks. Install skid plates for good measure.
Does this image send chills up your spine? | Photo: iStock
5 Blood-sucking leeches
Do thoughts of the scene in the 1986 hit movie Stand By Me, where child actor Wil Wheaton pulls a fat, slimy leech out of his underpants, send chills up your spine? If so, there’s little reason to worry—only a few species of leeches feed on humans. However, if one attaches to you, here’s what to do.
Do: The best method is to wait 10 to 20 minutes until the leech detaches itself. But if that’s too gross, place your fingernail next to the leech’s mouth, which is located on its thinner end, and slowly slide the nail underneath to dislodge its sucker. Wash the wound with soap and water.
Don’t: As tempting as it might seem, don’t rip the leech off. This tears your skin and can cause infection. Another treatment commonly prescribed is the application of salt or heat from a flame. While these methods work, they cause the leech to regurgitate into the open wound, which can cause infection, and is even grosser.
Remember, prevention is key, and yes—even 10mm aluminum poles can break. When putting poles together, make sure that they are well seated into each other and be careful not to drop them on hard surfaces.
If your pole breaks on trip, a pole sleeve in your repair kit really comes in handy. Fresh out of pole sleeves? Grab a strip of birch bark (from a dead tree), wrap it around the pole a few times and slap on some duct tape to hold it in place.
It goes without saying, if you hear banjo music make sure you paddle as fast as you can and don’t look back. All kidding aside, as representatives of the paddling community it is our responsibility to act in a respectable and friendly manner toward locals. Keep in mind that we are in their backyard.
Friendly conversation, leaving the site clean and keeping your speed down when driving through small communities helps boost the public image of paddlers. Also, before travelling to an area, learn the public put-ins and camping.
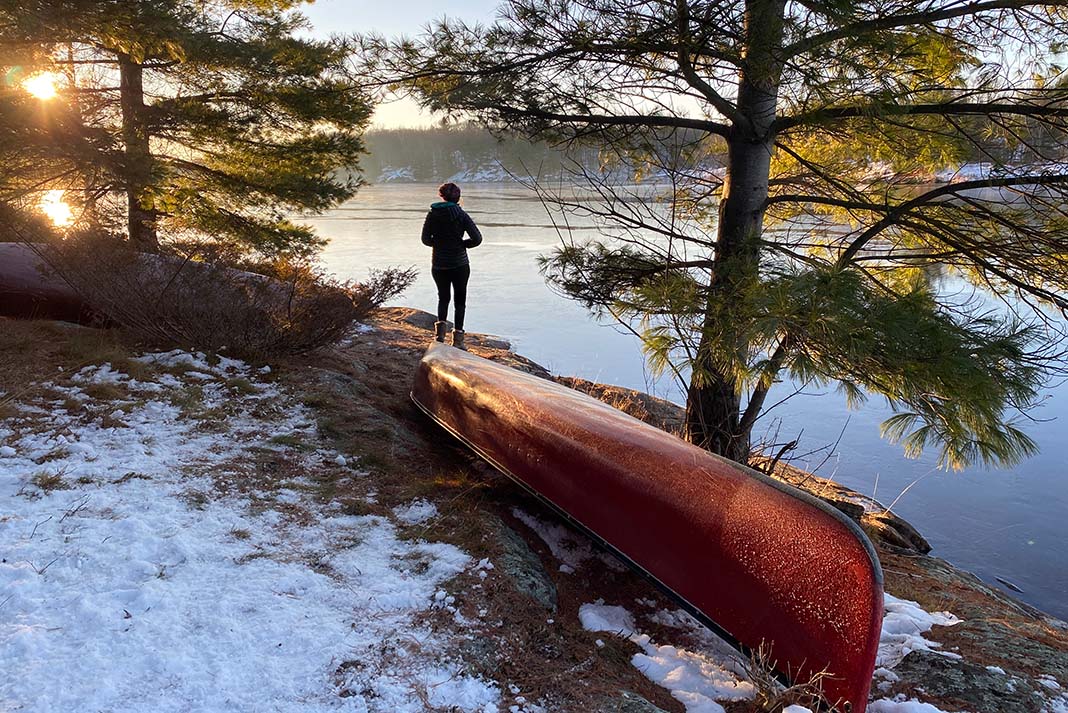
8 Icy water
Don’t panic. Panic can result in inhalation of large amounts of water and zap precious energy critical to survival. The U.S. Search and Rescue Task Force says that “cold water robs the body’s heat 32 times faster than cold air and all efforts should be given to getting out of the water fast.”
Don’t panic if you fall into icy water. | Photo: Eberhard Grossgasteiger/Pexels
Failing a speedy exodus from this numbing situation, conserving energy will effectively extend your survival time. “Cross your arms tightly against your chest and draw your knees up” if you’re wearing a PFD, says the Canadian Red Cross. “The HELP (Heat Escape Lessening Position) can increase your survival time by 50 per cent.” Prevention is your best means of survival.
A strainer is a tree that has fallen in the current and traps everything that tries to float through it. According to river rescue experts, if you are out of your boat and headed towards a strainer, swim aggressively towards it and try to launch yourself up on top of it.
If you’ve followed wilderness tripping wisdom, you’ll be travelling in a group of at least three canoes. Pare down your kit and stash excess gear in a location you can return to. Now the two remaining boats have three paddlers each and it’s time to go canoe hunting. Be aware that the missing canoe is an elusive creature and you may very well have to finish your trip without it.
If you’re tripping solo, your canoe trip has just turned into a hiking trip. A satellite messenger, full maps of the area, a compass and a GPS device are extremely handy in these situations.
11 Being lost in the woods
The first thing you should do is S.T.O.P.—Stop, Think, Observe and Plan. Created by SAS survival instructor Lofty Wiseman, this acronym may save your life. Stop moving, take an inventory, make yourself comfortable and assist searchers by being noticeable. If your plan is to move, leave a trail of clues that searchers can follow.
Lost? The first thing you should do is S.T.O.P.—Stop, Think, Observe and Plan. | Photo: Pixabay
12 Marshmallow burn
After discussing the hazards of waving about flaming marshmallows with a group of 13-years-olds, Family Camping contributor and guide Virginia Marshall was smacked in the cheek with a flaming ball of sugar and gelatin. “It was surprising and painful,” recalls Marshall, who was left with a second-degree burn.
Instead of waving it, Marshall offers this advice: If your marshmallow catches on fire, calmly blow it out, and make sure your first aid kit is stocked with moist burn pads.
Update everyone in your group with your status hourly. Comment on everything anyone else says. Invite other paddlers you meet to be your friend. Bring chalk to write on rock walls. Send invitations to people for all events, like breakfast and dishes. Give thumbs up to everything you like. Begin campfire stories with, “My name is Jim and I’m a social media-holic.” Do solo trips.
14 Capsized canoe
If you are travelling in a group and you capsize in the middle of a lake or moving river, then a canoe-over-canoe rescue may be your best option.
Form a T-shape with the rescue canoe alongside the end of the overturned boat.
Grab the end of the capsized canoe and lift it onto your gunwales while instructing the swimmers to push down on the far end to help break the suction of the overturned boat.
Slide the upside-down canoe across your gunwales so both ends are out of the water, then flip the drained boat right side up and slip it back into the water.
Stabilize the canoe alongside your own while the swimmers climb back in one at a time.
Capsized canoe in your group? Learn how to survive anything on your next paddling trip. | Feature photo: Virginia Marshall
15 Avoid hypothermia
Avoid hypothermia by staying warm and dry. The best defense is to always wear appropriate immersion protection when paddling in cool temperatures and especially when paddling on cold water.
If someone is cold and shivery, getting the person out of wet clothes and into warm, insulated gear is the first order of business. Use the casualty’s own heat generating ability. Think lots of hot chocolate, squats and running on the spot. Be on the lookout for the “umbles”—stumbles, mumbles and fumbles—which may mean their body temperature is dropping.
In the advanced stages of hypothermia, the person becomes disoriented and confused and may stop shivering. Bundle in sleeping bags and place Nalgene bottles filled with hot water alongside groin and under armpits. Seek emergency medical care.
[ Browse the widest selection of boats and gear in the Paddling Buyer’s Guide ]
16 Survive a moose attack
Moose are pretty chill creatures, but according to Wikipedia, in terms of raw numbers, moose attack more people than bears and wolves combined—usually with only minor consequences.
Not a-moosed to see you. | Photo: Follow Me North Photography
Males may be more aggressive in the fall during the rut, and females in summer while protecting calves. Give moose a wide berth and watch for warning signs that a charge may be imminent: ears back, grunting and stomping feet.
Should a moose charge, try to:
Make a run for it, but know that moose can run at 35 kilometers an hour.
Get behind a large tree and play a 720-kilogram game of ring around the rosy, keeping yourself opposite the moose.
If a moose knocks you down, adopt a fetal position and protect your head. Play dead and don’t fight back. The moose may stomp and kick at you, but will generally leave. Minor consequences, my (bruised) ass.
This article originally appeared in the Fall 2010 issue of Canoeroots Magazine and Paddling Magazine Issue 65. Subscribe to Paddling Magazine’s print and digital editions here, or download the Paddling Magazine app and browse the digital archives here.
Capsized canoe in your group? Learn how to survive anything on your next paddling trip. | Feature photo: Virginia Marshall
Founded in Utah in 1986, Lifetime Products has a long history of sporting goods innovation. The first product they made was basketball nets, and they were a big deal. Lifetime basketball nets featured a quick-adjust system, making the nets easy to raise or lower with just a broom handle. This caught on quickly, and soon every driveway basketball net was a Lifetime.
Today, you’ll see Lifetime nets on courts around the world, but the innovation didn’t stop there. The company grew and expanded their manufacturing to include picnic tables, sporting goods and many other products that require plastic strong enough to withstand the elements at a reasonable price.
When Lifetime Products acquired Emotion Kayaks in 2011, it was a natural transition to paddlesports. The merger combined Emotion’s knowledge of recreational kayak design with Lifetime’s robust plastic manufacturing processes. Lifetime adapted their experience producing high-density polyethylene plastics to producing affordable recreational kayaks that are perfect for beginners.
Wear A Life Jacket
Everyone, even strong swimmers, needs to wear a life jacket at all times when on the water. It is extremely difficult to put a life jacket on once you fall into the water. Even a light wind can blow any paddlecraft away from you, faster than you can swim.
Always wear a USCG-approved Level 70 or Type III life jacket designed for paddling.
Lifetime kayaks are great for those who want a stable and reliable kayak without making a hefty investment. Lifetime offers both sit-on-tops and sit-inside kayaks, as well as dedicated fishing and youth kayaks.
Lifetime kayaks are ideal for new kayakers or those who know they want to stay in sheltered waters. They are great for short outings at the local beach, slow-moving river or quiet lake. These plastic kayaks are very affordable, and their sturdy plastic construction requires very little maintenance. With different types to choose from, there are Lifetime kayak options for all body sizes.
“The Lifetime Tamarack Angler 100 is a sit-on-top kayak intended for kayak fishing. It is most suitable for day trips on mild waterways including small lakes, bays and slow moving rivers.
That’s a great start, but is the Lifetime Tamarack Angler 100 fishing kayak ocean capable? In concept, the Tamarack Angler 100 could be used…” [ Read full review ]
“The Lifetime Wave 60 Youth kayak features outstanding stability—a critical performance feature for parents concerned about their children’s safety. A flat bottom keeps the kayak from feeling tippy at first float; in fact, the Wave 60 Youth is stable enough to be used as a swim platform.
The stern of the kayak is blunt and low to the water to create a swim-up deck for kids to climb aboard. The Lifetime Wave 60 Youth kayak maximum capacity is 130 pounds, and the manufacturer recommends…” [ Read full review ]
Paddle your way to adventure with the Lifetime Payette kayak, a sit-inside kayak designed for stability and control. Whether you want to explore a mountainside lake or venture down a picturesque river, the Payette will take you there in style. The large cockpit with comfortable backrest allow for long paddling adventures and the enclosed storage compartment will let you store your gear while you’re on the water. Enjoy the durability of the UV-protected, impact-resistant construction and the convenience of front and rear T-handles that make transport to and from the water easier than ever. The Lifetime Payette is the perfect kayak to take along on trips with friends or family.
The 8 ft. Lifetime Lotus Kayak has a comfortable backrest perfect for long kayaking adventures. Its compact design easily fits inside the average apartment or home closet, and the back end allows the kayak to stand upright. With additional features like a tankwell storage with secure bungees, a stable hull design, and UV-protected construction, the standard Lotus is the true “do it all” kayak. From paddling to fishing, the Lotus ™ is perfect for your outdoor adventure.
The Lifetime Guster Kayak is a sit-in kayak with the perfect combination of comfort, stability, and performance. The ST Performance Hull design provides the speed, tracking, and maneuverability for just about every water condition from large lakes and bays to slow moving rivers and creeks. From comfort and convenience to performance and durability, the Guster is equipped with features that are built around the paddler. Features like the adjustable backrest, padded seat and thigh pads, and adjustable foot braces give you the most comfortable seating in your kayak. The excellent seating options give you easy access to the hull for storage. The front and rear handles let you quickly transport the kayak to and from the water. The Lifetime Guster Kayak is the perfect option for recreational kayaking.
The Lifetime Kokanee 106 Tandem Kayak is a unique sit-on-top design that allows for solo or tandem paddling making it a great choice for those looking for extra versatility and value in a recreational kayak. Hit the water with a friend using the two adjustable backrests or simply move one of the backrests to the center position and you can paddle solo. The comfortable high backrests and multiple footrest positions help you dial in your comfort level. Bungee cords on the bow and stern help keep gear within reach while paddling and a storage hatch to give you access to the hull for additional storage space. The Kokanee 106 features a durable build that is UV-protected, and impact resistant. Enjoy a trip to a tranquil lake or calm ocean bay with the Lifetime Kokanee.
Best Lifetime kayaks
Some of Lifetime’s most popular kayaks are their sit-on-top and fishing kayaks. To learn more about these best-selling kayaks, follow the links to our dedicated articles about them. There, you will find specific buying advice and detailed run-throughs of each Lifetime lineup.
Consider buying used if you are unsure whether kayaking is something you will stick with long-term, or if you are looking to save even more money. Lifetime kayaks are affordable to begin with, and finding them used can be a great score. There are a few things you’ll want to consider when looking at used kayaks.
Overall condition
All Lifetime Kayaks are made from high-density polyethylene (HDPE). HDPE is a plastic that is strong and impact-resistant. Even with frequent use, it’s unlikely that the kayak will get damaged to the point that it’s unusable. Most scratches and abrasions are superficial. The exception is if there are cracks or holes right through the hull (bottom) of the boat. For a sit-inside kayak, these are pretty obvious to see. On sit-on-top kayaks, pick the kayak up and listen for water sloshing around inside. This is a good indicator that there is a hole in the hull.
Storage and transport
One common cause of damage to used kayaks is the use of ratchet-style straps to secure the kayak when transporting it. People who use the ratchet straps tend to over tighten them, as the plastic bends under pressure. This can cause warping or distortion of the kayak hull. Look for damage from the ratchet straps along the sides of the kayak; bending and distortion will be obvious.
UV damage may be another potential issue with a used Lifetime kayak. Storing the kayak in direct sunlight will weaken the plastic over time. Look for excessive fading on one side of the kayak, and apply firm pressure to the hull and deck. If it feels spongy or appears sun-bleached, this doesn’t mean that the kayak is unusable, but it may wear out more quickly.
Outfitting
Thoroughly inspect the outfitting components of the kayak, like the foot pegs, hatch, seat and seat back—it’s more likely that these will be worn or damaged. Make sure that any buckles clip, and that adjustable foot pegs (if they’re present) slide forward and backward. It’s not a deal-breaker if they are broken. Contact Lifetime, and their customer service team will help source replacement parts.
For more tips on what to look for when selecting a used kayak, read our article How To Buy A Used Kayak.
Lifetime kayak buying advice
When you’re looking for the best Lifetime kayak, think about what kind of kayaking you want to do. Here, we’ll give an overview of the types of kayaks available in Lifetime’s lineup. See if any align with your paddling goals. We’ll also cover commonly asked questions about these kayaks.
Lifetime has over 20 different kayak models in their product lineup. These are broken down into four categories: Sit-inside, sit-on-top, fishing and youth kayaks.
Sit-inside
As their name suggests, sit-inside kayaks feature closed decks and a cockpit (seating area) which the paddler sits inside. Entering and exiting a sit-inside kayak takes a bit more technique and practice, but the covered deck offers better protection from wind, cold, rain or harsh sun. Sit-inside paddlers also find they have a bit more control as their legs can engage the kayak sides for a better connection with the boat.
Lifetime offers a selection of solo sit-in kayaks ranging in length from 9 feet to just over 10 feet. In the kayak world, these are classified as recreational kayaks, which are defined by their wide cockpits, relatively short length (compared to touring kayaks) and flat bottoms. They’re designed for ease of use and reassuring stability; if you’ve never kayaked before you can slide into one of these and quickly figure out how to get where you want to go. They’re so stable that capsizing isn’t much of a concern.
The downside of recreational sit-inside kayaks is that they are more difficult to enter and exit than a sit-on-top and are designed exclusively for use on calm, sheltered waters. However, for those new to the sport or who just want something cheap and easy to store and transport, a recreational sit-inside is a great choice.
Know The Local Hazards
Check navigation charts before you launch.
Check with those who have local knowledge of man-made and natural hazards, e.g. low-head dams; sweepers, strainers and undercuts; tides and currents; and rocks and shoals.
Sit-on-top
Sit-on-top kayaks are even easier to use than sit-inside kayaks. Jump on with a paddle in hand, and you will figure out how to use it. New paddlers don’t have the feeling of confinement that can occur with sit-inside kayaks. Lifetime sit-on-top kayaks are extremely popular, with solo and two-person models ranging from the 6-foot Lifetime Wave 60 youth kayak to the 11-foot Lifetime Temptation 110 kayak. Read our in-depth analysis to learn more about the Best Lifetime Sit-on-top Kayaks.
Fishing
Lifetime’s fishing kayaks include a wide variety of sit-on-top models, as well as the Payette Angler 98 sit-inside kayak. Fishing kayaks share the same overall shapes and design features as Lifetime’s recreational kayaks, and are similarly stable and easy to use. What sets them apart is the addition of angler-specific features that make fishing from the kayak easy and incredibly fun. Rod holders, frame seats (for a higher seating position and better vantage of the water) and extra bungee cords to hold tackle are some standard Lifetime fishing kayak add-ons.
“Pro” models from Lifetime like the Tamarack Pro 103 and Stealth Pro 118 include a universal slider to add extra rod holders or gadgets like a fish finder, as well as an integrated live well and molded-in ruler for measuring your catch. At the top of the Lifetime fishing kayak lineup is the Renegade pedal drive kayak, which allows anglers to propel the boat with their legs while keeping their hands free for fishing.
Youth
Kids will enjoy kayaking much more if they are in a boat that fits them. Smaller-sized youth kayaks are scaled-down versions of Lifetime’s regular recreational kayaks. The Lifetime Wave 60 is only six feet long. Its short length makes it much easier to control and lighter to carry. The sit-on-top style is user-friendly and the back of the kayak has a swim-up deck for easy re-entry. The Wave 60 kayak is recommended for ages five and up and has a 130-pound weight capacity.
Kayaking is a great way to spend quality time together. Peaceful days on the water create lasting memories and can start a lifetime of being active in the outdoors. If the kids are too young to paddle their own kayak, consider a tandem: Lifetime’s sit-on-top tandems are easily controlled by a single adult and allow kids to paddle as much as they want.
The best advice we can offer is to always test paddle before buying any boat. Of course, that’s a challenge at most of the big box outlets where many recreational kayaks are sold. Try to borrow a Lifetime kayak from a friend for a test paddle in real-world conditions. The more time you can spend on the water in a similar style of kayak, the better the purchasing decision you will make.
Here are answers to some of the most common online questions about Lifetime kayaks.
Are Lifetime kayaks good?
Lifetime kayaks are affordable, easy to use and relatively durable. Does Lifetime make good kayaks for you? It depends on the type of paddler you are. Lifetime kayaks are a great match for new paddlers and casual anglers who just want to float around for a few hours or explore calm waters close to shore. If you are an experienced kayaker seeking a fast boat with lots of storage space, look elsewhere.
Lifetime kayak models
Lifetime makes a wide variety of recreational kayak models suited for different uses and body types. These include sit-inside kayaks, solo and tandem sit-on-tops, fishing kayaks and youth kayaks.
Who makes Lifetime kayaks?
Lifetime kayaks are made by Utah-based sporting goods brand, Lifetime Products. They are known for making other outdoor equipment such as basketball nets, patio furniture and playground equipment. Lifetime specializes in the use of durable high-density polyethylene (HDPE) in their products.
Where are Lifetime kayaks manufactured?
Wondering if Lifetime kayaks are made in the USA? Like all their products, Lifetime kayaks are built in their Utah manufacturing facility.
What is a Lifetime kayak made of?
Lifetime kayaks are made of high-density polyethylene (HDPE) plastic through a process called blow-molding. Blow-molding is a common way to make plastic products that are strong and affordable. A plastic tube is heated, and a mold is pressed around it. Air is then blown into the plastic, which expands into the mold.
Are Lifetime kayaks rotomolded?
Lifetime kayaks are blow-molded in their Utah manufacturing facility, using high-density polyethylene (HDPE), which keeps their kayaks cheap.
How much do Lifetime kayaks weigh?
The weight of a Lifetime kayak depends on the model. Weights range from 40 lbs to over 100 lbs. Longer kayaks weigh more, as do sit-on-tops compared to sit-in kayaks, simply because they use more material. Polyethylene plastic—like that used in all Lifetime kayaks—is one of the heavier materials to build a kayak with; those looking for a lighter kayak should seek out thermoformed plastic or composite material options.
Carry A Whistle (And A Light For Night Use)
Every paddler should have a whistle attached to his/her life jacket.
Carry a light at night. Consider carrying a distress signal device.
Lifetime kayak price
Lifetime kayaks are very affordable. Lifetime adult sit-inside kayaks cost $500 to $600. Lifetime sit-on-top kayaks start at $440. Kids kayaks are even cheaper, under $250.
How much does a Lifetime kayak cost compared to other kayak brands? Lifetime kayaks are on the lower end of the price range. These no-nonsense recreational kayaks are simply designed with rudimentary outfitting to keep costs low. If you are looking for bells and whistles, look to other (more expensive) kayak companies.
Lifetime kayak dealers
Curious where to buy Lifetime kayaks? They are available through many different sources, including direct from the manufacturer. Brick-and-mortar Lifetime kayak retailers include many big-box stores like Home Depot, Dick’s Sporting Goods or Walmart. You can also get a Lifetime kayak delivered to your door through Amazon.
Lifetime kayak warranty
All Lifetime kayaks come with a five-year limited warranty.
Holes in Lifetime kayak
If you are new to the world of sit-on-top kayaks, you may be wondering why there are holes in the deck of your kayak. These are scuppers, holes designed to drain any water that splashes onto the deck, like a self bailer. The rubber valves also prevent large amounts of water from gushing up from below.
Lifetime kayak comparison
Pelican vs Lifetime kayaks
Pelican kayaks are a behemoth manufacturer producing over 100 different kayak models. Like Lifetime, they focus on recreational kayaks, making sit-inside and sit-on-tops. Pelican offers more variety in their kayak range. Some models land at comparable prices to Lifetime, while other Pelican kayaks are much more expensive. Many Pelican kayaks are made with twin-sheet thermoforming—a more costly process that makes these plastic kayaks much lighter.
If you are fine spending a bit of extra money for a lighter kayak, go for a Pelican. If you want to keep costs down with a basic boat, choose a Lifetime.
Perception vs Lifetime kayak
Compared to Lifetime, Perception kayaks are geared toward more experienced paddlers, with more refined outfitting and designs reflected in their higher prices. Expect to pay a bit more for a Perception, but you will be rewarded with a better-performing kayak. Perception kayaks also have more comfortable seating and adjustment options. Their longer, sleeker kayaks will be faster on the water.
If you want to commit to kayaking, spend the extra money and get a Perception. If you still aren’t sure if kayaking is for you, save the cash and choose a Lifetime. Once you’re in love with kayaking, you can always upgrade.
Vibe vs Lifetime kayak
Vibe makes high-end sit-on-top fishing kayaks. Vibe kayaks cost more than Lifetime kayaks but have many more features like advanced frame seats, rudders and optional pedal-drive or electric motor propulsion. These are kayaks for the serious kayak angler. If you’re hooked on kayak fishing, skip straight to Vibe kayaks.
If you’re more of a casual paddler and occasional angler, Lifetime kayaks get the job done at less cost.
Sun Dolphin vs Lifetime kayak
Like Lifetime, Sun Dolphin is another popular recreational kayak brand. They started out making old-fashioned pedal boats, and have since expanded to kayaks, paddleboards, dinghies and other recreational watercraft. Both brands make sit-inside, sit-on-top and youth kayaks with an emphasis on accessibility, affordability and stability.
Comparing the two brands, there are a few key differences. Sun Dolphin’s kayaks weigh 5 to 10 pounds less than equivalent models from Lifetime, while Lifetime kayaks tend to be a little cheaper. Both brands produce durable and reliable kayaks. Slight differences with specific models may be the deciding factor for you, like additional bungees, hatch shape or color.
Ascend vs Lifetime kayak
Ascend kayaks are comparable to Lifetime in price, and may be even cheaper. Like Lifetime, Ascend makes polyethylene recreational kayaks, with both sit-in or sit-on-top options available. They come in more neutral earth tones compared to Lifetime’s bright colors.
Both Ascend and Lifetime have large cockpits on their sit-inside kayaks for easy entry and ergonomic design for comfort on the water. Ascend’s open design may be easier for plus-size paddlers who still want a sit-in kayak. They also have a higher weight capacity, 300 lbs compared to 250 lbs on most Lifetime sit-ins. Ascend kayaks do not come with hatches like some Lifetimes, instead having an open back hull for on-deck storage.
If the hatch is something you want, opt for a Lifetime kayak. Both will be exceptionally stable and are good kayaks for beginners.
Emotion vs Lifetime kayaks
In 2011, Lifetime acquired Emotion Kayaks. Emotion is a widely-known recreational kayak manufacturer, and with the acquisition, Lifetime was able to source some of their quality designs and styles. Today, the Emotion Tide 103 sit-in kayak is made by Lifetime. Some older Emotion models may still be found on store floors. Expect them to closely resemble the modern Lifetime kayaks in design and performance.
Approximately 700 kayakers gathered on a Copenhagen canal earlier this month to celebrate St Lucia Day. Their kayaks were illuminated with festive string lights and luminous decor, creating a visual display that encompassed the festive spirit of the holidays.
Also known as the “Feast of Saint Lucy ”, St Lucia Day is a Christian feast day observed during the run-up to Christmas on December 13. “It’s a peaceful time,” said Lucia Parade organizer Gustavo Cordes.
[ View all Recreational Kayaks in the Paddling Buyer’s Guide ]
In the video, kayakers can be seen gathered together to share the celebration and sing songs from the water. “It is a real success. People love it,” said Cordes. Catch the best parts here.
Use it or lose it, but don’t forget to maintain your cottage canoe too. | Feature photo: Follow Me North Photography
Had Neil Young been singing about canoes, his famous lyric might have gone, “it’s better to burn out than to rot away.” The best way to keep your canoe in good shape is to paddle it regularly. And a little TLC goes a long way. Here are some simple ways to maintain your cottage canoe so it can keep on rockin’ for longer.
Just as we slather on sunscreen to protect ourselves from UV rays, we need to protect the canoe. Fiberglass-covered wood canoes should be protected with a high-quality marine-grade varnish with UV inhibitors. Inevitable scrapes and dings to painted canoes should be touched up regularly.
Here’s how to maintain your cottage canoe. | Photo: Paul German
2 Maintain wood gunwales
Severely weathered or abused wood will require 60-grit sandpaper, followed by 100 and then 220 for a silky finish. A random orbit sander is the ultimate tool for this job. If the wood has been covered with varnish or urethane, sanding off the old finish will be slow going.
Avoid using linseed oil—exposed to sun and water, it turns the wood black in just a few weeks. Instead use a marine-grade spar varnish or, better yet for ease of maintenance, any exterior oil finish such as Varathane’s Natural Oil Finish. It is effortless to apply, can be reapplied without sanding and should last for an entire season.
3 Touch up canvas
Many layers of paint are undesirable on a cedar canvas canoe—the flexibility of the wood and canvas is too much for the thick, brittle, painted-on coating, causing cracking right down to the canvas. When the urge to paint is too strong, only paint over the scratches. For bad scratches penetrating the paint, use model airplane glue and an old piece of denim or cotton bandana for a permanent and paintable patch.
Tighten all hardware such as wood screws, and the nuts and bolts holding thwarts, yokes and seats to prevent the hardware from wearing larger holes. Keep the tools in your trip repair kit.
Use it or lose it, but don’t forget to maintain your cottage canoe too. | Feature photo: Follow Me North Photography
5 Prepare for winter
Back off the screws in your wood gunwales on ABS canoes if they are to be stored near or below freezing temperatures. Royalex and T-Formex contracts and expands at a different rate than wood, which can result in cold cracks around the screws. Simply loosen all the inside gunwale screws. Remove deck plates.
[ Paddling Buyer’s Guide: See all transport, storage and launching accessories ]
6 Provide good storage
Keep your canoe dry and off the ground, gunwale-side down and shaded from UV. If you don’t have a boathouse or space to string it up in the garage, tarping is a good solution if you place some foam or small wood blocks on the overturned hull, allowing air and moisture to escape from under the tarp. Storing your canoe under some trees, such as birch, will stain your hull.
This article originally appeared in Paddling Magazine Issue 65. Subscribe to Paddling Magazine’s print and digital editions here, or download the Paddling Magazine app and browse the digital archives here.
Use it or lose it, but don’t forget to maintain your cottage canoe too. | Feature photo: Follow Me North Photography


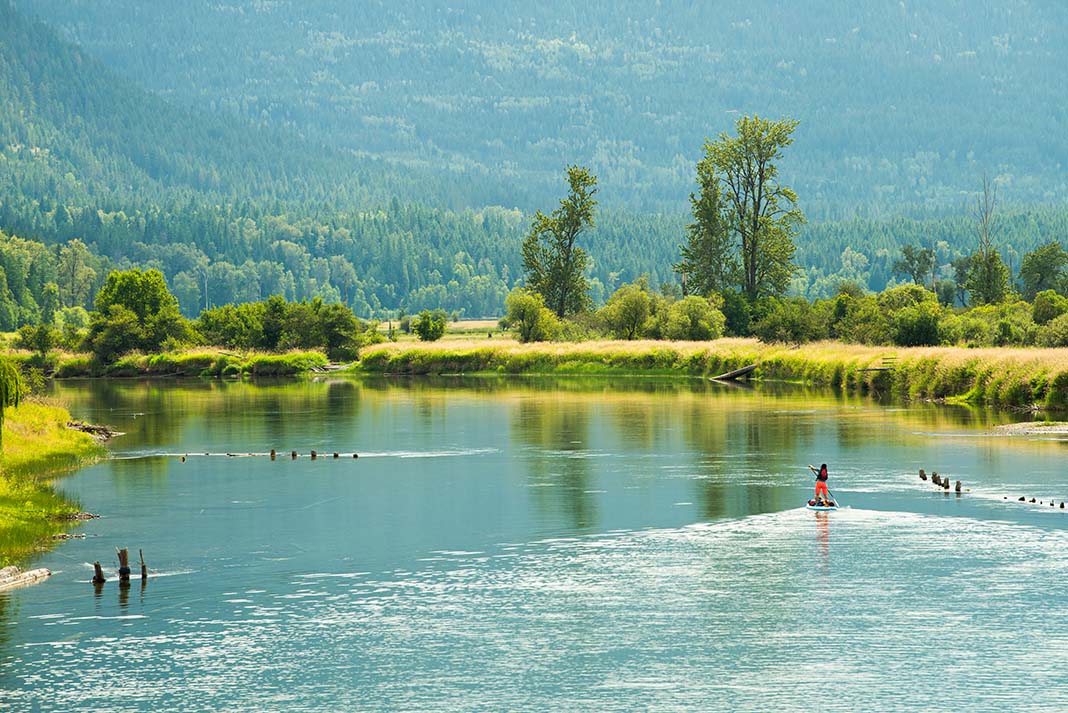
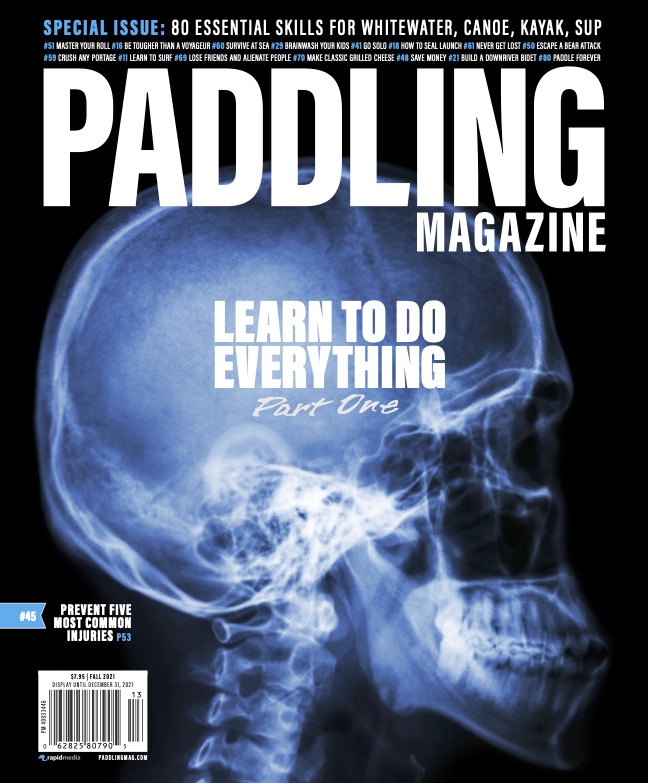


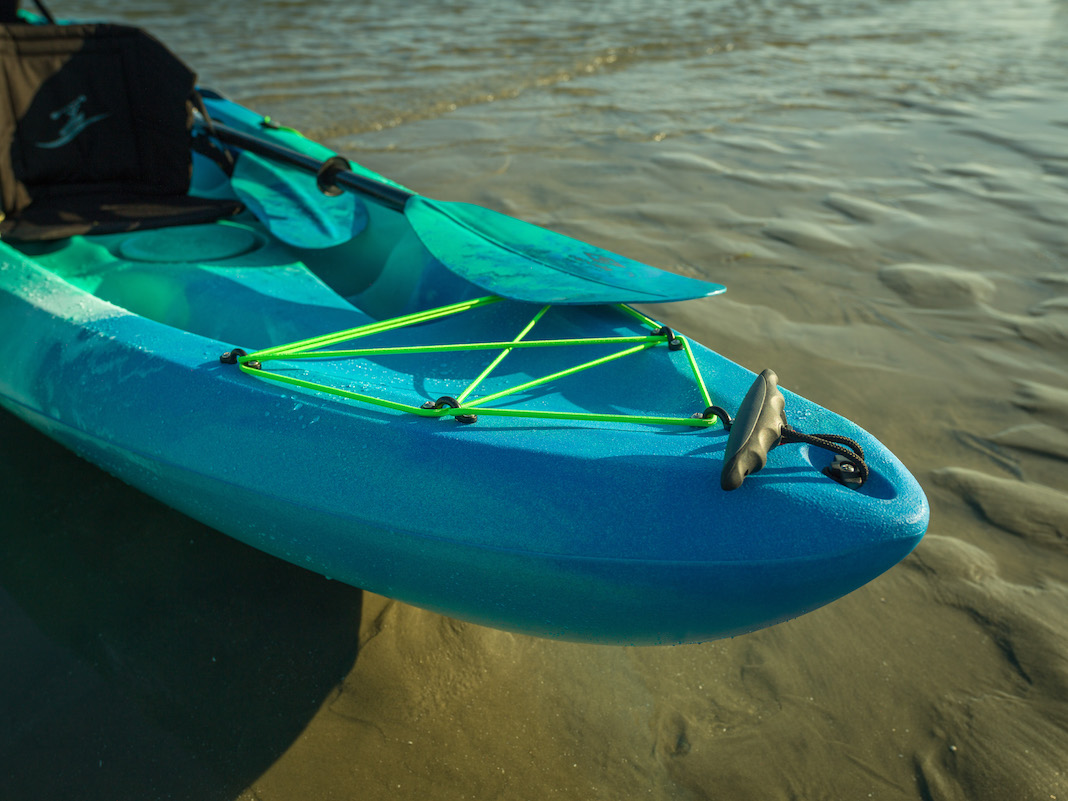
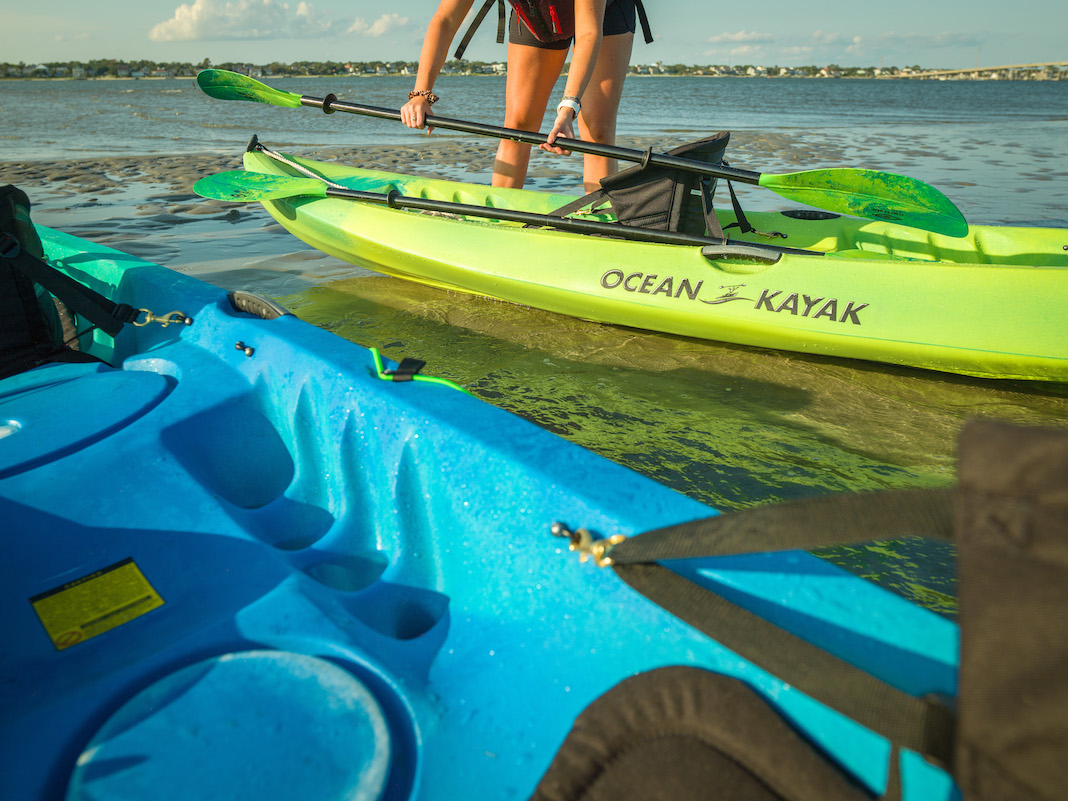
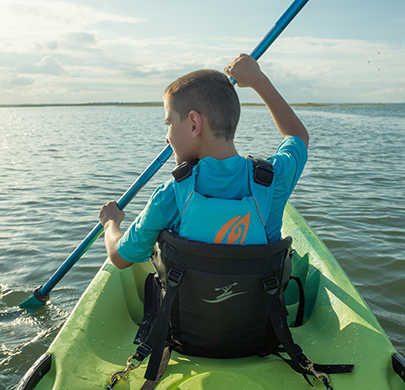
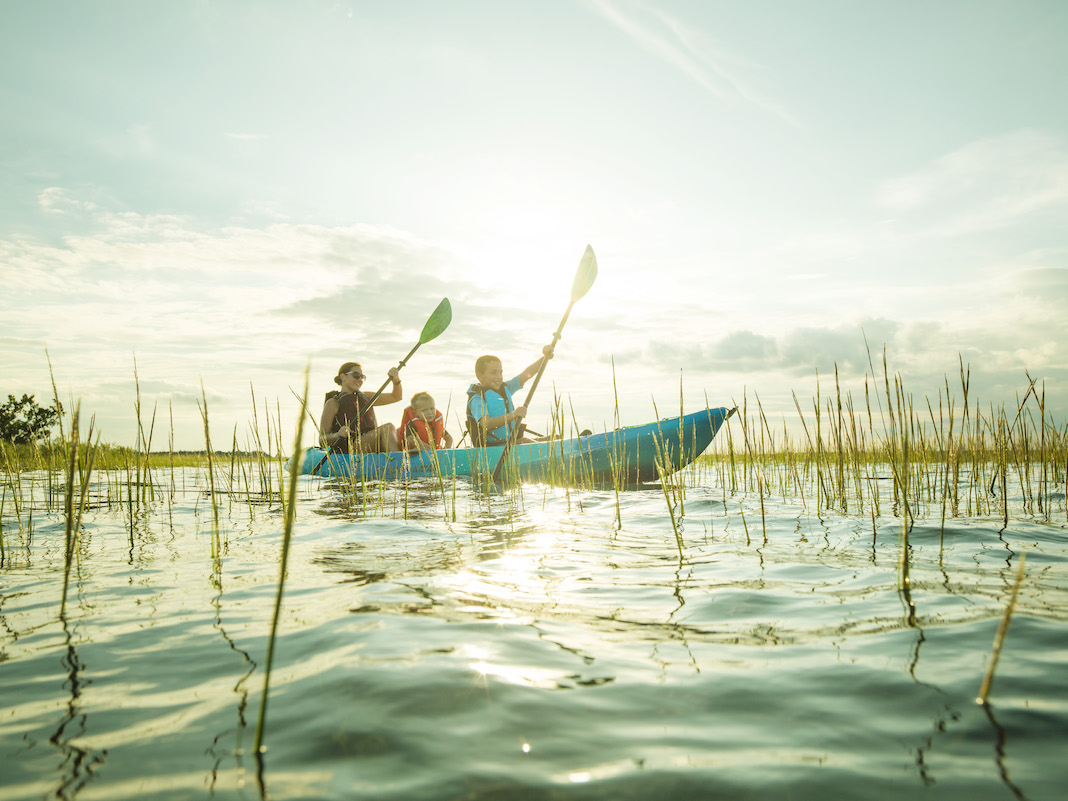

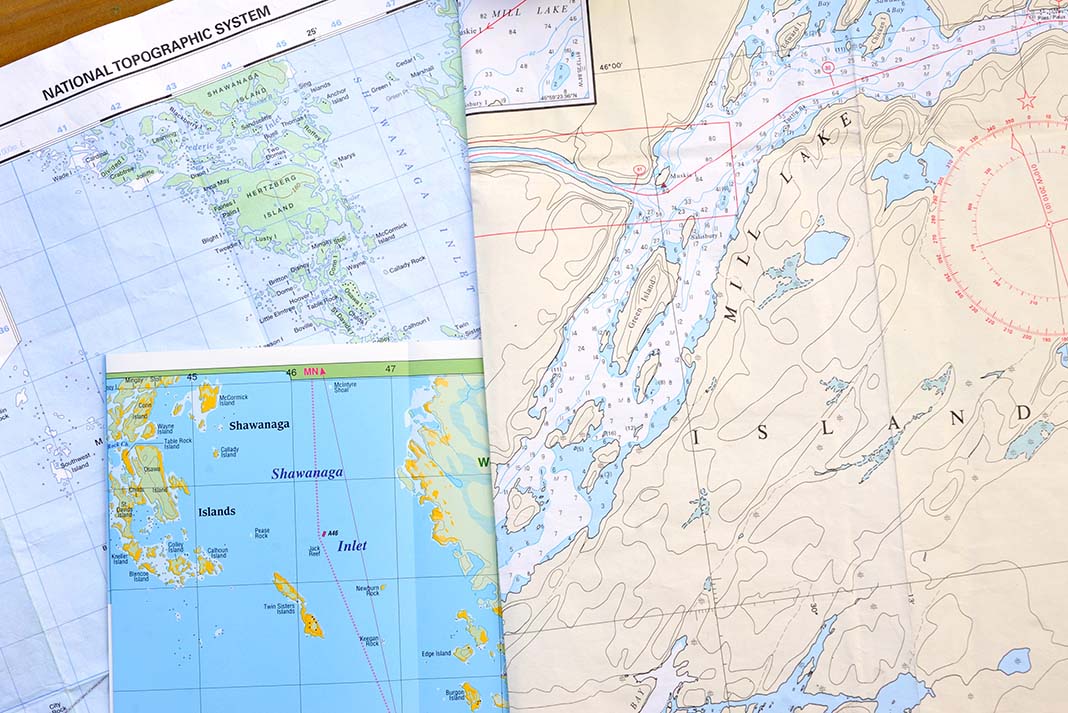
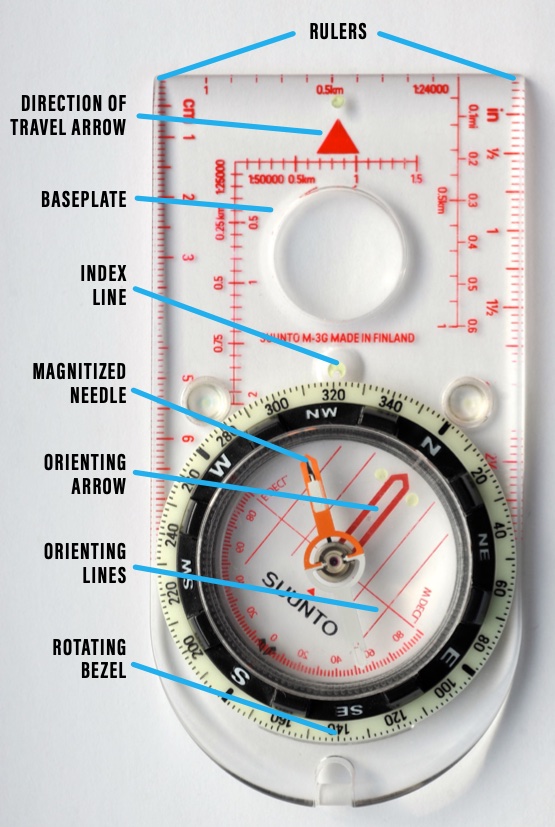
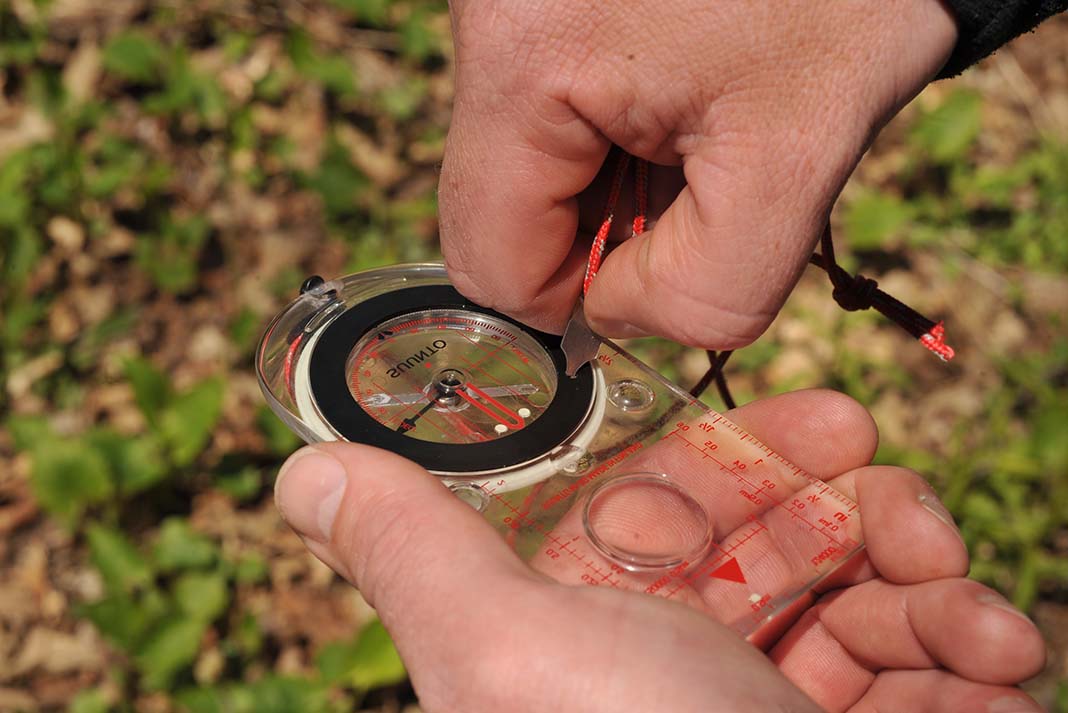
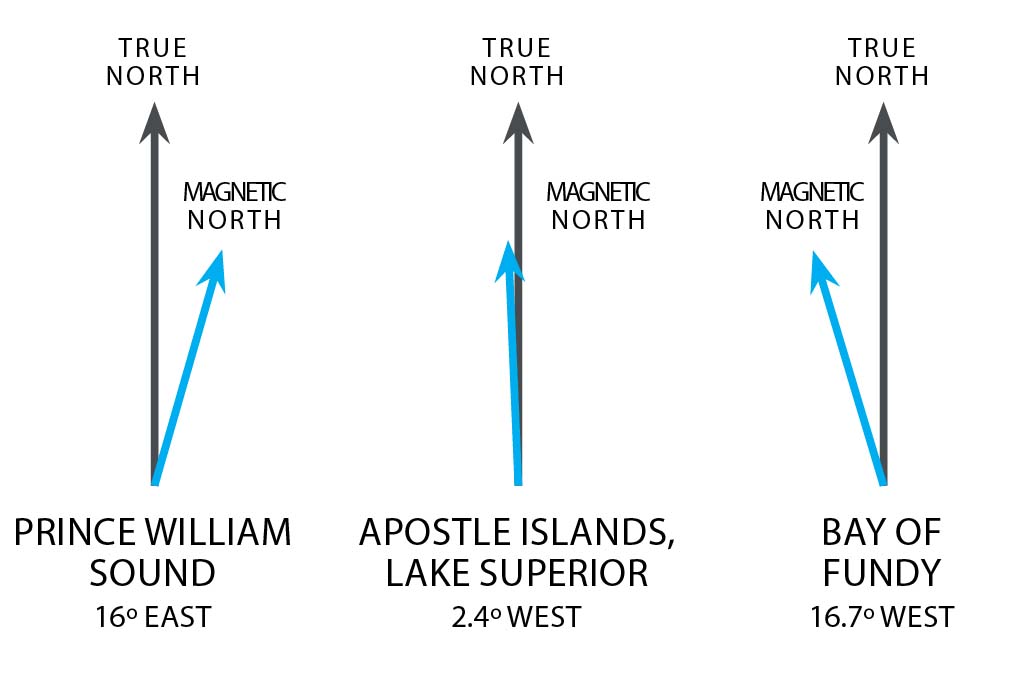
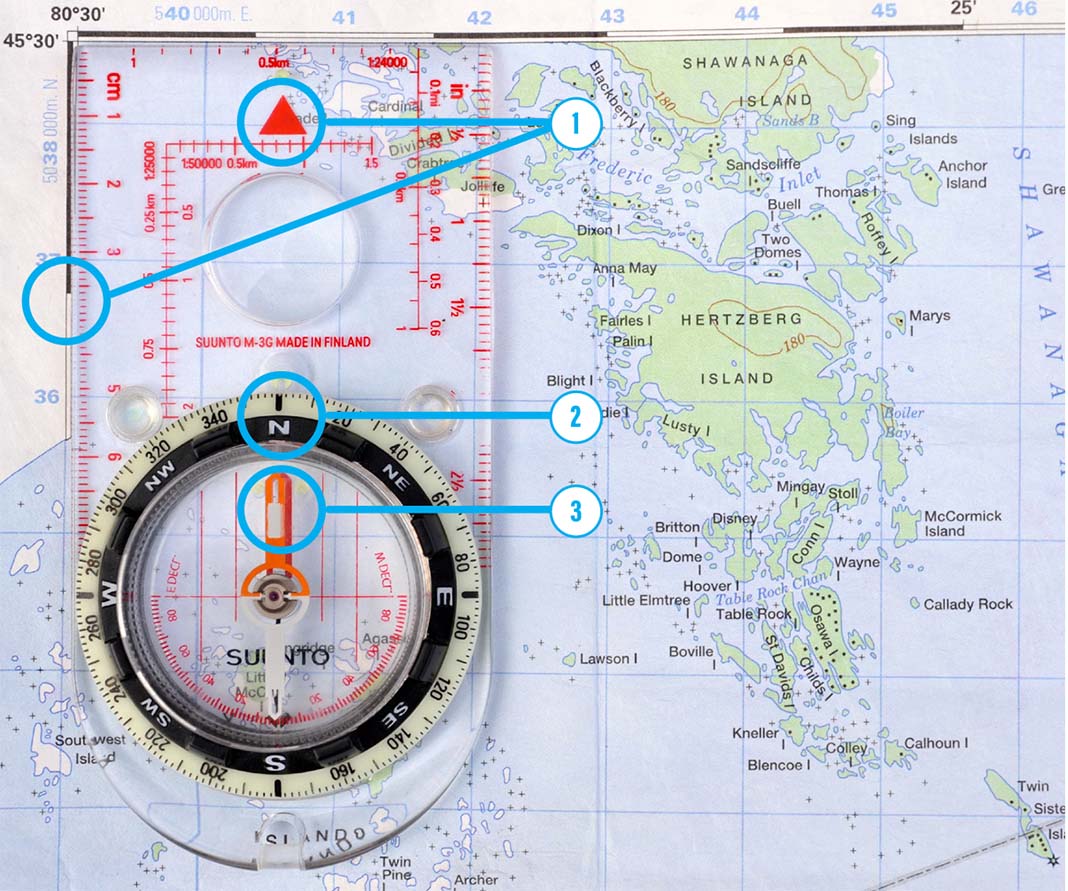
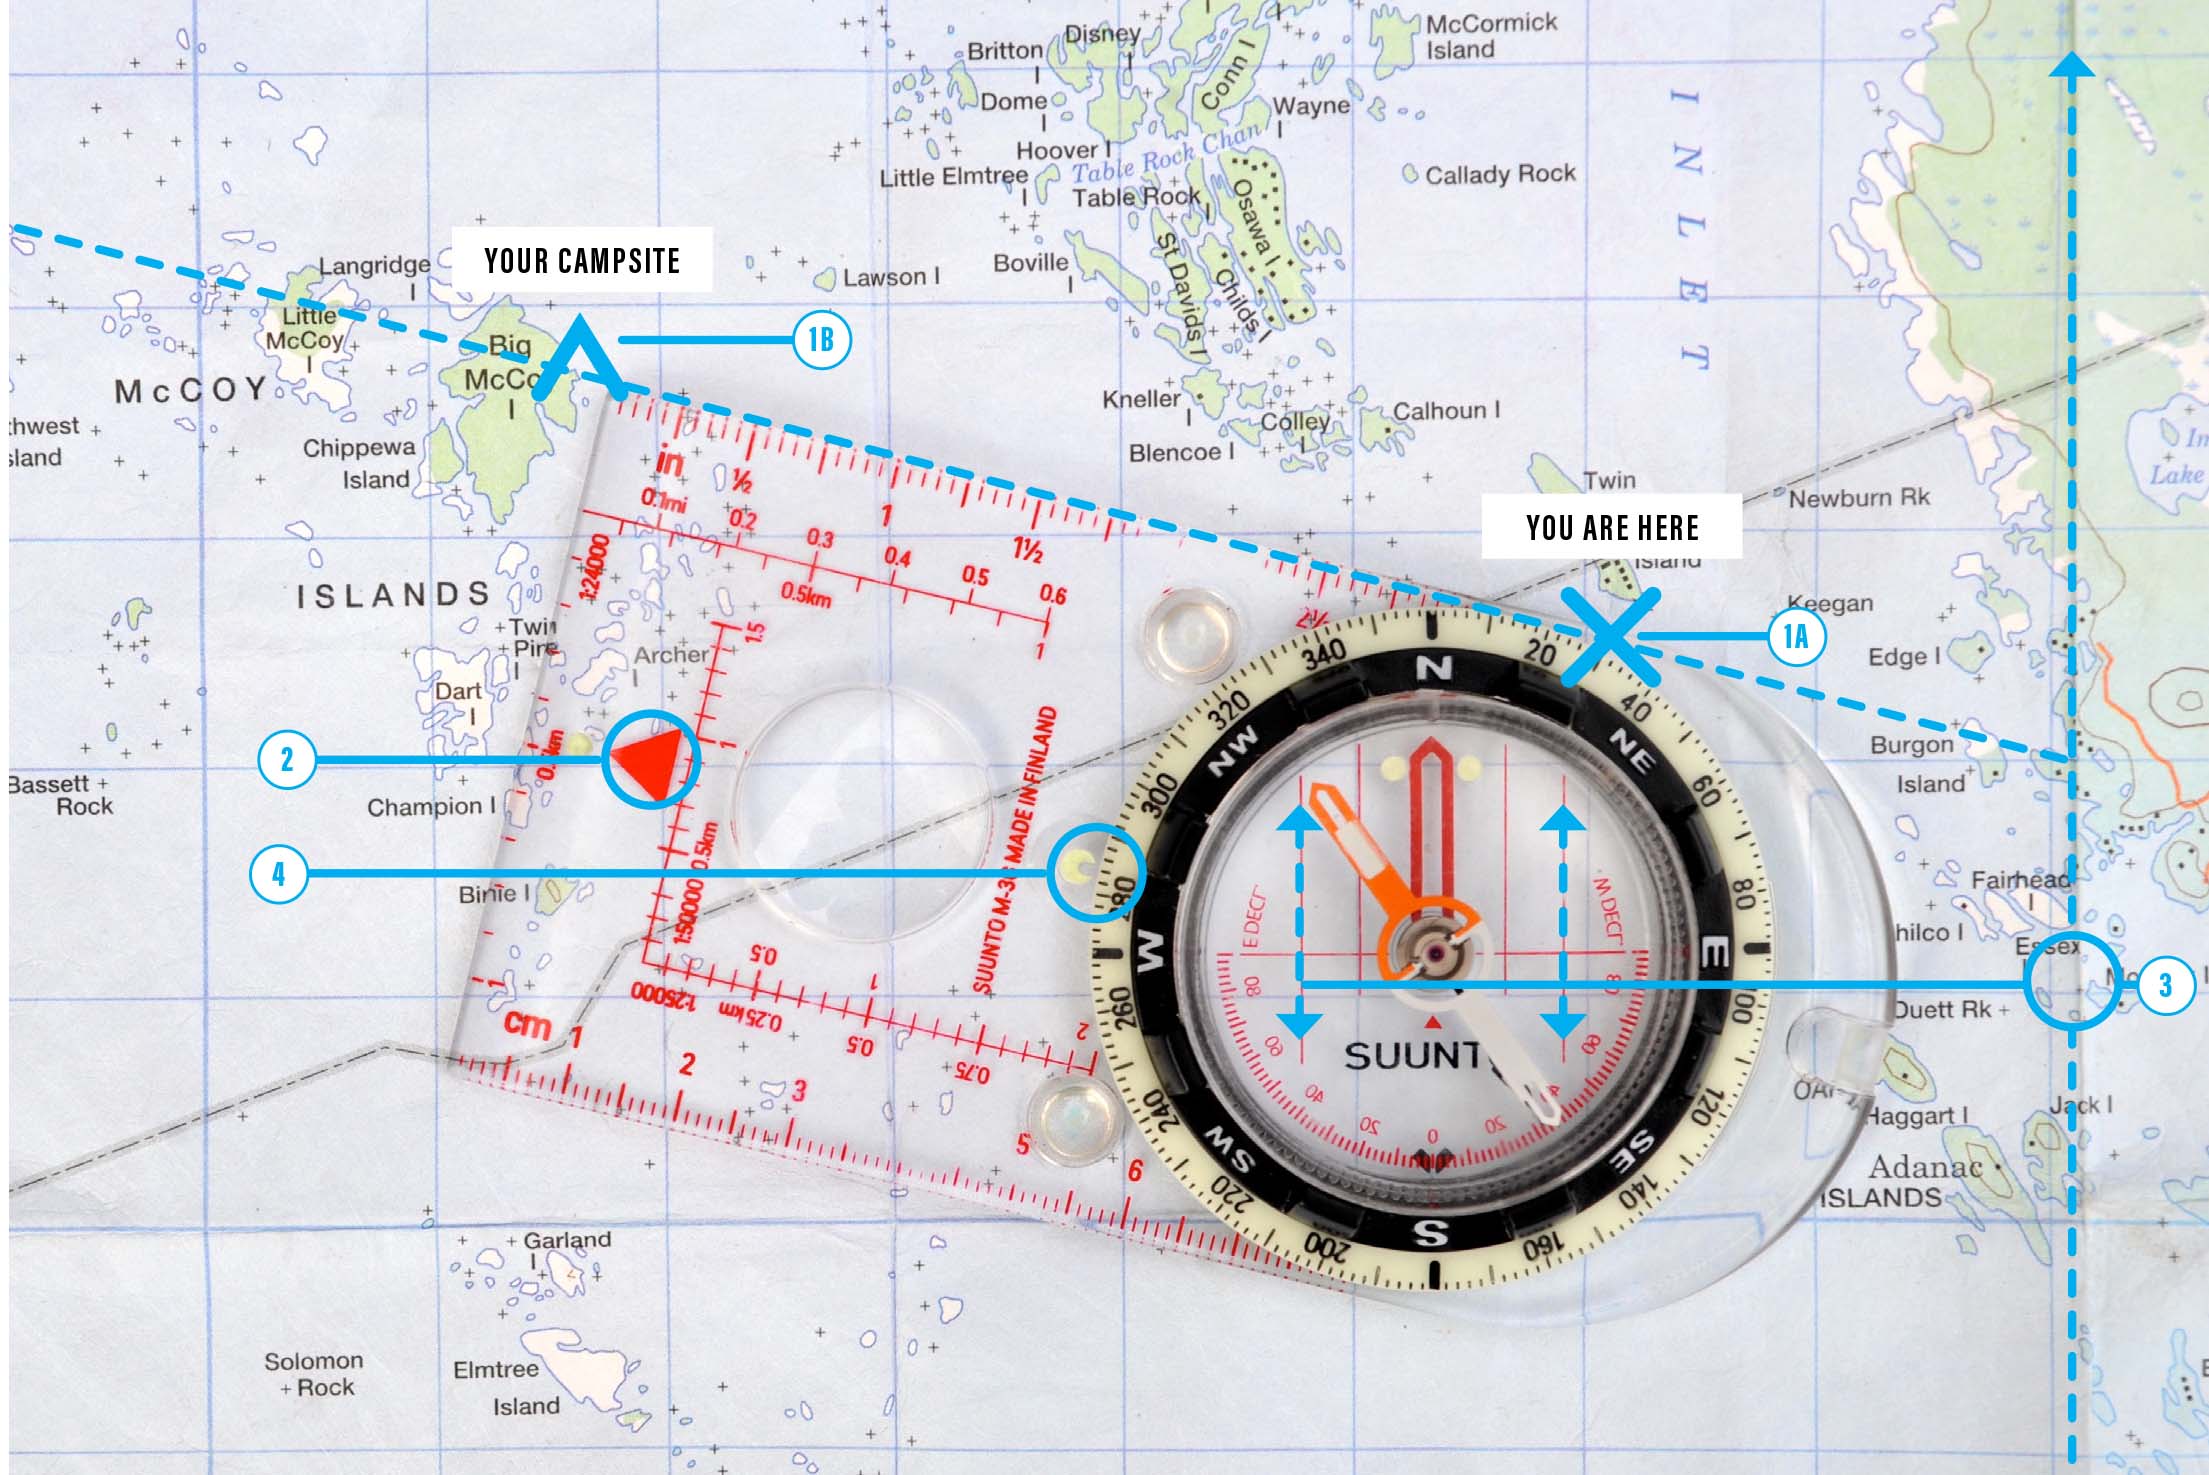
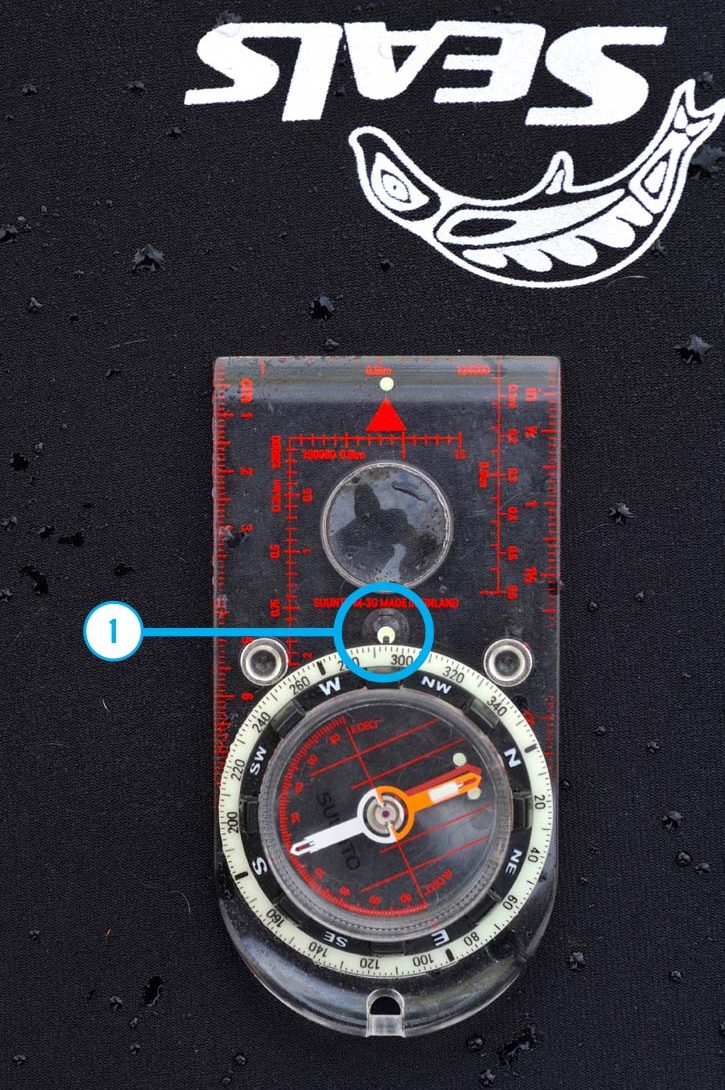
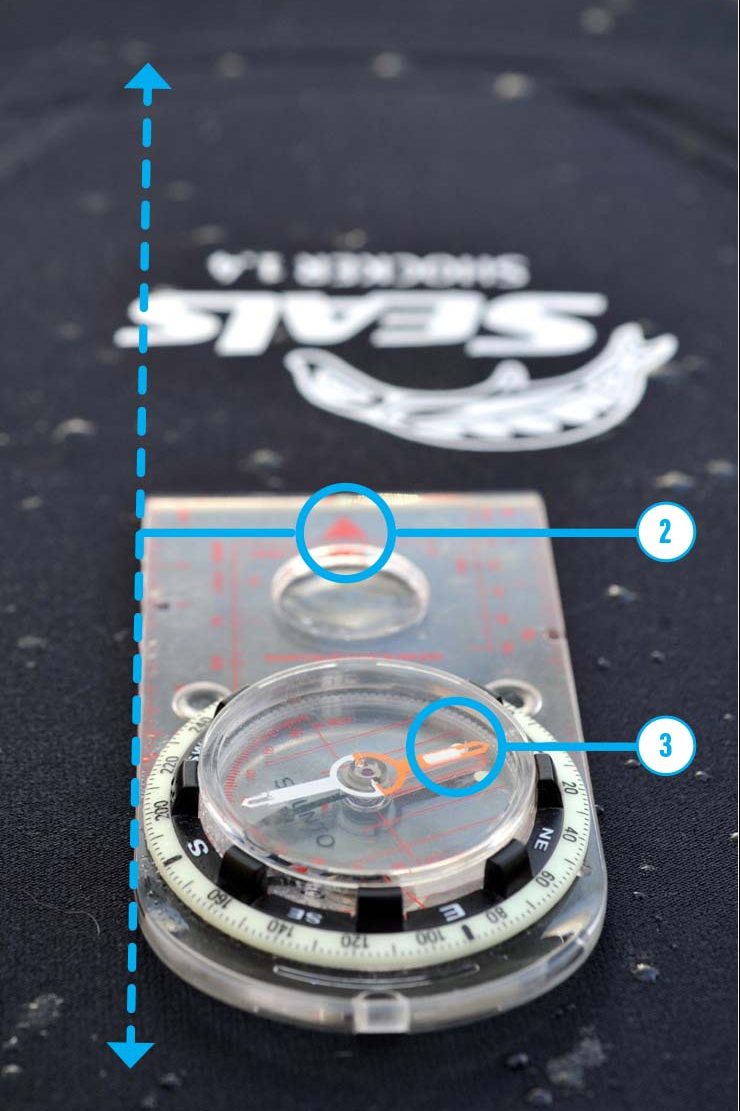
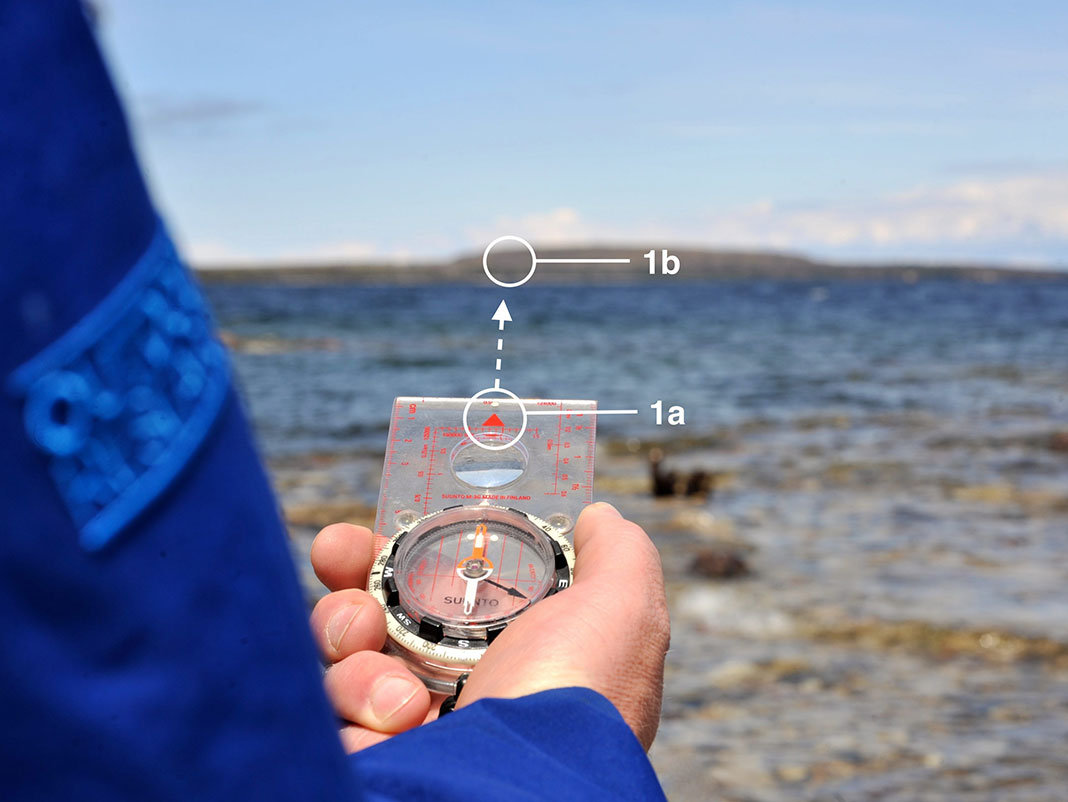
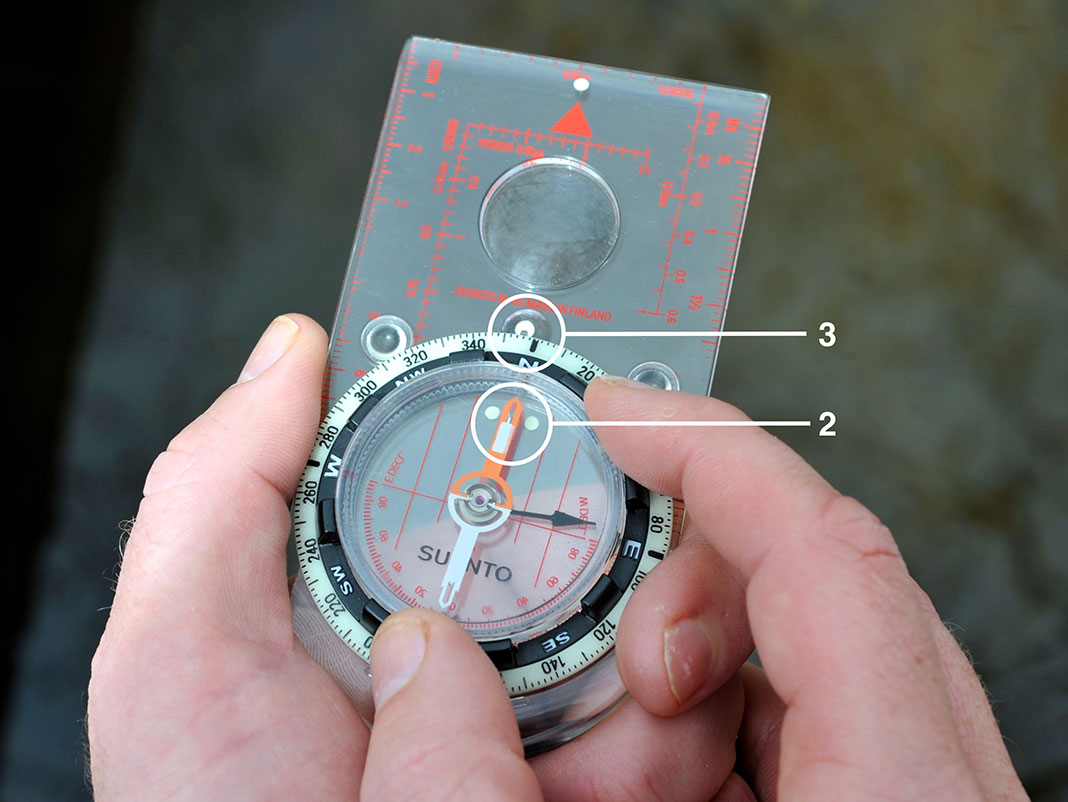
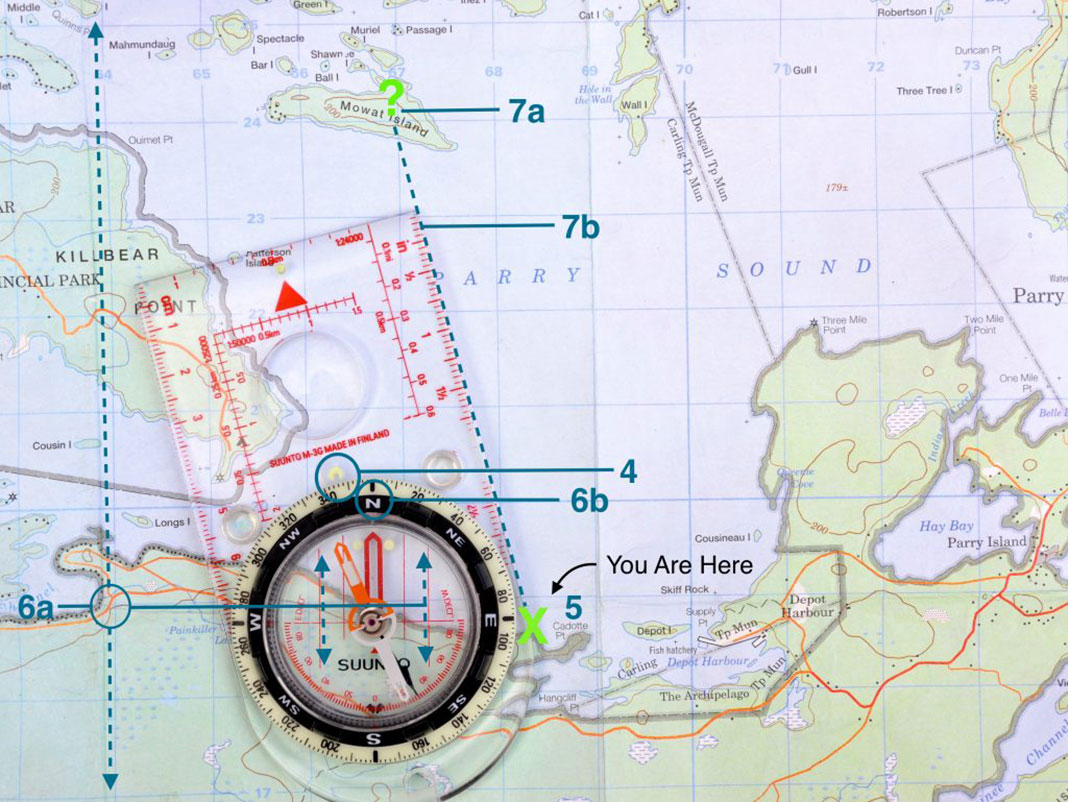
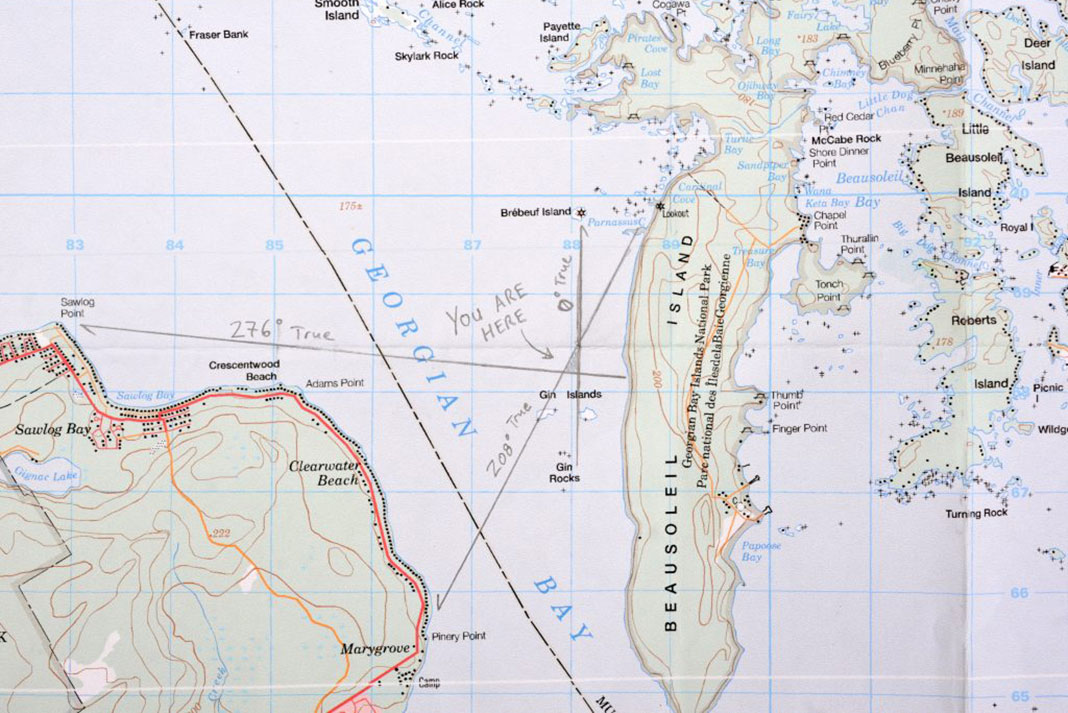
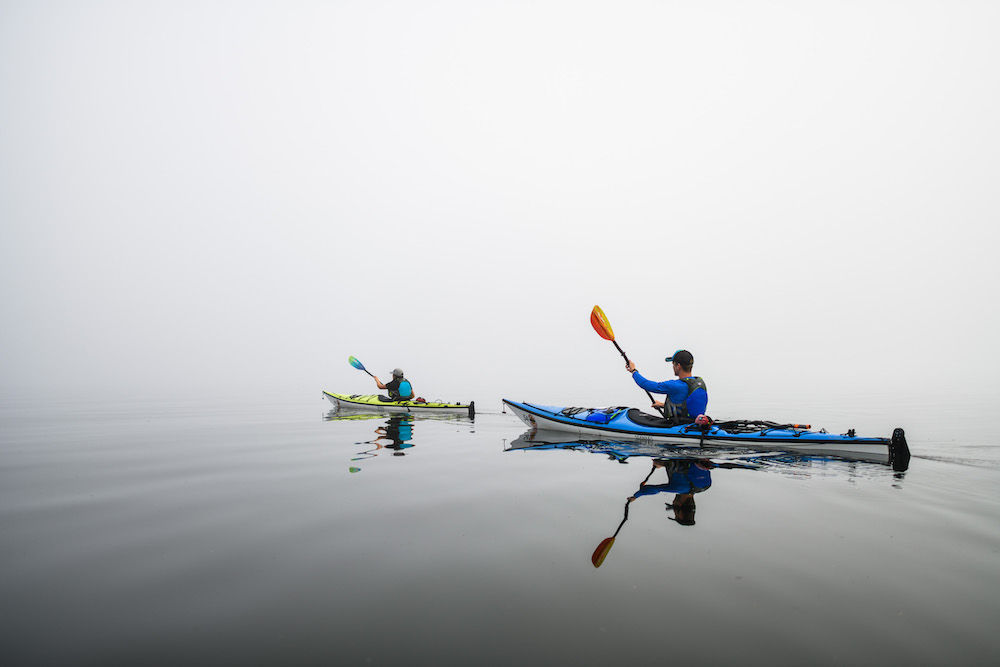
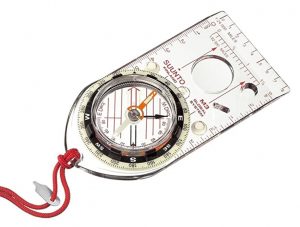
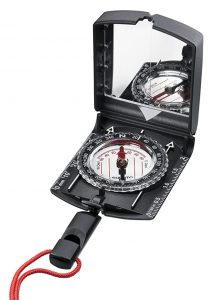

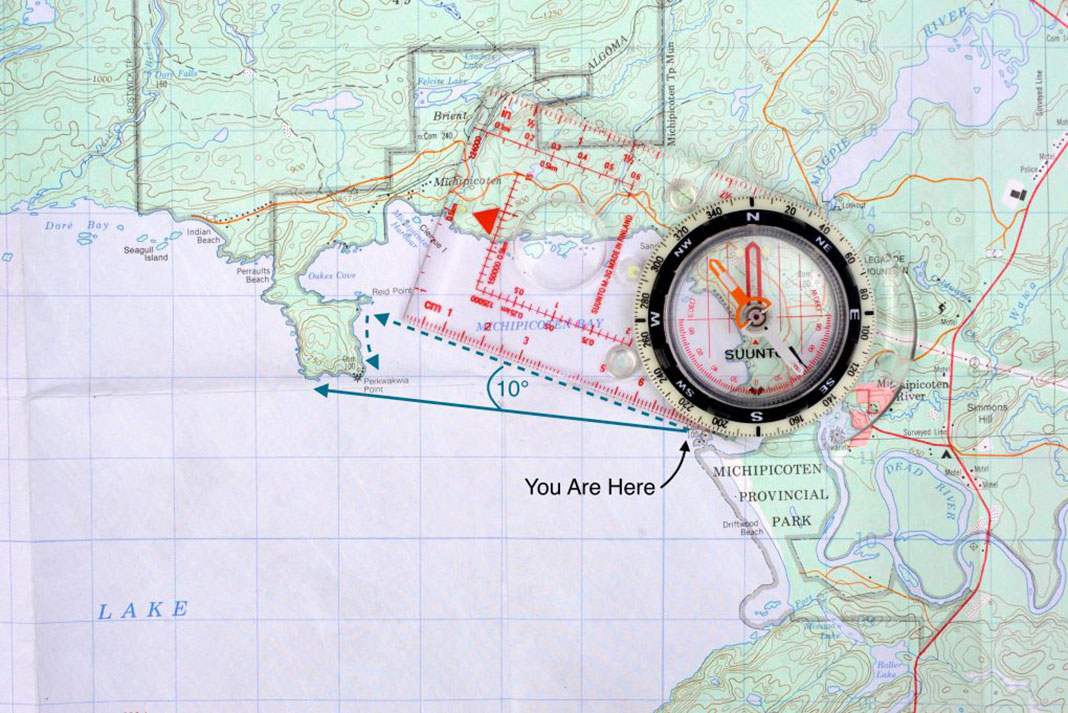

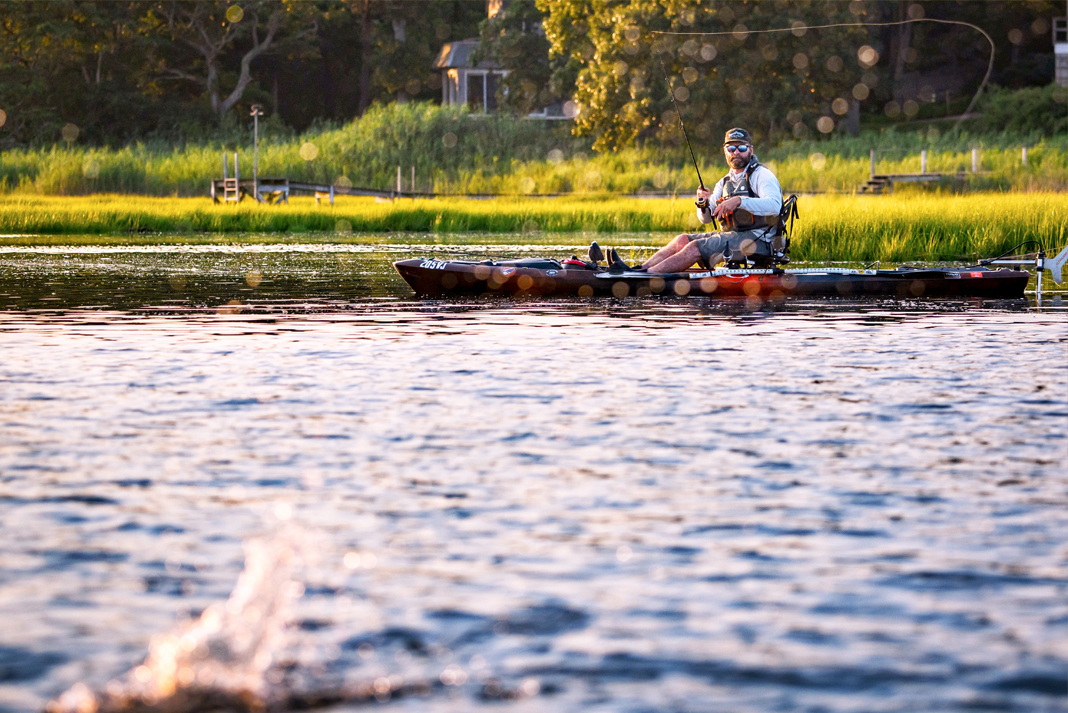
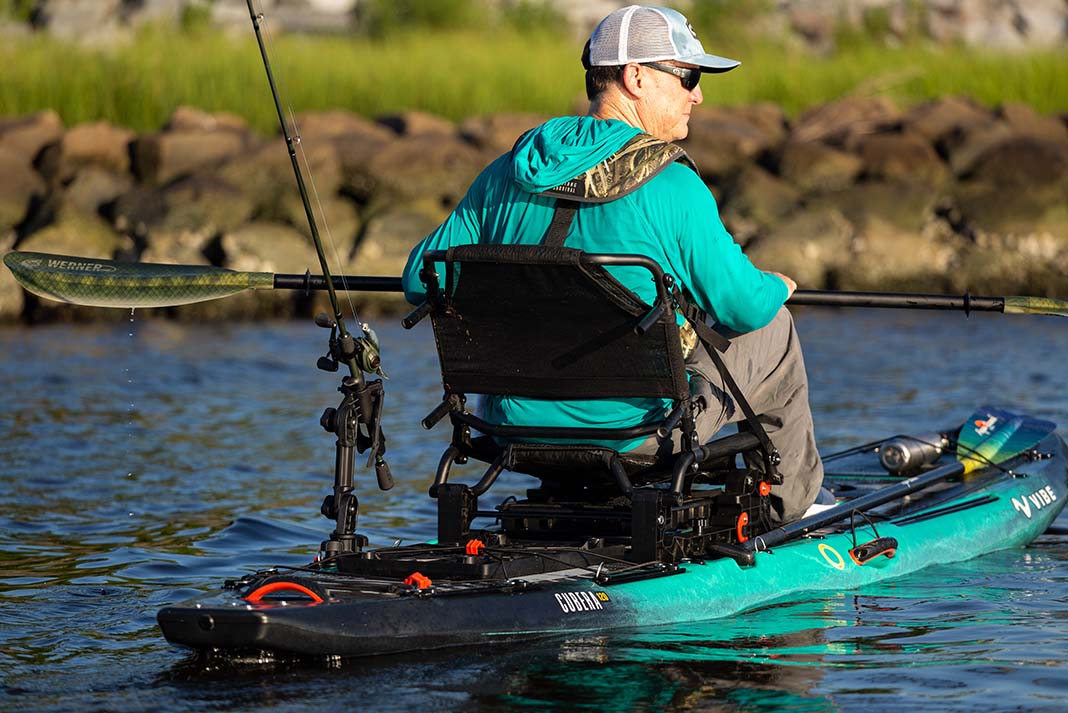
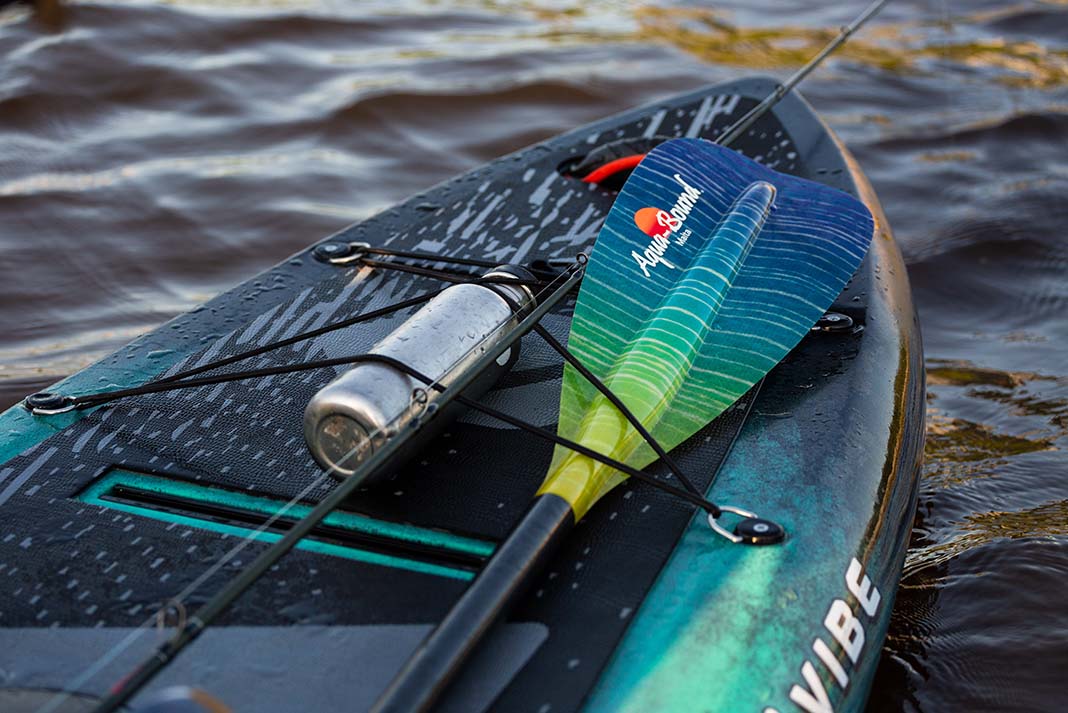
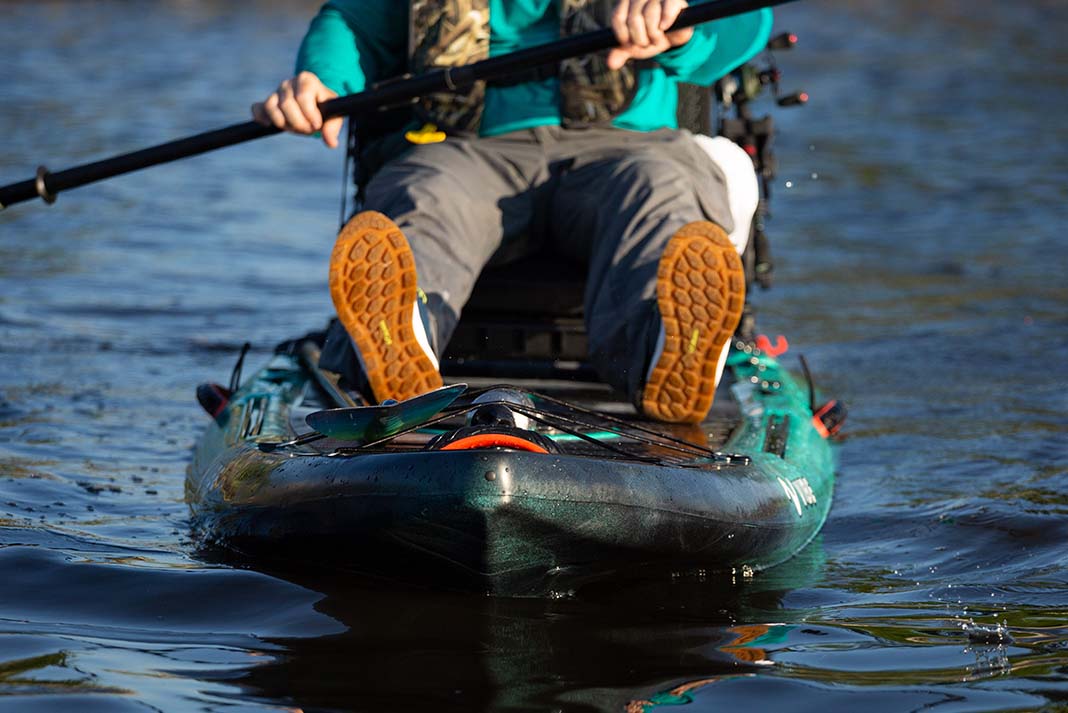
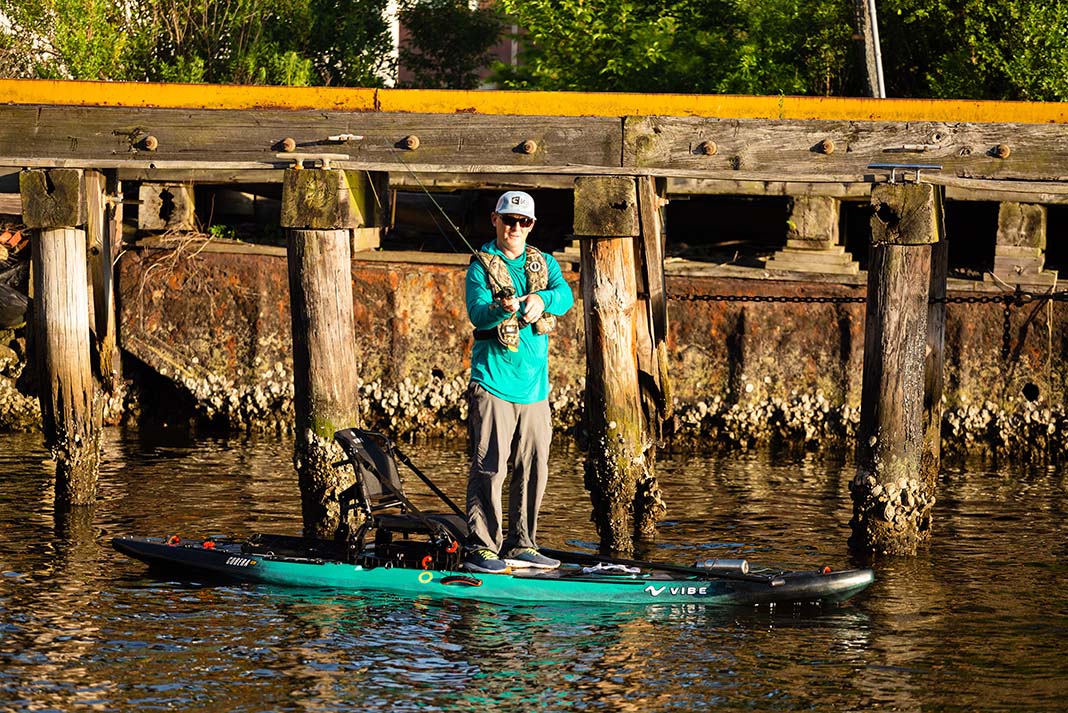
 This article was first published in Kayak Angler Issue 46.